Cross-Site Automation: Sync Fluent Forms with FluentCRM on a Different Domain Using Webhooks
Fluent Forms and FluentCRM work together right from installation if they’re on the same WordPress site. You don’t even need to enable the integration globally; just create an integration feed for specific forms, and every submission goes to your CRM.
But if you run Fluent Forms on one domain and FluentCRM on another, that native integration won’t work. The two plugins can’t communicate directly across separate WordPress installations.
The fix is webhooks. You can configure Fluent Forms to send submission data to FluentCRM on a different domain every time someone fills out your form. I’ll walk you through the full setup (it doesn’t require any third-party tools or code).
TL;DR
- The native Fluent Forms + FluentCRM integration only works when both plugins are installed on the same WordPress site.
- For multi-domain setups, use FluentCRM’s Incoming Webhooks feature and Fluent Forms’ Webhook integration to send data across domains.
- On the FluentCRM site: create an incoming webhook and copy the generated URL and field keys.
- On the Fluent Forms site: create a webhook feed on your form using POST, JSON format, and map your form fields to FluentCRM’s field keys.
- The only required field key is email. You can also map name, phone, address, and custom fields.
- Check webhook delivery under API Calls in Fluent Forms’ individual entries.
Why the Native Integration Doesn’t Work Across Domains
When Fluent Forms and FluentCRM are on the same site, they share the same WordPress database. The integration uses internal PHP hooks to pass submission data directly to FluentCRM. There’s no HTTP request involved.
On a separate domain, there’s no shared database. Fluent Forms on siteA.com has no way to reach the FluentCRM installation on siteB.com through internal hooks. They’re two completely independent WordPress setups.
The solution is Webhooks. When someone submits a form, Fluent Forms sends the data as an HTTP POST request to a URL on your FluentCRM site. FluentCRM receives it, processes it, and creates (or updates) a contact. The entire exchange happens in the background, in real time.
What You Need Before Starting
Before you set anything up, make sure you have:
- Fluent Forms Pro on the source domain (where the form lives). The webhook module is a Pro feature.
- FluentCRM (Pro) on the destination domain (where you want contacts to land).
- A form with at least an Email field on the source domain.
- Admin access to both WordPress sites.
- Both sites running on HTTPS. The webhook sends data over the internet, so SSL is important for security.
How Cross-Domain Webhook Sync Works
Here’s the data flow in short:
- A visitor fills out your form on siteA.com and clicks Submit.
- Fluent Forms saves the entry locally on siteA.com.
- Fluent Forms checks for active webhook feeds on that form.
- The webhook feed sends a POST request with the mapped field data (as JSON) to the FluentCRM webhook URL on siteB.com.
- FluentCRM receives the request, matches the data to contact fields, and creates a new contact with the lists, tags, and status you configured.
Contacts sync via a direct HTTP request from one WordPress site to another.
Step 1: Create an Incoming Webhook in FluentCRM
Start on the destination domain, the site where FluentCRM is installed.
Navigate to Incoming Webhooks
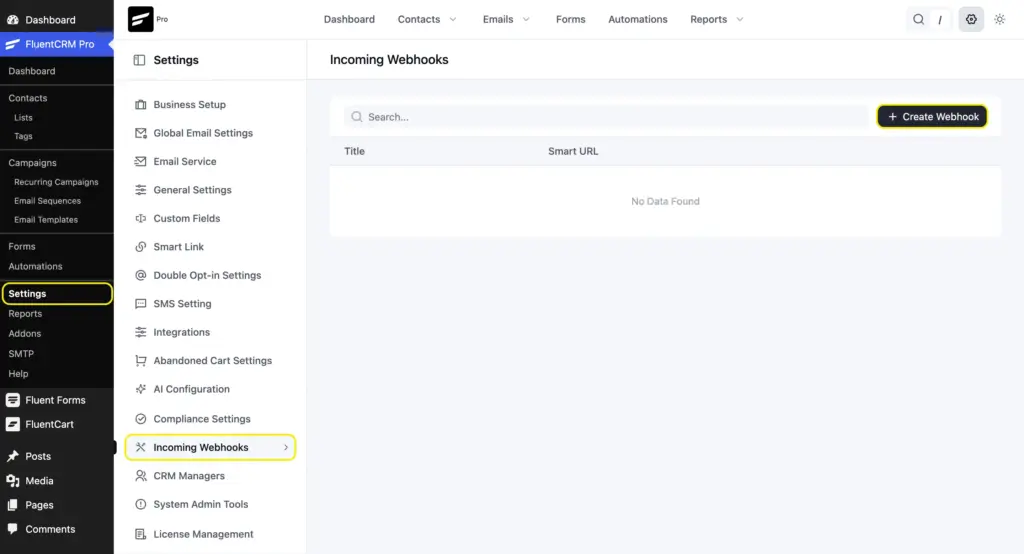
Go to FluentCRM > Settings > Incoming Webhooks. Click the + Create Webhook button.
Configure the webhook
A pop-up will appear. Fill in the following:
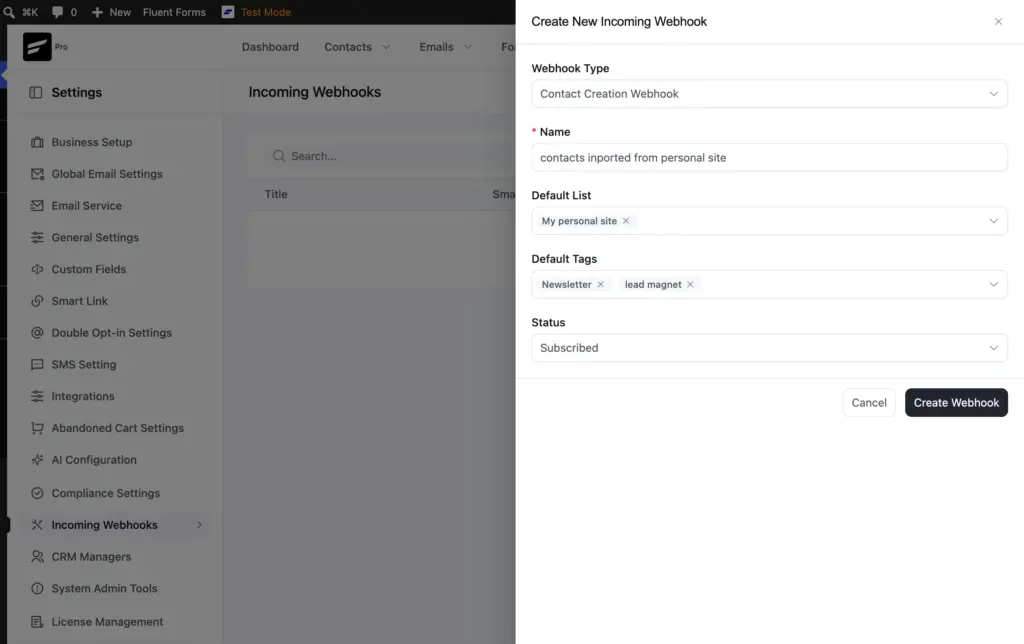
- Webhook Type: Select Contact Creation Webhook.
- Name: Give it a descriptive name, like “Leads from siteA.com Contact Form.”
- Default List: Choose the list(s) that contacts from this webhook should be added to.
- Default Tags: Select tags for segmentation.
- Status: Set to Subscribed/Unsubscribed/Pending.
If you set the status to Pending, FluentCRM will send a double opt-in confirmation email to the contact before they’re fully subscribed. This is recommended if you haven’t already collected consent through the form itself.
Click Create Webhook to save.
Copy the webhook URL and field keys
After creating the webhook, FluentCRM will show you two things:
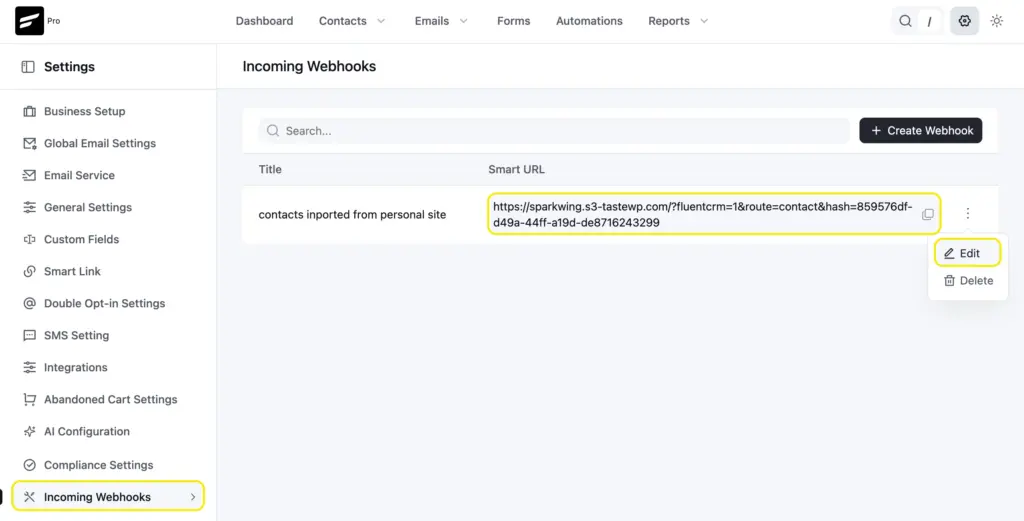
- A unique Webhook URL (the “Smart URL”). Copy this. You’ll paste it into Fluent Forms in the next step.
- A list of field keys that you can use for data mapping. These keys tell FluentCRM which piece of data goes where.
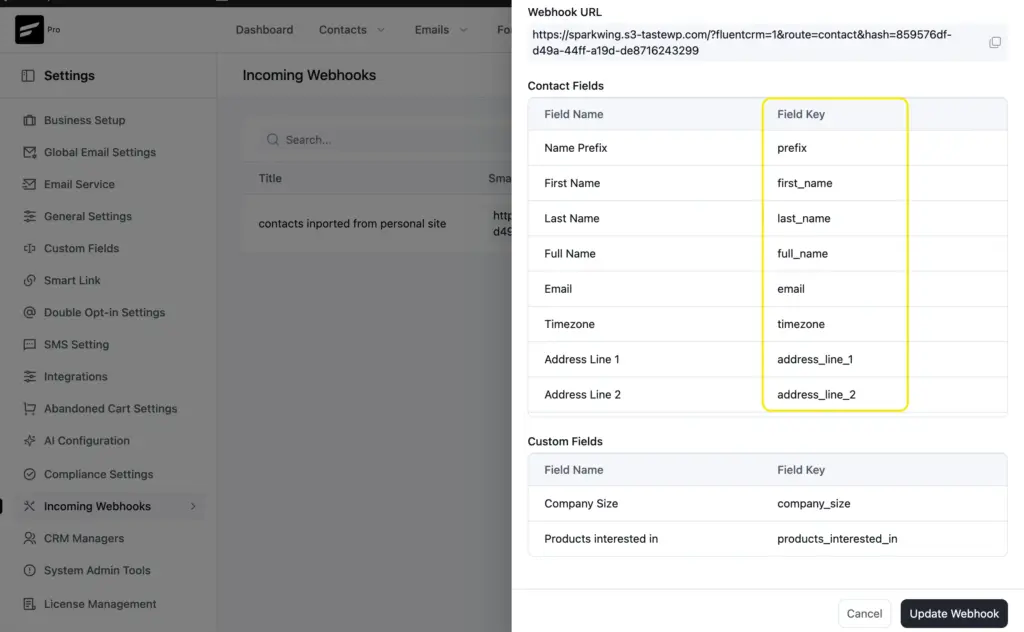
The field keys come from FluentCRM’s SmartCodes. Use the key names without the {{ }} wrapping. For example, the SmartCode {{contact.first_name}} becomes just first_name in the webhook.
Close the popup. You can always come back to copy the URL or edit the webhook from the Incoming Webhooks list.
Step 2: Set Up the Webhook Feed in Fluent Forms
Now switch to the source domain, the site where Fluent Forms is installed.
Enable the webhooks module
Go to Fluent Forms > Integrations. Search for WebHooks and toggle it to Enable.
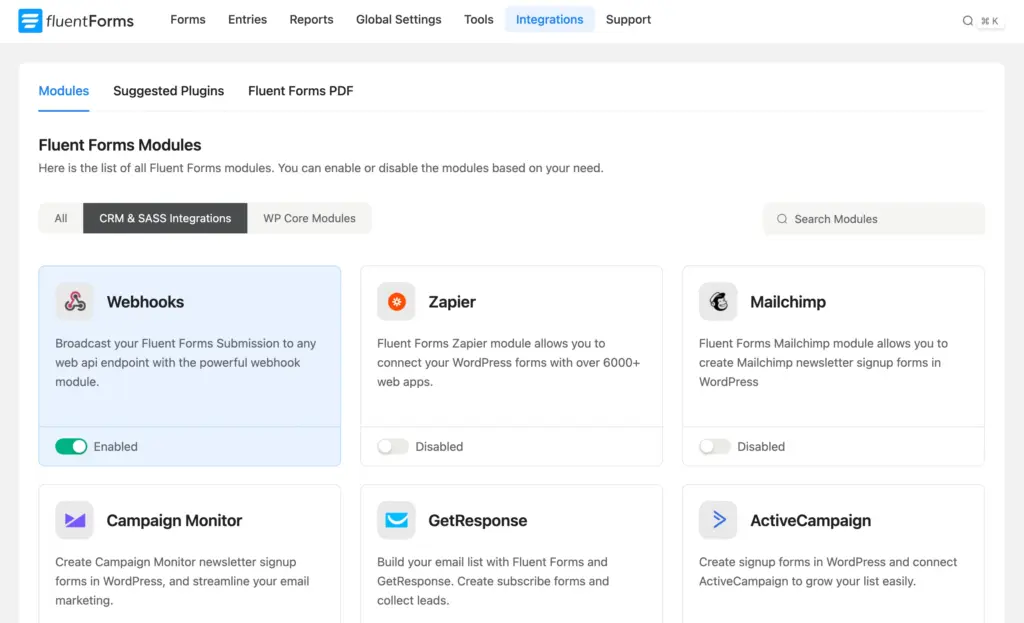
This activates the webhook option across all your forms. You still need to configure it on each form individually.
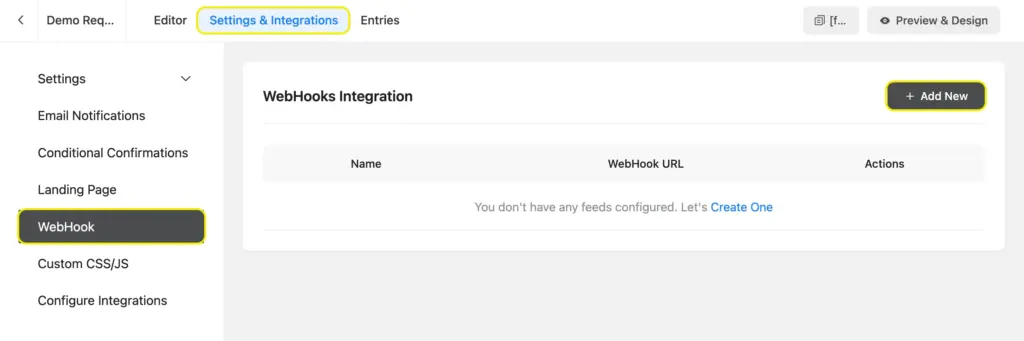
Create the webhook integration feed
Open the form you want to connect. Go to Settings & Integrations > WebHook from the left sidebar. Click + Add New.
Configure the feed
Fill in the settings:
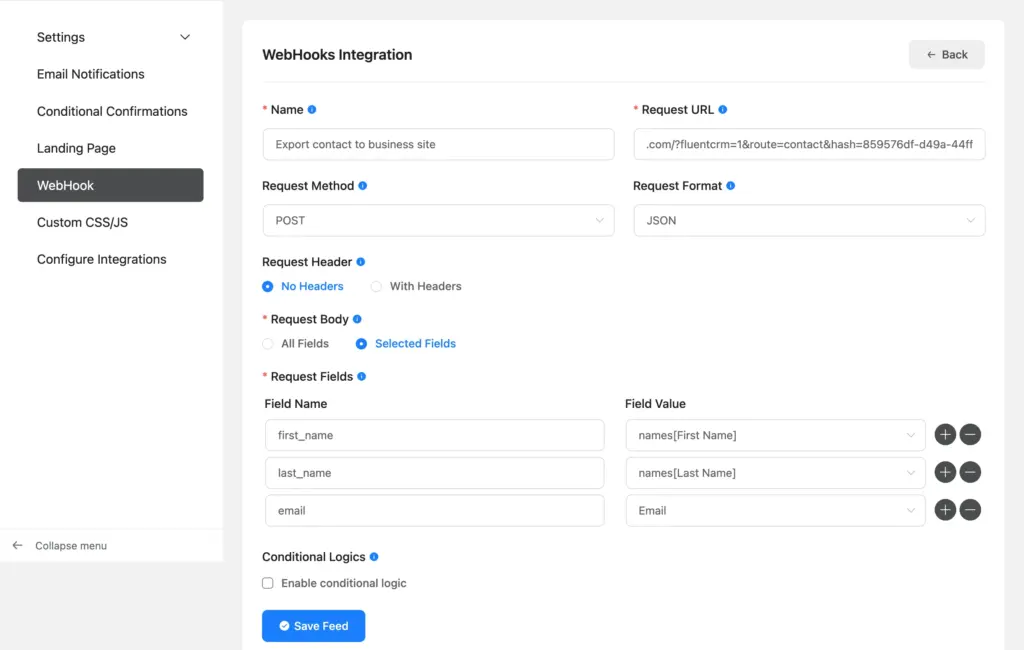
| Setting | Value |
| Name | A descriptive name (e.g., “Send to FluentCRM on siteB.com”) |
| Request URL | Paste the FluentCRM webhook URL you copied earlier |
| Request Method | POST |
| Request Format | JSON |
| Request Header | No Headers |
| Request Body | Selected Fields |
Map your fields
Under Request Body, you’ll see rows where you set a Field Name and a Field Value.
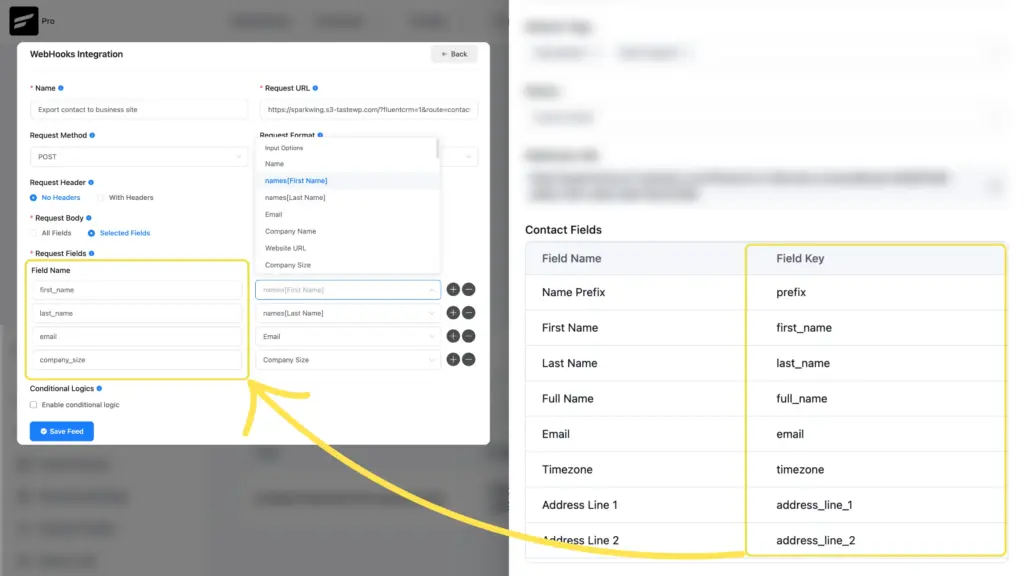
- The Field Name is the FluentCRM Field Key (like email, first_name, last_name).
- The Field Value is the corresponding Fluent Forms input from the dropdown.
At minimum, you need one row:
| Field Name | Field Value |
Add more rows for any additional data you want to send. See the full field mapping reference below.
Click Save Feed when you’re done.
Test and Verify the Connection
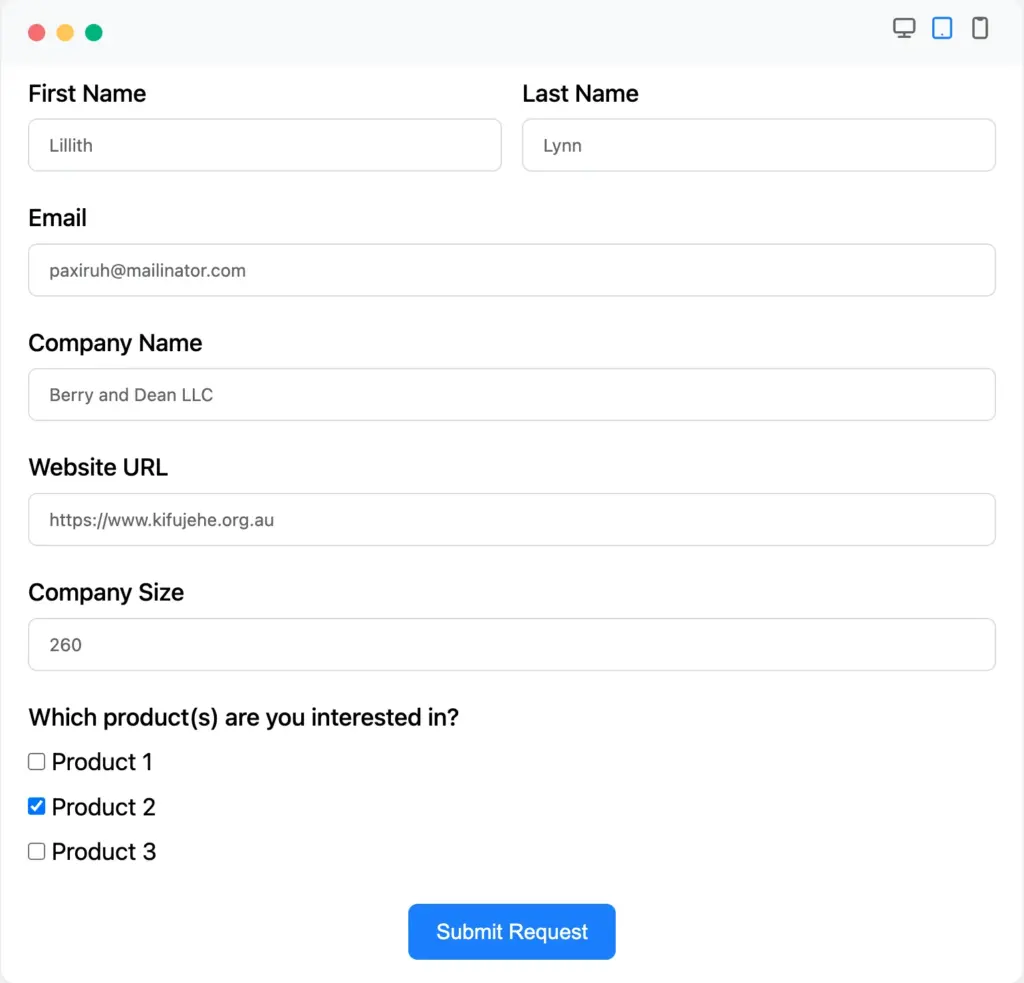
Submit a test entry
Go to your form on the source domain and submit a test entry from preview. Use a real email address so you can verify the contact in FluentCRM.
Check the API calls log
After submitting, go to Fluent Forms > Entries on the source domain. Open the test entry. Scroll down to Submission Logs. Switch to the API Calls tab.
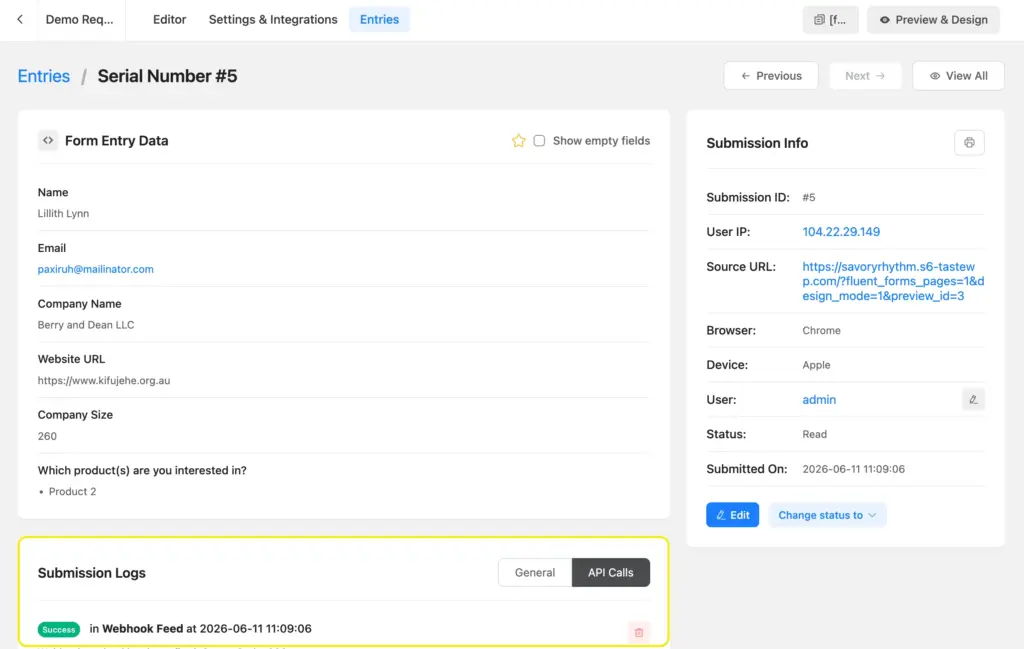
If the request was successful, you’ll see a success status. If it failed, the response will show what went wrong.
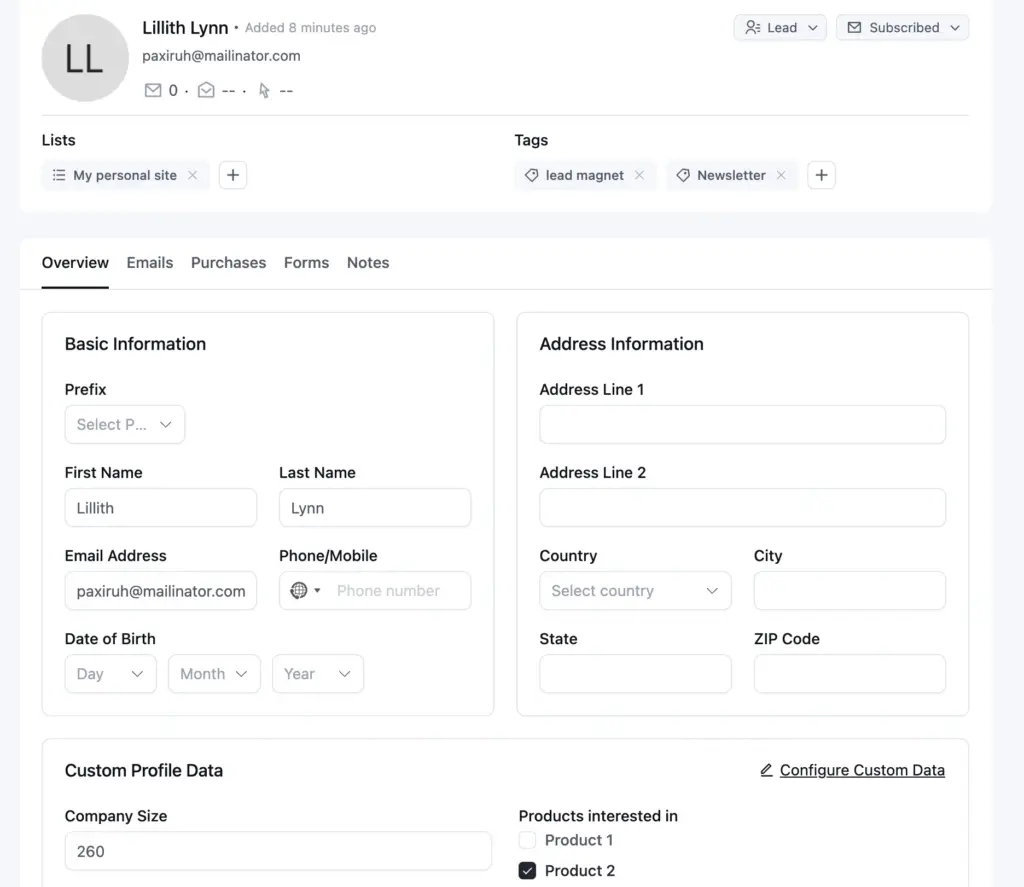
Verify the contact in FluentCRM
Switch to the destination domain. Go to FluentCRM > Contacts and look for the contact you just submitted.
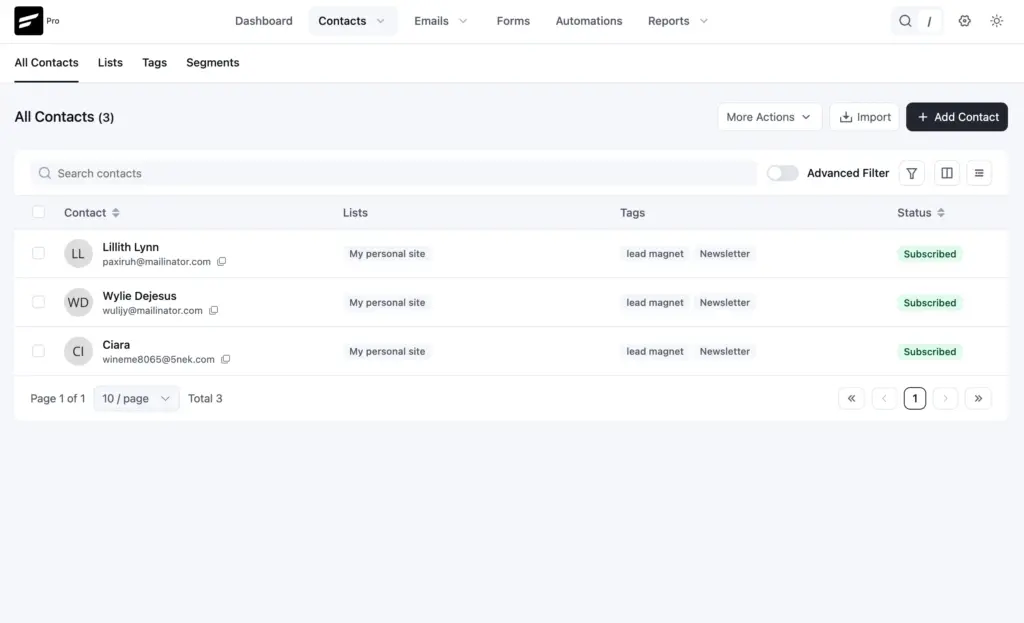
Click on the contact to confirm:
- The email, name, and other mapped fields are populated.
- The correct list(s) and tag(s) are assigned.
- The subscription status matches what you configured.
If only some fields appear (like email and name but not phone or address), check your field mapping in the Fluent Forms webhook feed. Any field you didn’t map will be empty in FluentCRM.
Troubleshooting Common Issues
Submissions aren’t appearing in FluentCRM
- Check the API Calls log first
Open the form entry on the source domain and go to the API Calls tab. If there’s no entry here, the webhook feed may be disabled or conditional logic is blocking it. - Verify the webhook URL is correct
A typo or extra space in the URL will cause the request to fail. Copy the URL fresh from FluentCRM and paste it again. - Check if the webhook feed is enabled
Open the webhook feed in Fluent Forms and confirm it’s toggled on.
The API Calls log shows a failed request
Look at the response code and message. Common ones:
- 404 Not Found: The webhook URL is wrong, or the FluentCRM webhook was deleted on the destination domain.
- 403 Forbidden: A security plugin or firewall on the destination domain is blocking the incoming request.
- 500 Internal Server Error: Something went wrong on the FluentCRM side. Check the destination site’s error logs.
Security plugins or firewalls blocking the webhook
If the destination domain uses a security plugin (Wordfence, Sucuri, iThemes Security) or a CDN firewall (Cloudflare), the incoming webhook request might get blocked.
The request comes from your source domain’s server IP, not from a browser. Security plugins sometimes flag server-to-server requests as suspicious.
Field data is missing or empty
If the contact appears in FluentCRM but some fields are blank, the issue is almost always in the field mapping. Check:
- Key spelling: The key must match exactly. first_name is correct. firstName or First_Name will not work.
- Value selection: Make sure the dropdown in Fluent Forms points to the correct form field.
Conditional logic is blocking the webhook
If you added conditional logic to the webhook feed, only submissions that match those conditions will fire the webhook. Temporarily disable the conditional logic, submit a test entry, and check if the data arrives in FluentCRM.
Advanced: Custom Fields, Conditional Logic, and Multiple Webhooks
Sending custom field data
FluentCRM comes with a set of default contact fields. These cover the basics: name, email, phone, date of birth, and a full set of address fields (address lines, city, state, postal code, country). You’ll see these fields listed as keys when you open your incoming webhook in FluentCRM.
If your form collects data that doesn’t fit into any of these defaults (like company size, product interest, or job title), you can create custom fields in FluentCRM to store it.
Creating Custom Fields
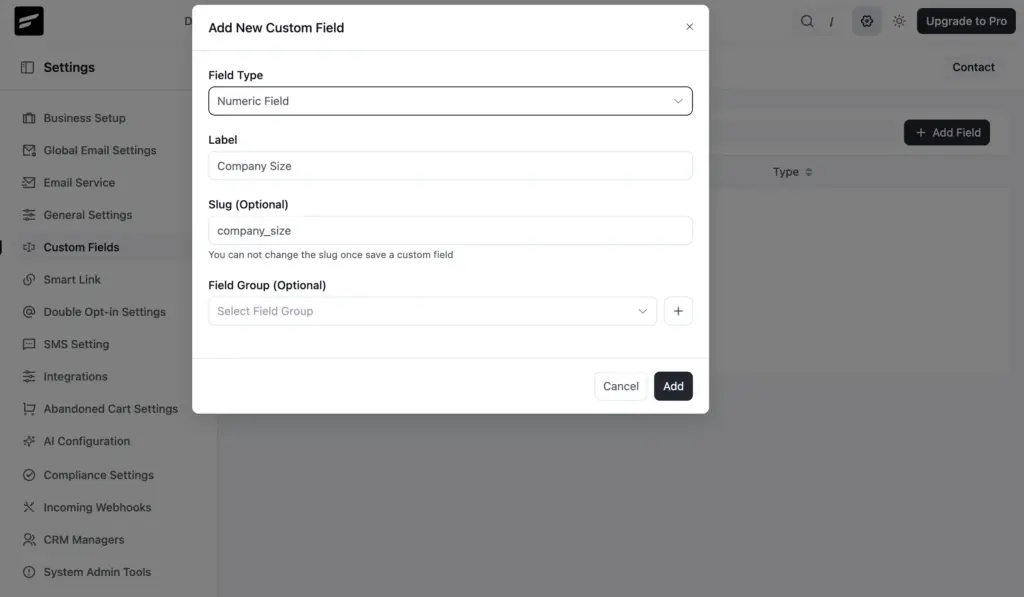
- On your FluentCRM site, go to Settings > Custom Fields.
- Click + Add Field.
- Choose a Field Type (Single Line Text, Multi Line Text, Numeric Field, Select Choice, Multiple Select Choice, Radio Choice, Checkboxes, or Date).
- Enter a Label (e.g., “Company Size”).
- The Slug auto-generates from the label (e.g., company_size). You can edit it before saving.
- For multi-option types like Checkboxes or Select Choice, add your options.
- Click Add.
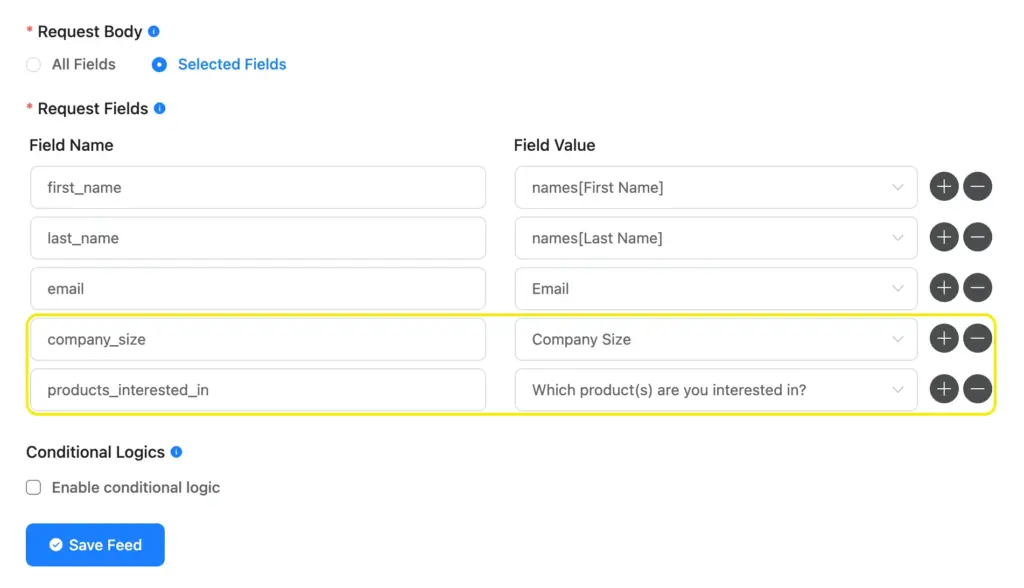
Mapping Custom Fields in the Webhook Feed
Custom fields appear in the Fluent Forms webhook feed exactly like default ones. In the Request Fields section, you add a row, type the field’s slug as the Field Name, and select the matching form field as the Field Value.
Filtering submissions with conditional logic
You don’t have to send every submission to FluentCRM. The webhook feed in Fluent Forms supports conditional logic. You can set rules like:
- Only send the webhook if the Country field contains “USA”
- Only send if the user selected “Yes” for newsletter opt-in
- Only send if the form type is “Contact” (not “Support”)
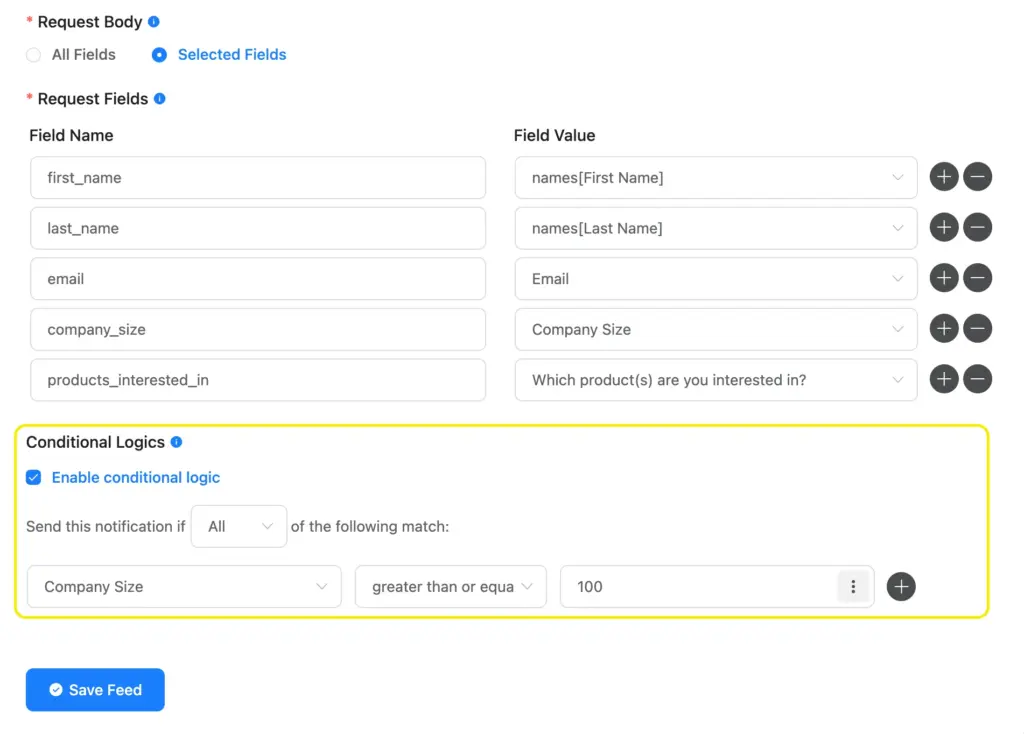
This helps when a single form serves multiple purposes, and you only want certain submissions going to your CRM.
Collecting leads from multiple domains
You can create multiple incoming webhooks in FluentCRM, one for each source domain. Each webhook can have different default lists, tags, and statuses. This lets you segment contacts by which domain they came from.
On each source domain, set up a Fluent Forms webhook feed pointing to the corresponding FluentCRM.
Double opt-in considerations
If you set the webhook status to Pending, FluentCRM will send a double opt-in email to the contact. This means the contact needs to confirm their subscription before they’re marked as Subscribed and start receiving campaigns.
For this to work, your FluentCRM site needs to have double opt-in settings configured and email delivery working properly. Go to FluentCRM > Settings > Double Opt-in Settings to customize the confirmation email.
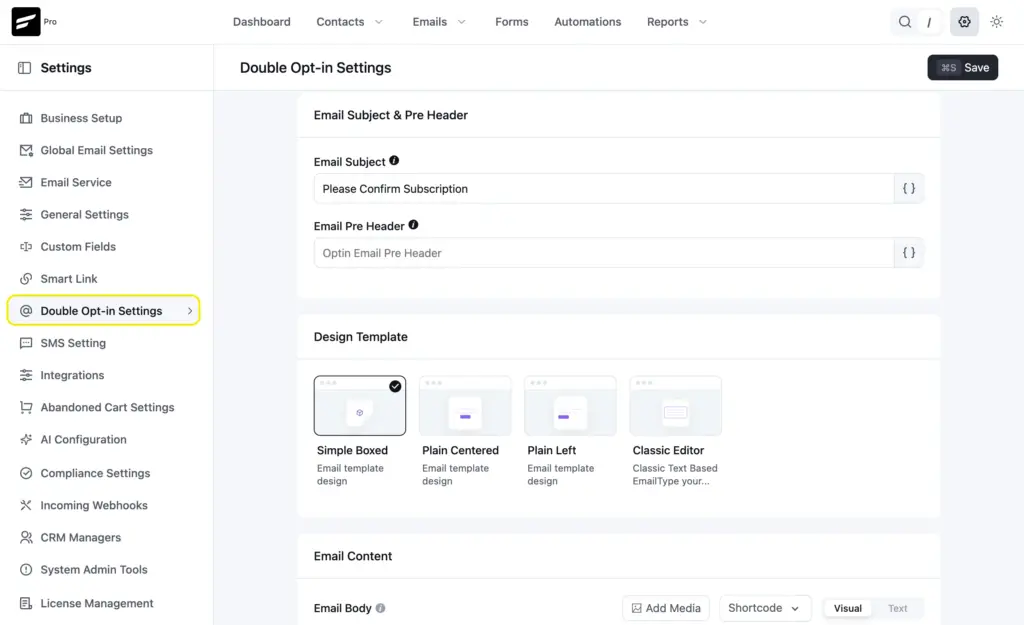
If you’ve already collected explicit consent on the form (like a GDPR checkbox), you can set the status to Subscribed to skip the double opt-in step.
Quick Setup Checklist
- FluentCRM installed on the destination domain
- Incoming webhook created in FluentCRM > Settings > Incoming Webhooks
- Webhook URL copied
- Fluent Forms Pro installed on the source domain
- Webhook module enabled in Fluent Forms > Integrations
- Webhook feed created on the form with correct URL, POST, JSON settings
- Field keys mapped (at minimum: email)
- Test submission sent from the source domain
- API Calls log checked for success status
- Contact verified in FluentCRM on the destination domain
- Lists, tags, and status confirmed on the contact
- Security plugins/firewalls are checked to see if requests are being blocked
Set It Up Once and Let the Webhook Do the Rest
Multi-domain setups are common. You can run a marketing site on one domain and your CRM on another. Or you might collect leads across several client sites and funnel them into one FluentCRM dashboard.
The webhook approach handles this without third-party tools or ongoing costs. Once it’s set up, every form submission on the source domain creates a contact in FluentCRM on the destination domain, with the right lists, tags, and status applied automatically.
If you’re not using Fluent Forms yet and need a form builder that supports cross-domain webhook delivery, give Fluent Forms Pro a try.

Sarika writes for Fluent Forms and loves to offer insights into small businesses. She’s curious and enjoys discussing ideas, interests, and perspectives. In her free time, she’s either marvelling at architectural beauties or trying different cuisines.


Leave a Reply