

How to Add Multiple Payment Methods to a WordPress Form

A customer lands on your checkout form, pulls out their card, and then stops. Your form only accepts PayPal, and they don’t have an account they want to use right now. So they close the tab, and you lose the sale.
This happens more often than most site owners realize. Shoppers, donors, and clients all have different preferred payment methods: credit cards, PayPal, regional gateways, and digital wallets. If your form only supports one option, you’re quietly turning away people who were ready to buy.
The good news is you don’t need separate forms for separate payment methods. With Fluent Forms, you can connect multiple payment gateways to a single form and let each customer pick the option that works for them, all from one build.
This tutorial explains why offering multiple payment methods matters and walks you through how to set it up in Fluent Forms.
TL;DR
- Fluent Forms lets you connect multiple payment gateways, like Stripe, PayPal, Square, and more, to a single form.
- Customers can choose their preferred payment method at checkout instead of being locked into a single option.
- You manage every gateway from one form, so there’s no need to build or maintain duplicate forms.
- Setup involves configuring your payment integrations first, then adding the Payment Method field to your form.
- You should test running through the entire payment flow safely before your form goes live.
- A single Payment Method field automatically displays every gateway you’ve enabled, so you never need multiple payment fields.
Why Multiple Payment Methods Matter in a Single WordPress Form
Not every customer trusts or has access to the same payment method. Someone in the US might default to a credit card through Stripe. A customer elsewhere might prefer PayPal or a regional gateway like Paystack or Razorpay. If your form only supports one of these, you’re asking every visitor to adapt to you instead of the other way around.
Offering multiple payment options in one form gives you a few concrete advantages:
- Fewer abandoned payments: Customers complete the purchase instead of leaving to find a workaround.
- A smoother checkout experience: People pay the way they already prefer, without extra friction.
- One form to manage: You’re not duplicating fields, layouts, or logic across multiple forms just to support different gateways.
- Easier reporting: All transactions, regardless of gateway, land in the same form entries and payment dashboard.
How to Offer Multiple Payment Method Options in a WordPress Form
Here’s how to set up a form that supports more than one payment gateway, without creating duplicate forms or stacking multiple payment fields.
What you need before starting
Before you build the form, make sure you have:
- A WordPress website with Fluent Forms Pro installed and activated
- At least two payment gateways you want to offer (for example, Stripe and PayPal)
- API credentials or account access for each gateway
- Test mode ready to go for each integration
- Your payment currency has been decided
It helps to connect your payment gateways before you start building the form itself. That way, when you add the Payment Method field later, your enabled gateways are already available to select.
Step 1: Create your payment form
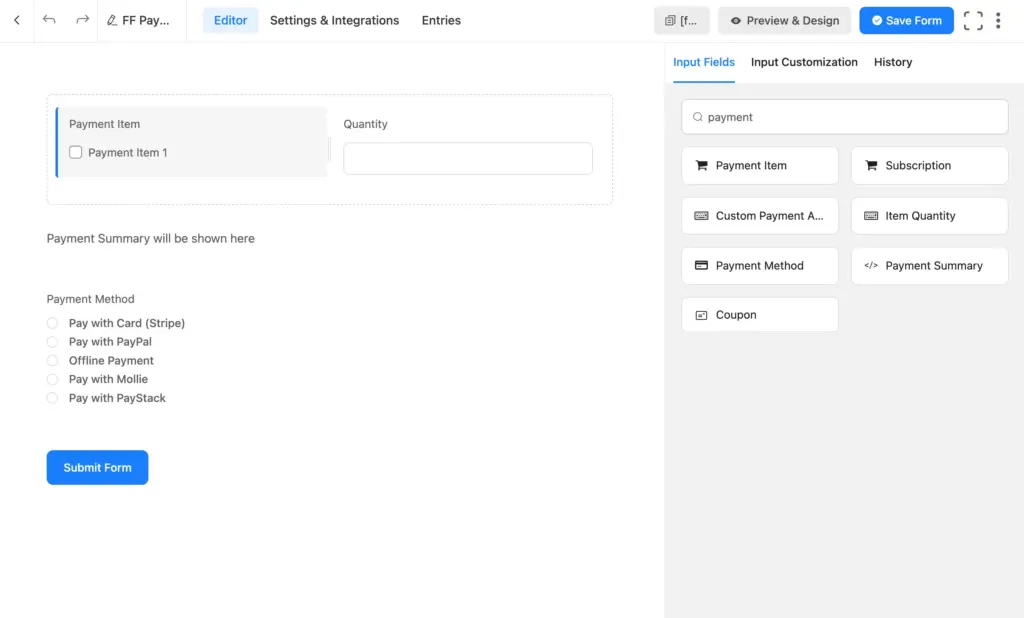
Start by creating a new form in Fluent Forms. Add the fields your customers need to fill out, such as name, email, and any order details.
Next, add your payment item fields. This could be a Payment Item field for products or services, or a Custom Payment Amount field if you want customers to enter their own amount. If you’re selling multiple products or plans, configure pricing for each item so totals calculate correctly.
Save the form once your fields and pricing are in place.
Step 2: Configure payment settings
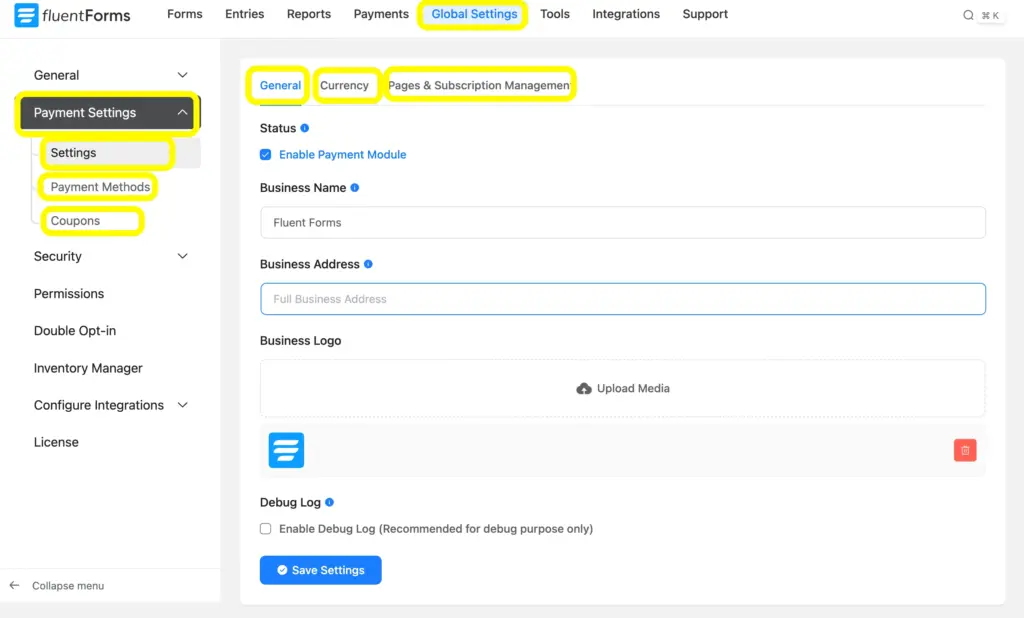
From the Global Settings of Fluent Forms, you will find the payment settings option, where you can set up the Settings, Payment Methods, and Coupons.
Before connecting gateways, head to your form’s Payment Settings. A few settings here directly affect how your checkout behaves:
- General: You need to Enable Payment Module here.
- Currency: Here you can select the default currency, currency separator, etc.
- Pages and Subscription Management: You can set the Payment Management Page and Payment Receipt Page here.
Getting these right matters more than it might seem. A vague success message or missing failure handling is often what makes customers unsure whether their payment actually worked.
[Screenshot: Payment Settings page configured for a payment form]
Step 3: Connect multiple payment gateways
To connect multiple payment gateways, go to your Fluent Forms payment integrations and connect each gateway you plan to offer.
For example, to connect Stripe, enable the integration and connect your Stripe account, choosing test or live mode. To connect PayPal, enable the PayPal integration and add your PayPal email address.
The same process applies if you want to add Square, Razorpay, Paystack, Mollie, Paddle, or Authorize.net. Each one gets enabled and configured on the same payment integrations screen, and none of them requires a separate form.
Once a gateway is connected, it becomes available to any form on your site, including the one you’re building now.
[Screenshot: Fluent Forms payment integrations page with multiple gateways enabled]
Step 4: Add the payment method field
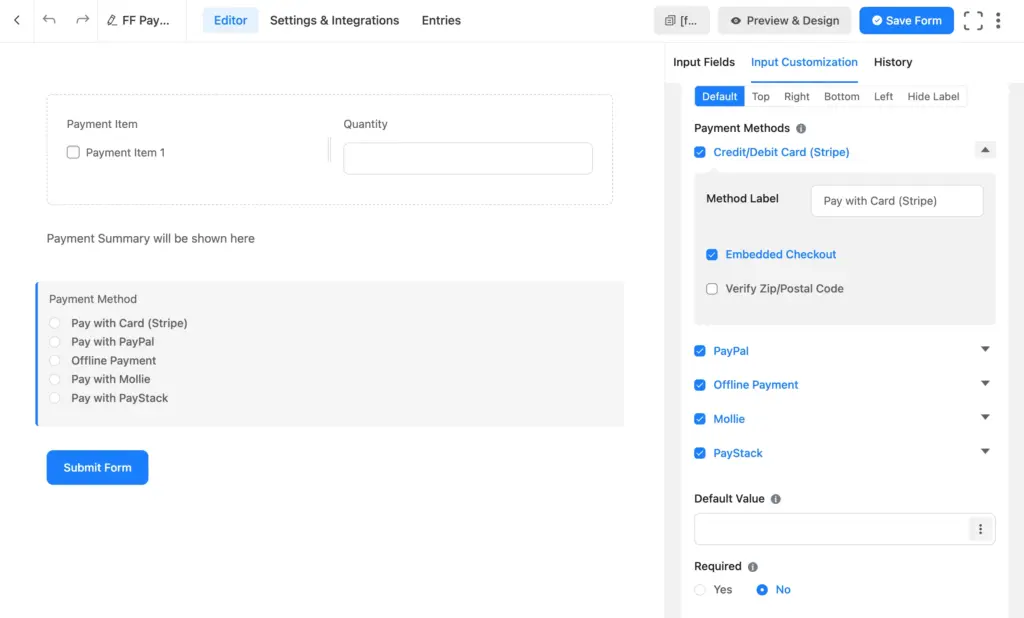
This is the step that actually brings everything together. Add the Payment Method field to your form.
Once it’s on the form, this field automatically lists every gateway you’ve enabled, whether that’s Stripe and PayPal or a longer list including regional gateways. Customers see all their options in one place and pick the one they want to use. Fluent Forms then routes the payment through whichever gateway the customer selected.
You don’t need to add a separate payment field for each gateway, and you don’t need multiple versions of the same form. One Payment Method field handles the entire selection process.
Step 5: Publish and test the form
Before your form goes live, test the full payment workflow with real (but non-charging) transactions. Using test mode, run through:
- A Stripe test payment
- A PayPal sandbox payment
- A successful transaction
- A failed or declined transaction
- The resulting form entry
- The payment dashboard
Test each gateway individually rather than assuming that because one works, they all do. Gateways can have different requirements for credentials, currencies, or webhook setup, so a Stripe payment succeeding doesn’t guarantee PayPal will behave the same way.
Beyond the payment itself, confirm the rest of the workflow holds up:
- Form submission goes through cleanly
- Payment processes and completes
- The transaction is recorded correctly
- Email notifications go out as expected
- Payment status updates properly
- The confirmation message displays correctly
You can check successful transactions inside your Fluent Forms entries and payment dashboard, where each submission shows which gateway was used and whether the payment succeeded.
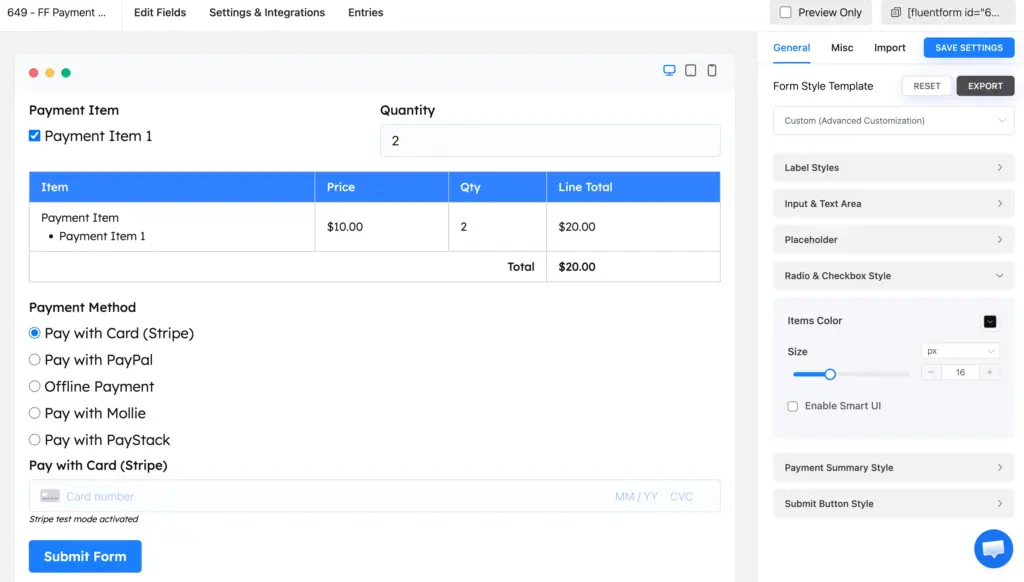
Once every gateway passes testing, turn off test mode and publish the form. Before publishing, check the form interface and make style or other changes accordingly:
Tips for Better Payment Forms
A few small adjustments can make a real difference in how your payment form performs:
- Only ask for information you actually need before charging a customer.
- Show a clear payment summary so customers know exactly what they’re paying for and how much.
- Double-check that your success and failure messages read naturally, not like default plugin text.
- Check your gateway credentials every few months — API keys expire without warning.
- If you offer coupons, test that discounts apply correctly across every payment gateway, not just one.
Build One Payment Form That Works for Everyone
Supporting multiple payment methods isn’t about adding complexity. It’s about meeting customers where they already are, without building and maintaining separate forms for every gateway. With Fluent Forms, you configure your gateways once, drop in a single Payment Method field, and let customers choose. Everything from entries to transaction status stays in one place, on one form.
If you haven’t set this up yet, explore the full range of payment features Fluent Forms supports, and check out what else Fluent Forms can do on the features page.
Ready to build a payment form that gives your customers real choice? Get Fluent Forms Pro and start collecting payments through multiple gateways today.

Hi, this is Aparup. I am a Literature postgraduate, mixing my creative thoughts with my experience in the tech industry to surpass AI. Professionally, I am a content marketer seeking solutions to users’ problems regarding WordPress.




Leave a Reply