

How to Create a Church Donation Form in WordPress
Passing a plate on Sunday only reaches the people in the room. A donation form on your church website reaches everyone from a member traveling for work to someone who tithes online.
You can build this directly on your WordPress site with the Fluent Forms plugin, without hiring a developer and without routing every gift through a separate platform that takes its own cut. I’ll show you how to set up one-time and recurring giving.
TL;DR
- Install the Fluent Forms plugin for WordPress and start a new form. No code required.
- Collect the donor’s name and email, and let them choose which fund or ministry their gift supports.
- Offer a few suggested giving amounts plus a custom amount field, and label each option with what it actually funds.
- Let donors switch between a one-time gift and recurring giving with a simple toggle and Conditional Logic.
- Set up recurring giving with the Subscription field so weekly tithes and monthly pledges bill automatically.
- Connect Stripe for free (a 1.9% platform fee applies) or remove that fee and unlock 7 more gateways with Pro.
- Add spam protection, customize the confirmation message and receipt, then publish and test before it goes live.
Why Your Church Needs an Online Donation Form
Attendance is different week to week. But the costs to run your church stay the same. A donation form on your website lets people give on their own schedule instead of only when they’re in the room.
It also matches how your congregation already handles money. Most people are comfortable paying online, so asking them to write a check can be the extra step that costs you a gift.
- Reaches people you’d otherwise miss. A member traveling for work, someone homebound, or a visitor watching online can give in seconds instead of waiting for next Sunday.
- Turns generosity into a budget you can plan around. A recurring gift arrives on schedule, rather than depending on who attended that week.
- Keeps a record you don’t have to reconstruct later. Every gift is logged with a name and email, so year-end giving statements easily come from your own data.
What Your Church Donation Form Needs to Capture
Before you open the form builder, it helps to know exactly what you’re asking for and why each piece matters. A donation form that only asks for a dollar amount misses information your finance team will want later.
It’s a common shortcut: build a quick name-and-amount form, get it live, move on. Then budget season arrives and someone asks how much the Building Fund raised this year, or which donors gave to Missions so the team can send a proper thank-you, and the form has no way to answer either question. A little more structure saves that inconvenience later.
- Donor name and email: so you can send a receipt and follow up with a thank-you.
- Gift amount: ideally, a few suggested figures plus room to type in a custom amount.
- Designation: which fund, ministry, or campaign the gift supports (General Fund, Building Fund, Missions, Youth Ministry, and so on).
- Frequency: whether the gift is a one-time contribution or a recurring one.
- Payment details: handled entirely by your payment gateway. Card numbers never touch your own WordPress database. Fluent Forms offers payment fields, features, and gateway connection.
- Optional extras: a note or prayer request field, a mailing address if someone wants a printed receipt, or a newsletter opt-in.
The goal is to collect answers that your finance team will need, without making the form unnecessarily lengthy.
Why Build Your Donation Form With Fluent Forms
Fluent Forms is the fastest form plugin for WordPress that lives on your own site, so giving stays on your church’s own domain instead of routing through other platforms.
- Every submission is stored in your own WordPress database. Nothing lives on a third-party server you don’t control.
- Stripe works on the free plan, though Fluent Forms applies a 1.9% platform fee on top of Stripe’s own processing fee. Upgrading to Pro removes that fee and unlocks 7 more gateways: PayPal, Mollie, Razorpay, Paystack, Square, Paddle, and Authorize.net.
- A free PDF add-on turns entries into PDF receipts your finance team can print or email to the recipient.
- The native FluentCRM integration lets you tag and follow up with givers automatically.
- Field-level conditional logic and spam protection (reCAPTCHA, hCaptcha, Turnstile, and built-in honeypot) are included on the free plan.
Common Giving Scenarios This Form Handles
The form you’re about to build handles most situations your church faces, without needing a rebuild each time.
- Regular Sunday giving. A donor picks General Fund, chooses One-time or Recurring, and gives on their own schedule instead of only when they’re physically in the building.
- Weekly or monthly tithing. The Subscription field bills automatically, so tithing doesn’t depend on someone remembering to write a check every week.
- A mission trip or benevolence appeal. Add the appeal as another fund option, or create a short-term duplicate form for it. Either way, you won’t need to rebuild the payment logic.
- A building or capital campaign. Larger, often one-time gifts still flow through the same Custom Payment Amount field, and the fund label keeps that money clearly separated from general giving in your entries.
Building Your Church Donation Form Step by Step
Here’s the build, from installing the plugin to publishing a form your donors can use.
1. Install the Fluent Forms plugin for WordPress
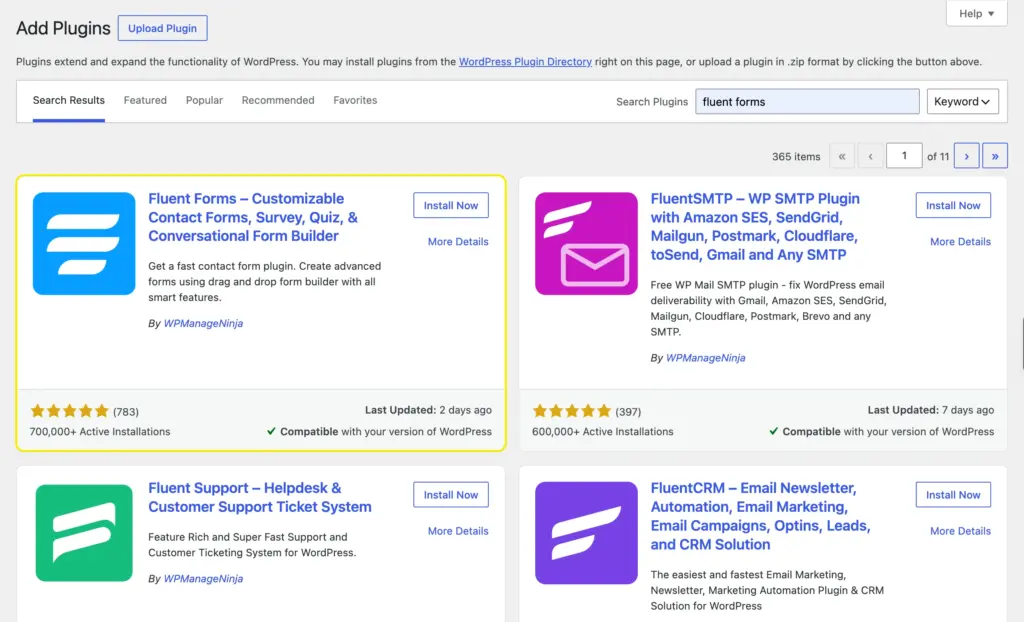
From your WordPress dashboard, go to Plugins → Add New Plugin, search “Fluent Forms,” then click Install Now followed by Activate.
2. Start your donation form
Go to Fluent Forms → New Form. Start from a blank form, or search the template library for a donation form to start from. A blank form gives you full control over field order
3. Collect donor information
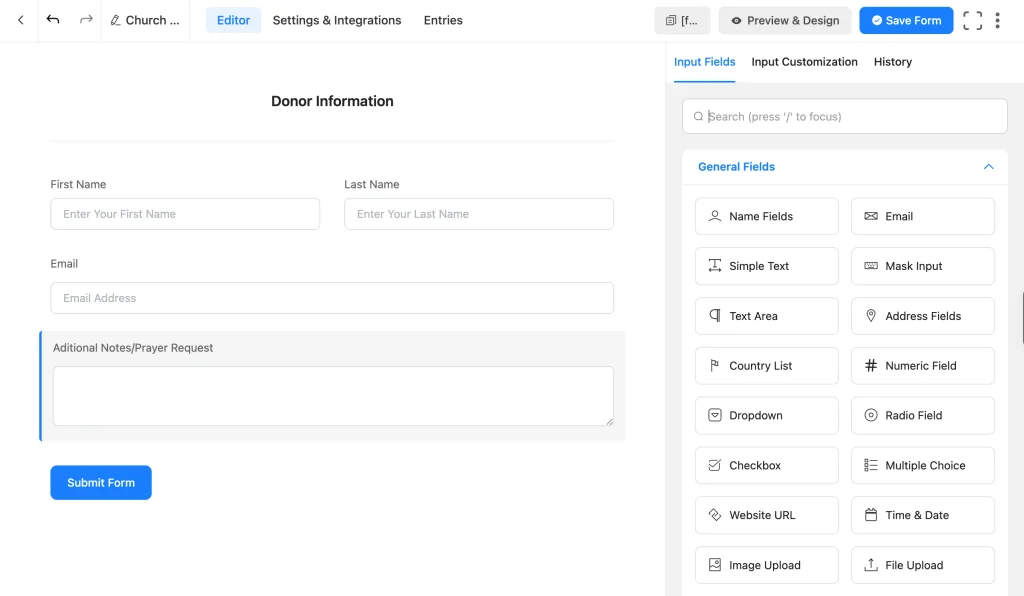
Add a Name field and an Email field, and mark both as required. If you want to mail a printed receipt, add an Address field too. A Text Area works well for an optional note or prayer request.
4. Let donors choose what their gift supports
Add a Dropdown or Radio field labeled “Where would you like your gift to go?” with options such as General Fund, Building Fund, Missions, and Youth Ministry. Use Dropdown if your list of funds is long and you’d rather keep it tucked behind a menu, or Radio if you want every option visible at a glance.
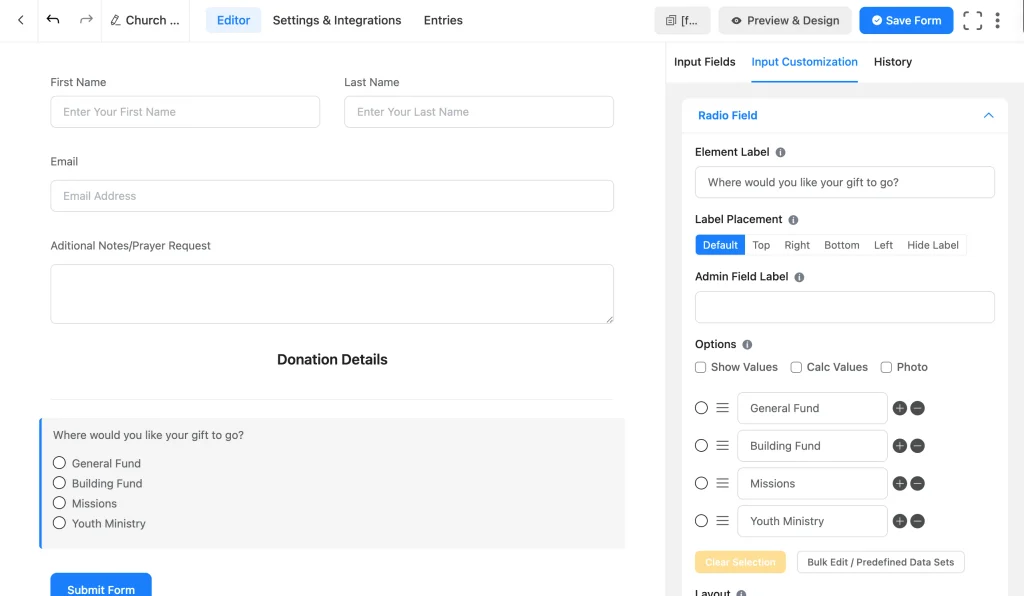
Keep the option labels exact and consistent. You’ll reuse them later to tag givers by fund type in FluentCRM and to filter entries when someone on the finance team asks how much a specific fund brought in.
5. Set suggested giving amounts and allow a custom gift
Add a Payment Item field and set its Display Type to Radio, so donors see every suggested amount at once. List a handful of common gift sizes, for example, $25, $50, $100, and $250.
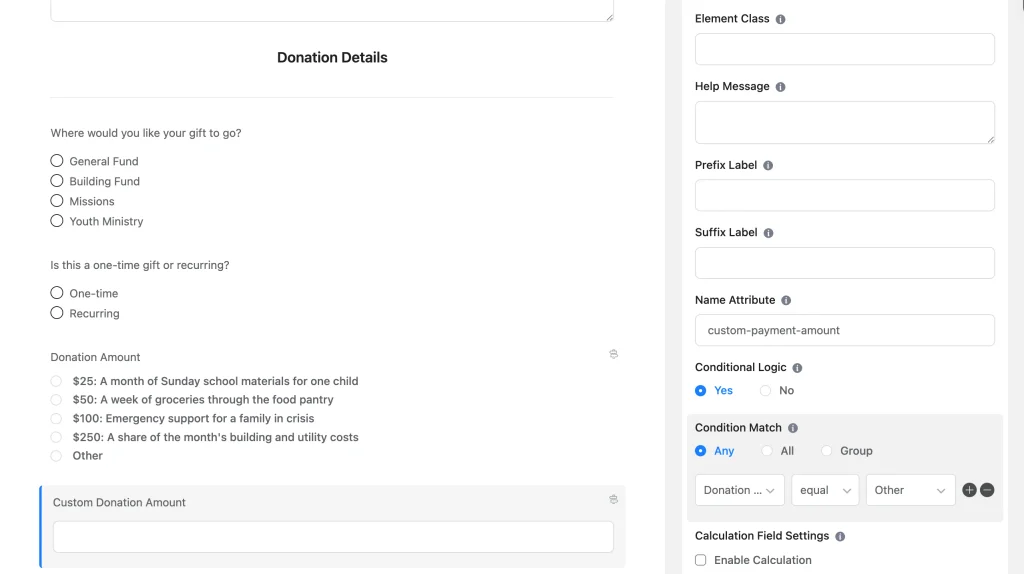
Then add a Custom Payment Amount field labeled “Or enter your own amount,” so nobody feels forced into your suggestions. If you’d rather it only appear once someone picks “Other,” add an Other option in the Payment Field, and use Conditional Logic under the Custom Payment Amount field’s Advanced Options.
Consider adding a Payment Summary field near the bottom of the form too. It shows a quick review of the amount a donor selected before they hit submit.
6. Show donors the real impact of their gift
A plain “$25” asks for money. “$25 feeds a family for a week” asks for something a donor can picture. It converts more because the donor can see the actual outcome instead of a number. Donors trust that the figure reflects a real cost rather than a guess, and they end up choosing a level of impact.
To build your own, list what your church actually needs, then attach an honest dollar amount to each one. Here’s an example set:
| Amount | What it provides |
| $25 | A month of Sunday school materials for one child |
| $50 | A week of groceries through the food pantry |
| $100 | Emergency support for a family in crisis |
| $250 | A share of the month’s building and utility costs |
Put these labels directly on your Payment Item options or place them near your form to incentivize donors.
7. Let donors choose one-time or recurring giving
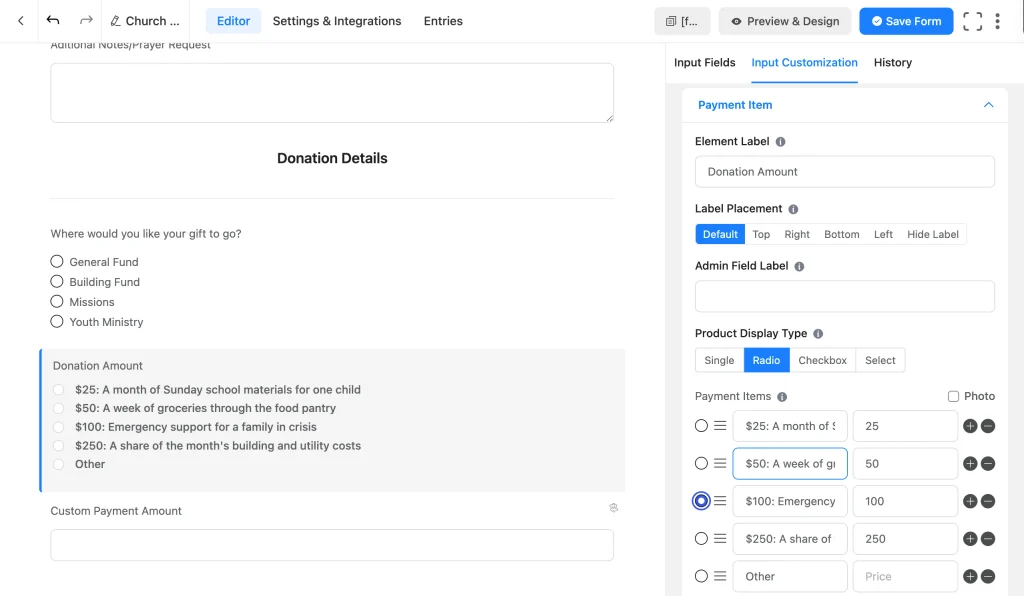
Add a Radio field asking “Is this a one-time gift or recurring?” on top of the payment field, with two options: One-time and Recurring.
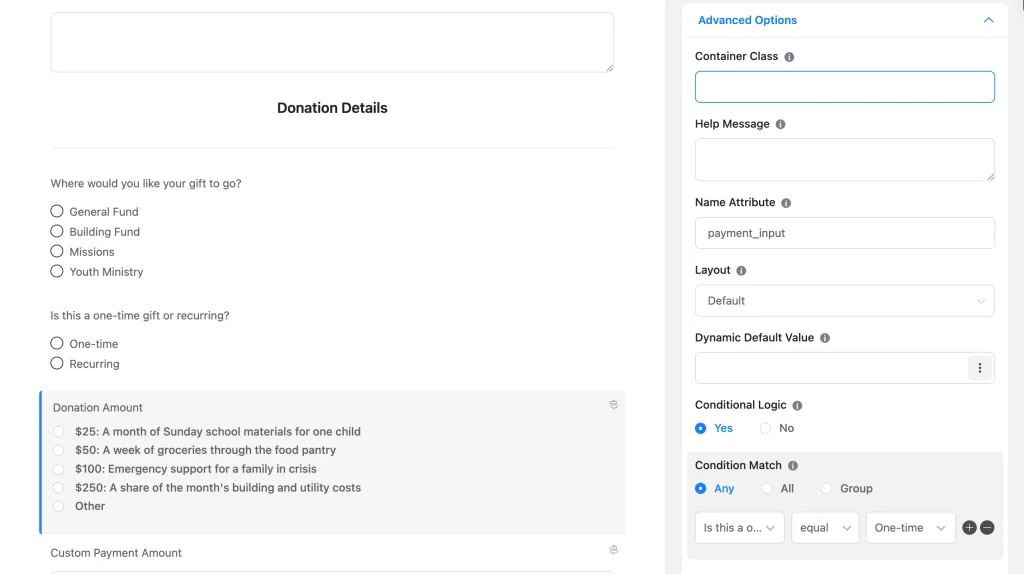
Then use Conditional Logic (Advanced Options → Conditional Logic → Yes) on the Payment Item field so the one-time amounts and Custom Payment Amount fields from Step 5 only show when someone picks One-time. Apply similar logic to the Subscription field from the next step so it only shows when they pick Recurring.
8. Set up recurring giving for tithes and pledges
Add a Subscription field. If you want to offer more than one recurring option, say a weekly tithe and a monthly pledge, set Subscription Type to Multiple Pricing Plans so both live inside the same field, and set Plan Display Type to Radio input field so donors see both at once.
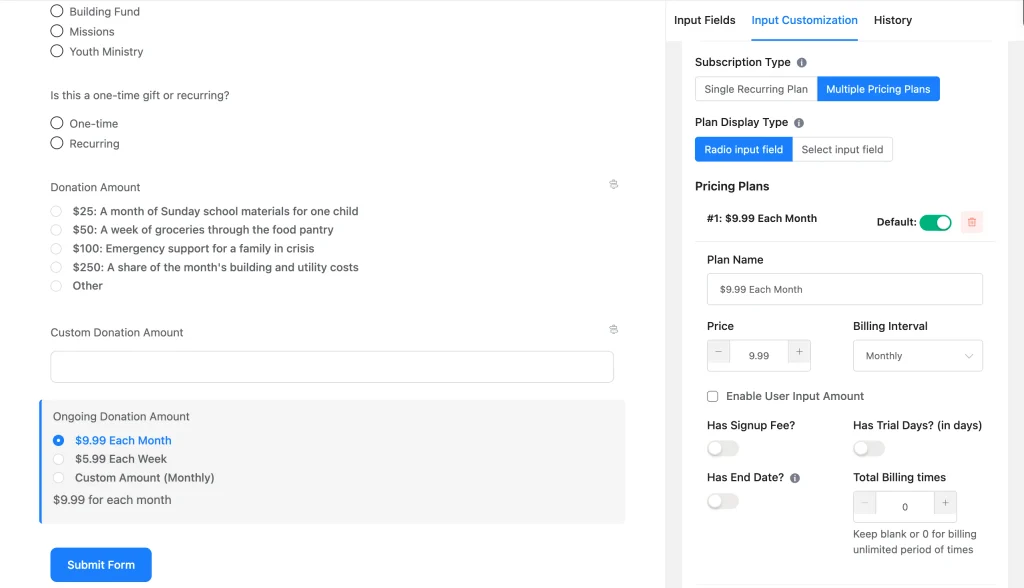
For each plan, fill in the Plan Name, Price, and Billing Interval. Leave Total Billing Times blank for an ongoing gift, or set a number if you’re running a pledge with a defined end date. Toggle Enable User Input Amount if you’d rather let recurring donors set their own figure instead of a fixed price.
9. Connect a secure payment gateway
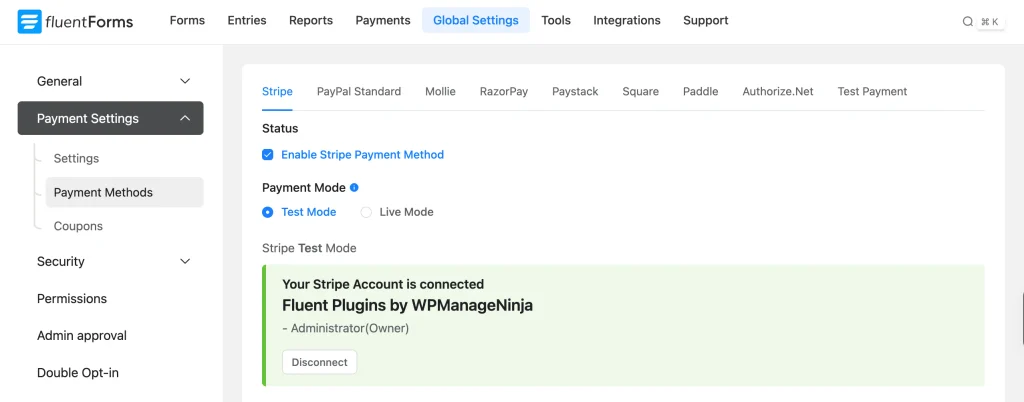
Connect a payment processor to accept the donations. Go to Fluent Forms → Global Settings → Payment → Payment Methods and enable Stripe with the one-click Connect with Stripe button.
On the free plan, Fluent Forms keeps a 1.9% fee per transaction, on top of Stripe’s own processing fee. Pro removes that 1.9% cut and unlocks the other 7 gateways, useful if your congregation includes donors outside the US who’d rather pay through Razorpay or Paystack. Add a Payment Method field to the form so donors can choose.
The subscription field only works with Stripe and PayPal. If you enable other gateways, they’re available for one-time gifts only.
The gateway you connect to processes and stores the actual card number and carries its own PCI compliance.
10. Protect your form from spam
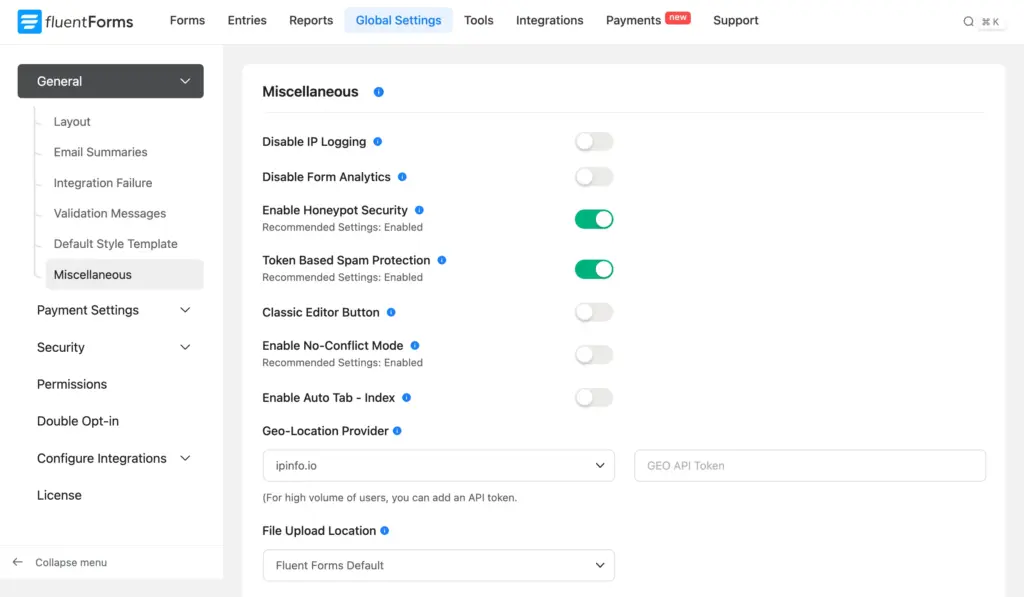
A public donation form is a target for bots. Add a reCAPTCHA, hCaptcha, or Turnstile field, or turn on Honeypot and token protection under Global Settings → General → Miscellaneous. All of these are free.
11. Customize the confirmation message and giving receipt
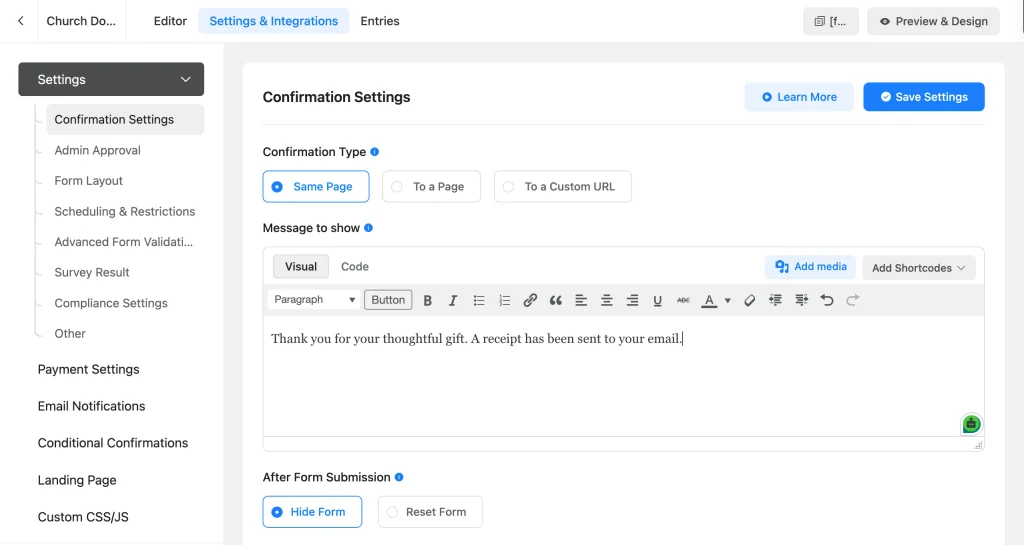
Go to Settings & Integrations → Confirmation Settings and write a genuine thank-you message rather than a generic “Thanks for your submission.” Mention the fund they gave to using the form’s smart tags.
Then set up Settings & Integrations → Email Notifications so both the donor and your finance team get an email. For a formal, printable receipt, install the free “Fluent Forms PDF” add-on so each entry can be exported or emailed as a PDF (useful at tax time).
12. Publish your form on your church website
Add the form to a dedicated Give or Donate page using the Fluent Forms block or shortcode. Link to that page from your main navigation so donors can easily find it.
Download the Church Donation Form.
Bonus Features Worth Adding
Once the core form is working, a few optional touches make it feel more polished on the donor’s side and easier to manage on yours.
- Let donors cover the processing fee. Add a Custom Payment Amount Field with calculation enabled (a Pro feature) to add a percentage on top of the chosen amount, so the church receives the full gift.
- Tag givers by fund with FluentCRM. Map each fund option to a matching tag using Dynamic Tag Selection or Conditional Logic for multiple rules.
- Export records to Google Sheets. A native, Pro-only integration that gives your treasurer or bookkeeper a copy of the records outside the WordPress database.
- Break a long form into steps. If your donation form has grown to include fund selection, impact messaging, and recurring options, a multi-step layout (Pro) can guide donors screen by screen.
Explore Fluent Forms’ nonprofit and donation features.
Test Your Donation Form Before You Go Live
Before you publish this form, run it the way a donor would.
- Submit a real transaction in your gateway’s test mode, using Stripe’s published test card numbers.
- Confirm that the confirmation email and the PDF receipt arrive.
- Check Fluent Forms → Entries to make sure the fund, amount, and frequency are all recorded correctly.
- Open the form on a phone and check that the layout is okay.
- Try it in an incognito or private window, not just while logged in as an admin, so you see the exact page a first-time visitor sees.
- If you set up recurring giving, check your gateway’s dashboard to see what a failed or declined recurring charge looks like on your end.
Tips to Improve Donation Completion
A few small practices keep more donors from dropping off partway through.
- Keep required fields to the essentials. Name, email, and the gift itself. Leave address, phone, and the note field optional, since every required field you add is a reason to abandon.
- Put the Give or Donate link where people actually look. Your main navigation, not a footer someone has to scroll to find.
- Keep fund labels exact and specific. “General Fund,” not “Other.” A vague label makes a donor pause to guess what it means.
- Check your impact statements before publishing. If a number sounds padded or made up, a donor will notice too.
- Add a Payment Summary field. A quick review before submitting catches mistakes, so you don’t receive many refund requests later.
Enjoy up to 50% Discount on WPManageNinja Products
for Non-profits
Frequently Asked Questions
Is Fluent Forms free to use for a church donation form?
Yes. The core fields, Conditional Logic, spam protection, and Stripe payments all work on the free plan. Free-plan Stripe transactions carry a 1.9% platform fee on top of Stripe’s own processing fee; Pro removes that fee and adds 7 more gateways.
Can donors give on a recurring schedule, like weekly tithing?
Yes, using the Subscription field, which is free. You can offer more than one recurring plan, such as weekly and monthly, inside a single field.
Does Fluent Forms take a cut of every donation?
Only on the free plan, where a 1.9% platform fee applies on top of Stripe’s own fee. Pro removes that platform fee. Whichever gateway you use, its own processing fee is separate and set by that gateway, not by Fluent Forms.
Can I let donors choose which ministry or fund their gift supports?
Yes, with a Dropdown or Radio field listing your funds or ministries. It’s a standard field, no special add-on is required.
Will donors get a receipt for tax purposes?
You can send a confirmation email automatically and generate a PDF receipt with the free Fluent Forms PDF add-on. Confirm the exact wording your receipts need with your church’s own accountant, since tax-receipt requirements vary by jurisdiction.
Do I need coding skills to set this up?
No. Every step here uses the drag-and-drop form editor and the plugin’s built-in settings screens.
Can I accept donations from congregation members outside the US?
Yes, for one-time gifts. Alongside Stripe and PayPal, Pro unlocks gateways like Razorpay and Paystack that are commonly used outside the US, useful for a multi-campus or diaspora congregation. Keep in mind that recurring giving through the Subscription field only works with Stripe and PayPal.
Your Church Donation Form Is Ready to Collect Online Giving
You now have a church donation form that does more than collect a number. It captures who gave, what fund they supported, and whether to expect the gift again next month, all inside your own WordPress site instead of a separate giving platform you don’t fully control.
If you haven’t installed the plugin yet, start with the free version of Fluent Forms and add Pro features like extra gateways or Google Sheets export once your giving grows.
Build Smarter Forms for Free

Sarika writes for Fluent Forms and loves to offer insights into small businesses. She’s curious and enjoys discussing ideas, interests, and perspectives. In her free time, she’s either marvelling at architectural beauties or trying different cuisines.



Leave a Reply