
How to Grow Your Business Using WordPress Subscription Payments

Running a one-time sales based business can get overwhelming or exhausting at times. You close a deal, celebrate, then wake up the next day to repeat the process from the start.
Recurring payment is the knight in shining armor to break you free from this loop. You get to retain your existing customers, ensure a stable income, and expand your business at a comfortable pace.
And the best part is, you don’t need to be an enterprise to be successful in a recurring business model. Regardless of your business size, setting up recurring payments with WordPress is easier than you might think. You do not need custom code or expensive developers. The right plugin and a well-designed form can get you started.
In this tutorial, I’ll walk you through how to easily set up WordPress subscription payments step by step using Fluent Forms (you can create subscription payment forms using the plugin’s free version as well). Let’s see what a recurring revenue model is and how it works before we move on to the tutorial.
TL;DR
- Recurring payments let customers pay on a regular schedule (weekly, monthly, yearly) instead of making one-time purchases
- Common models include subscriptions, memberships, SaaS, usage-based, tiered, and freemium pricing
- Benefits: predictable cash flow, higher customer lifetime value, lower acquisition costs, and automated billing
- Fluent Forms lets you create recurring payment forms in WordPress using Stripe and PayPal (the free version supports Stripe with 1.9% transaction fee)
- Tutorial walks through building a gym membership form featuring tiered pricing (Basic/Standard/Premium) and dynamic switching between Monthly and Yearly billing
- Use Fluent Forms’ subscription fields for pricing plans, conditional logic to link plans to billing cycles, and payment method fields to collect payments
- You can add signup fees, free trial periods, and limit total billing cycles directly in the subscription field’s settings
What’s a recurring revenue model
A recurring revenue model is a business strategy in which customers pay on a regular basis (usually weekly, monthly, or yearly) for ongoing access to a product or service rather than making a one-time purchase. Here’s how it works:
- Customer subscribes to a product or service
- Payment is charged automatically at set intervals
- Access continues as long as the subscription remains active
Recurring revenue models are suitable for almost any industry. Here are some key model types:
- Subscription: Regular payment for continued access to content/entertainment (Netflix, Spotify)
- Membership: Fee for exclusive benefits or community (gym memberships, online courses)
- SaaS: Monthly/annual fees for software access (Dropbox, Zoom)
- Usage-based: Customers pay based on how much they use (AWS, Mailchimp)
- User-based: Price depends on the number of users or seats (Slack, Microsoft 365)
- Tiered: Multiple plans offered at different price points (HubSpot: Starter, Professional, Enterprise)
- Freemium: Basic version is free; advanced features require a paid upgrade (WordPress, LinkedIn)
- Retainers: Ongoing service agreements (Marketing agencies, consultants)
- Consumables: Regular delivery of products (meal kits, skincare products)
- Licensing: Periodic fees for using intellectual property (Stock photo sites)
The recurring revenue model shifts your business focus from sales (constantly seeking new prospects) to retention (keeping your current customers satisfied). You still need new customers to grow; however, retaining your existing customers is the main goal here.
How WordPress subscription payments help you scale
Customers are more comfortable paying a lower ongoing charge than a high one-time payment. Thus, a recurring business model gets you more customers. While the initial payment might not be as high, the total amount a customer pays you over time is usually significantly higher.
Besides, recurring revenue models bring a steady cash flow. As a result, you always have an estimation of how much money is coming in, helping you plan strategically.
For example, retaining subscribers is less costly than finding new customers (marketing, ad expenses). Since you don’t need to replace old customers with new ones, you have enough budget to focus on product development or expansion. This keeps your customers happy, who even do free word-of-mouth marketing for you.
What’s more, no matter how much your business scales, your workload doesn’t scale even a bit. Because Fluent Forms automatically handles your recurring payment like a pro. You receive the payments right from your forms, without any back-and-forth emails. Let’s see how this wonder works in the following section.
How to set up recurring payments in WordPress (with Fluent Forms)
In this section, I’ll show you how to create a gym membership form that accepts recurring payments. There’ll be 3 different pricing tiers, each of which unlocks additional privileges. Users can choose to pay monthly or yearly. Let’s get to it.
First things first. You’ll need Fluent Forms to create this recurring payment form. No worries if you haven’t used it before, because the plugin is pretty self-explanatory. Follow these steps for installation:
- Go to your WordPress dashboard.
- Find the “Plugins” option on the left menu bar.
- Select “Add New.”
- Search for the “Fluent Forms” plugin.
- Click “Install.”
- Activate the plugin when installation is complete.
- Enable the payment module and connect to payment gateways.
Fluent Forms has integration with 8 payment gateways: Stripe, PayPal, Mollie, RazorPay, Paystack, Square, Authorize.net, and Paddle. All of these integrations are included in the Fluent Forms Pro plan.
Out of these, 2 payment gateways support subscription payment: Stripe and PayPal.
Fluent Forms’ free version offers integration with Stripe (you can accept both one-time & recurring payments); however, there’s a 1.9% charge per transaction.
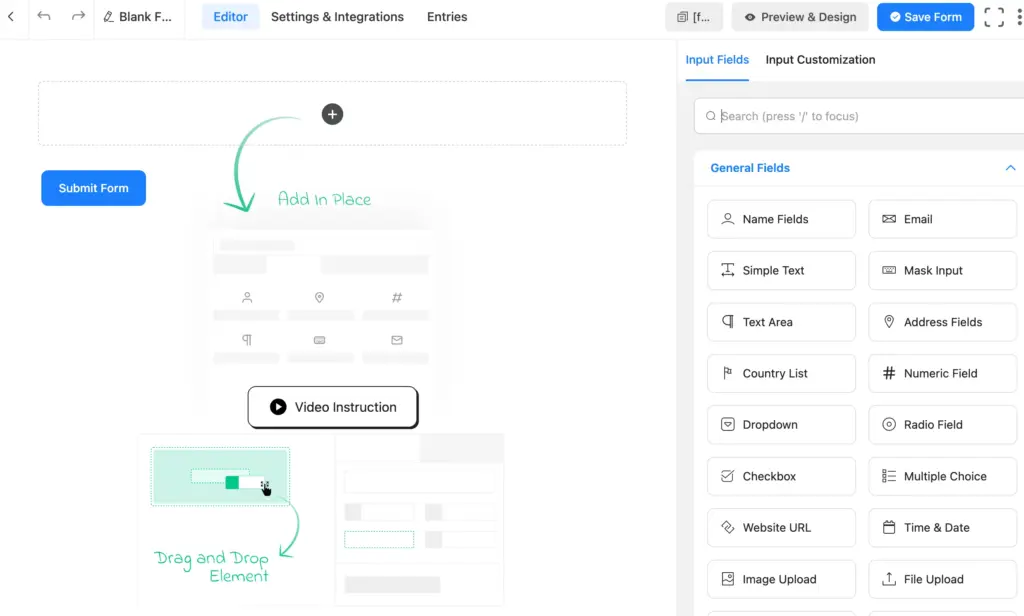
Now, let’s move on to creating our form. Navigate to Fluent Forms > New Form > New Blank Form from your left-hand menu.

It’ll lead you to the form editor tab. You’ll find the input fields on the right side in four categories: general fields, advanced fields, containers, and payment fields. Start by renaming your form from the top left corner.
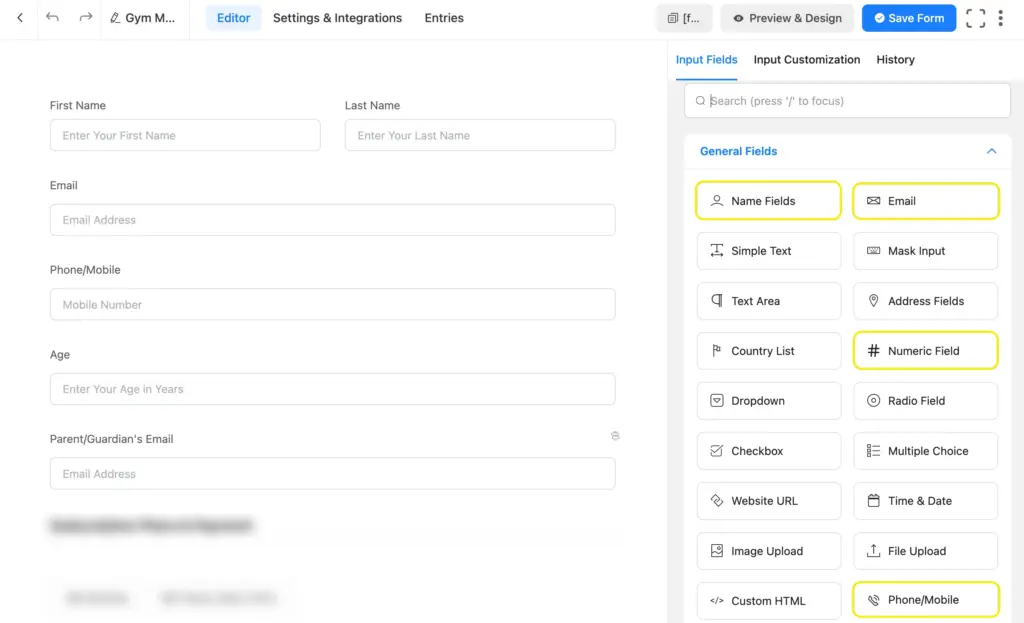
Then add the necessary fields to collect vital client information, like name, contact information (email, phone), age (numeric field or a date field for collecting birth date), etc.
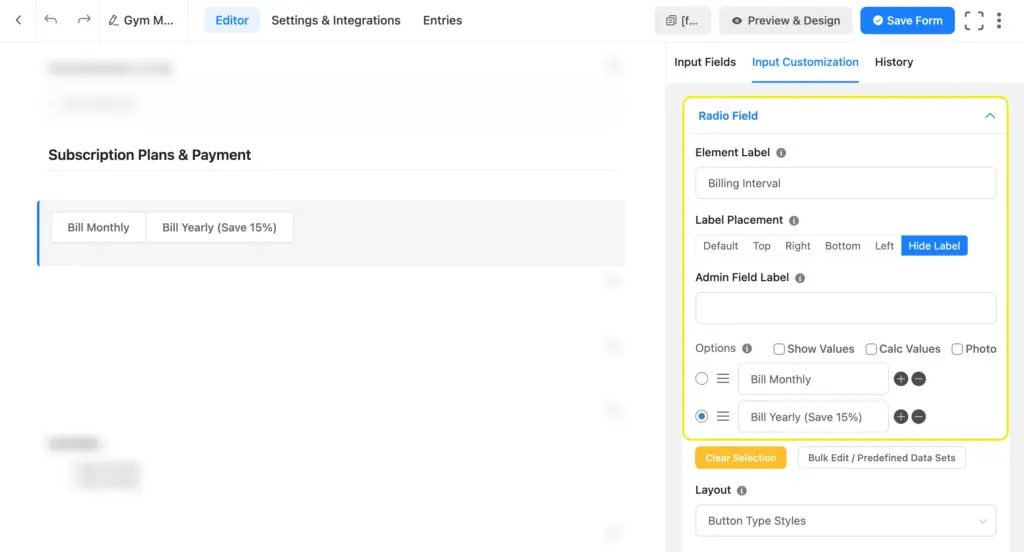
The next section is selecting membership plans & payment. You can take a section break field to guide users smoothly from one section to another. Take a radio field next to let users choose between monthly and yearly pricing plans.
After that, take a subscription field from the payment fields section.
Now let’s see how to configure the pricing plans:
- Plan Name: Appears as a radio/dropdown option for users to choose from
- Price: The price that you assign to this plan
- Billing Interval: Select the billing frequency (daily/weekly/monthly/yearly) from the dropdown options. Choose “monthly” in each plan for this field (as these plans will be displayed when the user chooses to pay monthly).
- Enable User Input Amount: Check this box if you want users to decide the payment amount (suitable for donation forms, fundraisers, etc.).
- Has Signup Fee: Toggle this on and set a price if you want there to be a signup fee.
- Has Trial Days: Toggle this on and write the number of days for which you want to offer a free trial period.
- Total Billing Times: Limit the number of total billing cycles by adding a number here. Leave it empty if you want users to keep paying indefinitely.
- Add New Plan button: Click it to add another plan, and repeat this configuration process.
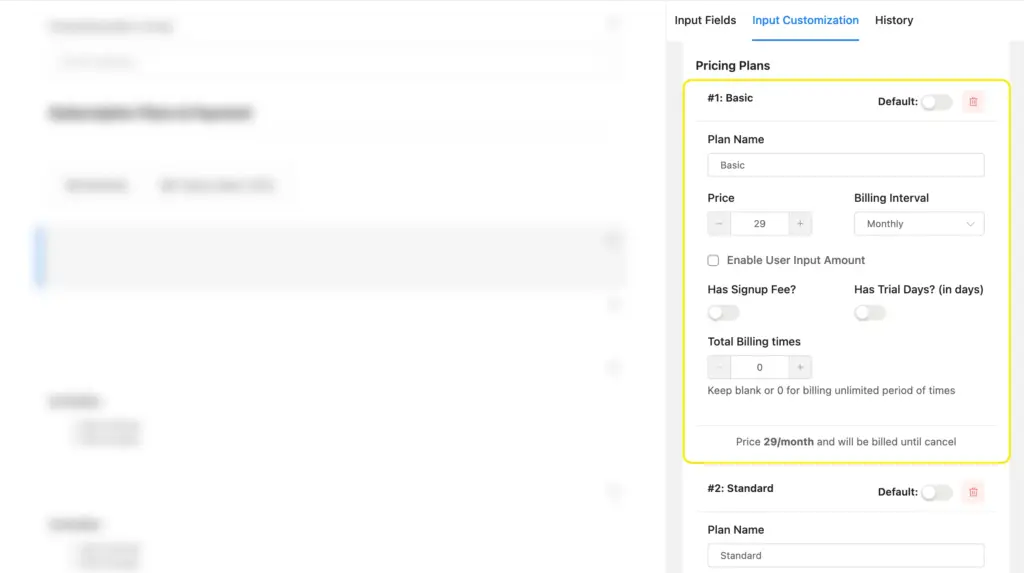
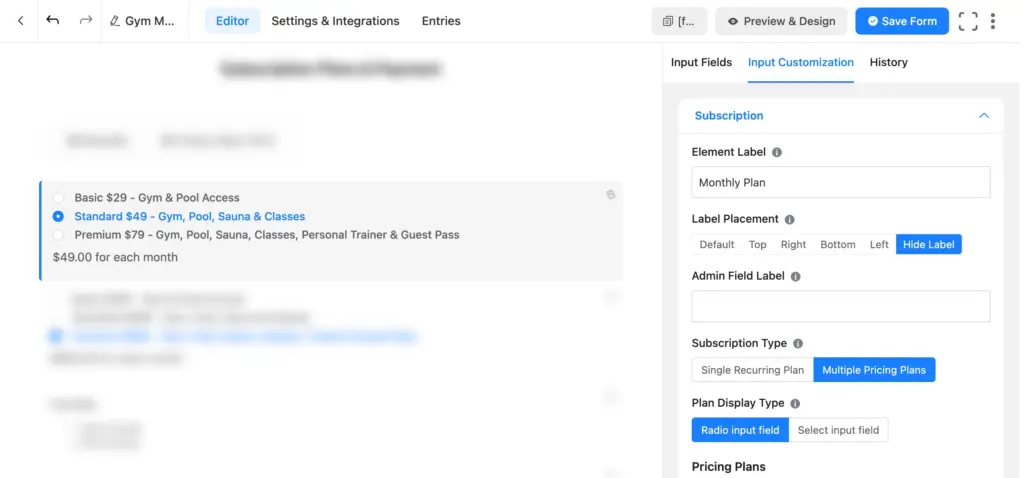
I added three plans in the subscription field: basic, standard, and premium. Each plan has different pricing, but the billing interval is the same for all of these (monthly).
Next, take another subscription field and configure it for yearly payment plans. I kept the same three plans/tiers as those of the monthly. For the price, I listed 85% of the monthly price times 12 (as I’m offering a 15% discount on yearly payments). Set the price that works for you. Keep the billing interval “yearly” across all plans in this field.
In the next part, I have to link the monthly subscription tiers to the monthly plan and the yearly plans to the yearly option in the radio field. Scroll down to the “Advanced Options” from the subscription field’s (monthly) input customization. Check “yes” under conditional logic. In the condition match section, select the radio field’s label in the first box, “equal” in the second, and the “monthly” option in the third.
This creates a logic like this: show this monthly subscription field if users select “Bill Monthly” in the Monthly/Yearly radio field.
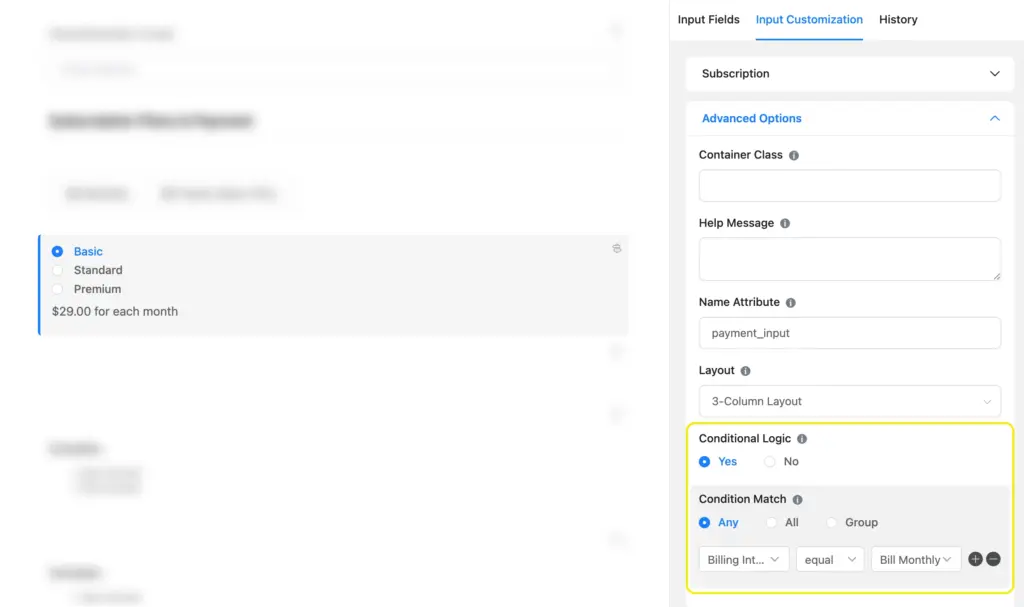
Repeat this process to conditionally link the yearly plans to the radio field’s “yearly” option as well, and your plans/subscription section is ready.
However, I’m going to show what each plan includes using custom HTML fields (visually editable). There’ll be 3 custom HTML fields covering the perks of the basic, standard, and premium plans. I’ll then conditionally link each custom HTML field to its corresponding subscription plan.
The condition application is the same as before. However, there are two equations because we want to show the same amenities when users select a certain plan from either the monthly or yearly billing options.
Select “any” under the condition match (that will show this field when any of the conditions are met). We put the value of the subscription plans in the third box of the equations; you’ll find this value by inspecting the options in the form preview.
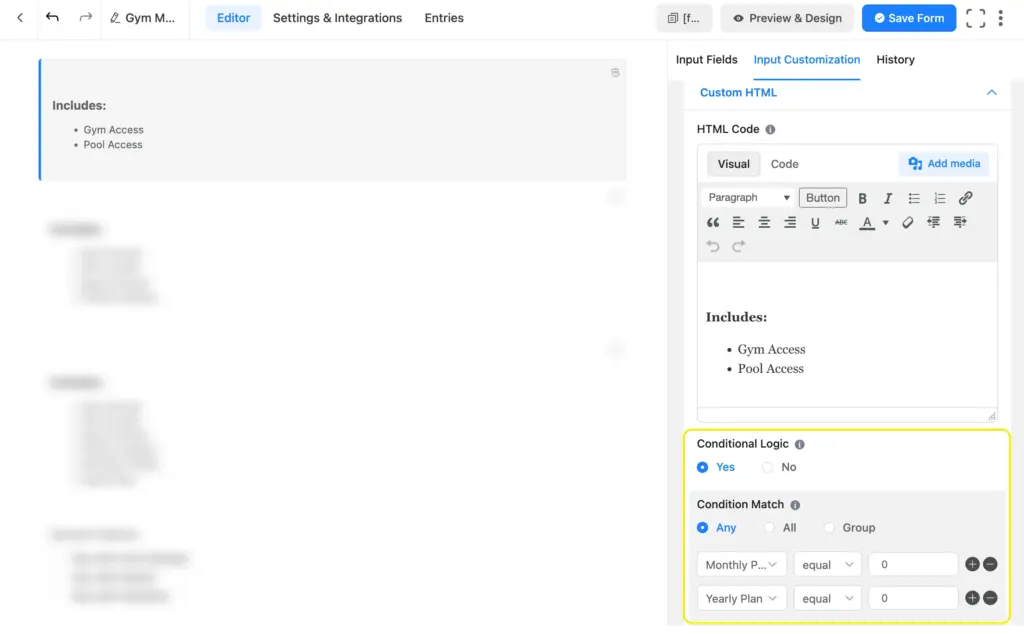
However, this step is optional. You can simply include the perks in the plan name to show them in the form. You can show them outside the form as well (as a static message).
Finally, we’ll add the payment method field. All your active payment integrations (gateways) will show as options in the input customization section. Check the gateways that you want to enable for this form.

Finally, add the “terms and conditions” field, and the form is ready. Last but not least, optimize your button text for the form. Make it action-oriented and encouraging. Save the form, and you’re done.
Download this gym membership form template.
Build Smarter Forms for Free

Stop working harder; start taking recurring payments
Recurring payments are one of the simplest ways to bring stability to your business. You focus on retaining the customers you already have while looking for new prospects at a comfortable pace. The steady monthly or yearly payments give you a head start every month/year and add up to a reliable, growing revenue over time.
The setup is super simple as well. As you saw in this tutorial, creating a subscription form in WordPress takes just a few steps. Pick your pricing tiers/plans, connect a payment gateway, and your form automatically collects WordPress subscription payments.
You do not need a massive subscriber base to see results. Even a handful of paying members can make a noticeable difference in your monthly income.
Take what you learned here and build your first recurring payment form. Because the sooner you set it up, the sooner your forms start doing your work for you. So start small, give your customers a reason to stay, and adjust the strategy as you go.
Let me know how it goes or if you have any questions along the way!

Sarika writes for Fluent Forms and loves to offer insights into small businesses. She's curious and enjoys discussing ideas, interests, and perspectives. In her free time, she's either marvelling at architectural beauties or trying different cuisines.


Leave a Reply