How To Create a Searchable Database on a WordPress Site
You need a way to collect and find data on your WordPress site without the hassle. The good news? You can build a fully searchable database in minutes using the right tools.
This guide will walk you through exactly how to set it up, step by step, using a powerful two-part system:
The Backend Database: For you, the admin, to search and manage everything.
The Frontend Database: For your visitors to search and filter data publicly.
First, let’s quickly cover the “why.” A default WordPress database just stores information. A searchable database lets you instantly find, filter, and use that information. It’s the difference between a locked filing cabinet and a digital command center.
What you’ll need:
Fluent Forms (Free or Pro)
Ninja Tables Pro (To show the database in the frontend)
TL;DR
- You can create a searchable database in WordPress without custom code using Fluent Forms.
- Fluent Forms works as a backend database by default. It collects structured data through forms and lets you search, filter, sort, and export entries directly from the WordPress dashboard. For many use cases, this is all you need.
- If you also want visitors to search or filter that data on the frontend, you can optionally connect Fluent Forms with Ninja Tables Pro to display entries in a searchable table. This step is not required for backend-only databases.
- This setup works well for member directories, inventories, applications, event registrations, and internal databases. Fluent Forms handles data collection and admin control. Ninja Tables handles public display and search.
- If you need a searchable backend and a flexible frontend database, this two-plugin approach keeps things fast, clean, and maintainable without over-engineering.
Difference between searchable database vs default WordPress database
The default WordPress database stores your data, but it’s not easy to search or use. You’d need technical tools to dig through it.
A searchable database is different. It lets you instantly find, filter, and view your form submissions – both in your admin dashboard and on your live site. Think of it as a smart, user-friendly version of the default one.
Other Ways to create a searchable database (And why we chose this approach)
You have three main paths to build a searchable database in WordPress. Each has its place, so let’s break them down simply.
Option 1: Code from scratch. This is the most flexible but also the most demanding path. You’d write custom PHP and MySQL to build a database tailored to your exact needs. The downside? It requires serious development skills, ongoing maintenance, and any future changes mean diving back into code. For most users, this is overkill.
Option 2: Use a single plugin with built-in display features. Some form builders claim to handle both backend management and frontend display in one package. The problem is, those frontend features often require expensive add-ons or leave you with limited customization and slower performance.
Option 3: Use a form plugin. This is the approach we recommend. Use Fluent Forms for robust data collection and use as a backend searchable database. Then connect it to Ninja Tables Pro for a clean, fast, searchable frontend display. Each tool does one thing exceptionally well, they integrate seamlessly, and the total cost is often lower than the premium add-ons other form plugins charge.
By pairing Fluent Forms with Ninja Tables Pro, you get powerful backend management without sacrificing frontend flexibility. It’s the most balanced, affordable, and maintainable solution for most WordPress sites.
Create a searchable WordPress database with a form plugin
Using a plugin to create our searchable database is the easiest solution at hand. We can use a database plugin or a form plugin to do this.
A database plugin is good, but a form plugin like Fluent Forms provides some added functionalities, such as:
- Collect data with advanced forms
- A user interface/dashboard to search, sort and filter data through forms, fields, and search functions
- Tools to visualize data
I hope you already know about all the preparations, let’s get to the action.
Your backend database – manage data with Fluent Forms
This is your private, all-access control panel. Fluent Forms not only collects your data but also gives you a powerful dashboard to search and manage every single entry.
Step 1: Collect your data with a smart form
First, we need to collect the data in an organized way.
Go to Fluent Forms > Add New Form in your WordPress dashboard.
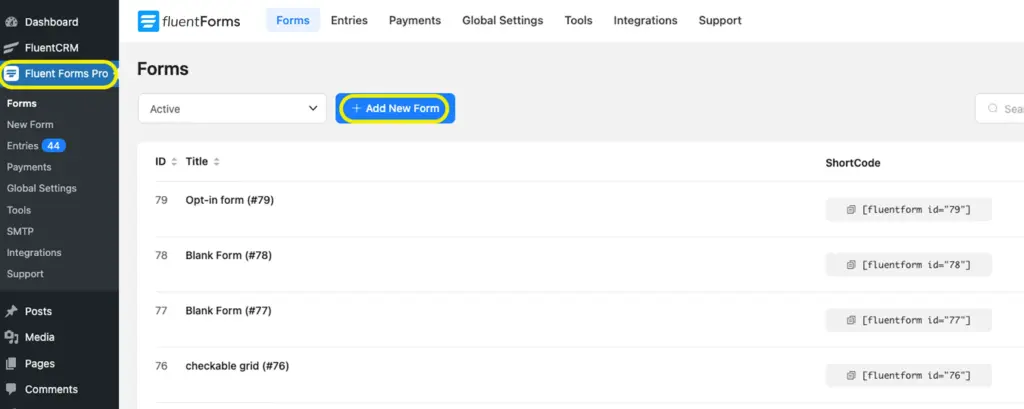
Use the drag-and-drop builder to add the fields you need (Name, Email, etc.).
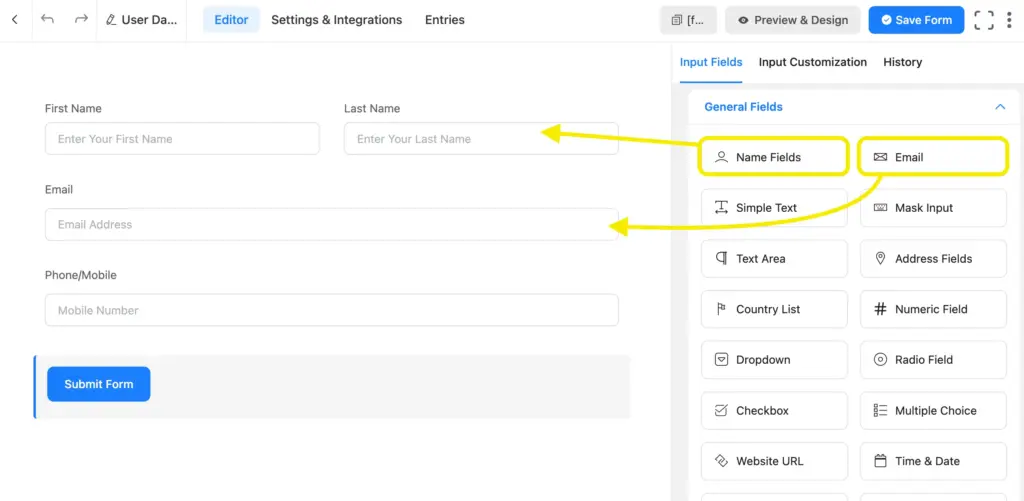
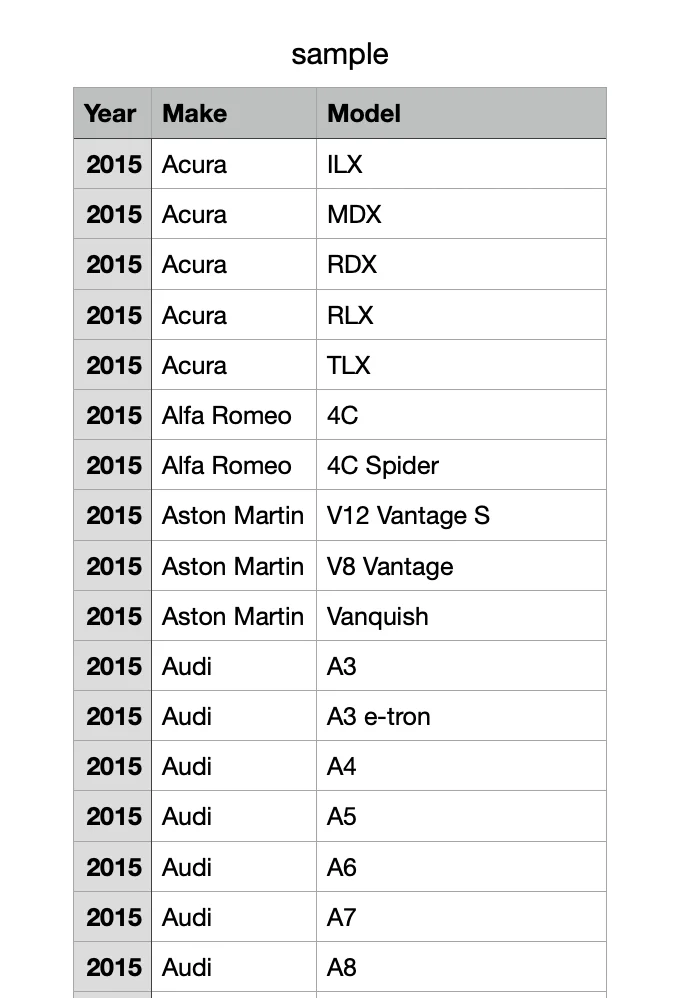
Pro Tip for Structured Data: Use the Chained Select field for dependent dropdowns. This is perfect for things like a vehicle directory (Year > Make > Model) or a gym membership form.
Upload a simple CSV, and the form will guide users through the selections, keeping your data clean and structured from the start.
Once your form is ready, publish it on any page.
Every submission will automatically land in your secure backend database.
The data collection method can be further streamlined if you use dynamic fields. I’m dropping the tutorial here, just in case you need it.
Step 2: Search and manage your entries
This is where you can see the power of your backend database.
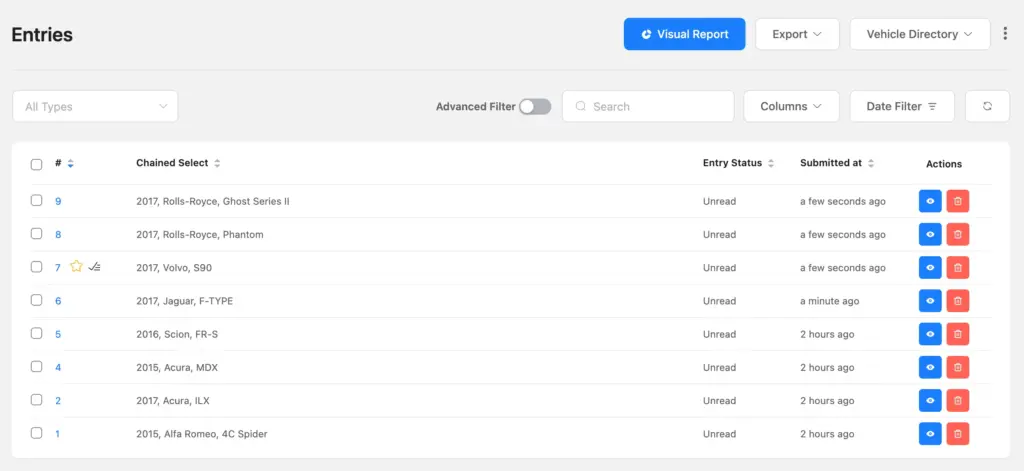
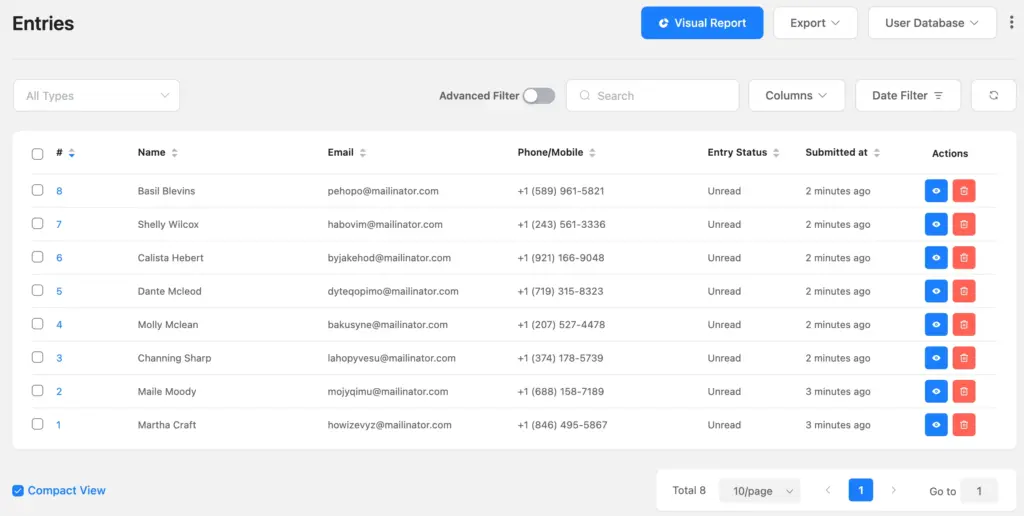
Go to Fluent Forms > All Forms, find your form, and click on Entries.
You’ll see a clean table with all your submissions. From here, you can use the global search bar to find entries by keyword.
For a deeper dive, use the advanced tools:
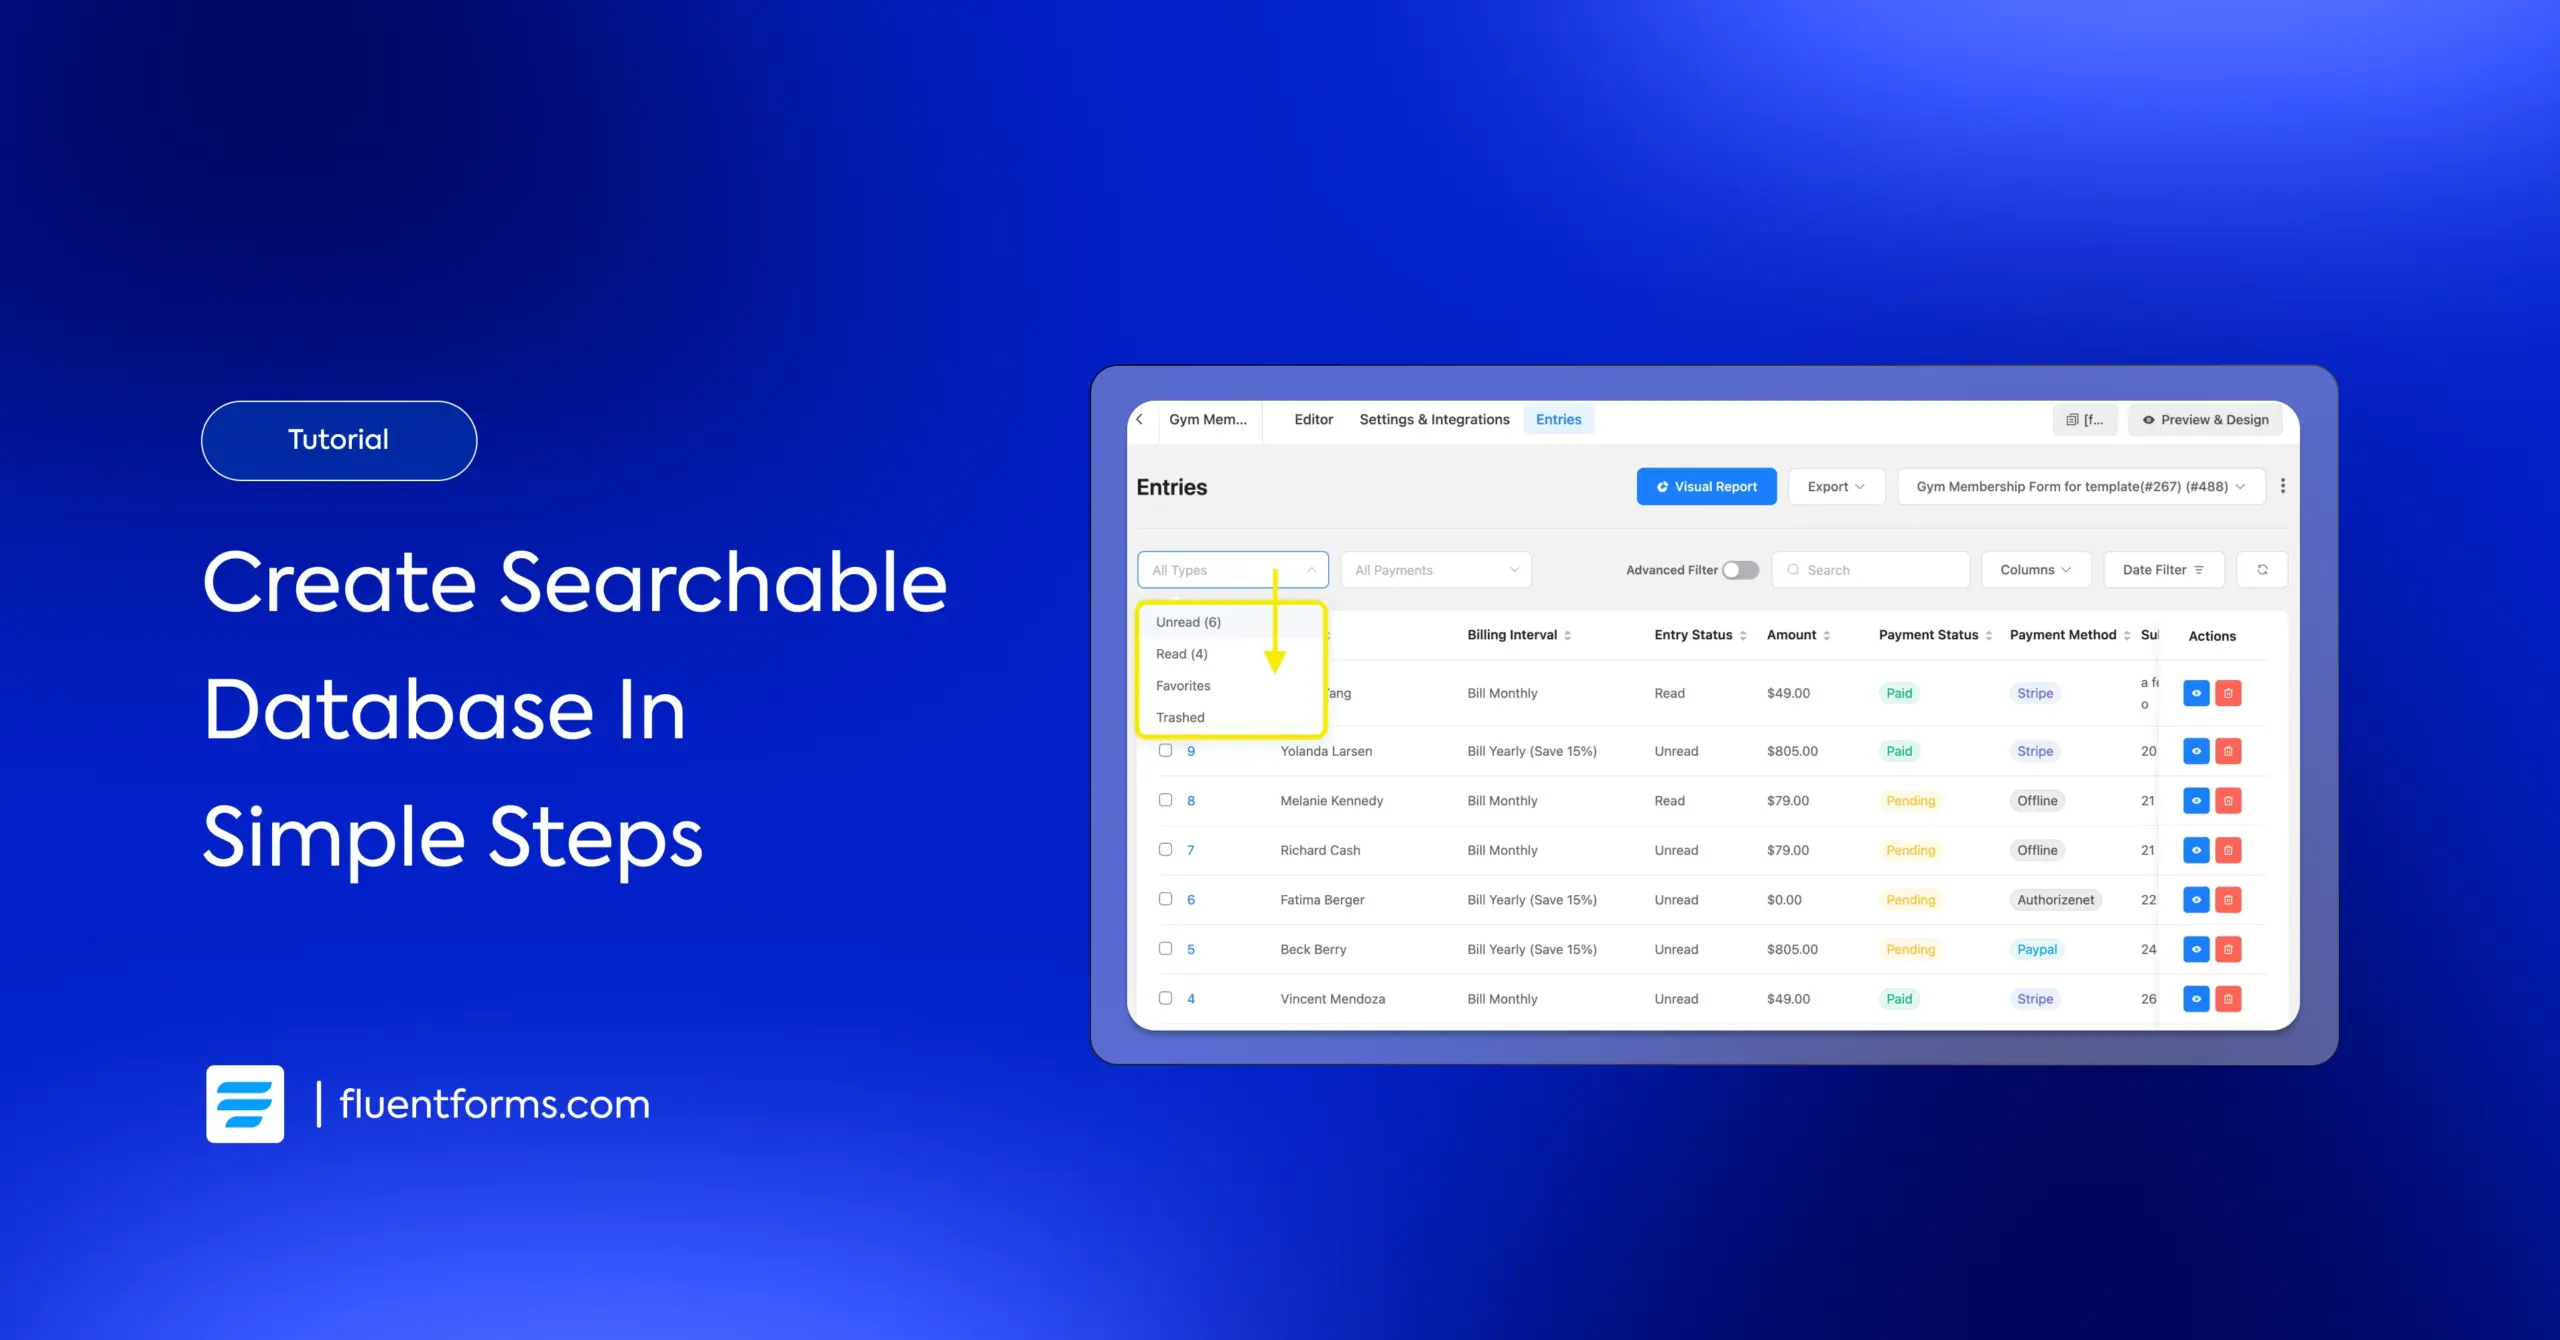
I’ve used a Gym Membership Form, in which I will demonstrate the overall database, usage of advanced filters, and other features for both the backend and frontend.
Let’s think about creating a database of the gym members, including their name, emails, and payment details for better sorting. Go to the Entries section of the specific form first.
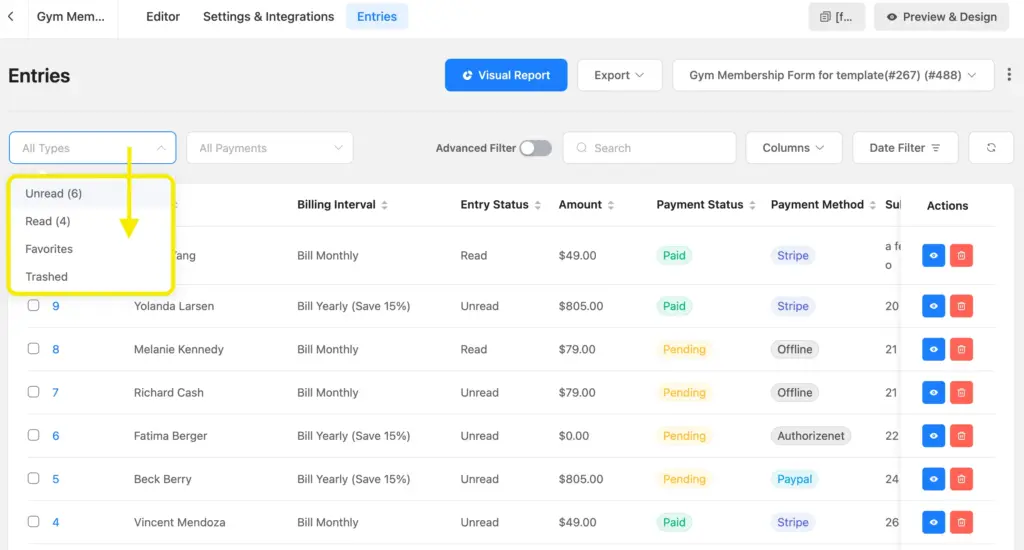
Then, filter by type: Show only “Read,” “Unread,” “Favorites,” or “Trashed” entries.
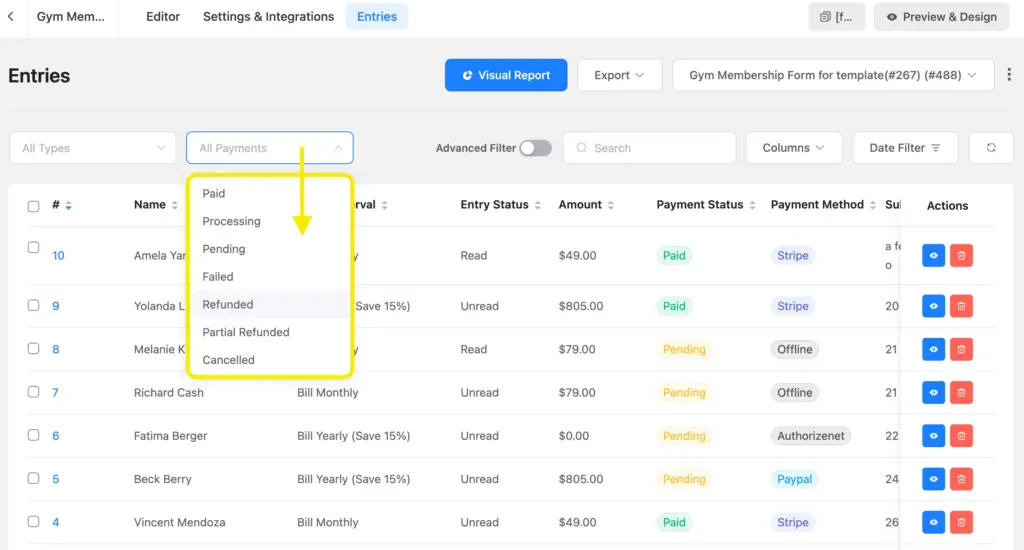
Filter by payment status: If you’re using payments, find “Paid,” “Pending,” or “Failed” transactions instantly.
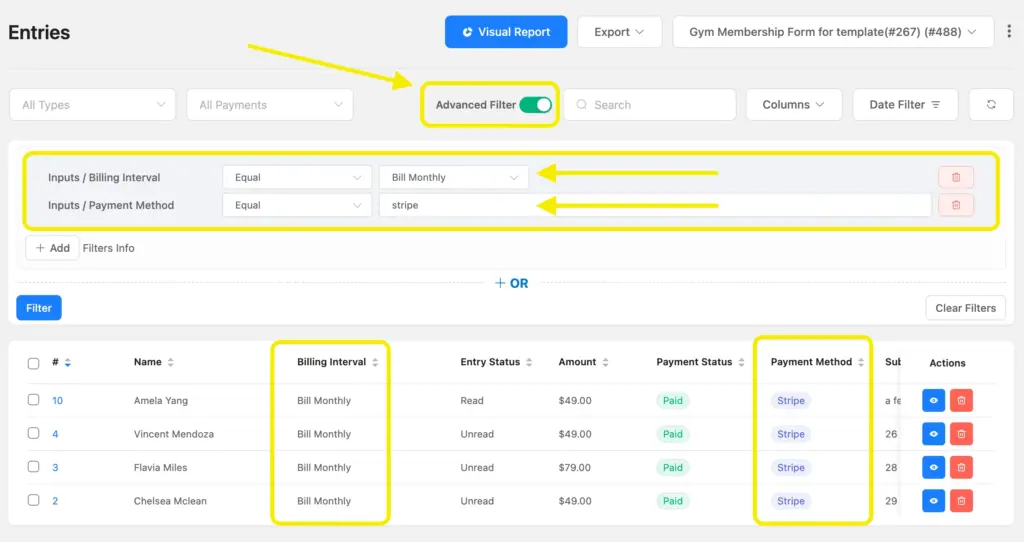
Use the Advanced Filter toggle: This is incredibly powerful. You can create grouped conditions like –
Billing Interval is ‘Monthly’ AND Payment Method is ‘Stripe’.
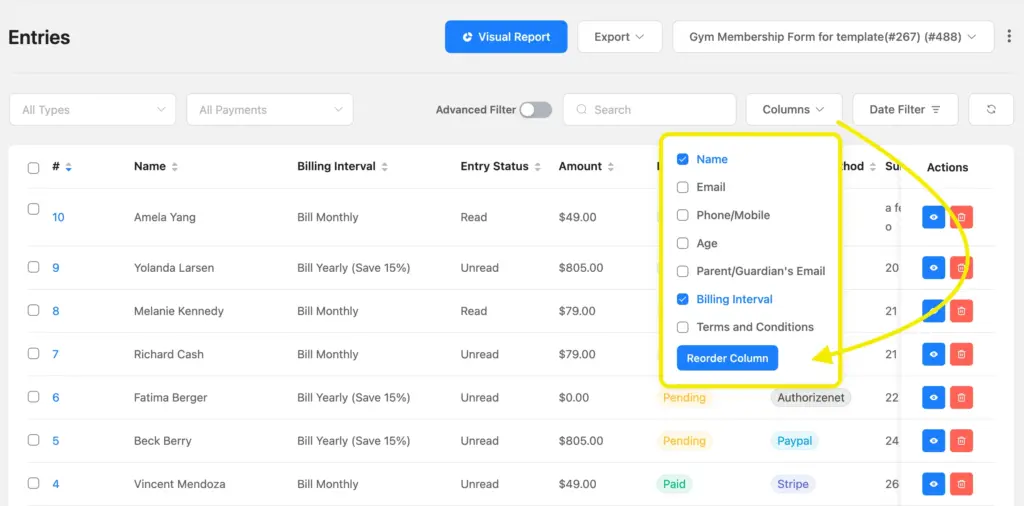
Customize columns: Choose exactly which form fields you want to see in your dashboard.
Export: Download your filtered data as a CSV, XLSX, ODS, or JSON file with one click. Select which field entries you want in your exported data and export.
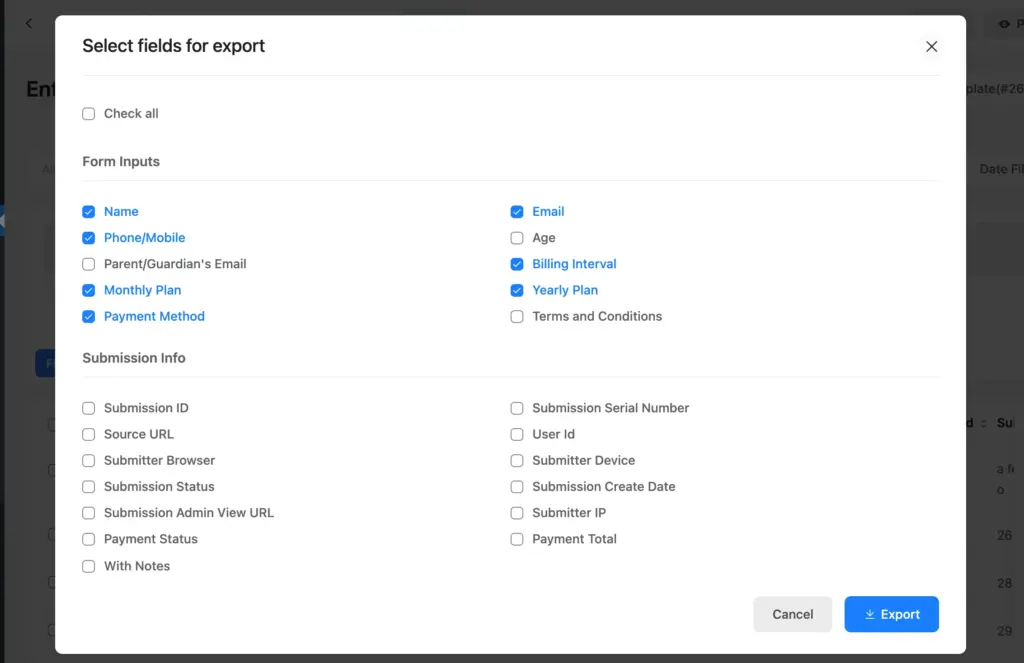
This is how your downloaded entries will look like –

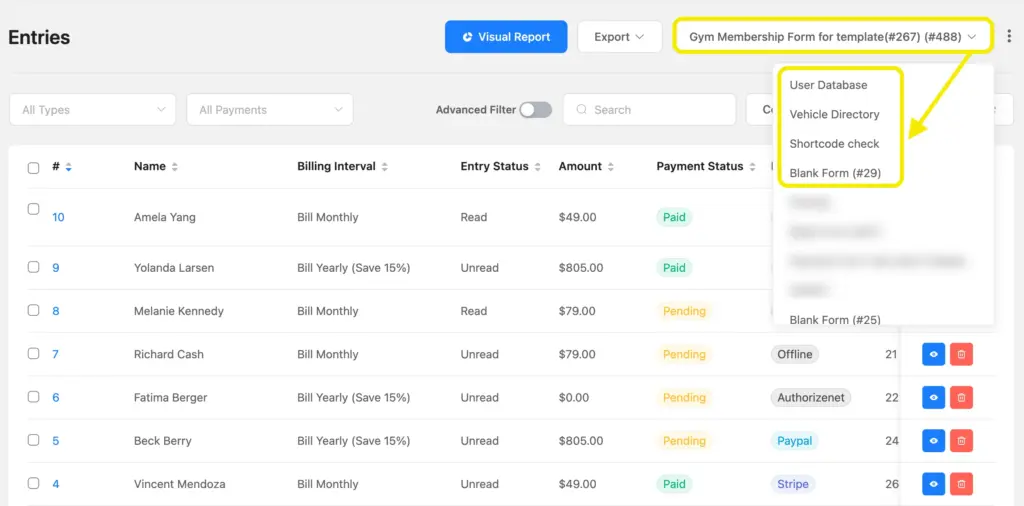
You can also access other forms entries from here:
This is your complete administrative command center, built right into WordPress.
Your Frontend Database – Display Data with Ninja Tables Pro
Now, let’s take that data and make it searchable for your visitors, clients, or team members on the live site. We’ll use the Ninja Tables integration with Fluent Forms in this case.
Step 1: Connect your form to a table
This step bridges the gap between your backend data and your frontend display.
Go to Ninja Tables > Create a New Table.
Select the “Connect Fluent Forms” option.
Give your new table a title (e.g., “Gym”).
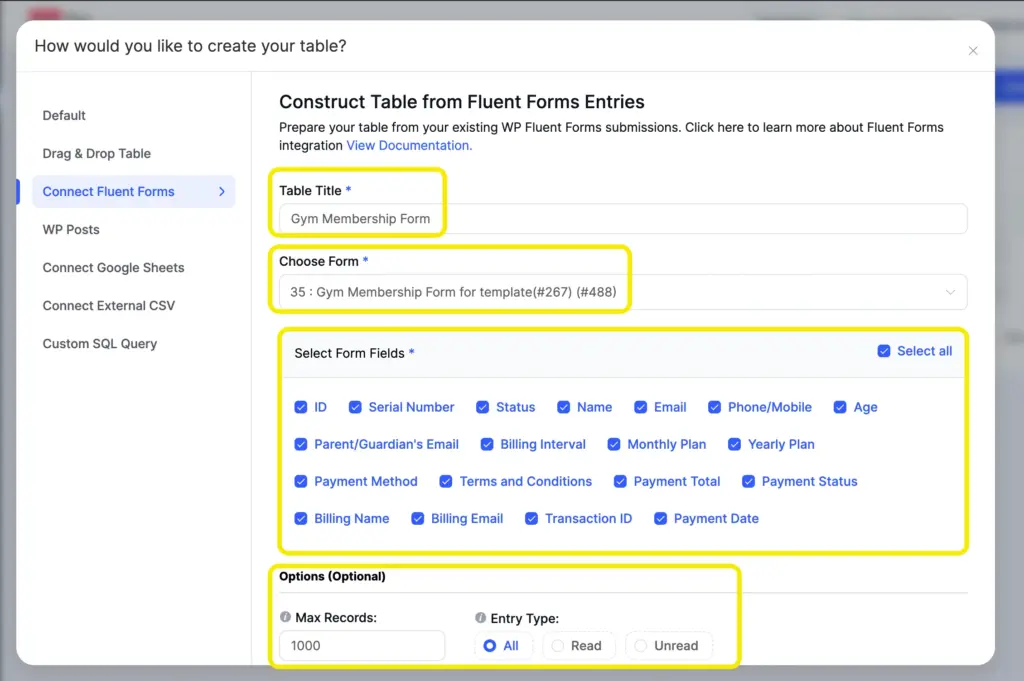
From the dropdown, choose the form you want to pull data from. You can also select the number of entries you want to get on the table.
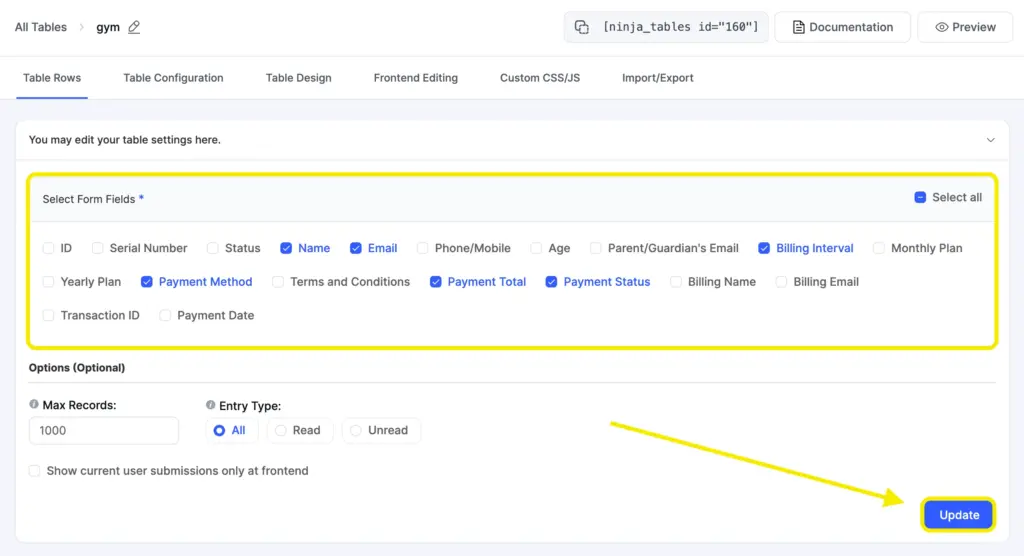
Step 2: Configure your table columns
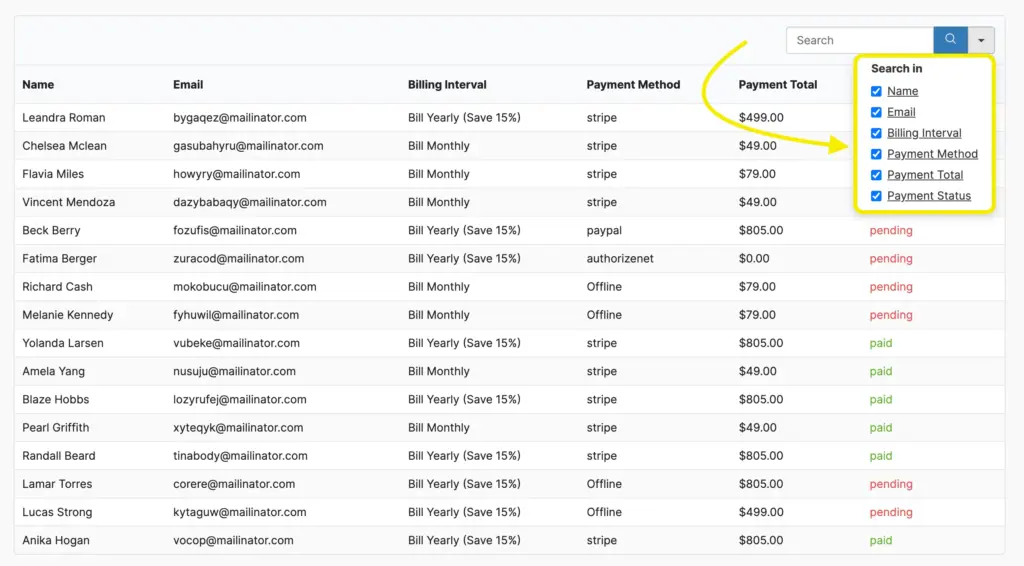
Ninja Tables will display all the fields from your form. Now, you decide what the public sees.
Tick the checkboxes next to the fields you want to display as columns (e.g., Name, Membership Type).
Uncheck any internal fields you want to keep private (e.g., Submission ID, User IP).
Click “Update.” Your table is now live and populated with all your form submissions!
Step 3: Enable frontend search & filters
This is where the magic happens for your visitors. In the Ninja Tables editor, go to the “Table Configuration” tab.
Find the “Table Design” section and make sure “Enable the visitor to filter or search the table” and
“Enable sorting of the table by the visitor” is toggled ON.
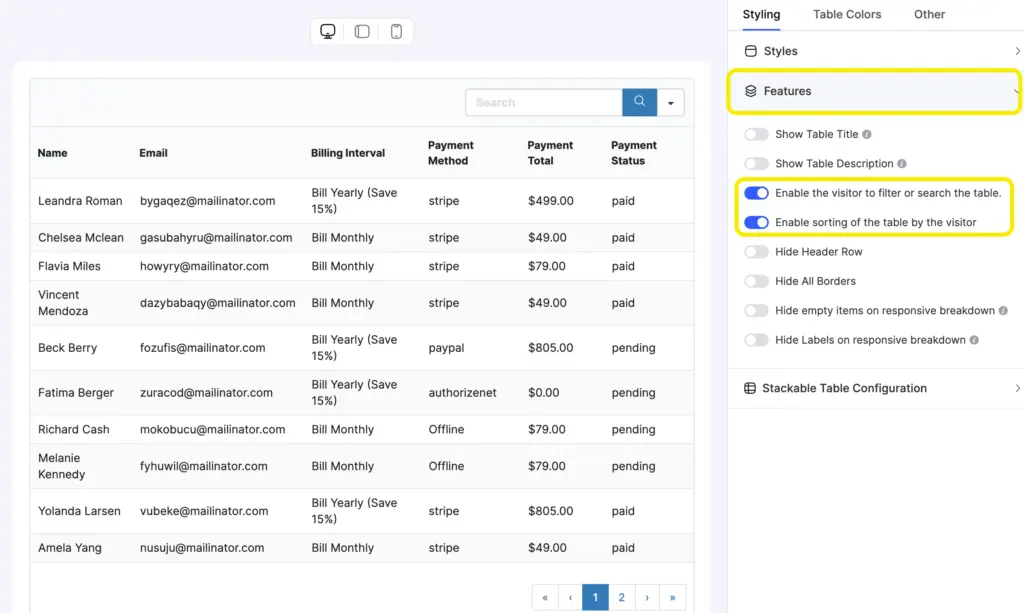
For even more power, enable “Custom Filters” to let users filter the table by specific columns, like finding everyone who has “paid” the subscription fees.
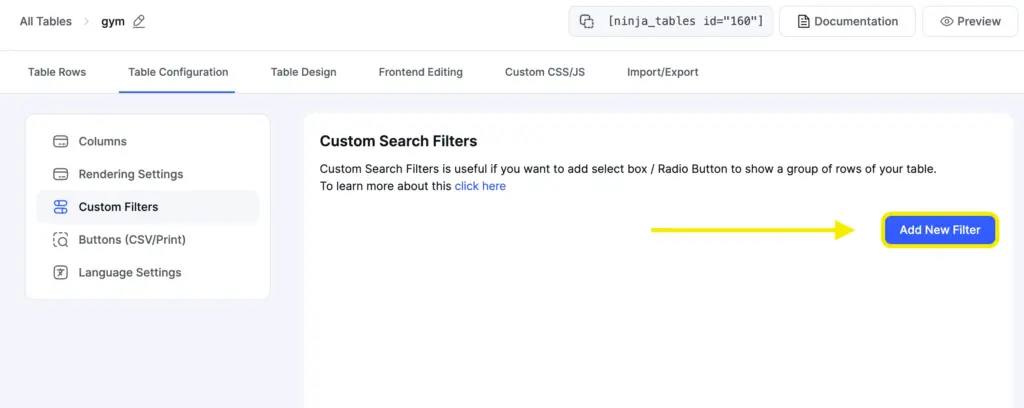
Fill up the necessary details, including – Filter Title, set the Filter UI Type (Radio, Checkbox and other), set values for the filter, and select columns where your filters will be applied. You can also enable strict mode, so that the filters will try to match exact values.
This is the basic setup in the Ninja Tables backend to create your frontend database. Now let’s move on to how the database will be presented to the users, and how much they can do with it.
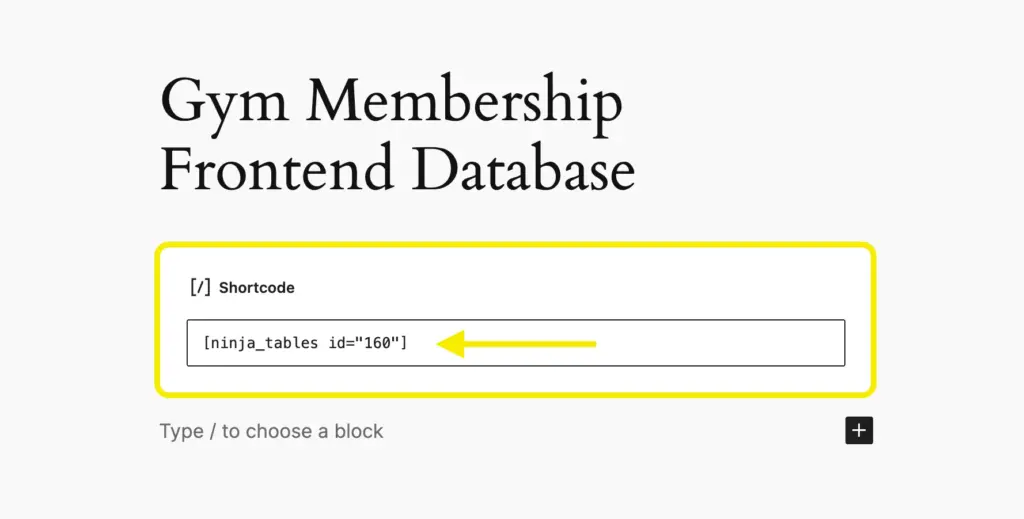
Step 4: Publish your searchable table
Your searchable, filterable table is ready.
Copy the Shortcode provided by Ninja Tables.
Paste it into any WordPress page, post, or widget area.
Now, we’ll view the page and try out if the functions work properly in the frontend. I selected all the columns to be considered within the search filter.
Let’s start with a very basic search. As we didn’t select ‘Strict Mode’ before, we’ll be okay with the capitalization. I searched for the ‘paid’ members in the search bar. And it worked fine.
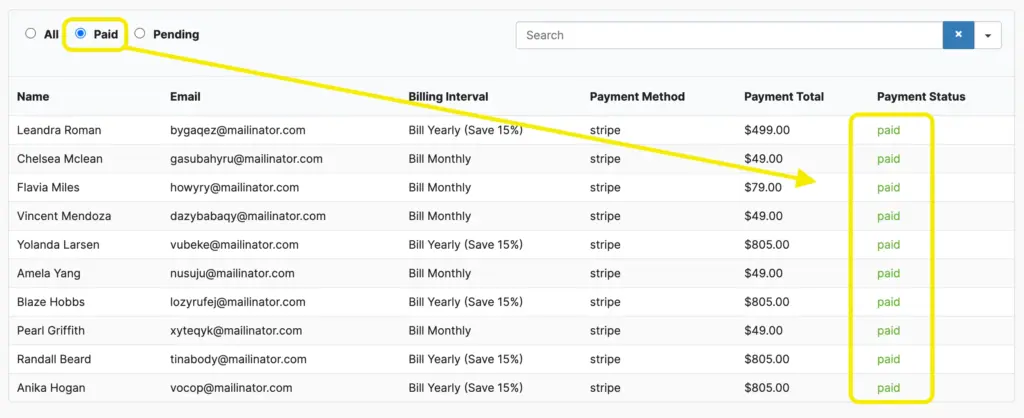
This is a preview where the ‘Custom Filters’ are disabled. When I enabled them, this is how the database will be shown –
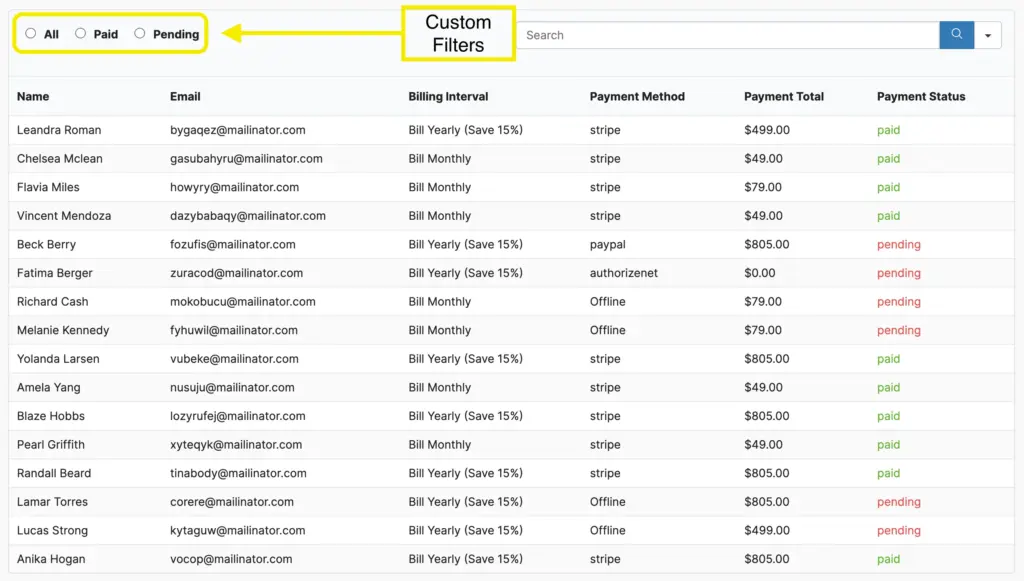
I created two custom filters, Paid and Pending, so that the members can see the payment status for others as well. As I used test mails, it won’t be an issue, but you can hide the emails or payment totals when showing on a live site to protect the privacy.
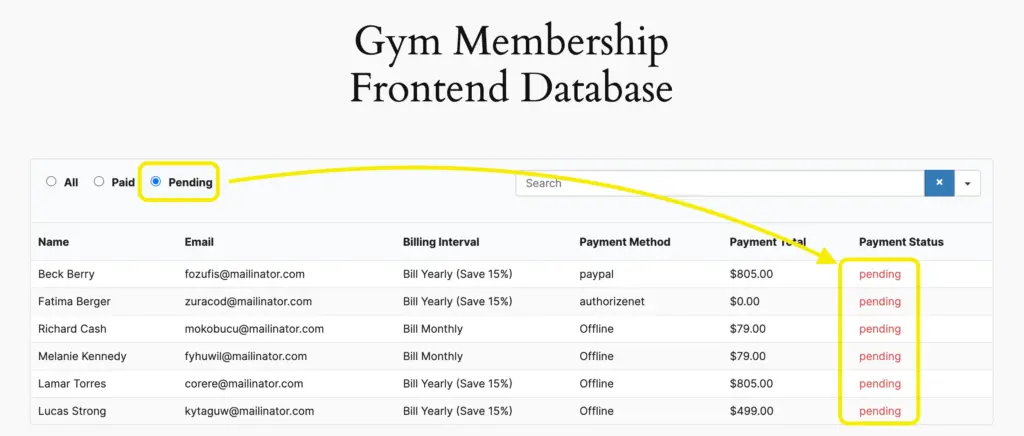
If I wish to check the pending payments from the frontend, I would simply click the ‘Pending’ radio on the table and it’s all sorted –
I guess this much will be enough for now to get started with creating a database.
Your site now has a fully functional frontend database where users can instantly find the information they need.
Enjoying this article?
We regularly publish actionable content on our blog. Subscribe to get them delivered straight to your inbox.
We won’t spam you. You can unsubscribe whenever you want.
Utilize your searchable database
Building a searchable database doesn’t have to be complicated. By pairing Fluent Forms with Ninja Tables Pro, you get the best of both worlds: powerful backend management and a clean, user-friendly frontend display.
Each tool handles its role perfectly. They integrate seamlessly, and you avoid the bloat and high costs of plugins that try to do everything at once.
So, what can you actually do with this system? Plenty.
Use it to build a member directory where visitors search by name, membership type, or location. Create an inventory tracker that your team updates through forms and searches through tables. Set up a job application system where applicants submit details through a form and your hiring team filters candidates by experience, skills, or status. Build an event registration database that lets you manage attendees privately while displaying session schedules publicly.
The possibilities extend to customer support ticket tracking, volunteer coordination, product catalogs, course enrollment systems, and much more. Any situation where you need to collect structured data and make it searchable fits perfectly with this setup.
Start building your searchable database today. Your data (and your users) will thank you.

This is Sumit. He’s a physics major who’s trying to understand both the physical as well as the WordPress worlds. Whenever he’s not busy, plays fifa or spends time with his family.


Leave a Reply