How to Create an RSVP Form for Your Big Event
Whether you’re planning to host your son’s birthday, a big celebration, a baby dedication, a gender reveal, a weekend dinner party, or an intimate party, you surely want it to be a big success, right? Then ensuring your invited guests’ RSVP is a must.
You may find many RSVP free form templates online, but one thing is for sure it won’t be the best fit for your occasion. Why search and modify any RSVP form to get what you need when you can simply make beautiful and functional RSVP forms without any coding knowledge at all?
Fluent Forms is the most beginner-friendly form builder. Download now and start crafting beautiful forms FREE!!!
What’s an RSVP form
I bet many of you don’t know what RSVP actually means. RSVP is an acronym that stands for “répondez s’il vous plaît.” It’s a French phrase that means Please respond or Please reply.
When you send out your invitation, the next thing you expect is your guests’ response confirming their availability/unavailability to attend. So that, you get to know the number of people is going to come, if they bring plus one or not, what would they prefer to have for food and drinks.
To ensure to get your guests’ RSVPs, you need to make it easy for them to reply. And the easiest way to achieve that is by Fluent Forms. You can create beautiful, functional, and responsive fast forms with this amazing form builder and share them anywhere you want.
What is Fluent Forms
If you search for a form builder, you might have encountered Fluent Forms. This is the most lightweight, fastest, and packed-with-features form builder in the market. With this drag-and-drop WordPress form plugin, you can make any form you want.
Moreover, you’ll get amazing functionalities and third-party integrations that make it a full-fledged marketing tool.
- Conversational forms to get more response
- Partial Entries to capture as many leads as possible
- 50+ input fields to make versatile forms
- 50+ third-party integrations (4000+ via Zapier) to extend your forms functionalities
- Conditional Logic for formatting forms, email notifications, and many more
- Quiz module for different tests and surveys
- Spam protection, instant notification, pdf conversion, custom confirmation, a couple of options to share your form, analyze entries visually, and whatnot.
Furthermore, you won’t see any diversified form builder that can offer these many features and functionalities. Whether a multi-step form, an interactive conversational form, or just a plain old-fashioned form, you can create your RSVP form anytime you want without having any coding knowledge.
4 Easy steps to create an RSVP or Please Reply form
As you get your facts in place, let’s learn how to create an RSVP form without coding.
Step 1: Install Fluent Forms
The very first step would be to install and activate the plugin. Head over to your WordPress site’s dashboard and click on Plugins. Search for Fluent Forms, then Install & Activate it.
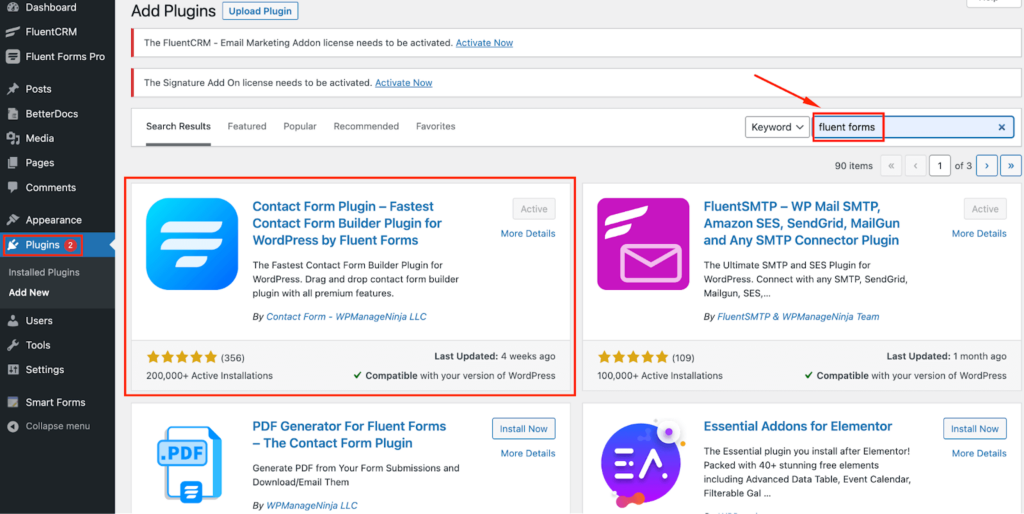
Installing Fluent Forms is like installing any other WordPress plugin. Now you start creating your form.
Step 2: Add necessary fields to your RSVP event
Go to Fluent Forms from the dashboard and click on Add a New Form to create your desired form. If you click on the chevron down arrow key, you’ll see two options: Create Conversational Form & Create Post Form.
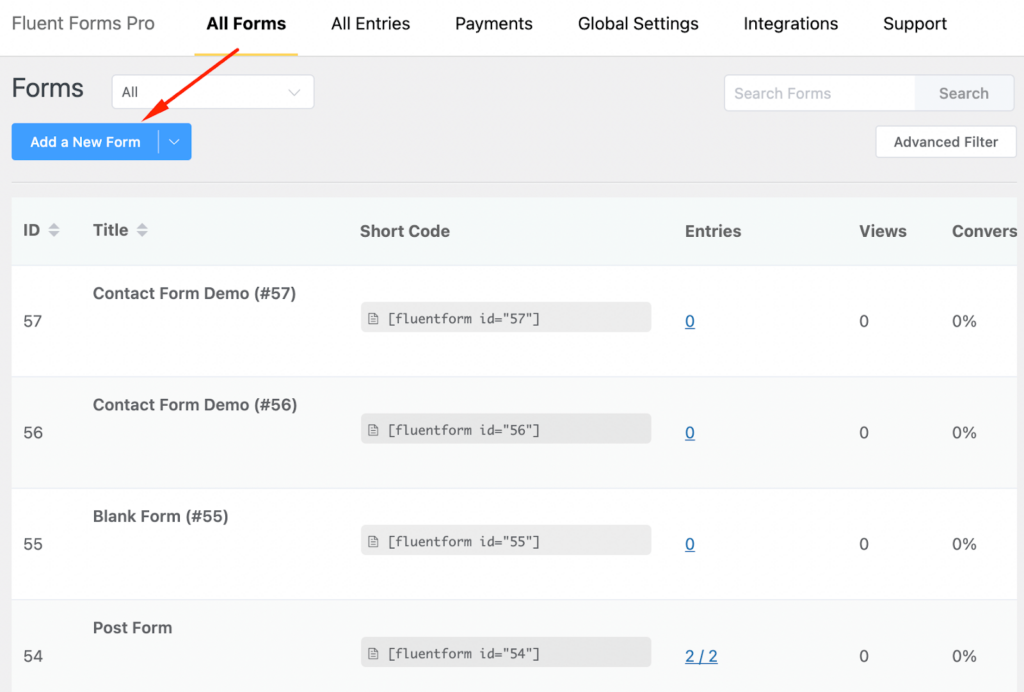
We’ll create a normal form first, Fluent Forms allows you to convert your forms into Conversational Forms anytime you want.
Step 3: Customize your RSVP form
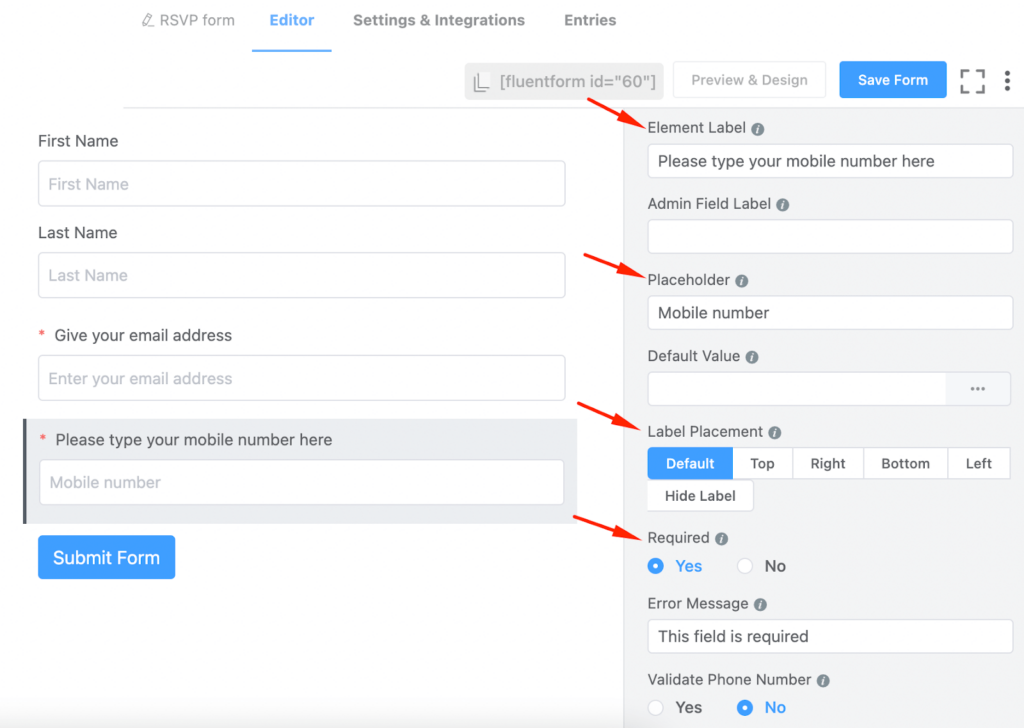
You’ll see 50+ input fields on the right side of your screen in 4 categories. To create an RSVP event form, we’ll add the Name, Email, and Phone fields first. You can customize these form fields, for instance, add/remove the middle name option, change the label placement, rename the placeholder, make any field mandatory to fill, and so on.
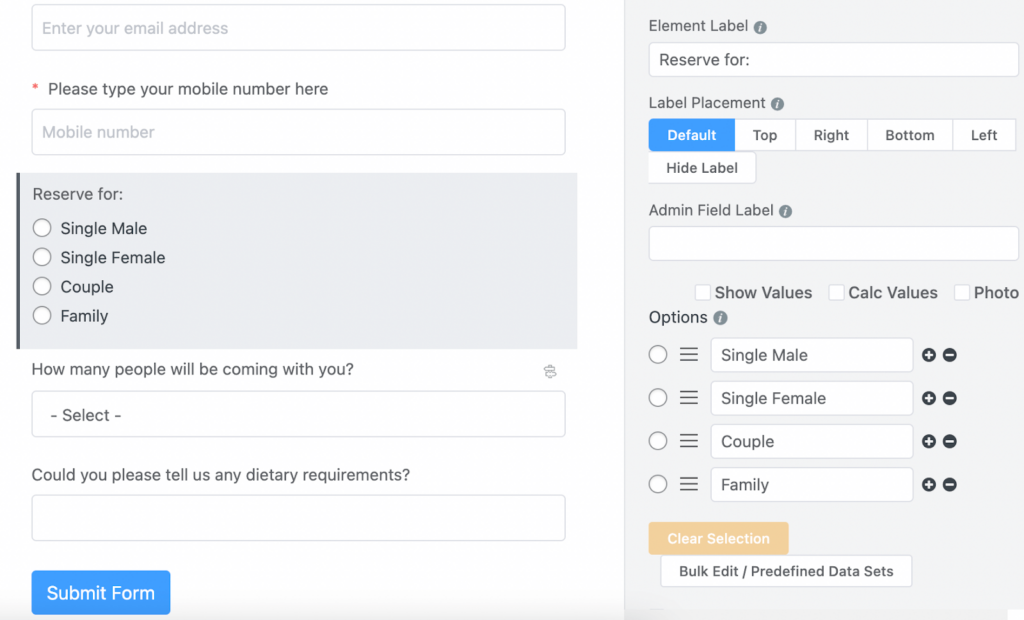
Now to spice up, add other required fields for your Please Reply form. We added 3 fields – Radio Field to know how many people will come, Dropdown Field for knowing the number of family members he/she will come with, and Simple Text Field to learn about the dietary requirements
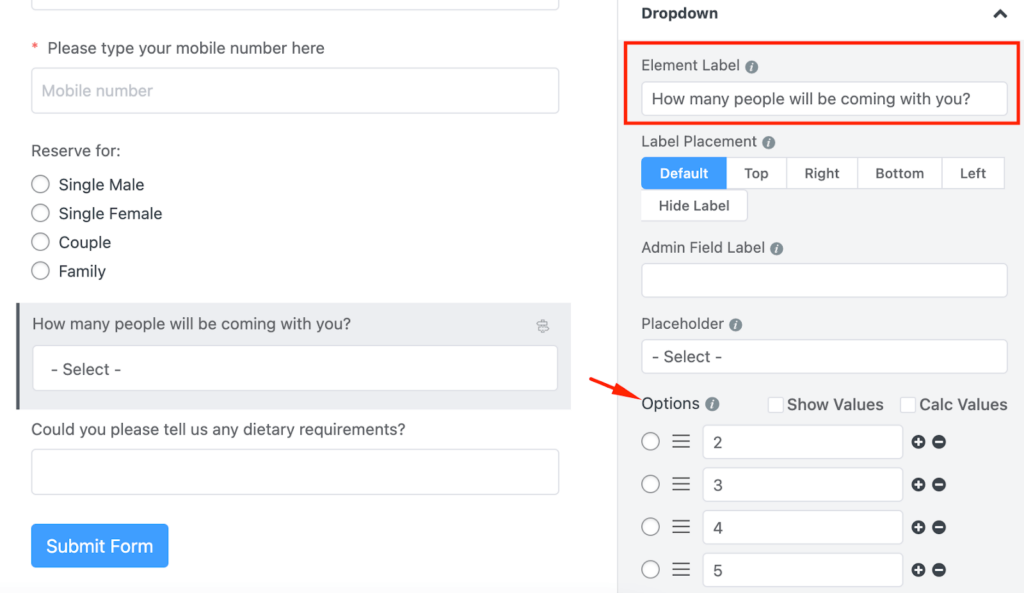
You can use Conditional Logic to make your form more dynamic. Usually, Conditional Logic helps you to dynamically display or hide this field based on values from another field. We created a dropdown field right after the radio field. Changed the label name to “How many people will be coming with you?” and gave some predefined options to select from.
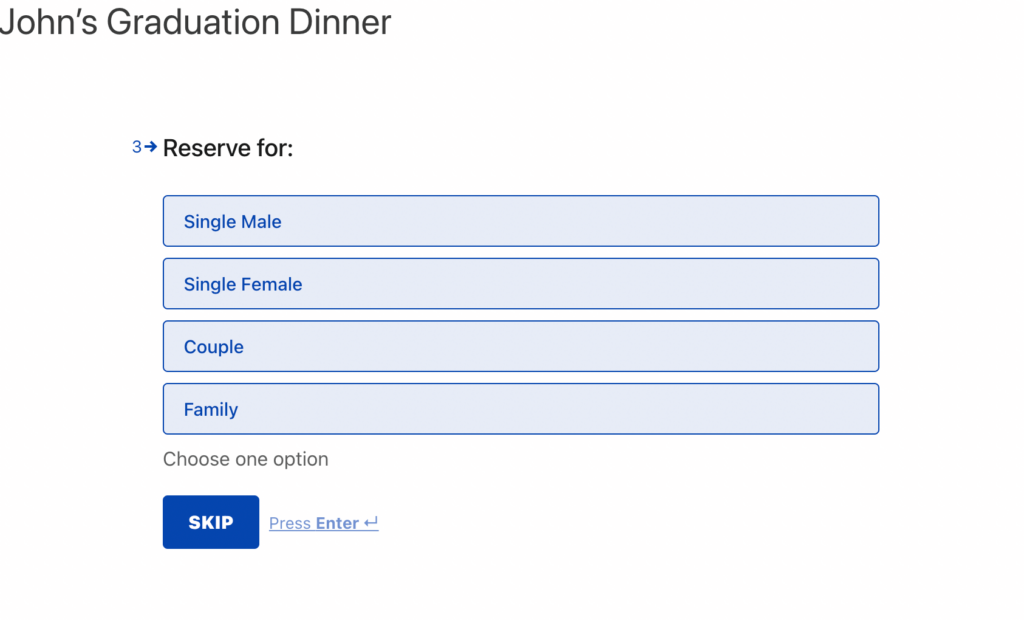
We wanted this field to be visible only if someone selects Family in the “Reserve for” question. For that, select the dropdown field, scroll down from the input customization, and simply click on Advanced Options. At the bottom, you’ll see the Conditional Logic, select Yes and set your condition. We set the condition “Reserve for = Family” according to our plan.
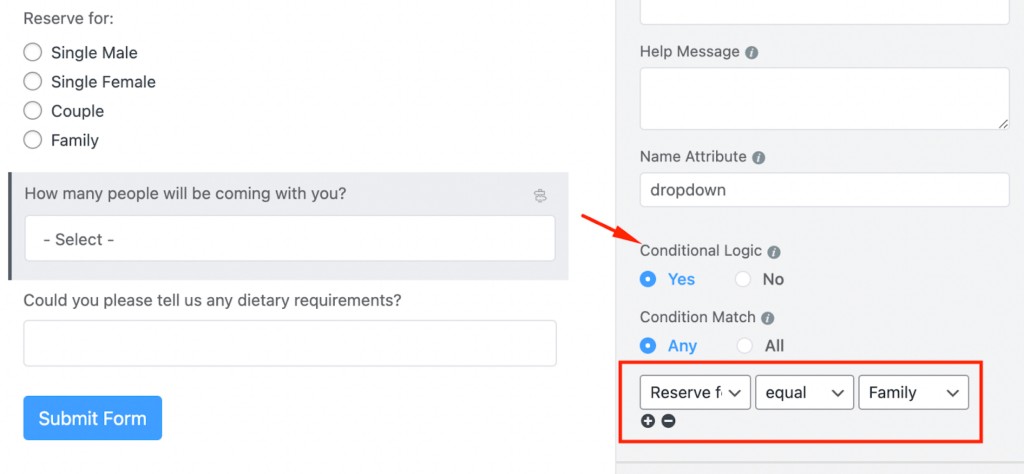
Now, if someone selects Family, only they will see this field. People tend to forget to hit the Save Form button after any modification. Don’t be that guy.
Step 4: Design your RSVP form
After saving your form, if you want to design your form, there’s an option called Preview & Design next to the Save Form button.
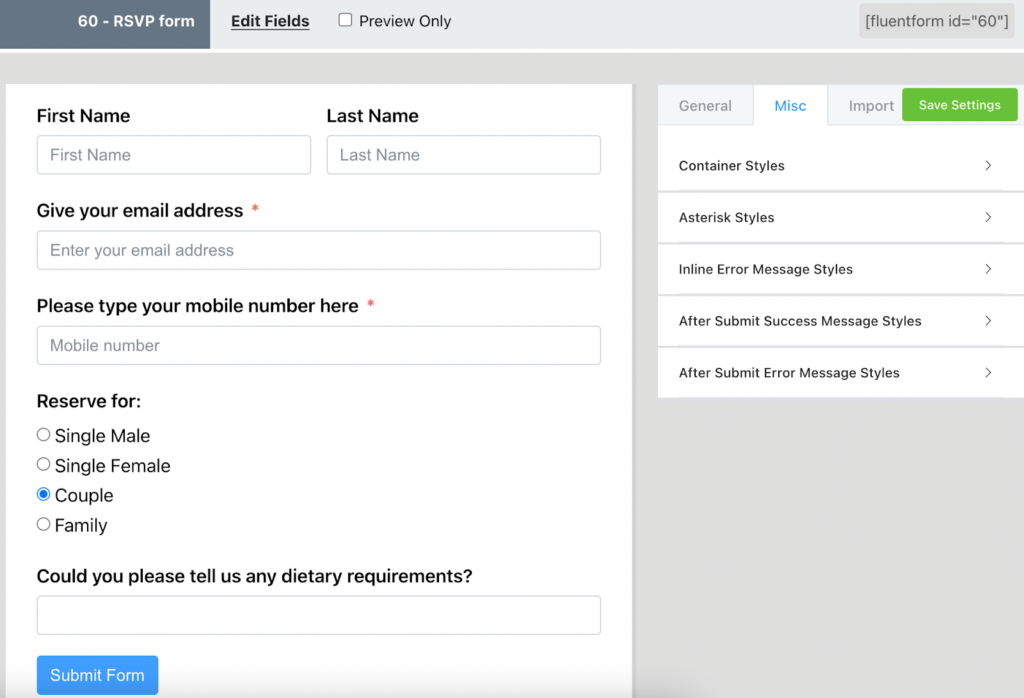
This allows you to change your form’s style, the container’s background color, set the margin & padding, the Asterisk style, the After Submit Message style, etc., as per your need.
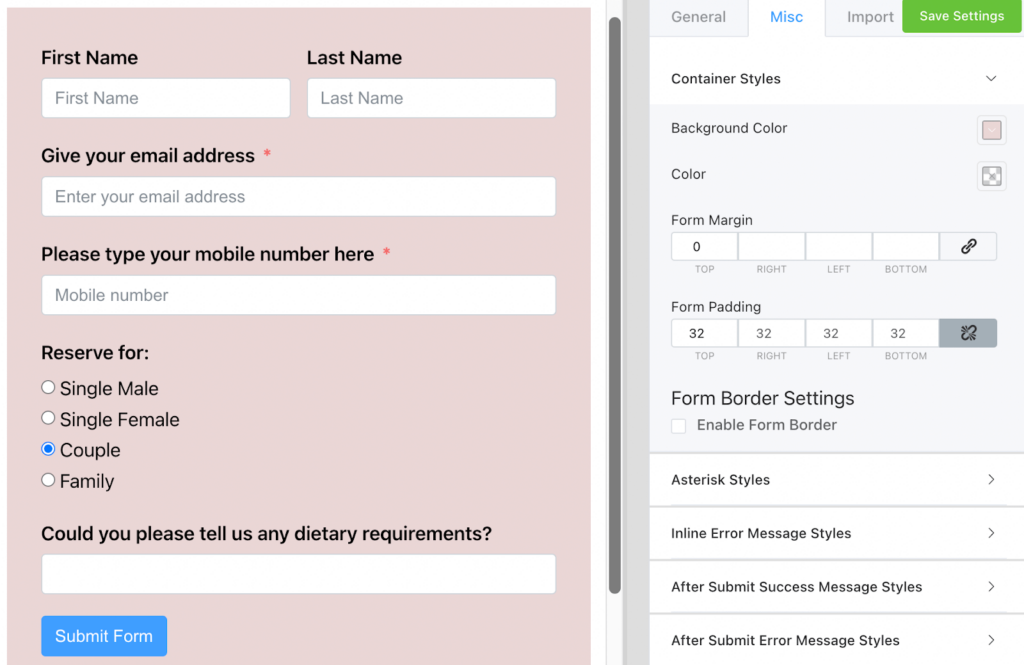
You can publish it as it is on any page of your website or maybe create a landing page to stand out in the crowd. Moreover, you can share it outside of WordPress if you like. We’ll talk about this later.
Now, what if you want your form to be an interactive Conversational Form? Head over to your Editor page. You’ll see a three-dot menu button on the right top of your screen. Click on the button, and you’ll see the Convert to Conversational Forms option.
You need to make some adjustments to make it interactive and also interesting. At first, we added a Simple Text field and changed the Element Label to get the guest’s name.
Add a Custom HTML field to pull the name dynamically and enlighten the guest about the event. You can pull data from other fields by using {dynamic.Name_Attribute} tag.
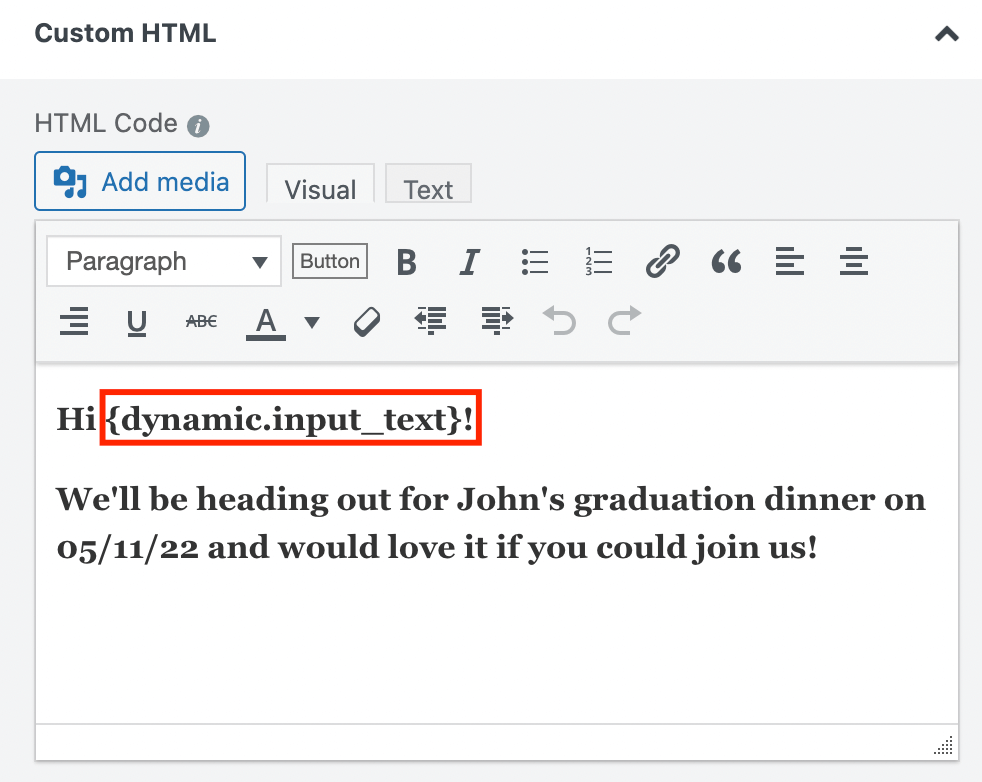
Now tweak and twitch the texts of the fields as you please to make it conversation-like.
If someone puts the answer that they can’t join the party, why bother to show them the other fields?
Let’s take this RSVP form to another level, shall we?
We just added conditional logic to all the input fields, only if someone answered “you in? = Hell yeah.” Now only people who are interested in attending your big party will see the next questions. Otherwise, they will be sent to the thank you page.
Now you need to set up your confirmation message to conclude the invitation. Head over to the WordPress dashboard (mentioning again, don’t forget to save the form anytime you leave the editor screen), then Fluent Forms → All Forms. Now hover over the RSVP form and click on Settings.
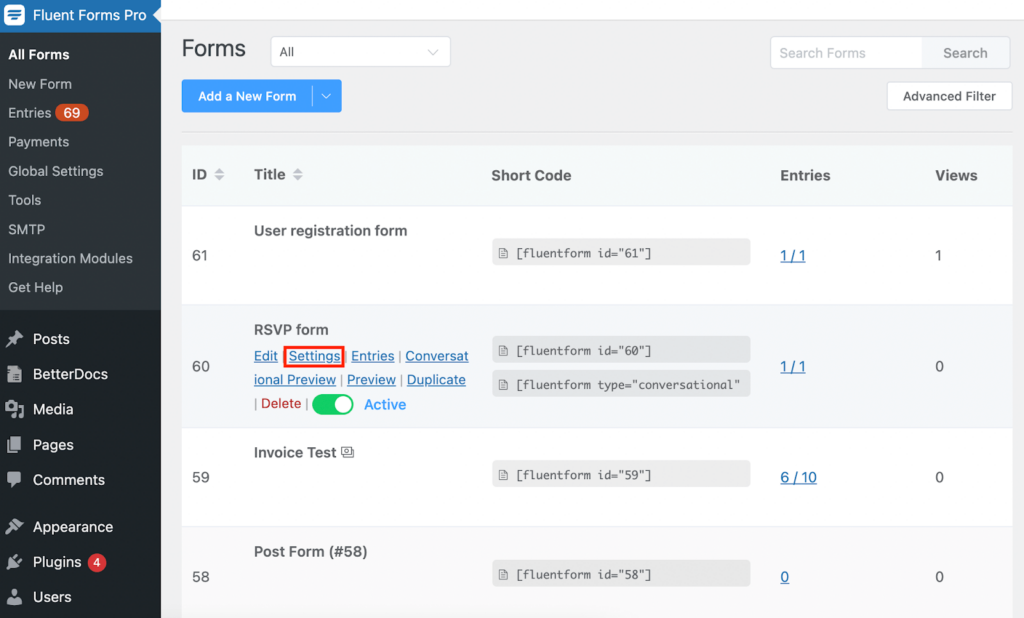
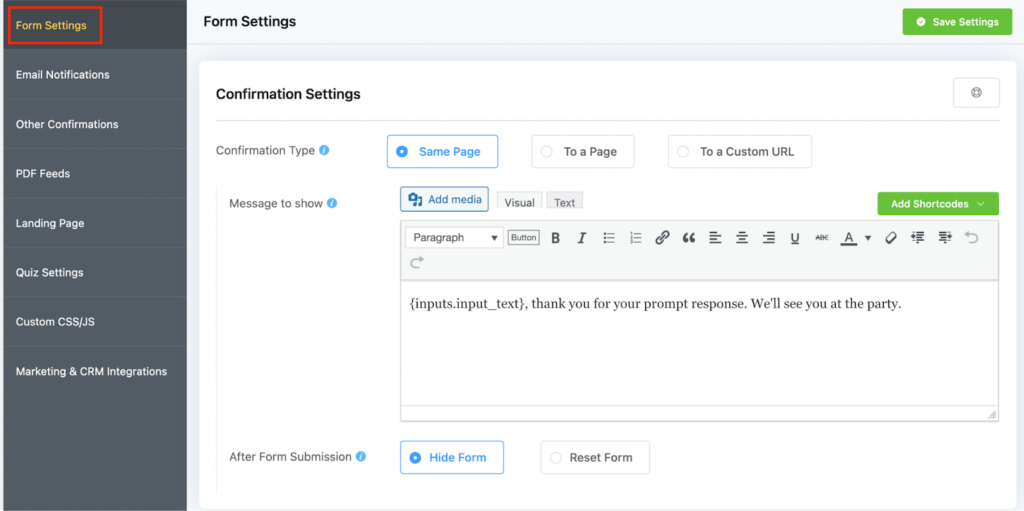
After finishing one Confirmation Settings, we’ll set up another to match up their response.
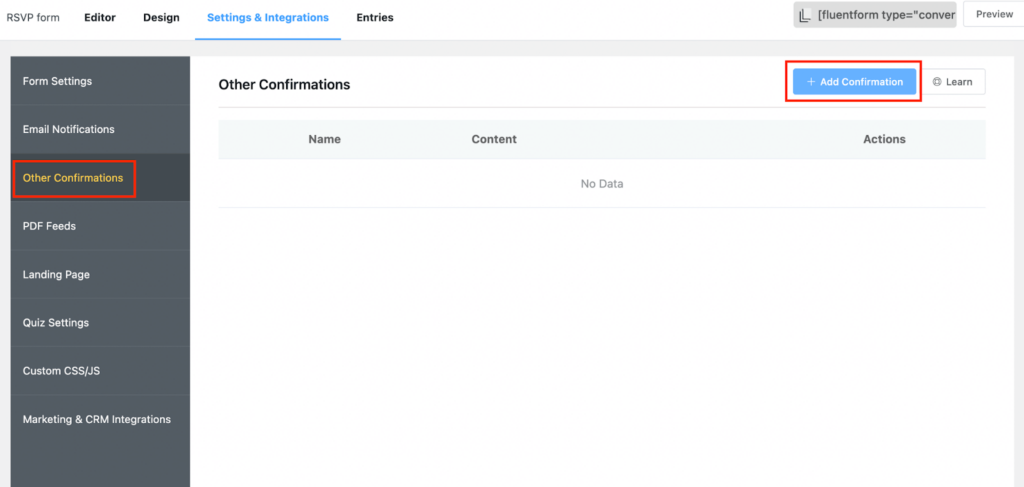
To do so, go to the Other Confirmations and click Add Confirmation. Now simply add the text you want to show to the people who can’t attend your party.
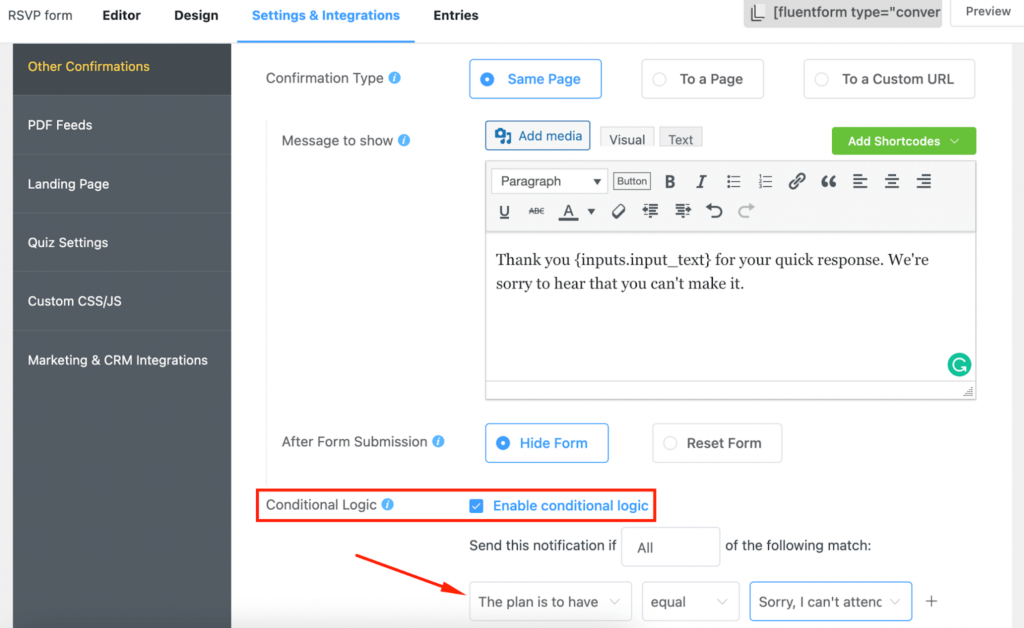
Set up the conditional logic as earlier. Voila, you’ve created the most sophisticated RSVP form all by yourself.
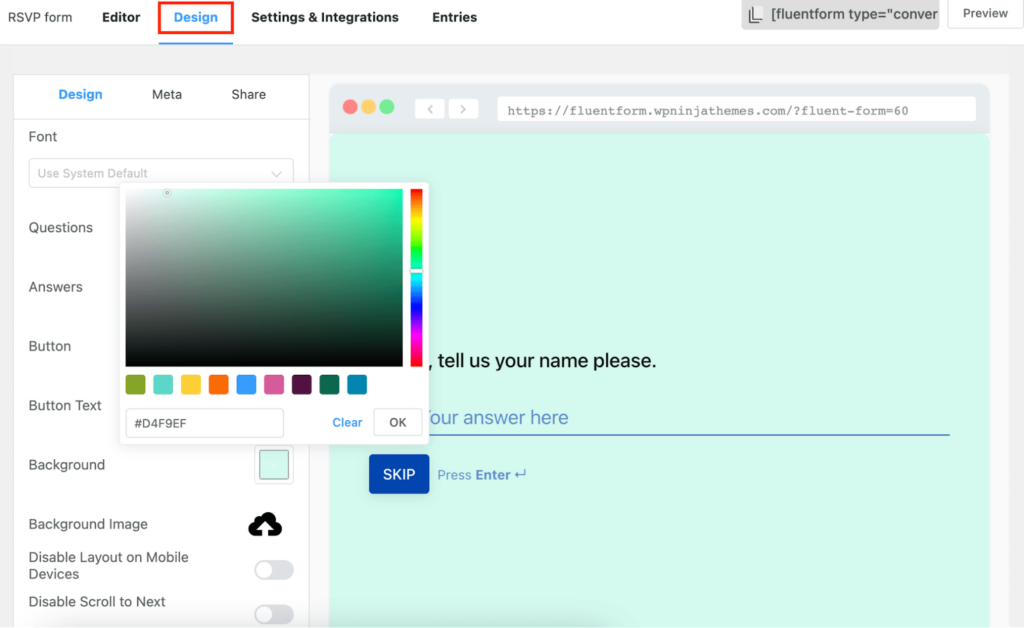
You can change the background color of your form and text, set a background image, change the font or button text, and so on.
With Fluent Forms changing metadata is as easy as drinking coffee. Click on Meta, and you’ll see a bunch of options like meta description, title, button text, featured image, security code, etc.
When it comes to form sharing, nothing beats Fluent Forms. You can share your forms via direct URL, share the shortcode in a page or post, or even embed it via HTML code outside WordPress.
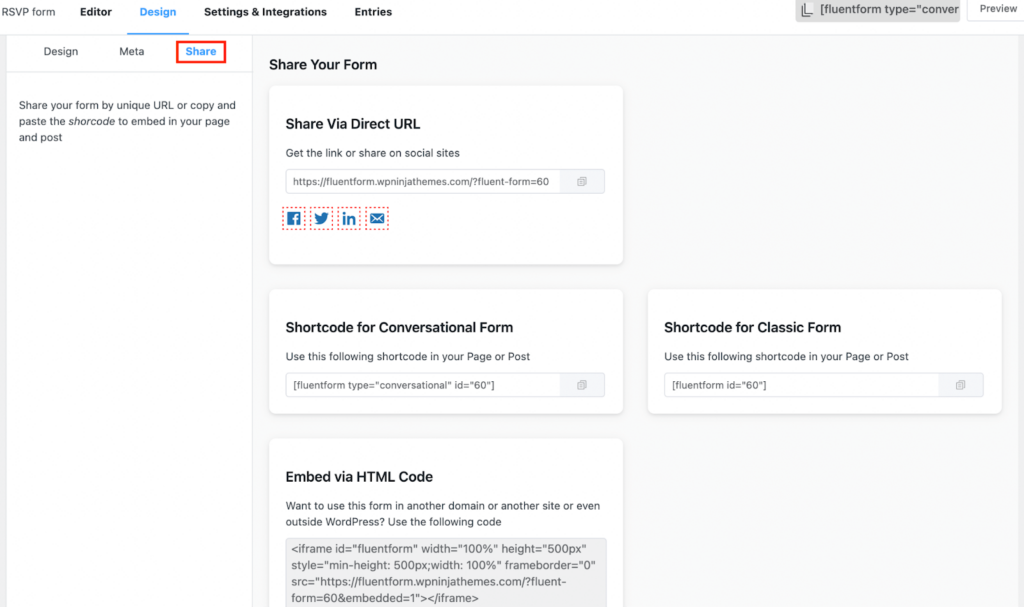
This would be the ultimate form you’ve made if you followed all the instructions. Nice, isn’t it?
Get instant SMS notifications to stay in touch
Now, what if you want to get notified every time anyone submits a form? Perhaps it’ll be better if you get that on your mobile phone. Also, you can give them replies or reminders to stay in touch. You can also set up email notifications with Fluent Forms, but in this case, we think if you contact via SMS, it would be easy for the guest to remember. People can set the date on their phone’s calendar and won’t miss your amazing party.
You can integrate Twilio with Fluent Forms to make this work smoothly. Just head over to Integration Modules and enable Twilio. Go to Global Settings and map your number, Account SID, and Auth Token.

You’ll get these from your Twilio account. Fluent Forms and Twilio integration can help you get the maximum responses possible.
Email notification on RSVP submission
The Fluent Forms team thought of everything. You can set up email notifications anytime you want. First, head over to Settings & Integration from the Fluent Forms dashboard. Now, click on the Email Notifications and toggle on to enable Email notifications after any submission.
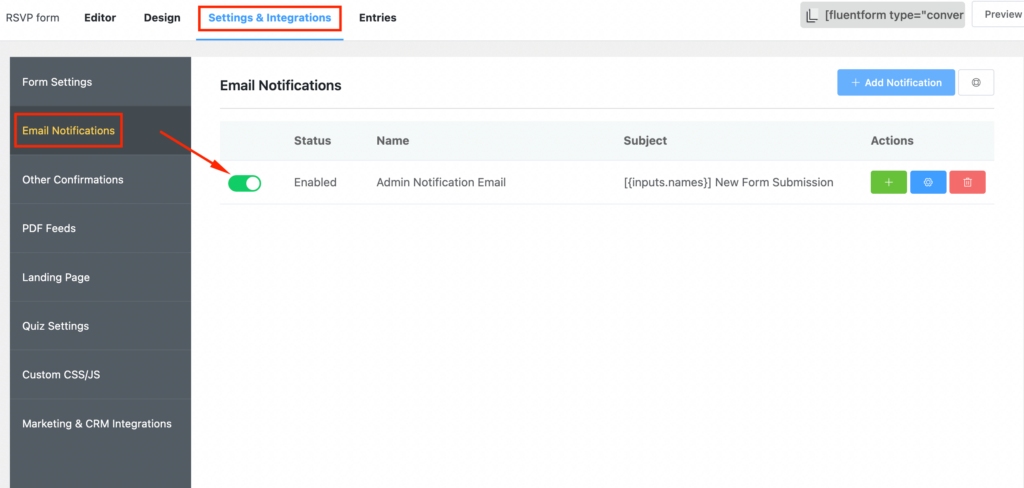
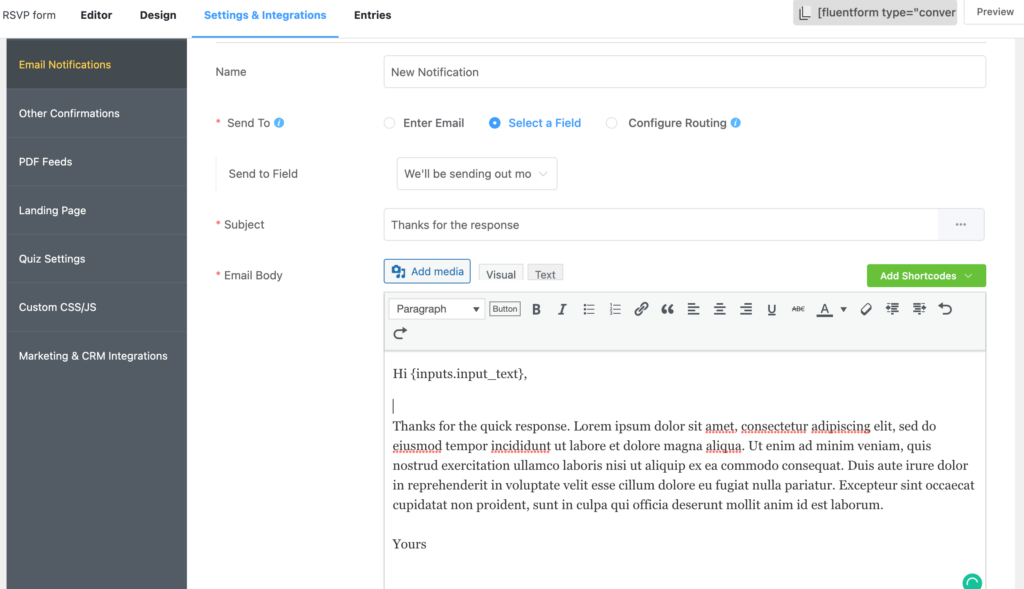
Click on the Add Notification button to set up your email. You can change the Notification Name, Send To email address, Subject, Email Body, Conditional Logic, and so on. This could be real handy if you want to send the email to the users or get notified on your email as well.
Publish your RSVP forms
You can publish your form anywhere you want, just copy the shortcode and paste it into a page or post. Even use the landing page feature if you want, or as we said, you can share your form outside WordPress.
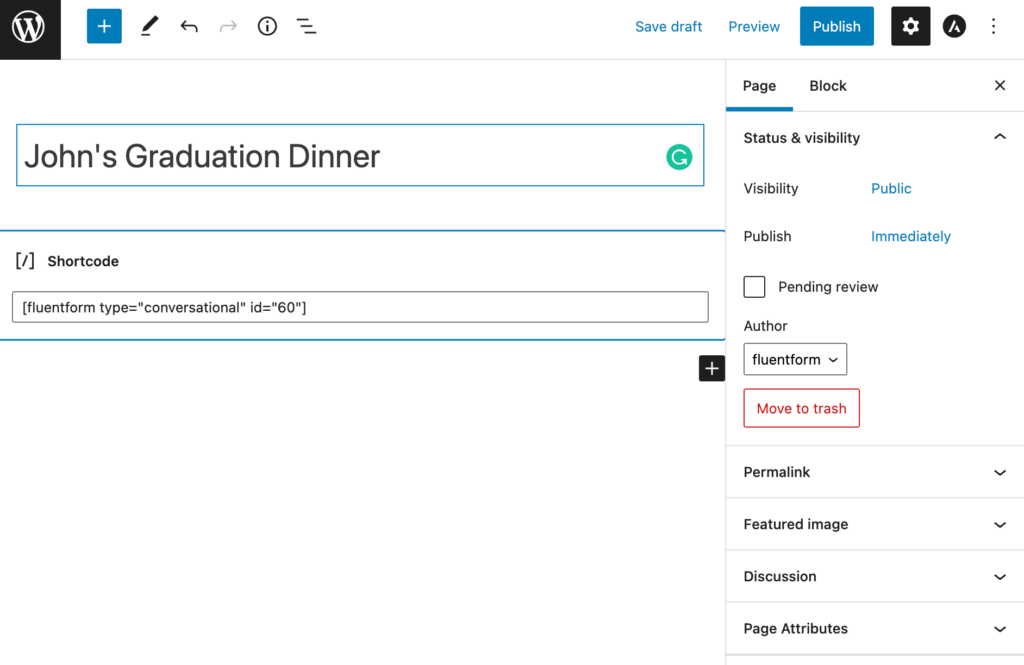
To publish your form on a page, first, you need to go to pages from your WordPress dashboard. If you want to create a new page, click on Add New, or you can publish it on the existing page too.
Set your page title accordingly, then add a new block and paste your form’s shortcode there. That’s it, now you have a page with your RSVP form.
Wrap up
The RSVP forms can play one of the most vital in hosting a successful party. Even the Google RSVP event template seems too simple. Fluent Forms is the next-level form builder that gives you the maximum range of features and functionalities to make beautiful forms. Next up, manage your entries. You can easily analyze, sort, manipulate, and export entries with Fluent Forms. Even if you want to create a simple t-shirt order form or create a multi-step form, you can do that too.
Create your form as you like, and make sure it meets your needs. Comment below if you want to add something. Follow our social media channels to learn tips and tricks of WordPress.




Leave a Reply