How to Customize a Thank You Page on WordPress: No-code Solution

A WordPress redirection to the WordPress thank you page broadens the way to engage visitors while confirming a successful form submission.
WordPress contact form plugin, such as Fluent Forms, gives you access to edit the settings and form confirmation message, ensuring that the visitor can be redirected to a new page or even a URL. It makes it obvious to the user what’s next. Here is the scope of how a post-submission redirection improves the user experience on your website.
In this tutorial blog, I will show you the simplest way to customize the thank-you page of your WordPress website.
Why customize the thank you page

You may ask why you need a customized thank-you page since your audience has already submitted the form and the action is done. If it’s the destination to make the visitors fill out the form, then you may stop there. But as long as the lead generation and user journey matter to your business, you can take your website and visitors further from there, and make sure to build a better relationship.
Reduce bounce rate: a custom thank-you page gives visitors a reason to stay rather than leave immediately. It provides them with further options to choose from in order to have a tour of your site.
Track conversions accurately: dedicated thank you page URLs make Google Analytics goal tracking dead simple. You can track the user journey and find out what can excite them.
Upsell or cross-sell: show related products or upgrades while the user is still engaged. Relevance can make a good conversion there.
Encourage referrals: add social sharing buttons or referral incentives right after they’ve committed. Use a user-friendly social plugin and show your community strength.
Segment your audience: set up conditional confirmation to route different user types to relevant next steps. This type of audience segmentation takes the users to where they actually want to land.
Reinforce brand identity: a polished confirmation experience makes your brand feel more professional. It makes sure you care, and your brand upholds clarity with the users.
Reduce support tickets: clear next-step instructions, prevent “did my form go through?” emails. Users need not worry whether the submission went well or not.
Capture additional micro-conversions: invite users to follow on social, join a community, or download a resource. They may want to get connected with you in different channels, which will lead them to advocate for your brand, too.
A/B test post-submission offers: different thank-you pages let you test which one converts best. You can design the page without triggering the form.
Create urgency: Time-limited offers on thank you pages convert well because users are already action-primed. It surprises the users and makes new clicks
Steps to customize a thank-you page on WordPress
There are a few steps you can take to set up and customize the thank you message in Fluent Forms using the confirmation settings. It provides you with three options: one is a confirmation message, and the other two are redirections.
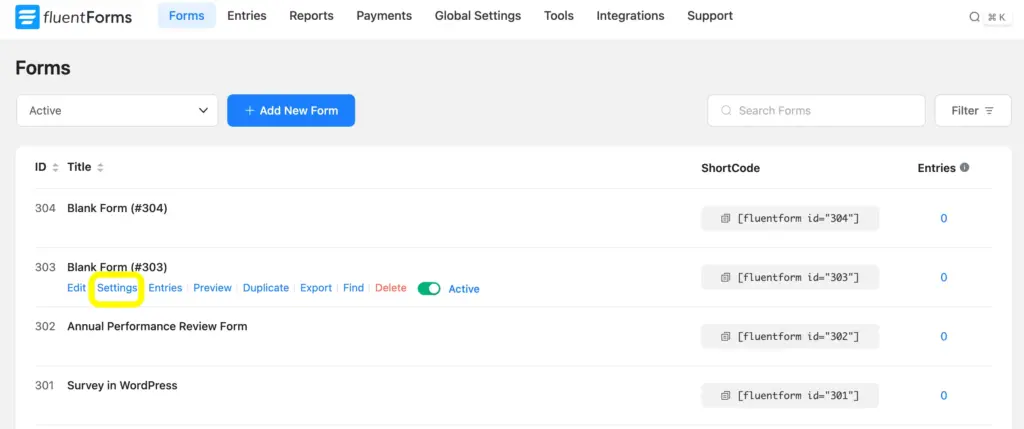
First of all, you need to go to the Settings and Integrations page to customize the confirmation redirection.
First of all, you need to go to the Settings of the form, which you can find in the Forms page, in the Fluent Forms dashboard. You can also get the Settings and Integration from the form editor page.
Your site visitors can be redirected to:
- The same page
- To a page
- To a custom URL
Besides this 3 options, you can also set a conditional confirmation. I have explained each of the 4 types of settings.
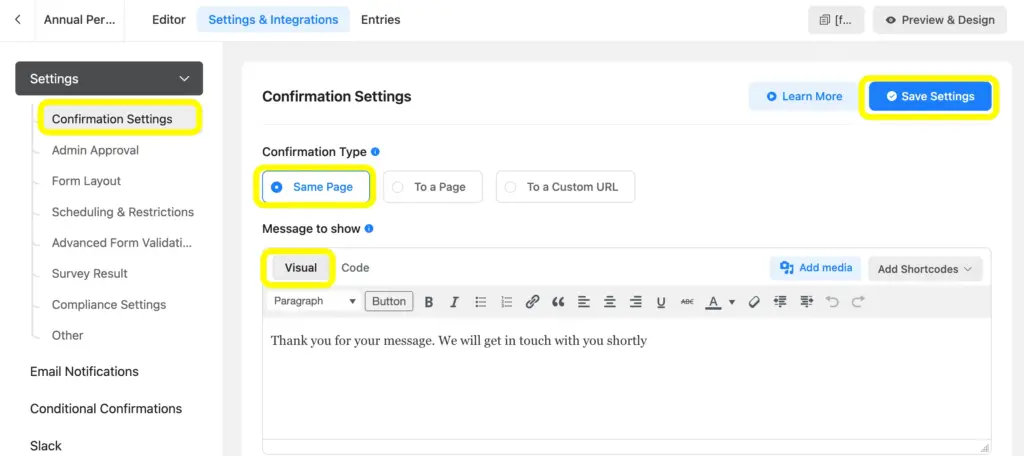
1. The same page
To redirect the users to the same page, you can select the Same Page as the preferred Confirmation Type.
You will find the Message to Show box below the Confirmation Type.
This message is in a visual format, so you need not write a single line of code. Just write down the thank you message as a token of confirmation.
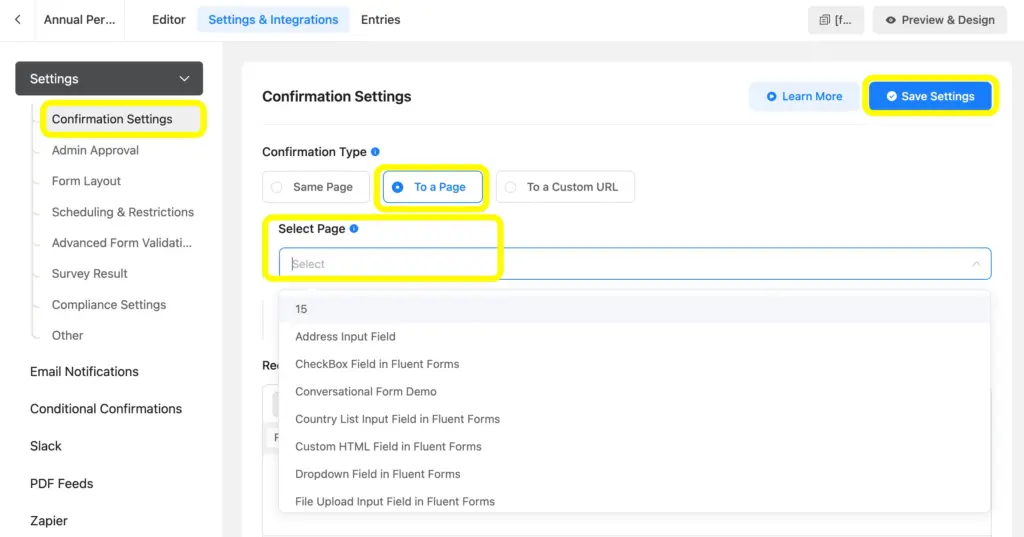
2. To a page
When you select the To a Page option, users will be redirected to any page of your website, from where you want to define their next move as a visitor. It can be a deal page, home page, special discount page, or any page that you like. Simply go for the Select Page on the Confirmation Settings page and choose from the list in the dropdown.
You can customize the Redirection Message, too.
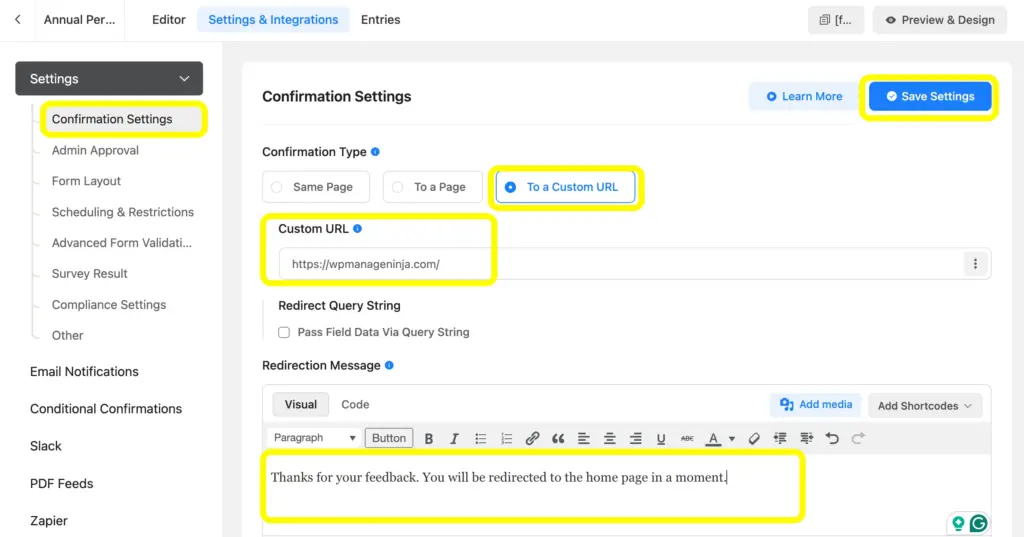
3. To a custom URL
Redirecting to a custom URL is a splendid way to gather leads from different sites and accumulate them in one place, and then use them centrally.
All you need to do is choose the option of To a Custom URL and enter the URL in the given space for Custom URL.
4. Conditional confirmation
You can also set up conditional confirmation to enhance the scope of your thank-you page. Only users fulfilling particular conditions will be redirected when you set this up.
Simply go to the Conditional Confirmations and click on the Add Confirmation button.
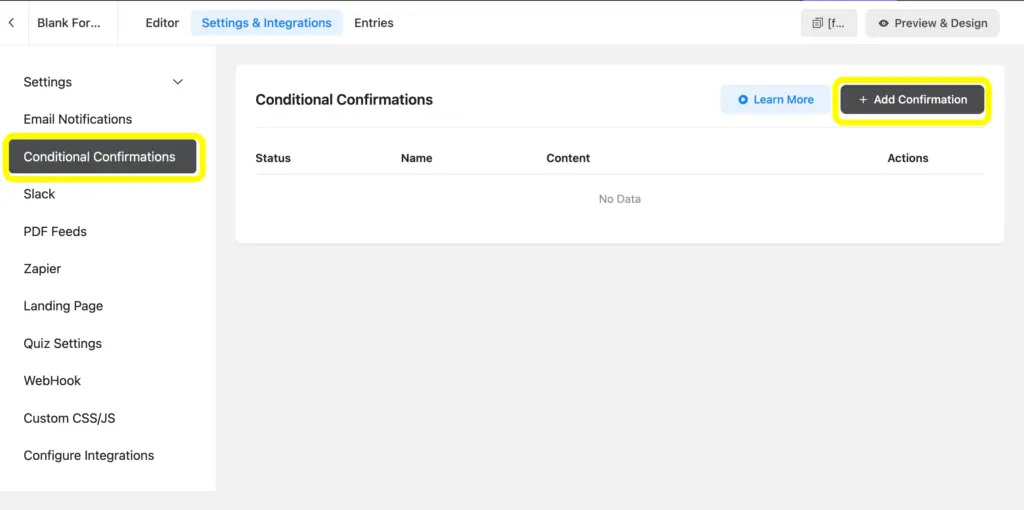
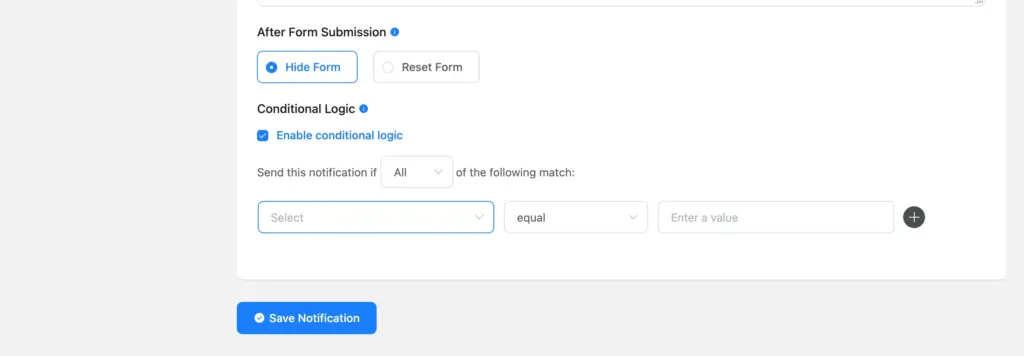
Once you click on the Add Confirmation button, the Conditional Confirmations will appear. After setting the confirmation like the previous ones, scroll down and select Enable Conditional Logic to apply conditions. This will help you define the thank-you page audience based on your conditions.
This is the simplest way you can implement customizing the thank you page to show the users their next moves on your website. As you see, it requires no coding and can be applied using the settings of the plugin.
Related features
Advanced form validation
Define who you want to restrict from submitting a form on your website. You can enable advanced form validation to set a barrier based on conditions such as the user’s country. It saves your time, which you might have required to go through many unnecessary entries.
Empty submission blocking
Avoid getting blank submissions with a simple setting of scheduling and restrictions. Enable the Deny Empty Submission and restrict blank forms from being submitted. You can also show a customized message against every empty submission.

Hi, this is Aparup. I am a Literature postgraduate, mixing my creative thoughts with my experience in the tech industry to surpass AI. Professionally, I am a content marketer seeking solutions to users’ problems regarding WordPress.


Leave a Reply