How to Create an Online Market Research Survey

The new era of online marketing has evolved consumers’ participation even before new ideas, designs, features, or products arrive. Big brands are winning on their initial actions using users’ mindset and perspective towards any industry, brand, or product.
Because of the data-centric method and quick evaluation process, a market research survey helps a business make proper decisions.
In this blog, we will explore the steps to create an online market research survey.
TL;DR
- A market research survey is conducted to get the consumers’ feedback to find out the market gaps, users’ interests, competitve positions, and possibilities.
- Market research surveys help you optimize the production cost, introduce potential products, and connect with the consumers.
- With Fluent Forms, you can Create Using AI, by giving the prompt in the given box, then customizing the fields if necessary.
- You can Choose A Template, selecting from the categories or using the search bar, and then customizing if necessary.
- On a New Blank Form, you can add the relevant fields such as name field, email, checkbox, dropdown, text area, etc.
- Edit the Element Label, Options, Layout, etc, from the Input Customization options.
- Add conditional logic by selecting Condition Match: Any, All, or Group. Set your preference as equal to or not equal to.
What is a market research survey
A market research survey is a survey conducted to analyze the condition of a market, especially a specific one. It helps a brand get feedback from a standard group of consumers relevant to the products and brand.
Businesses conduct market surveys to strategize their next actions, such as production, business development, quality control, and supply chain management. It’s an overall view of the consumer interest, probable challenges, competitors’ positions, and success ratio.
So, market research surveys are a way of data collection that collects information and opinions about consumer preferences.
Why conduct a market research survey
The larger your production or business, the greater value market research can provide. It can optimize the cost management and human resource management of your business.
There are several reasons why you should conduct market research surveys.
- Brings new opinions
- Displays market conditions
- Focuses on possibilities and obstacles
- Helps determine the range of productions
- Builds a connection with the existing market
- Helps avoid doing what people are already ignoring
Market survey pro tips
Conducting a market survey involves asking people what they would like and what they would not. The main focus is to encourage people to participate in the survey, allowing you to gather accurate and up-to-date information.
- Create an engaging survey form
- Reach out to the proper target customer base
- Ask the most relevant and impactful questions
- Conduct the survey right before launching a new product/feature
- To some extent, the survey should itself be problem-solving
- Put some space so that users can add their unique insights
- Make the questions look clear and valuable
- Include multiple ways to respond, such as checkmark, yes/no, numeric range, etc
Examples of market research survey questions
Every survey contains a few demographic questions, such as the submitter’s age, gender, and profession. The secondary questions may vary based on the purpose of the market research survey.
Here are a few online market research survey demo questions that may serve your purpose.
- Which features of this product do you like the most?
- Which features would you like not to have?
- How will you rate the latest update?
- How often do you use the product?
- Which of these products are you aware of?
- How did you hear about us?
- Which brand do you think sells the best version of this product?
- Do you know (benefit name) benefit of (product name)?
- Why do you prefer to shop online?
- Which part of the product do you want us to improve?
- How likely are you to suggest your friends or colleagues use this product?
- Do you find the pricing of our products reasonable?
- Which features do you think (product name) has missed?
- Which product do you consider as an alternative to ours?
- Are you currently using this product?
- How likely are you to purchase again from us?
- Which brand is your favorite in this category?
Steps to create an online market research survey on WordPress
Building a market research form on WordPress is not complicated when you are clear about the goals and what information you are going to get from your target audience. Especially, when you use a form builder plugin like Fluent Forms, there are multiple ways, including AI form builder, templates, or creating a new form using the drag and drop functionality.
Here, you will find the steps to create an online market research survey form using Fluent Forms.
First of all, you need to download the Fluent Forms plugin from the WordPress plugin repository and then install it on your WordPress website.
Step 1: Create a new form
Go to the Forms page of Fluent Forms and click on the Add New Form. Then you will get the options as Create A New Form, where you can select New Blank Form, Choose a Template, Create Conversational Form, or Create Using AI, which are more relevant to creating a market research survey.
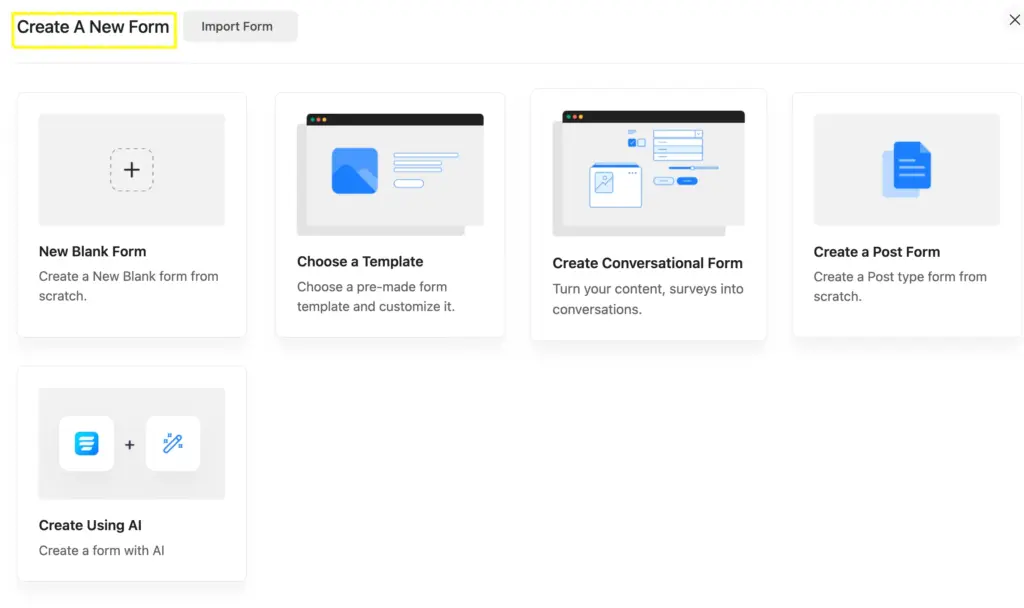
Here, we will take the New Blank Form to proceed with building the market research survey.
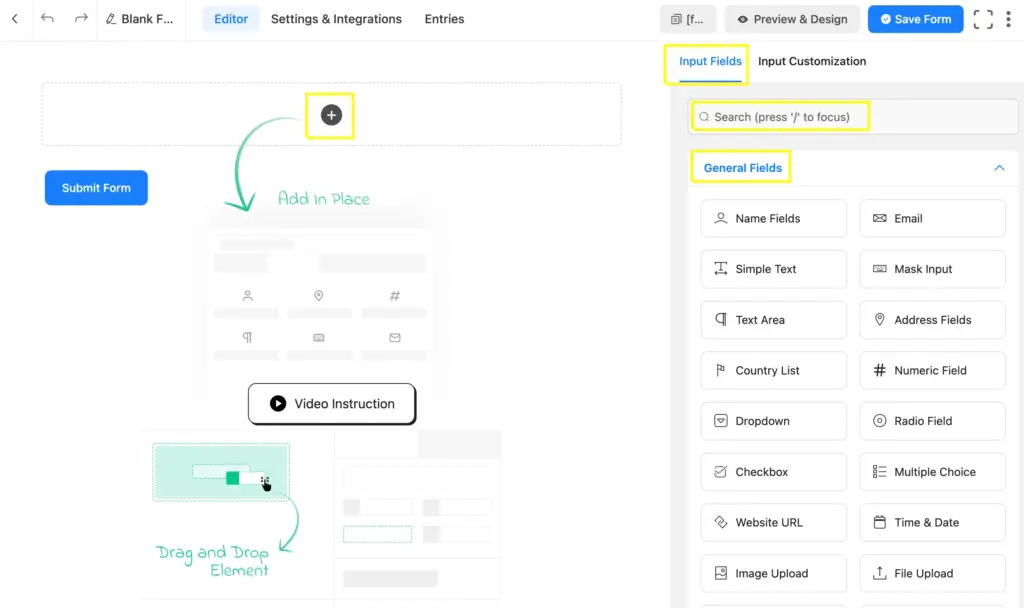
The editor page of Fluent Forms looks as it’s displayed in the image. You can add fields by clicking on the + sign or simply adding them from the input fields on the right side. As it’s a drag-and-drop form builder, you can drag the form fields and drop them to any position.
Step 2: Add the relevant fields
To make a survey form faster and more optimized, you need to select the fields first.
So, let’s pick up the input fields.
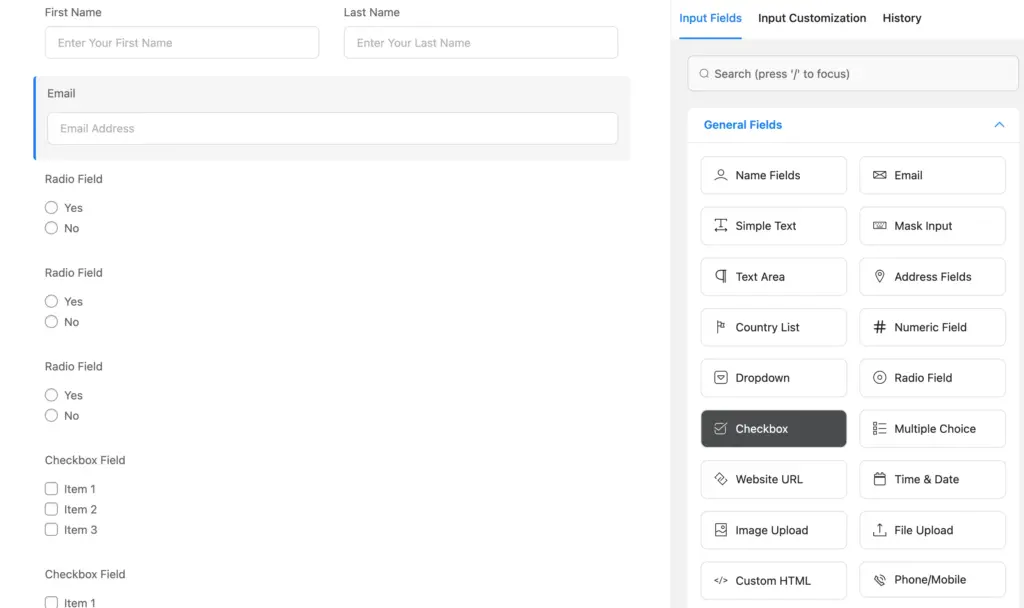
There are a few fields that seem to be more relevant for a survey:
- Name field
- Email field
- Radio field
- Checkbox field
- Text area
We are primarily taking these fields, which can be customized as per the requirements.
Step 3: Customize the input fields
You need to customize almost every one of the input fields of a survey form, especially the Element Label and the options in the applicable fields.
While customizing the Radio Field or the Checkbox, the question should be placed in the Element Label, and the answers should be in the Options.
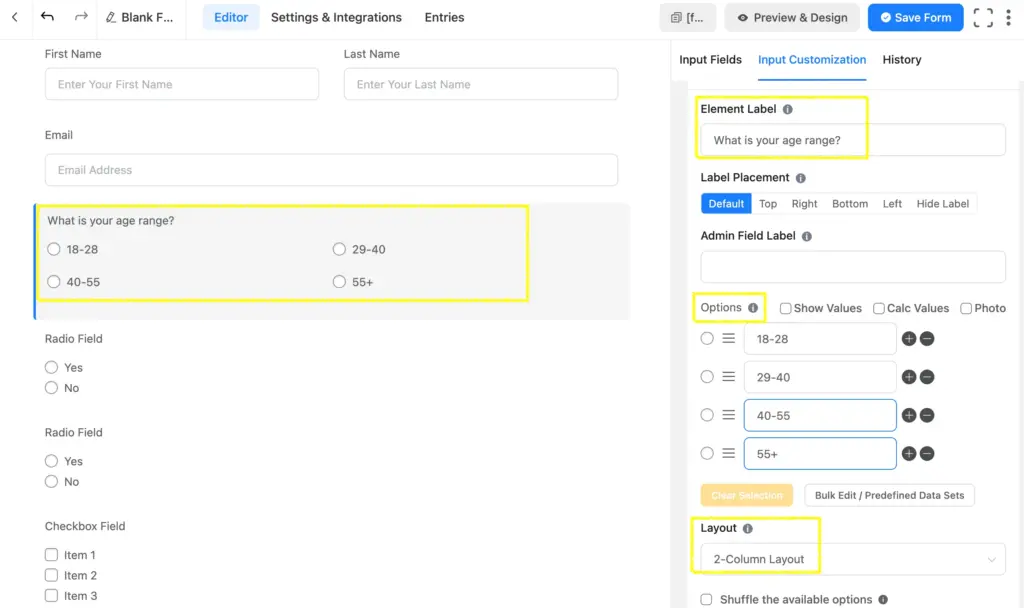
Here you can see that I’ve customized the element label and put a question as the element label, added the options, and changed the layout.
Step 4: Add Conditional Logic
In most cases of surveys, the latter question depends more on the previous response. So, adding conditional logic to the questions can make it relevant and eliminate irrelevant fields. It automatically sets the relevant ones to appear, and the irrelevant ones disappear.
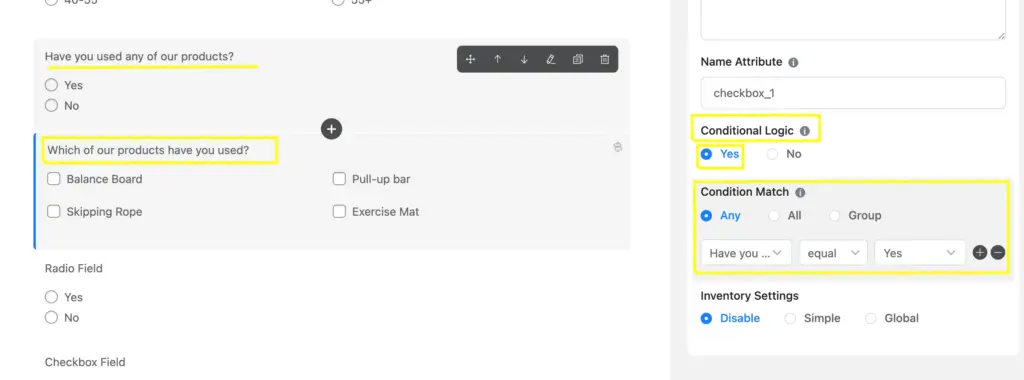
For example, here we’ve added a conditional logic on the question: ‘Which of our products have you used?’, which only appears if the question ‘Have you used any of our products?’. Now, the question about which product the user has used will only appear if the question about whether the user has used any product is answered with a ‘Yes’ reply.
You can add endless conditional logic and select Condition Match by any or all, or group it using Fluent Forms.
To make sure the conditional logic applies correctly, scroll down to the Advanced Options of the Input Customization and select Yes. Then choose the Condition Match: Any, All, or Group. You can set it to both equal to or not equal to.
Step 5: Rename, Save, preview, shortcode
By clicking on the top-left side of the form, you can change the form name. By default, the name is addressed as a blank form, which you can edit.
You can save the form by clicking on the Save Form button, check the preview on a new page by clicking on the Preview & Design button, and copy the shortcode that is placed beside the Preview & Design button.
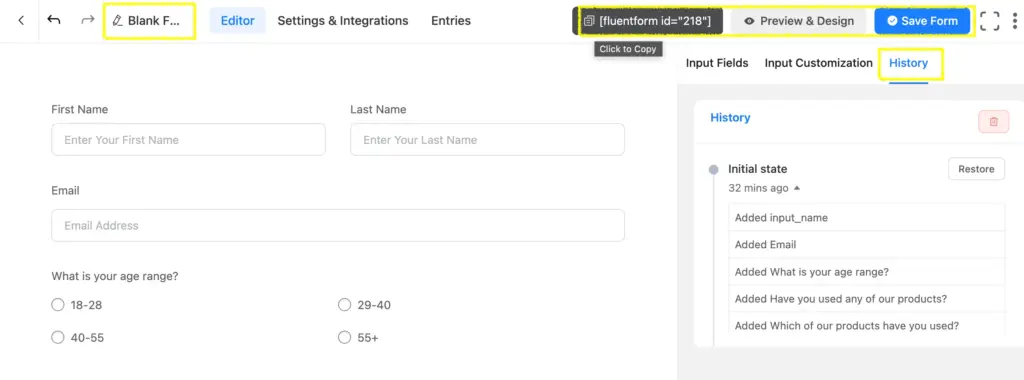
Once you find the form to be okay, you can paste the shortcode on any page to post the form.
Let’s see how this online market research form appears on a WordPress website:
You can also download another pre-built market research survey form template built with Fluent Forms and use it instantly.
Related features
Multi-step form
The multi-step form feature of Fluent Forms comes with a progress indicator and breaks down the form into multiple pages to keep up the engagement. It decreases the abandonment rate and increases conversion.
Conversational forms
Make the forms of your website appear like a conversation that has custom styling, too. The conversational forms feature of Fluent Forms helps the submitters respond to one question at a time. The simple navigation and user-friendly appearance bring engagement and make it fun.
Address autocomplete
Relieve your users from typing an address in the specific fields, and focus on the other fields. Use the Address Autocomplete feature and help users select their address from the suggestions empowered by Google Maps.




Leave a Reply