How to Create a Medical Intake Form in WordPress

When filling out a medical intake form, there are always two sides to consider. On one side, an attendant or the patient, who is under stress, needs to complete the formalities as quickly as possible. On the other side, there is a hospital’s administrative person who wants the form filled out with every tiny detail.
Anyway, there is a common manner on both sides: both want the disease cured.
What is the best possible way to make the hospital intake form work like the simplest, yet adequate, one to collect information to accomplish patient enrollment?
In this blog, I’ll take you on a tour to build a patient intake form on your hospital’s WordPress website, containing the medical information about the patient. I’ll show you how you can build hospital intake forms on WordPress.
TL;DR
- A medical intake form is used before the treatment, diagnosis, or hospital enrollment of a patient to collect patient data, including their contact details and medical history, at a time
- A well-structured hospital intake form helps the healthcare provider get precise information to avoid any errors, and reduces paperwork
- To build an online hospital intake form in WordPress without coding, it requires a drag-and-drop form plugin such as Fluent Forms
- You can set up conditional confirmation, restriction and scheduling, auto delete form entries, etc. features to make the form serve a better purpose
- After adding fields and customizing them, you can use the Fluent Forms block to publish the form easily and instantly
- Advanced Form Styler, Conditional Confirmation, Form Security, File Upload, and PDF Generator are a few of the top features to use in a medical intake form in WordPress
What is a medical intake form
A medical documentation form is a piece of documentation provided by the healthcare service provider to the patients or their guardians/attendants while enrolling in a hospital. It includes the required and precise information in a structured way, which will be considered for further treatment and diagnosis purposes.
A medical or hospital intake form typically contains information about the patient’s personal demographics, contact information, medical history, basic of the current treatment, etc. It actually varies based on the policies of the respective healthcare service providers.
Best practices for medical intake forms
A medical intake form requires precision and details while being concise, too. So it’s all about making a balance of informational broadness along with a better user experience.
There should be a mix and match because the intake form you are attaching to your website will turn into a file of records about the patient getting admitted into the hospital.
Save submission time and form space
It’s surely a fact on the web form that you have the choice to enhance the space of your form as much as you want. But, it lacks the concentration which might be the cause of constraining focus, eventually leading the users to let the form be unfulfilled. So, you can optimize the form with a few aspects:
- multi-step form along with a progress indicator
- a section break with a better understanding of one step
- checkbox, multi-select, radio field, etc., for faster responses
- conditional logic (for dynamic responses) that makes the relevant fields appear
Form building plugin like Fluent Forms also offer input fields like “Accordion & Tabs”, which you can use to show multiple input fields on one page form, breaking them into sections for different information collection. This helps you gather more information without annoying the patient with a long form.
Add an option to submit required documentations
In most of the cases, detailed patient information can not be submitted manually. So, you need to help the users with the file submission process. It allows the patient to easily submit the prescriptions, diagnosis reports, and other health documents in a faster process, requiring no scanning or photocopying.
Let patients add seamless contact info
In case of any emergency, the patient’s contact information needs to be seamless, ensuring alternatives. The house address, email address, phone number, and emergency contact number. To make it smoother and perfect, you can use the email and phone number’s validity assurance, and the Fluent Forms address autocomplete feature to make it faster.
Less writing and more selection
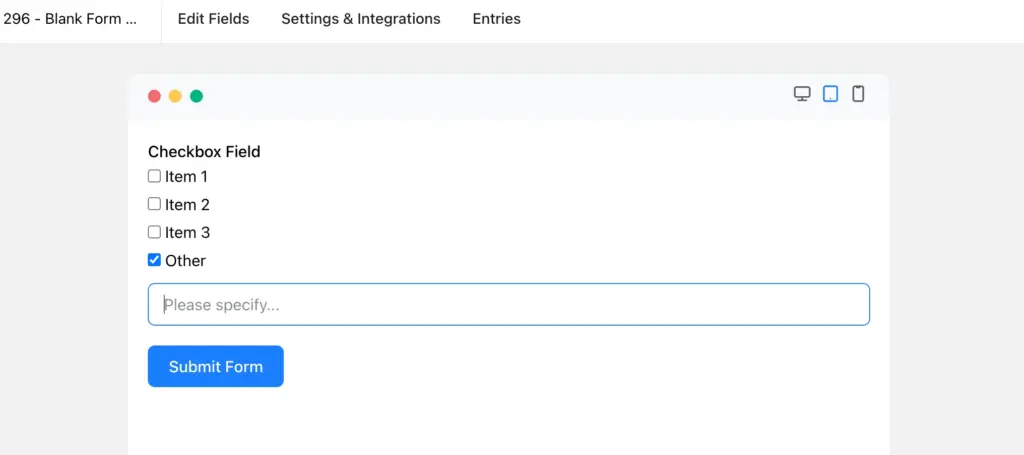
Since most of the medical forms require many fields to be filled out, it’s better if you can help users select the options rather than writing them in manually. It also helps you skim the form faster. Use a checkbox and a multiple field container while allowing the users to select the options rapidly.
You can give users the other option, besides the checkbox, where they can put more information if necessary.
Make the form easily turn into a paper
Once a form is submitted, it soon turns into a constant copy that will not be changed anymore. It helps you send the final copy with all entries done, sand end it to different sections. You can also print it on demand whenever you want, using the PDF generator.
Keep informational validity at its peak
Validity is the key to making sure that the information is correct and came from the right place. Use form security features to reduce spamming, too. Validate phone number and email so that you can get back to the responsible persons in no time.
Help the submission info move rapidly to the proper tables
Enable confirmation email notification so that you can make sure the proper authority is informed once a form is submitted that touches their jurisdiction. The patient should be informed of the confirmation once the enrollment is in progress.
Clarify the terms and conditions
Use the terms and conditions field, clearly stating the conditions applicable in the patient intake and further treatment. You can also add the signature field so that it remains valid.
Steps to create a medical intake form for patient enrollment
Here, I’ll show you the steps on how you can create a medical intake form on WordPress, using a contact form plugin like Fluent Forms. It’s a drag-and-drop form builder, so you don’t need to write even a single line of code.
First of all, you need to install the Fluent Forms plugin in your WordPress site if you haven’t installed it already. In the dashboard of your WordPress website, you will find Fluent Forms, from which you need to go to the
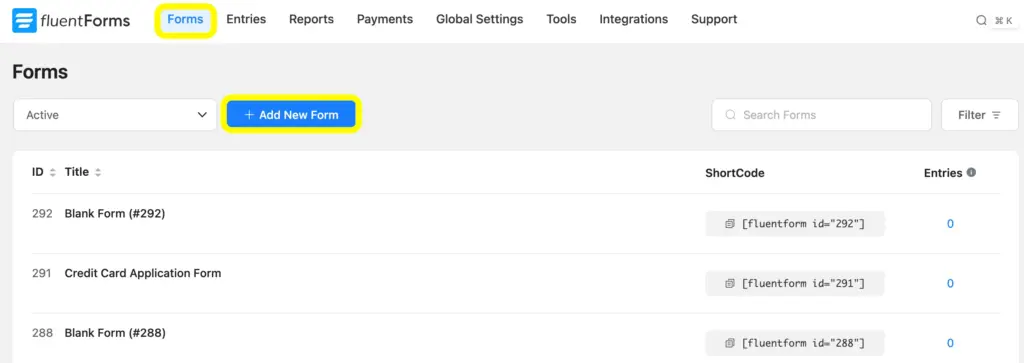
To create a form using Fluent Forms, you need to click on the Forms button and then the Add New Form.
1. Creating using a contact us form template
Using Fluent Forms as your primary form plugin, you can easily create a form by choosing a template that you can edit as well.
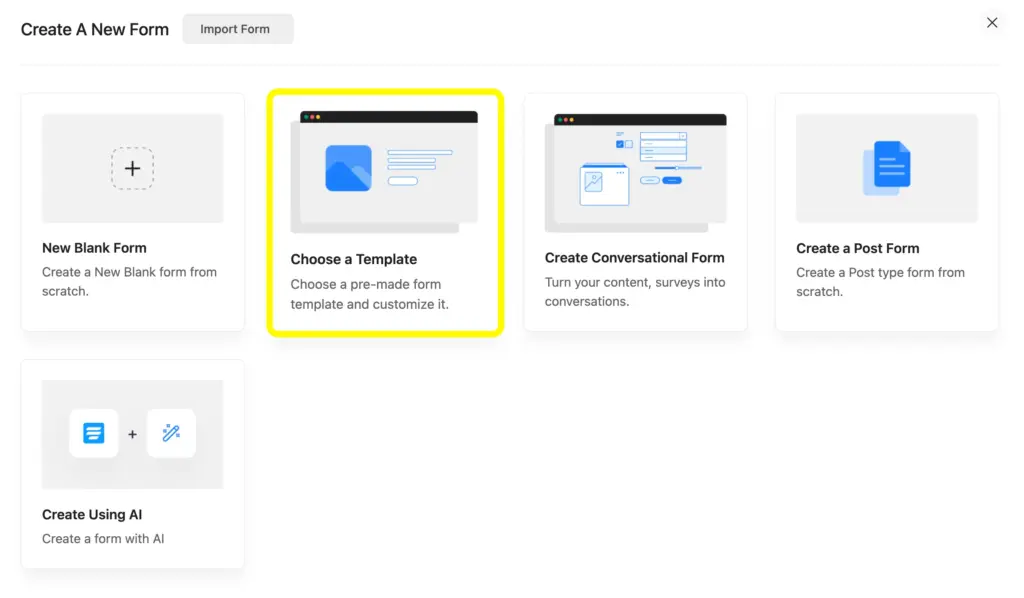
After clicking on the Add New Form button, you will get the options for how you want to build the form. From there, choose a Template and start building your form.
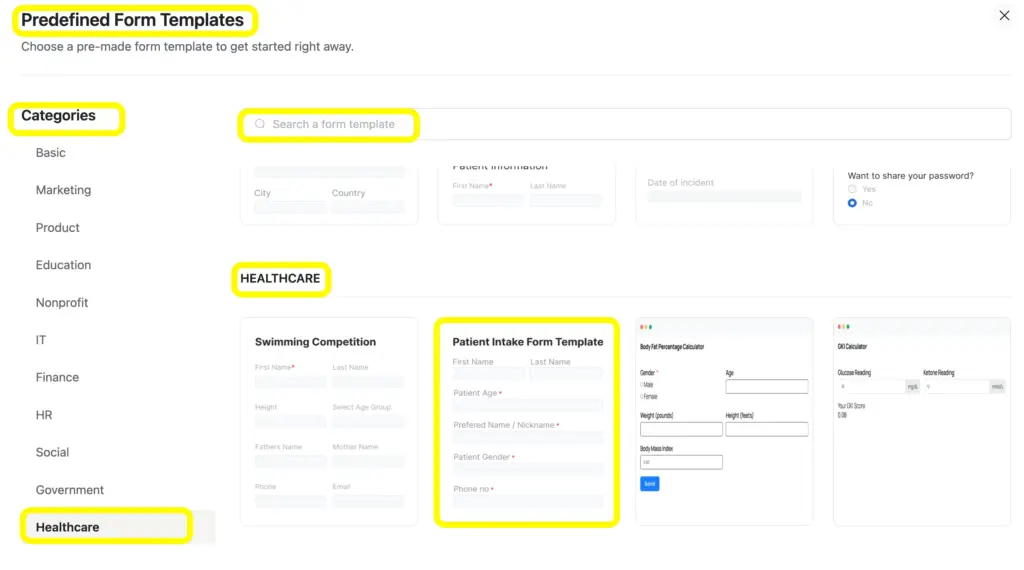
In Fluent Forms, you can find several demo form categories from which you can choose the one that best fits you. You can also check the preview there, and can search for the template you are looking for.
In Fluent Forms, every form template’s fields are customizable. You can also change the settings of particular forms using the Settings and Integrations.
2. Creating using the AI form builder
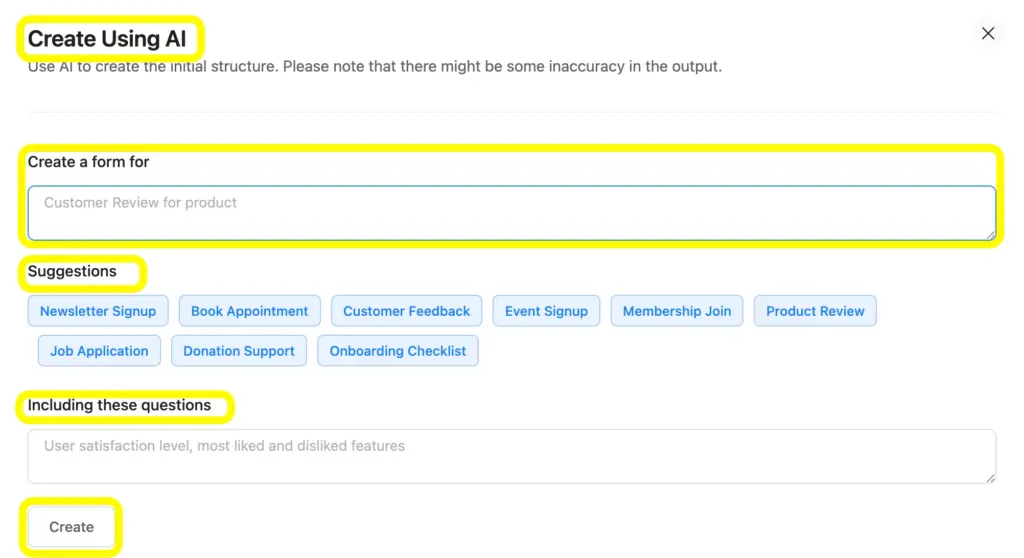
Fluent Forms comes with its free AI Form Builder, using which you can create a form by simply putting in a prompt describing what type of form you want, in fact, also applying suggestions.
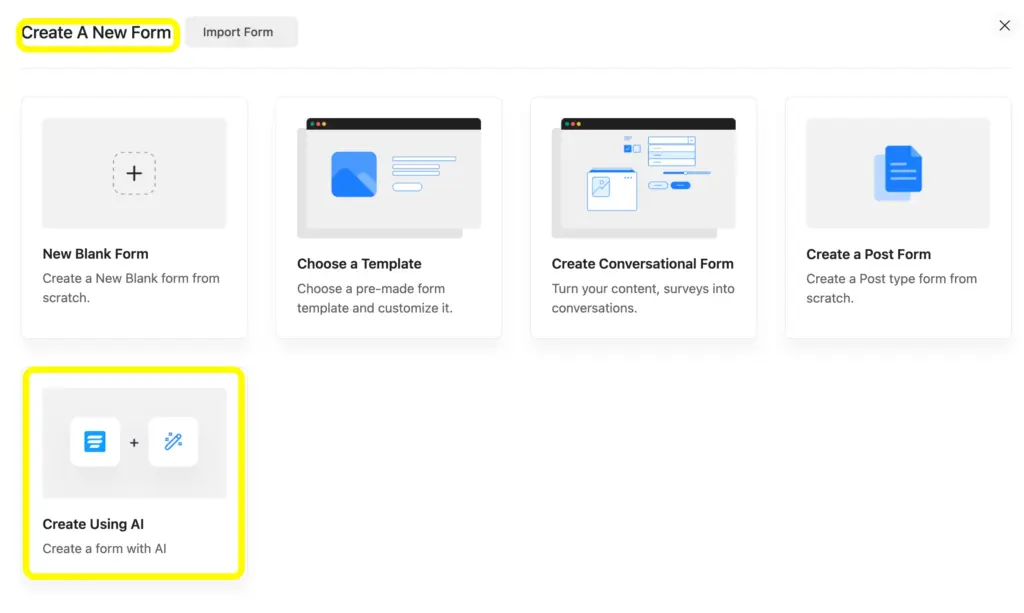
From the Create A New Form pop-up, choose the Create Using AI option, which will take you to the prompting page.
After clicking on that, you will go to the next page, where you will get the space to write the prompt, and also get the suggestions, and another space for commanding to add the questions.
Creating on a blank form
To make a form from scratch, applying your creative thoughts, focusing on your organizational structure, you can create a new form using Fluent Forms by clicking on the New Blank Form.
When selecting the New Blank Form, you will find the Editor page, where you can add and customize fields, as well as change settings.
3.1. Add required fields

As you can see here, you can add any fields easily from the 60+ input fields of Fluent Forms of 4 different types, where multiple methods are applied.
You can add those fields by:
- Using the + icon at the top
- Selecting from the tabs in the central pop-up
- Clicking on the input fields on the right side
- Adding by searching from the search bars
- And the most lovely one: simply drag and drop
Here, I will select a few fields typically applicable for patient intake form. I am adding:
- Name fields
- Email field
- Three-column Container
- Address field
- Phone/Mobile field
- Form Step
- Radio Field
- Checkbox Field
- File Upload
- Rich Text Input
- Terms & Conditions.
Note: the accessibility to the fields you can add depends on whether your plugin version is free or pro.
3.2. Customize the form fields
3.3. Organize the form settings
The form setting is a very crucial part right after finalizing the fields. Whether you want to add a confirmation email notification or limit and schedule forms, you will find it in the Settings and Integrations page. You can also enable conditional confirmation or landing page mode from the same page.
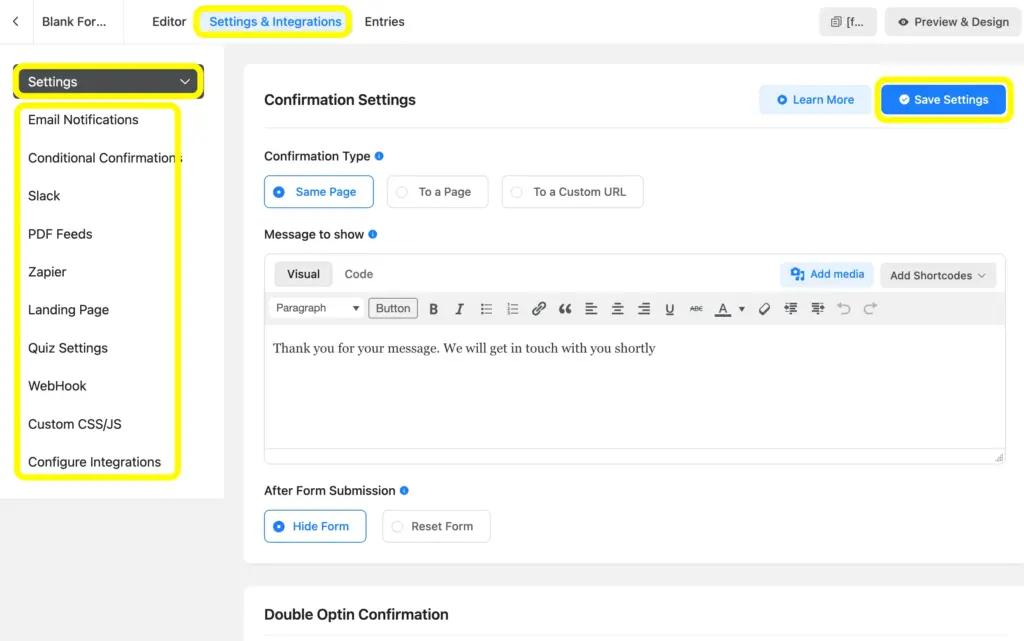
You can also enable deleting entries automatically with a simple setting from the compliance settings, along with the option to delete entry data after form submission.
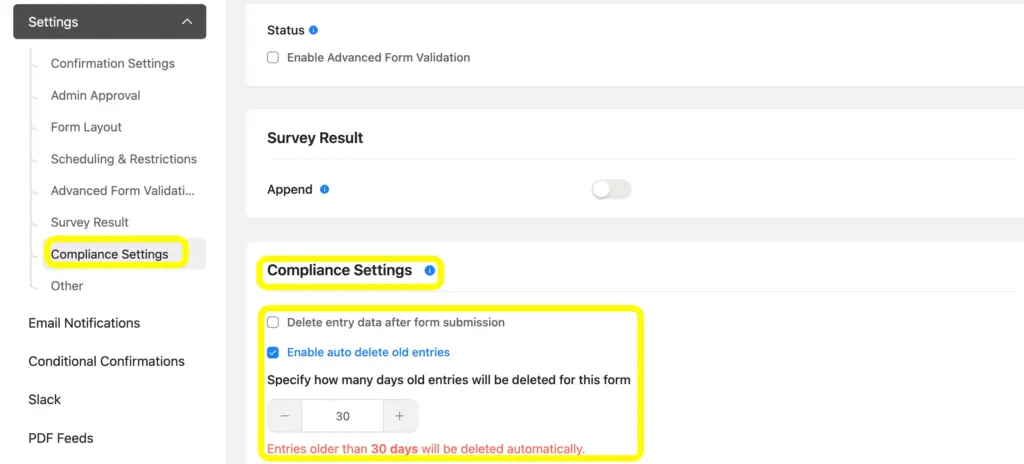
As Fluent Forms comes with 60+ integrations, you can configure integrations from that one page.
4. Accomplishing the steps to publish the form
First of all, you can rename the form to give a suitable name. Just click on the initially ‘Blank Form’ titled button on the top-left side and write down the name by which you want to entitle the form, and hit the Rename.
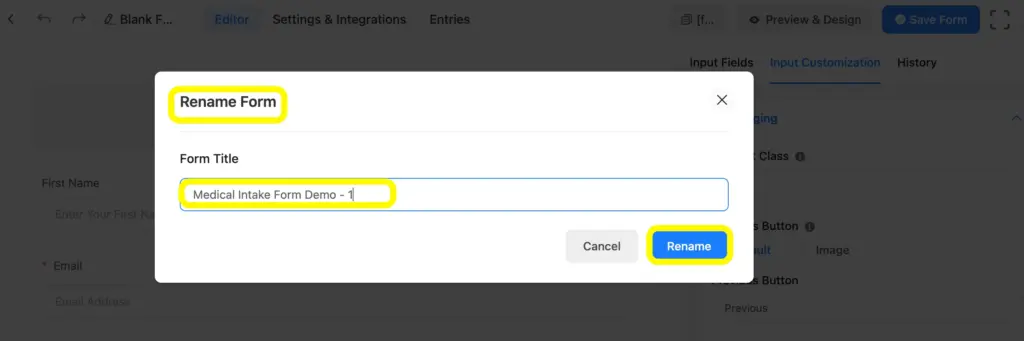
Rename helps you select the form name easily in the post/page from the Fluent Forms block. Anyway, you can also use the shortcode to add the form to the post/page.
To copy the shortcode, just look at the top-right side of the editor page and grab it with a click.
Next to the shortcode button, you will find the Preview & Design button, clicking on which you can check the preview.

In the preview page, you can check the device-responsiveness and progress indicator(where applicable). You can also choose a form style template from multiple options and customize the selected preset to provide the form with an advanced look.
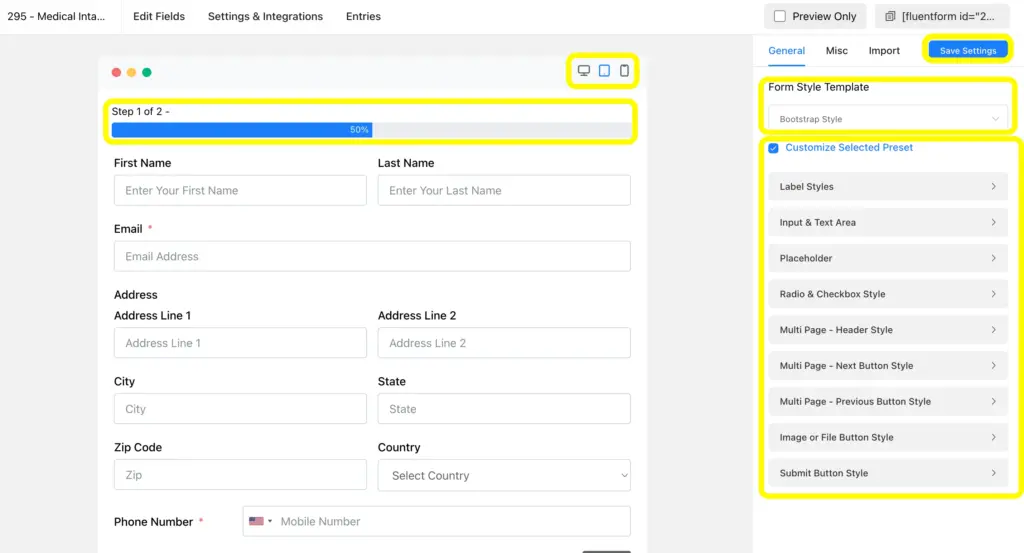
Note: Click the save settings button if you have made any changes in the form style. Fluent Forms is powered by its advanced form styler to make various types of changes with a better user experience.
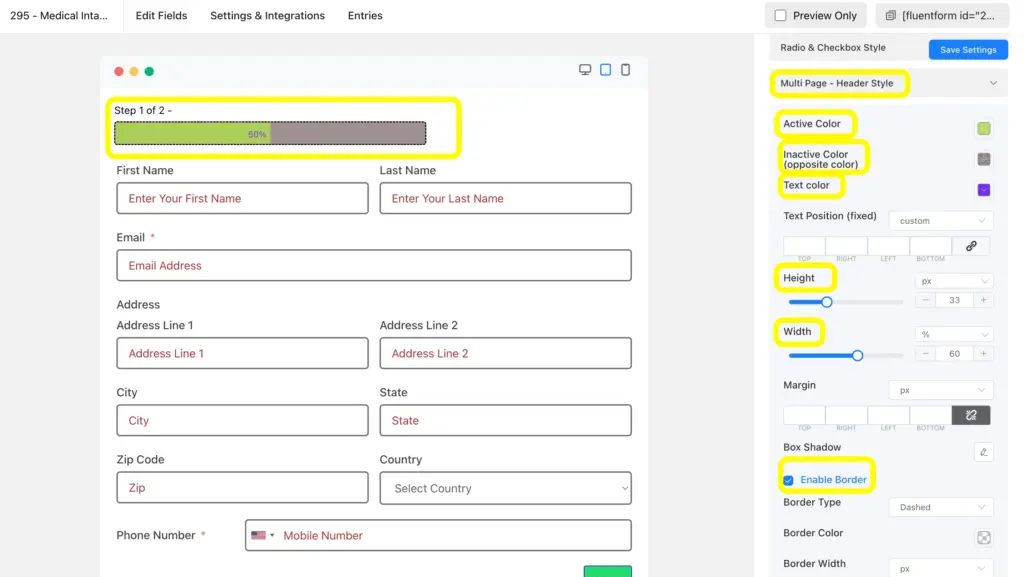
See how you can empower your form by applying broad styles to particular items:
Once you are done with this, you are all set to publish the form.
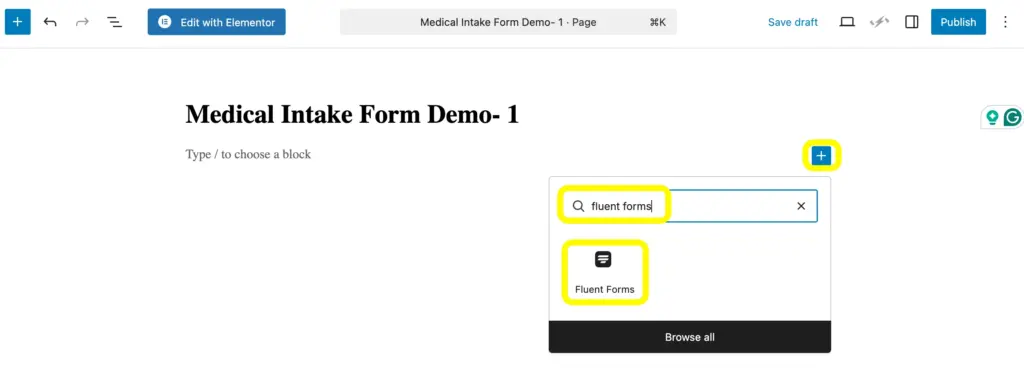
You can publish the form by selecting the Fluent Forms block first and then selecting the form you want to embed.
Select Fluent Forms first:
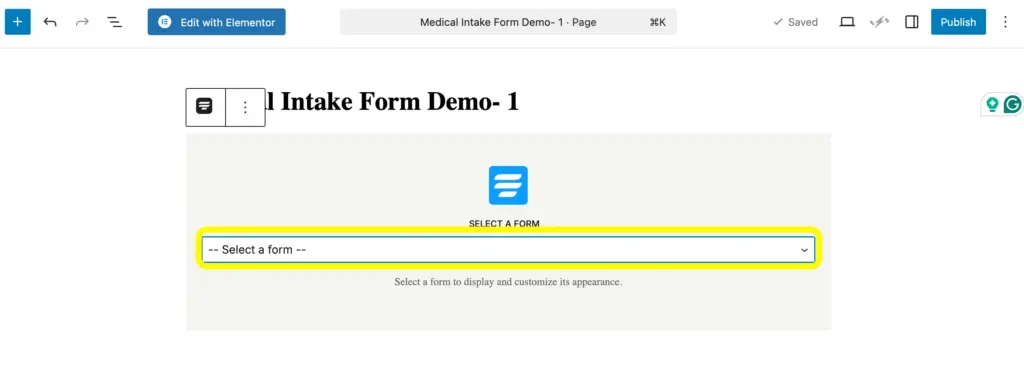
Now, select the form you want to embed from the dropdown menu:
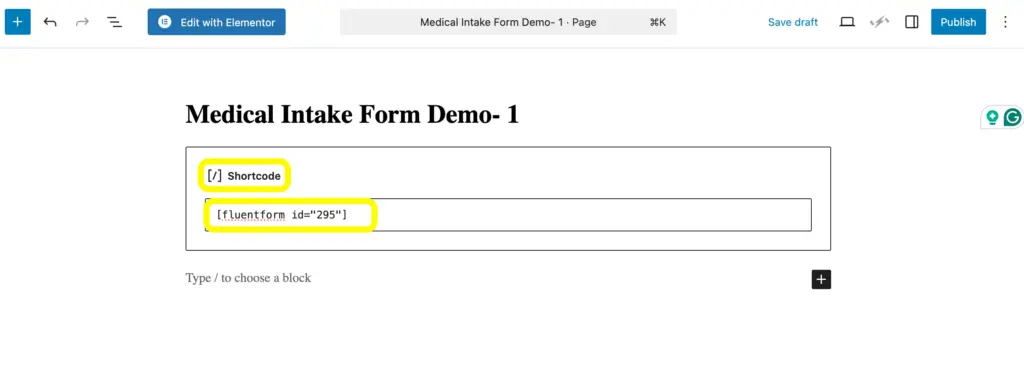
You can also paste the shortcode of the form you copied earlier. For this, use the shortcode block and paste the code there:
These are the steps on how you can create, customize, stylize, and publish a patient intake form without coding a single line.
You can also use the patient intake form template as well. Also have a tour of our demo forms gallery.
Related features
Advanced form styler
The advanced form styler of Fluent Forms allows you to customize the form style to maintain brand consistency. Whether it’s about the color, padding, or typography, you can customize the styling without coding. This makes the form well-designed and ready to add to the landing page as well.
Conditional Confirmation
Fluent Forms’ conditional confirmation allows you to set up customized confirmation based on the user’s action. Notify users with tailored confirmation messages after a form submission, applying any specific set of responses.
Spam protection
Fluent Forms ensures form security powered by several security integrations, including Akismet, Turnstile, hCaptcha, reCAPTCHA, etc. On one side, you can enable the login requirements, and on the other side, you can access control submissions. It helps you control spamming in form submission.
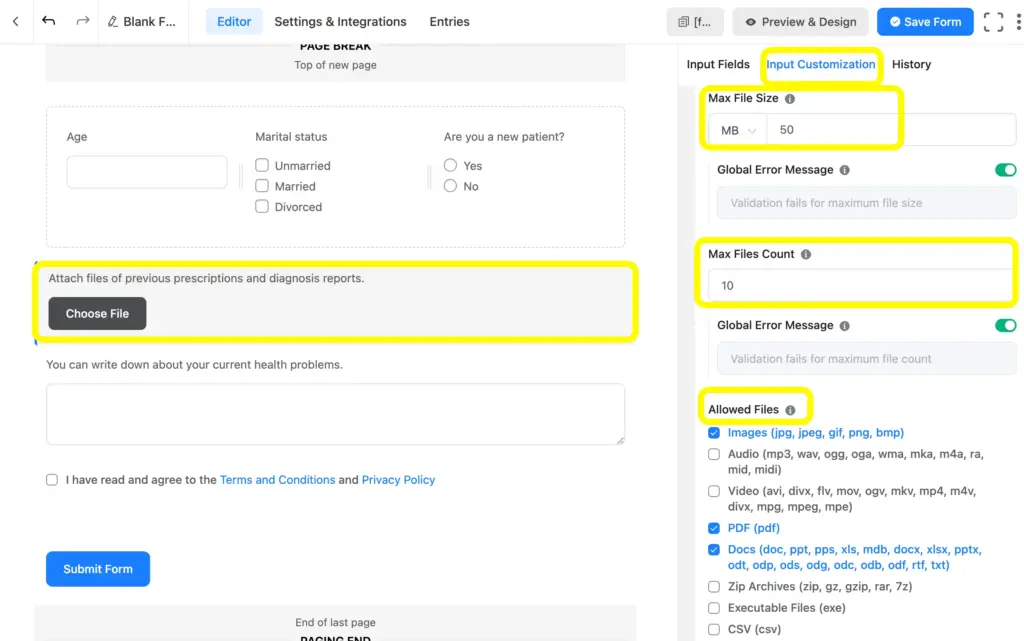
File upload
The file upload feature of Fluent Forms allows you to collect documents from users in various formats, applying a file size limitation. Allow users upload files instantly within the form at once.
PDF generator
Send a PDF document to the users along with the submission and further details. Fluent Forms PDF Generator is an add-on that helps you get pdf version of a form’s details by applying templates, whereas the password protection is applied. This works superbly for the forms in which the numeric calculation is applicable.
Advanced form validation
Set boundaries for form responses with the advanced form validation when acceptable input doesn’t come from the users. Show the error message that the form cannot be submitted, as the condition doesn’t match.

Hi, this is Aparup. I am a Literature postgraduate, mixing my creative thoughts with my experience in the tech industry to surpass AI. Professionally, I am a content marketer seeking solutions to users’ problems regarding WordPress.


Leave a Reply