Booking a podcast guest shouldn’t involve back-and-forth emails. Two forms handle the whole thing: an open application that lets you review and choose guests and a follow-up form for the ones you approve, where they upload a headshot, sign a recording release, and book a slot on your calendar.
I built this workflow with Fluent Forms, the fastest form builder for WordPress, plus FluentBooking for the scheduling step. Everything runs automatically except one step: reviewing applicants and deciding who gets on the show. I’ll show you how to plan and build each form, and how to allow users to book a recording session right from the form.
TL;DR
Use two forms: an open podcast guest application form to qualify guests, and a follow-up guest form (your podcast guest questionnaire) that only approved guests fill in.
The application collects just enough to decide: name, email, bio, expertise, proposed topics, and a link. Keep it short.
Use the Admin Approval module to gate applications. Everyone sees the same pending message on submit; declined entries only get a decline email, while approved entries process and trigger the email notification that carries the guest-form link.
The approved-guest form gathers the prep details: a high-resolution headshot, name pronunciation, final talking points, a signed recording release, and booking a recording slot.
The FluentBooking field books the slot inside the form. It is a native, free integration; you map it to a calendar you set up in FluentBooking first.
Publish the guest form as a dedicated landing page with a private share link (a tokenized URL), not a public page, so only approved guests who have the link can open it and book.
File upload, image upload, multi-step layout, and the dedicated landing page are Fluent Forms Pro features. The Signature field is a separate add-on. You can skip these to build the forms for free.
Use FluentPlayer to turn published episodes into conversion tools, capturing listener emails straight into FluentCRM.
Why You Need a Podcast Guest Application Form
When guest pitches arrive by email or DM, no two look alike. One person sends a bio and nothing else, another sends five links. As a result, you cannot compare them fairly.
An application form fixes that. Every pitch arrives in the same format, with the same fields, so you can scan applicants side by side and decide fast. It is also the first impression a guest gets of your show, so a clean form conveys your professionalism.
The application is only half the job, though. Once you approve guests, you still need the final details: the guest’s headshot, their talking points, a recording release, and a time on your calendar. That’s what the second form is for (podcast guest questionnaire/form).
The Two-Form Workflow: Application First, Booking After Approval
Here is the setup this guide builds:
Form 1, the application. Open to anyone. Collects what you need to decide whether to have them on the show.
Form 2, the approved-guest form. Sent only to people you approve. Collects the prep details and lets the guest book a recording slot. Also known as a “podcast guest form” or “podcast guest questionnaire.”
What Your Podcast Guest Application Should Collect
Keep the application lean. Collect enough to make a decision. Save the details for after you’ve approved a guest. This will keep your approval process simple and save time.
What to collect
Why it’s on the application
Contact basics: full name and email
So you can reach the applicant with your decision.
Guest background: short bio and area of expertise
Offer the expertise as a dropdown or checkboxes of your show’s usual categories, so you can sort applicants by topic at a glance.
Topics and fit: the angle they want to cover and why they fit your audience
This is the field you’ll consider carefully when deciding.
Fluent Forms Pro for the Image Upload field and multi-step layout on the second form.
FluentBooking installed for the scheduling step. Its Fluent Forms integration is native and works on the free plan.
The recording release on the second form uses the Signature field, which is a Fluent Forms add-on you need to purchase separately. If you would rather keep it simple, a consent checkbox on its own records that the guest agreed.
How to Create a Podcast Guest Application Form in WordPress
Build the application form first. Keep it simple and quick to fill in to get maximum submissions.
Step 1: Create a new form
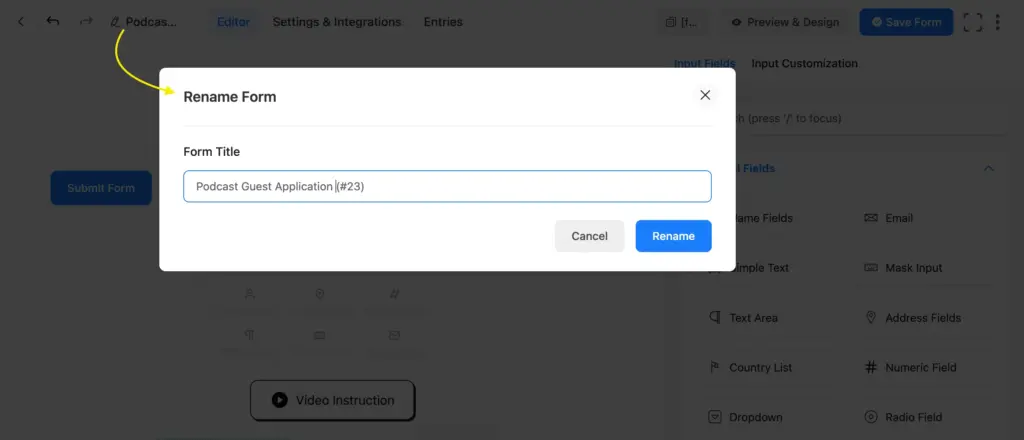
Go to Fluent Forms > New Form. Start from a blank form and name it “Podcast Guest Application” so you find it fast.
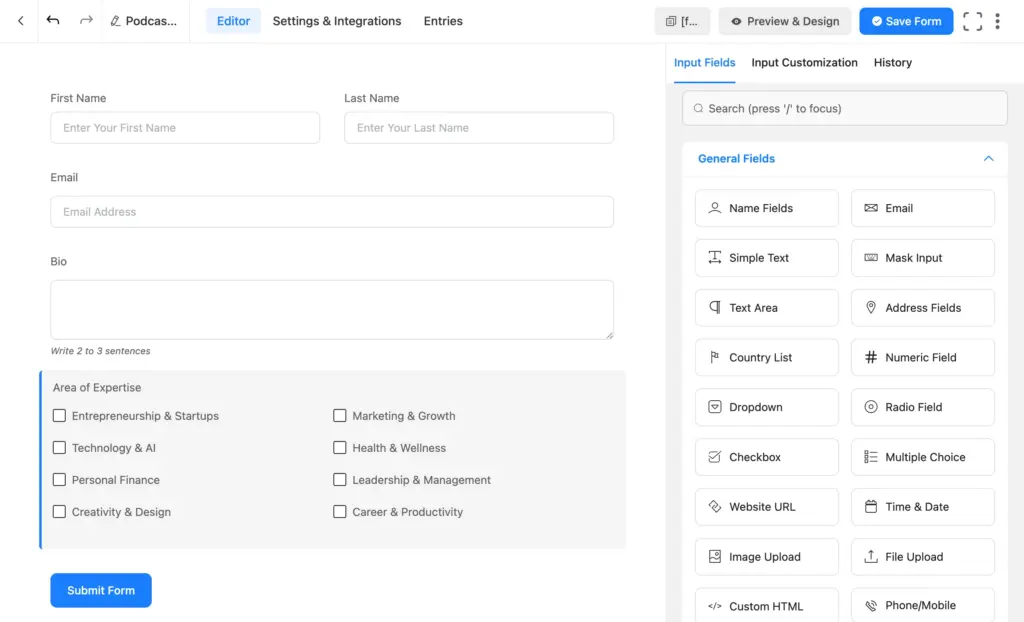
Step 2: Add contact and background fields
Drag in these fields:
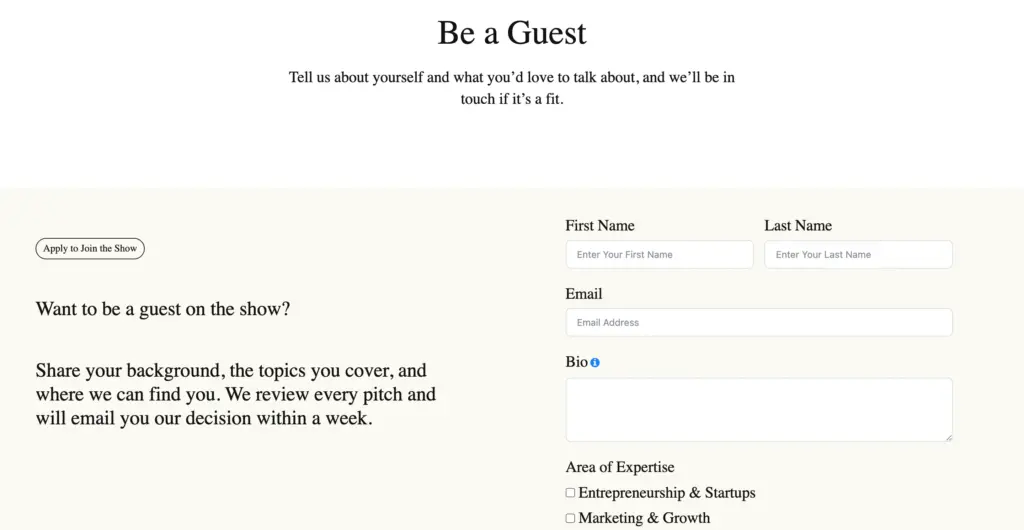
Name Fields for the applicant’s first and last name.
An Email field, set to required.
A Text Area labeled “Short bio”, with a hint like “2 to 3 sentences.”
A Checkbox field labeled “Area of expertise,” with your show’s core topics as options. Checkboxes allow guests to select multiple topics (a marketing founder’s expertise might be both “Marketing” and “Entrepreneurship”). Use Radio instead if you want a single primary category.
Step 3: Add topics and fit fields
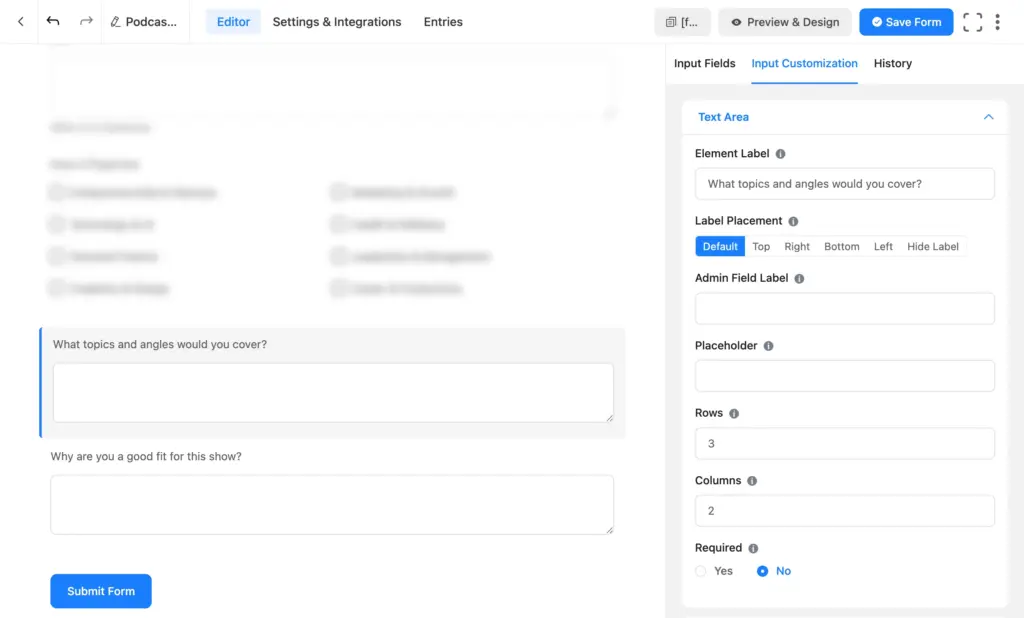
Add a Text Area labeled “What topics and angles would you cover?” and another labeled “Why are you a good fit for this show?” These are the answers you will weigh when deciding.
Step 4: Add links
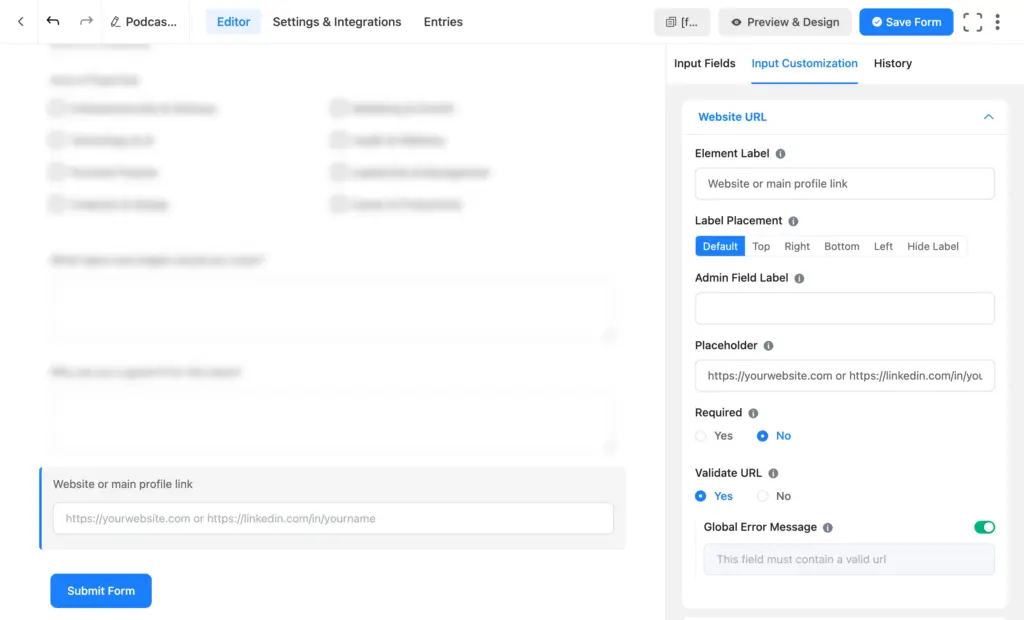
Add a Website URL field labeled “Website or main profile link.” The URL field validates the format, so you never get a broken link.
Step 5: Add a consent checkbox
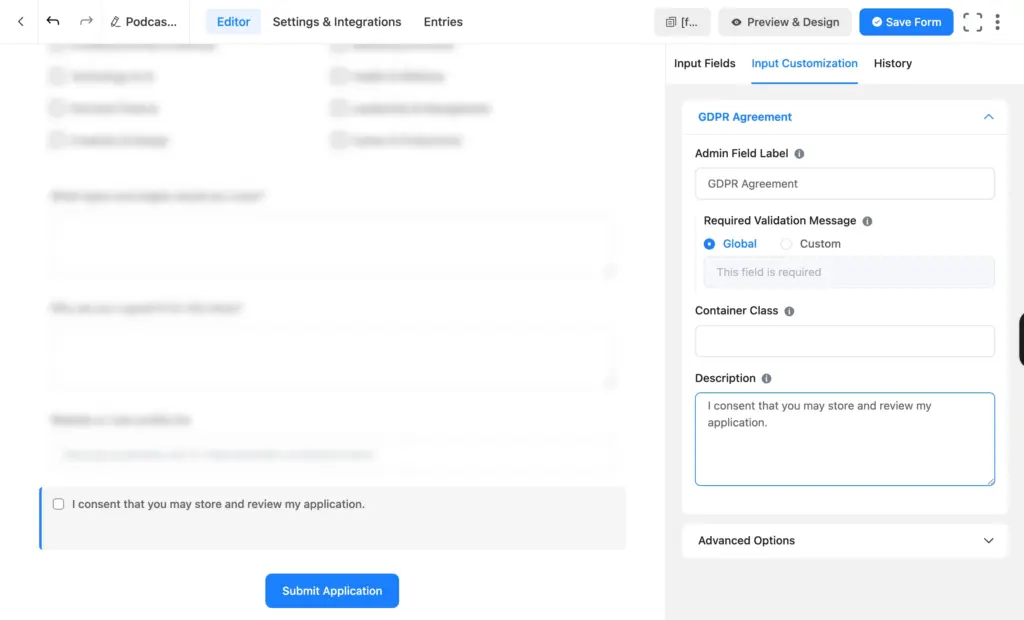
This is a light consent. Drag in a GDPR Agreement field (or a plain checkbox) with text like “I agree that you may store and review my application.”
Step 6: Set the notifications
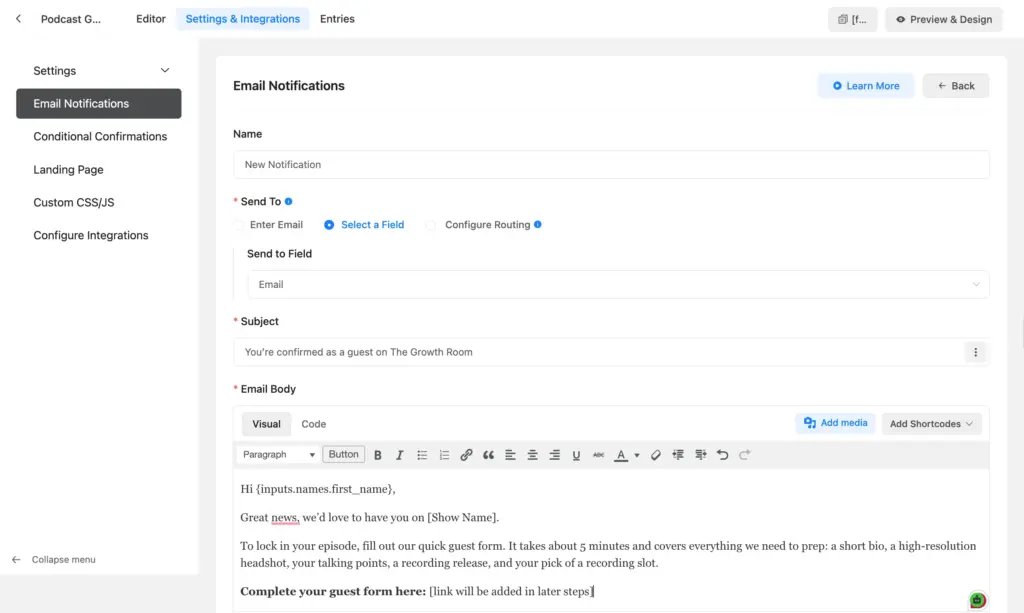
Open Settings & Integrations > Email Notifications and set up one email to the applicant. This is the message that will carry the link to your guest form, so leave a spot for that link, you’ll drop it in once you build the guest form and generate its private link later.
You’ll set up admin approval in the next section, so this email only triggers once you approve someone. The rejected applicants receive a different email.
You don’t need a separate email notification to yourself here. Admin Approval already sends you an approve or decline email for every submission, so you’re caught up on new application submissions.
Step 7: Set the on-screen confirmation message
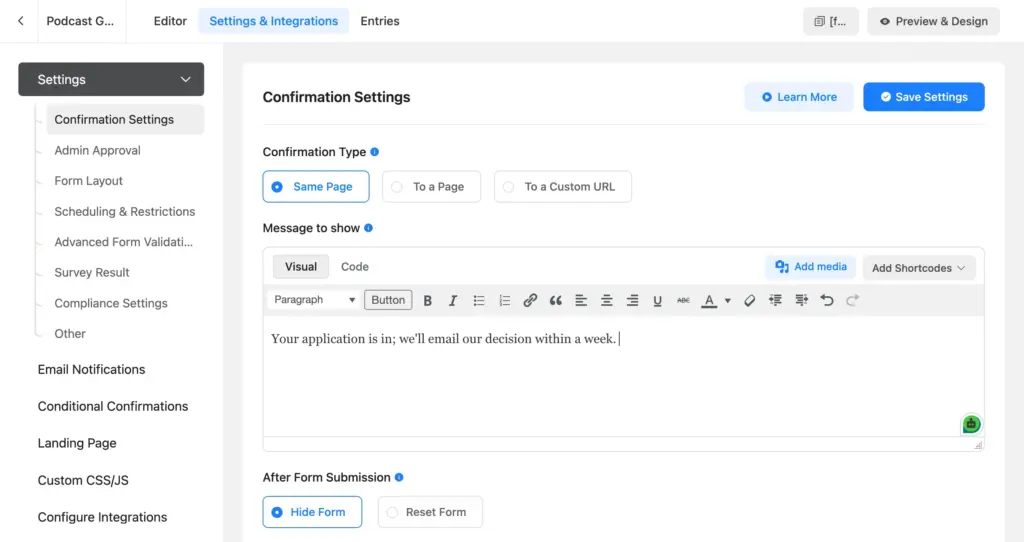
This is a fallback message to confirm form submission. Usually users see this message after they submit a form. But if admin approval is turned on, a different pending message overrides this default confirmation message. Use it to point applicants to their email for the decision.
Set it under Settings & Integrations > Confirmation Settings. Write a confirmation message like, “Your application is in, we’ll email our decision within a week.” Naming a timeframe sets the right expectation.
Step 8: Publish the application form
Save the form, then add it to a page with the shortcode, the Fluent Forms block, or a dedicated landing page. A “Be a guest” page is the easiest to link from your show notes and social bio.
Review and Approve Applications
You could read every submission in the application form’s Entries tab, but the Admin Approval module makes this cleaner. It holds each application for your review and emails you the submission data along with an approve and a decline button.
Everyone sees the same pending message on screen when they submit. After that, declined entries stop at a decline email. Only the approved entries process, and approved guests receive the email notification with your guest-form link.
Turn on the Admin Approval module
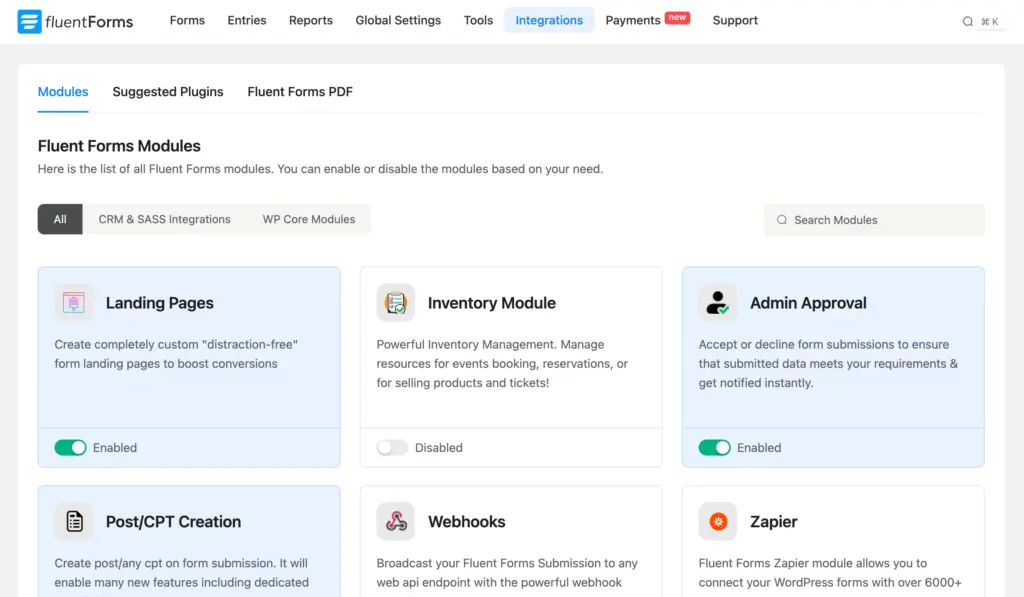
Go to Fluent Forms > Integrations, search for and enable the Admin Approval Module, and enable it. This unlocks the approval settings on your forms.
Configure the global approval settings
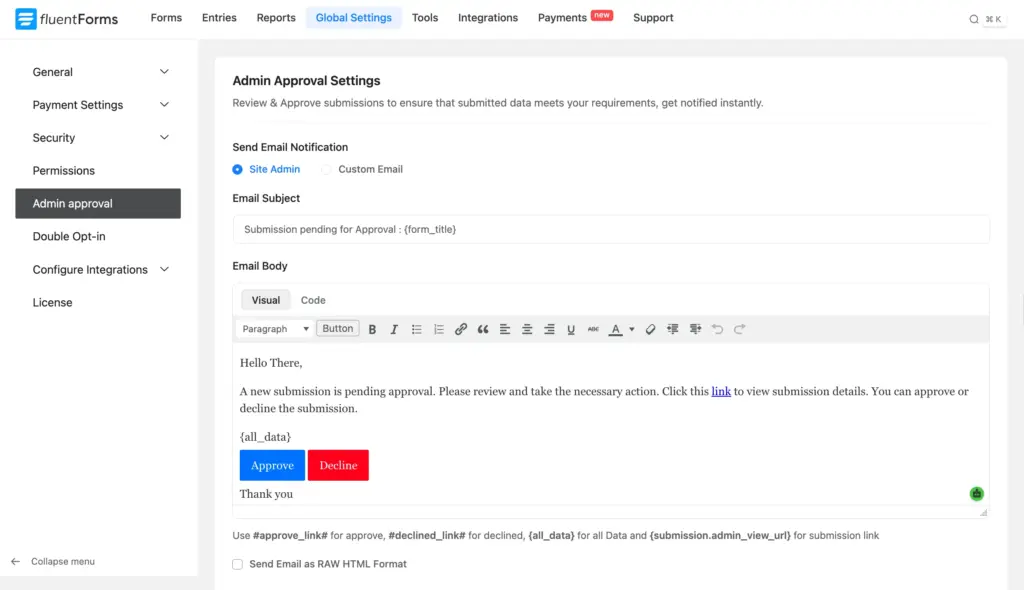
Go to Global Settings > Admin approval. This is where you set up the email that tells you a submission is waiting, and it applies across all your approval-enabled forms.
Send Email Notification: choose Site Admin to send it to your admin email, or Custom Email to send it somewhere else (say, a producer’s inbox).
Email Subject and Body: keep the defaults or customize them. The body holds the approve and decline links as buttons and the complete application data, so you can decide right from the email.
Auto-delete unapproved and declined entries: tick this and set the number of days to clear applications you never act on, so no application is in the pending list indefinitely. Seven days is a sensible default.
Save, and you’ll see “Admin Approval is currently active” confirmed at the bottom.
Enable approval on the application form
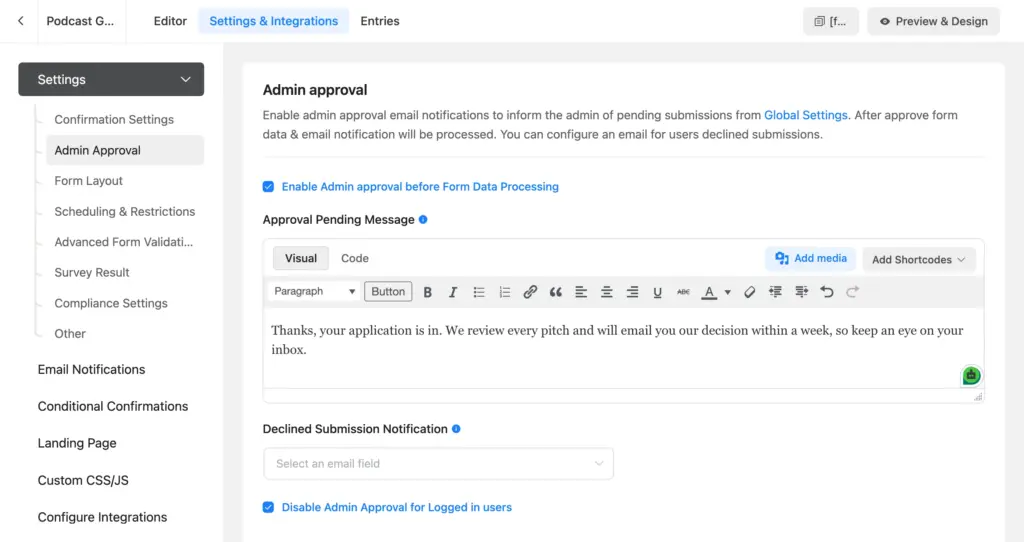
Open your application form and go to Settings & Integrations > Settings > Admin Approval. Turn on Admin Approval before Form Data Processing so no application is finalized until you review it.
Here you’ll also see the Approval Pending Message field. This on-submit message will override the confirmation message from Step 7, so paste in your “Thanks, your application is in. We review every pitch and will email you our decision within a week, so keep an eye on your inbox.” text if you set it here rather than in Confirmation Settings.
Send declined applicants a message
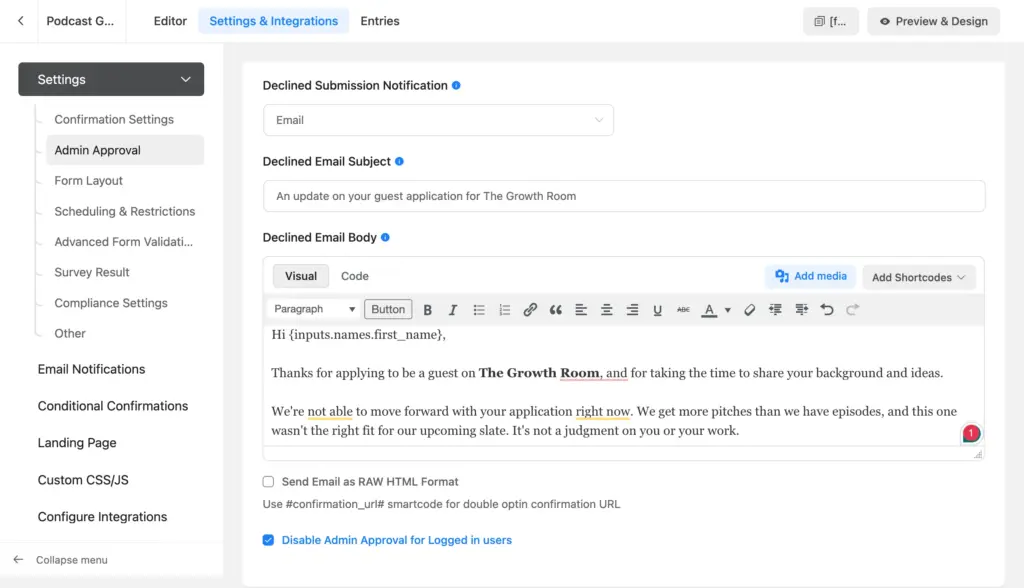
Turn on the Declined Submission Notification so applicants you pass on hear back. Because your form already has an Email field, select it as the recipient, then write the subject and body, for example, “Thanks for your interest in the show” with a short, kind note. A declined entry never processes, so this is the only email it triggers.
Make Sure Your Emails Actually Get Delivered
This whole workflow runs on email, including the decline notice, the approval email with the private form link, and your own new-application alerts. None of it works if those messages land in spam or are never sent at all. By default, WordPress sends mail through its own server, which many hosts handle poorly, so form emails often go missing.
Fix this before you go live by routing your email through a proper service. FluentSMTP is a free plugin for WordPress that connects your site to an email service provider, so your notifications land in your inbox.
The guest form’s booking field connects to a FluentBooking calendar, so let’s create that calendar first.
In your WordPress dashboard, open FluentBooking and create a host (that’s you or whoever runs recordings).
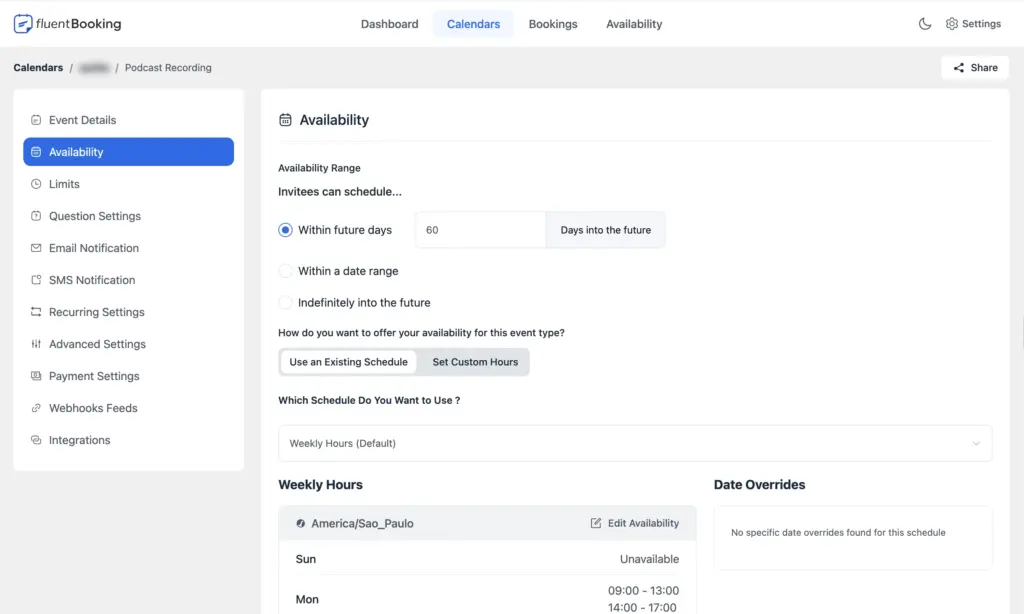
Create an event for recordings, for example “Podcast Recording, 60 minutes.”
Set your availability so guests can only book on the days and times you actually record. FluentBooking handles time zones, so a guest in another country sees slots in their own time.
Connect your calendar app if you use one (pro feature), so bookings sync and you avoid double-booking.
You’ll select this event in the FluentBooking field’s Select Calendar dropdown when you build the guest form next.
Build the Approved-Guest Form (Your Podcast Guest Questionnaire)
This second form only goes to guests you have approved. Now that they are confirmed, you can ask for the prep details and let them book a recording slot.
Step 1: Add the prep fields
Create a new form named “Podcast Guest Questionnaire” and add:
Name Fields and an Email field. The booking step needs both, so include them here too.
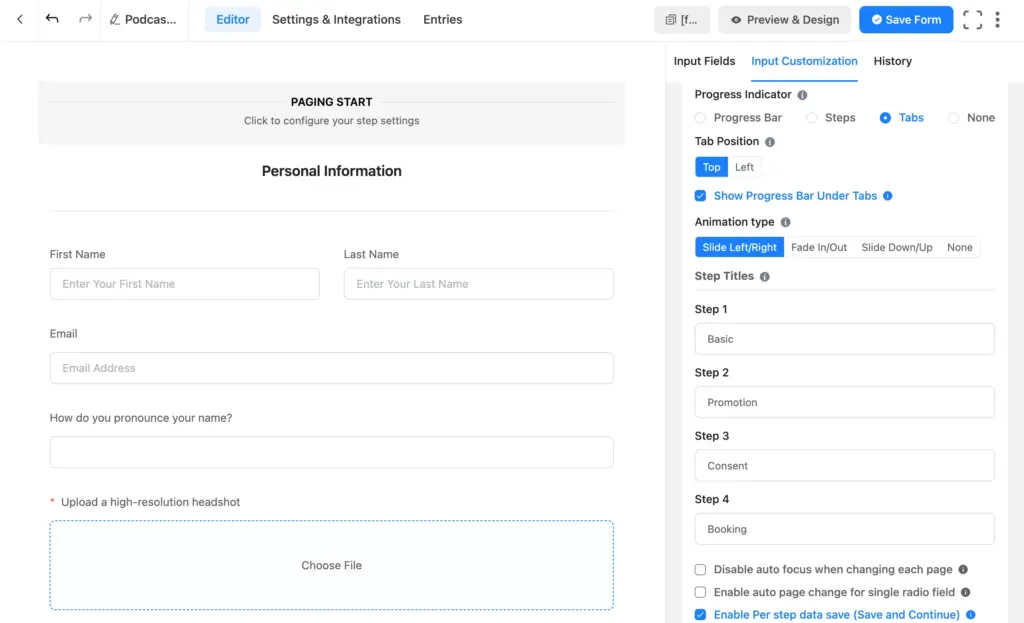
A Simple Text field labeled “How do you pronounce your name?” so you say it right on air.
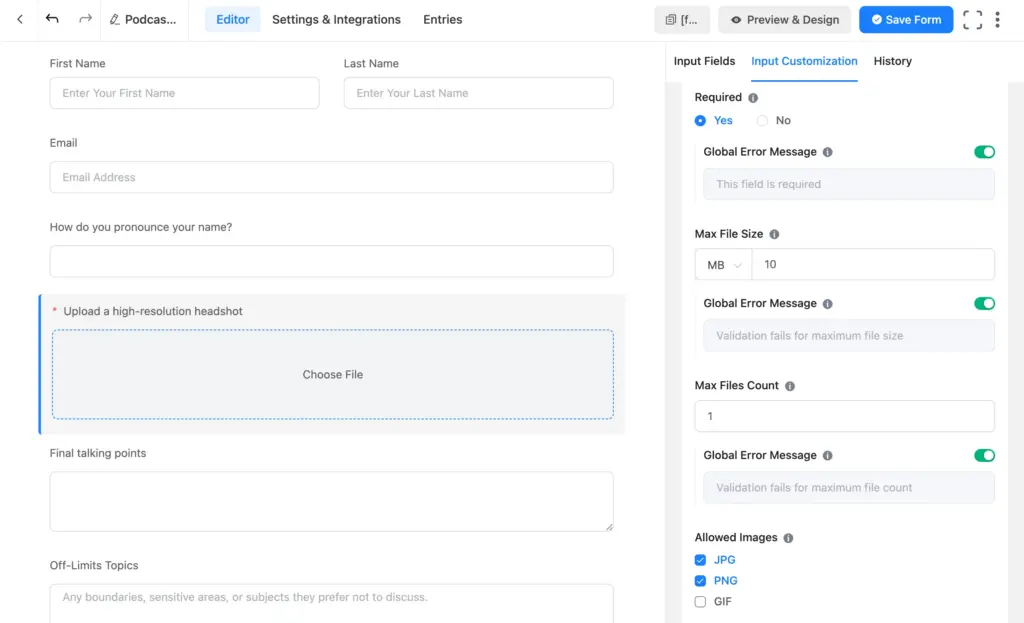
An Image Upload field labeled “Upload a high-resolution headshot.” Open Input Customization and set the max file size (around 5 MB), limit the count to 1, and restrict allowed types to JPG and PNG. Add a hint: “At least 1500 pixels wide.”
A Text Area labeled “Final talking points”, one per line.
A Website URL or Text Area labeled “Links to past interviews or talks.”
Step 2: Add the recording release consent
This is where you capture permission to record, edit, and distribute the episode.
Drag in a Terms & Conditions field and write the release text, for example: “I grant permission to record, edit, and distribute the audio and video of this interview across podcast platforms and social channels.” The guest checks the box to agree.
Then drag the Signature field (an add-on purchased separately) below it, labeled “Sign here.” Guests can sign with a mouse, trackpad, or finger on a touchscreen. You can skip it to keep the form simple.
Step 3: Add a booking slot with FluentBooking
Now let the guest pick a recording time with the FluentBooking field, which connects to the recording calendar you set up earlier.
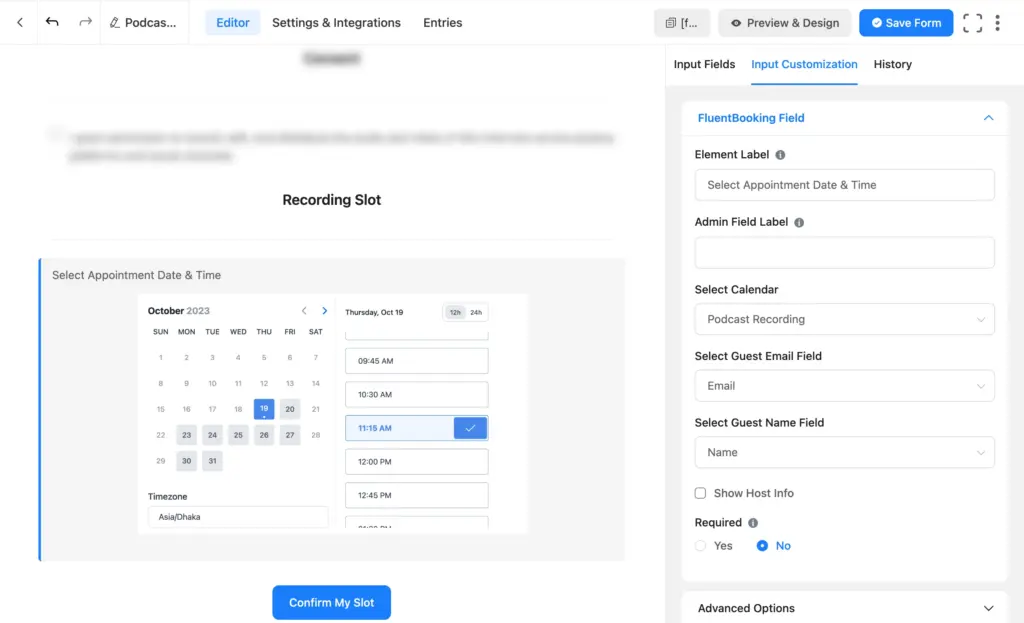
In the form editor, open the Advanced Fields panel (or click the plus icon and search for FluentBooking) and drag the FluentBooking field into the form. Hover over it and click the pencil icon to open Input Customization, then set:
Element Label: something like “Pick your recording slot.”
Select Calendar: choose the recording event you created in FluentBooking.
Select Guest Name Field: map it to the Name field on this form.
Select Guest Email Field: map it to the Email field.
That name and email mapping is why both fields have to be on this form. Once mapped, the guest sees your open times right inside the form, picks one, and the booking lands on your calendar.
Step 4: Group your forms into steps and set confirmation
Split the form into a multi-step layout. Drag the Form Step field for each section so the form feels short: prep details, then release, then booking. From the Settings & Integrations tab, add a confirmation message like “You’re all set. We’ll see you at your recording slot.”
Step 5: Keep the form private to approved guests
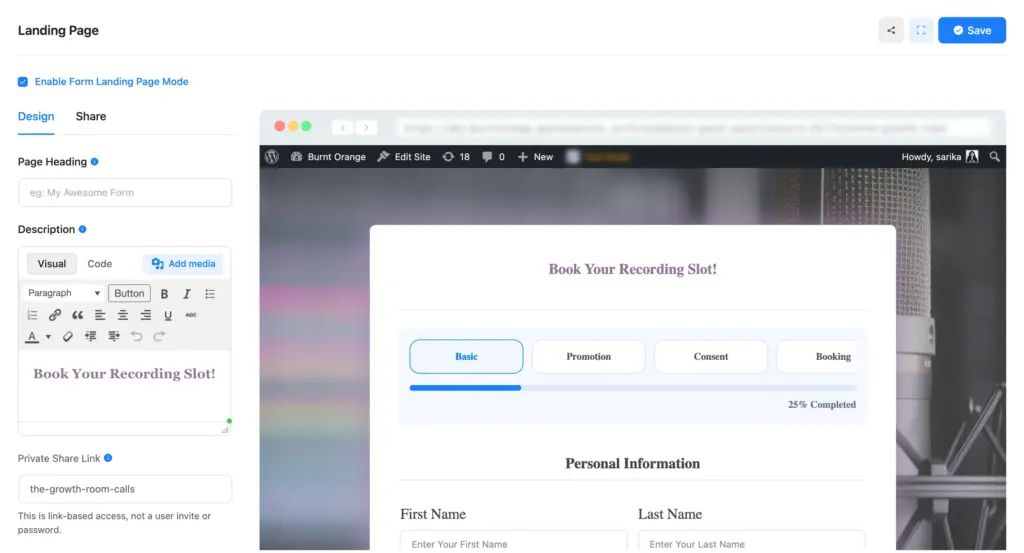
If you publish the guest form on a normal WordPress page, the URL is public. Anyone with the link can open the form and book a recording slot. Publish it as a dedicated landing page so the form is only accessible to those who receive the URL from you.
Turn on the Landing Pages module first under Fluent Forms > Integrations. Then, go to Settings & Integrations > Landing Page from your Podcast Guest Questionnaire form. Check EnableForm Landing Page Mode. You can customize the landing page to match your site’s style.
Switch on the Private Share Link. This adds a private token to the landing page URL, so only visitors with the full private link can open the page. Switch to the Share tab and copy the Share Via Direct URL link.
To protect the guest form even better, turn on Fluent Forms’ login requirement so only logged-in users see the form, and create a WordPress account for each approved guest.
Send approved guests the follow-up form link
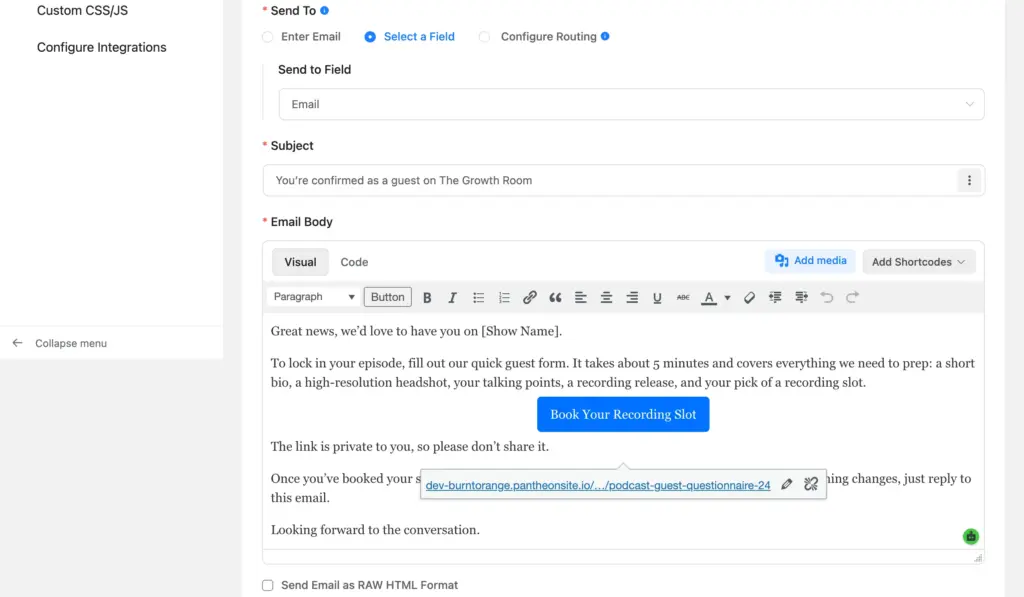
Go back to your podcast guest application form’s email notification. Clickthe green setting icon to make changes. Edit the email body to insert the link to the private landing page you just copied. Because declined guests never receive this email, only approved guests can access the landing page form.
Test Both Forms Before You Share Them
Run through the full workflow yourself before any guest sees it.
Submit a test application, then open the application form’s Entries tab and confirm it appears as pending (unapproved).
Check that your own admin alert email arrived and that the applicant did not yet get the approval email (approval hasn’t happened, so the guest-form link should not have gone out).
Approve the entry, then confirm the applicant receives the approval email with the private guest-form link. Click that link and make sure it opens the guest form.
Submit another test application and decline it. Confirm that the applicant gets the decline email instead (and no guest-form link).
Open the approved-guest form and submit a full test entry. Open the headshot from the entry and check it arrives at usable resolution, not a thumbnail, and that the signature is saved.
Complete a test booking and check it lands on your FluentBooking calendar. Confirm the FluentBooking confirmation email reaches the guest.
Open the guest form’s plain landing page URL in a private browser window without the token, and confirm the form stays hidden. This proves that only the private share link opens it.
If any of these emails don’t arrive, that’s a deliverability problem, not a form problem. Set up FluentSMTP as described above, then run the email checks again.
Tips for an Application People Actually Complete
Keep the application short
Every field on the application is friction for someone who has not committed yet. Ask only what you need to decide. Save the headshot, release, and booking for after you approve them.
Explain the heavier asks on form two
By the second form, the guest is invested, but a short line still helps. “We use this headshot for your episode art,” and “This release lets us publish the episode” tell guests why you need their consent.
Set your recording availability carefully
Set your FluentBooking availability to the exact days and hours you record. The booking field only offers what your calendar allows, so guests self-schedule only on hours when you’re available to record.
Pro Tip: Capture Leads from the Published Episodes
When you publish an episode, someone watches and then leaves. You never learn who they were.
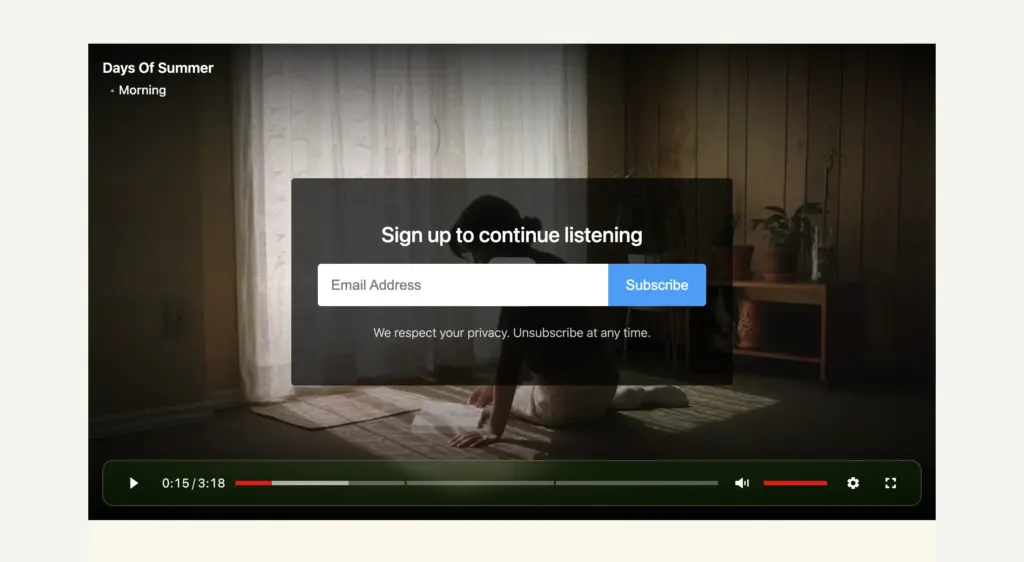
Use FluentPlayer to change that. It’s a video player for WordPress built for podcasts and video, from the same team behind Fluent Forms. And it helps you capture and convert leads right from your podcast episodes. Here’s how:
Capture listeners while they’re engaged: Drop an email capture or a form directly inside the player at a set timestamp, so a listener who’s hooked mid-episode can subscribe or join your list (you can allow skipping as well) without leaving the podcast.
Guide them to the next step: CTA banners and clickable hotspots point viewers to your guest application, a related episode, or a signup, right inside the player.
See what’s working: Built-in analytics show views, average watch time, completion rate, and the moment listeners drop off, so you learn which episodes and guests actually hold attention.
Organize a growing show: Playlists and chapters keep your catalog easy to browse as episodes add up.
Because it’s part of the Fluent ecosystem, the connections are native: an email captured inside an episode lands in FluentCRM instantly, tagged, and ready for follow-up. You can sell products and services right from the episode using Fluent Forms or embed your booking calendars on a video using its shortcode.
You now have a workflow that does two jobs cleanly. The application form gives every pitch the same structure so you can choose the right guests. The approved-guest form collects the headshot, talking points, and signed release and lets each confirmed guest book a recording slot on your calendar.
Download Fluent Forms for free. Build your podcast guest application form in WordPress and run your guest bookings the easy way.
Sarika Sarmin
Sarika writes for Fluent Forms and loves to offer insights into small businesses. She’s curious and enjoys discussing ideas, interests, and perspectives. In her free time, she’s either marvelling at architectural beauties or trying different cuisines.





Leave a Reply