
How to Create an Online T-shirt Order Form in WordPress
Running an online t-shirt business is exciting! Especially when so many people are drawn to your unique designs, meaning endless DMs and phone calls from prospects waiting to buy them.
As great as that sounds, responding to all these messages and calls can be time-consuming. That’s why you should consider a t-shirt order form to streamline orders from your WordPress website. It’s effective, yet it doesn’t make your website heavy, unlike e-commerce software.
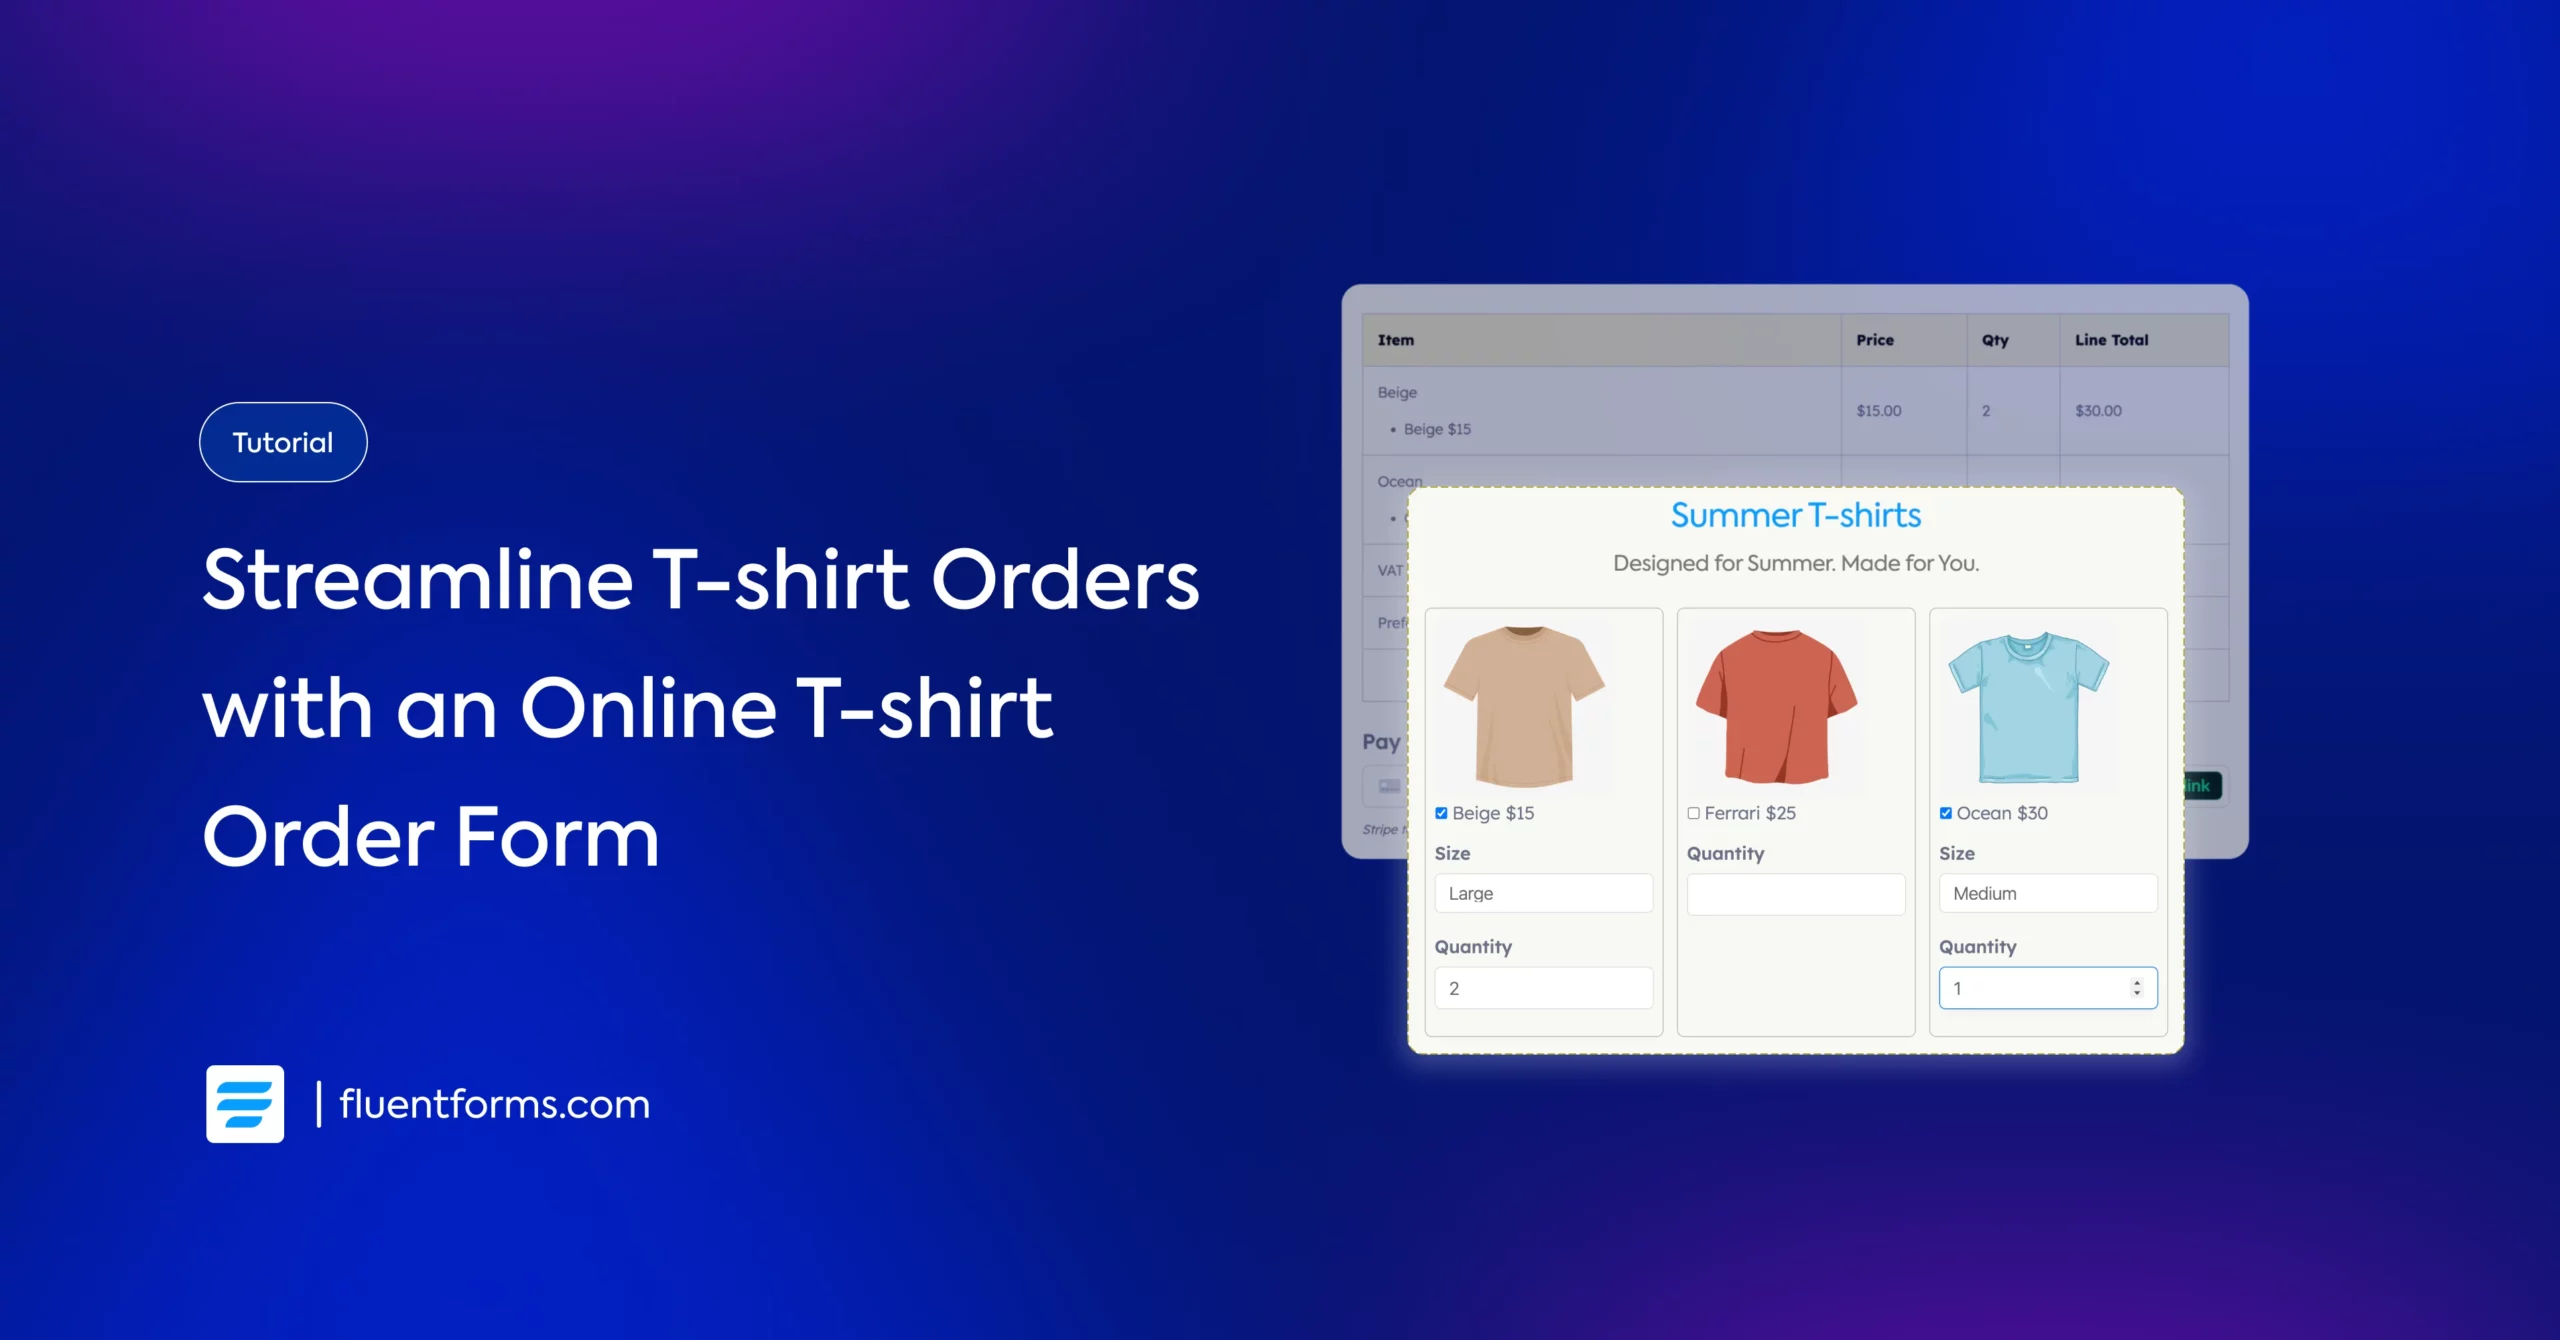
An online t-shirt order form simplifies your entire t-shirt order process; customers can select t-shirts, sizes, colors, and quantities while you automatically collect all the details you need to fulfill their orders. On top of that, you can accept payment through the form, including shipping charges and VAT.
Let’s walk through how to add a professional t-shirt order form to your site that makes ordering easy for your customers and order management simple for you.
How to create an online t-shirt order form
We’ll use Fluent Forms to create our t-shirt order form in this tutorial, so download the contact form plugin if you haven’t already. Once you install and activate the plugin, you have to enable the payment module and configure payment methods to streamline t-shirt sales from your form.
We’ll need to display the t-shirts and allow users to select them, along with their sizes and quantities. After users select their desired t-shirts, we need to guide them to checkout, where we’ll collect their contact and delivery information and accept payment, including VAT and shipping charges.
Let’s dive right in.
1. Display t-shirts, sizes, and quantities
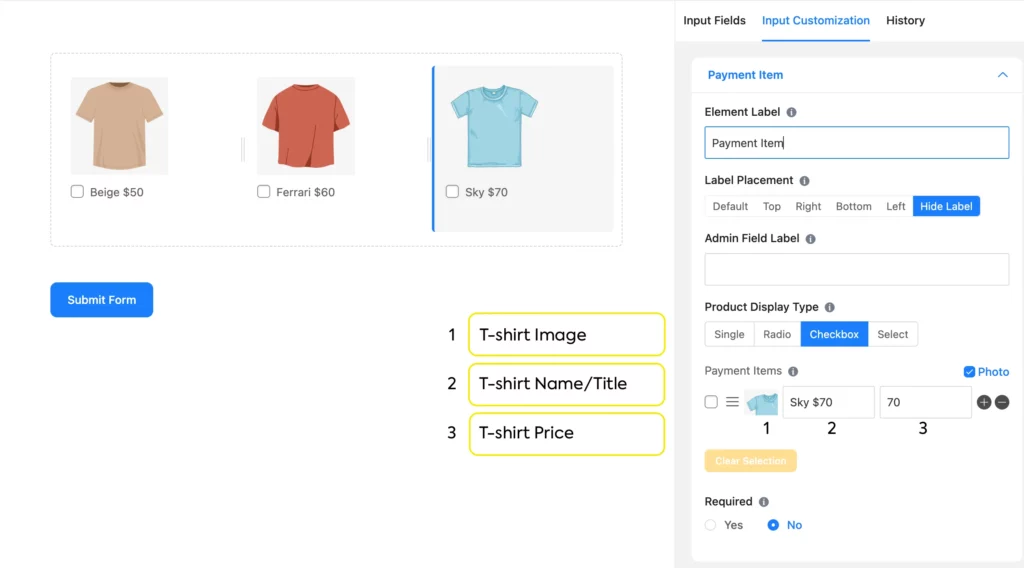
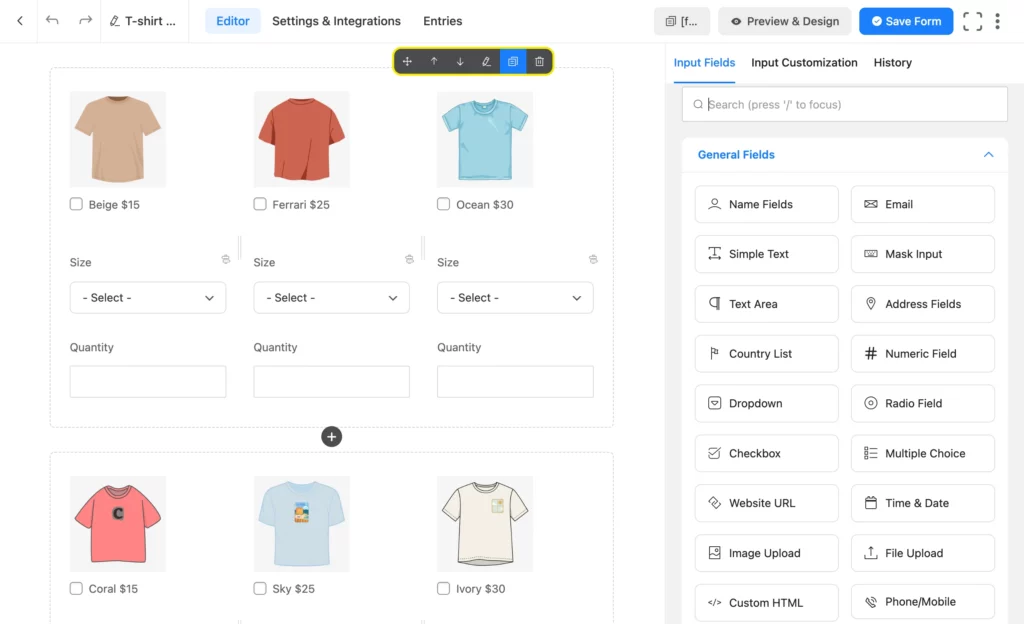
We want to create a grid view to display our t-shirts, so we’ll take a 3-column container from the input fields. Next, we’ll drag & drop a “Payment Item” input field from the Payment Fields inside each column to list t-shirts.
Now, we’ll click on each Payment Item field to customize it. Edit the Element Label text to T-shirt name, select the product display type “Checkbox,” and add the t-shirt image, display name & price. We’re also hiding the element label because we want to keep the texts to a minimum.
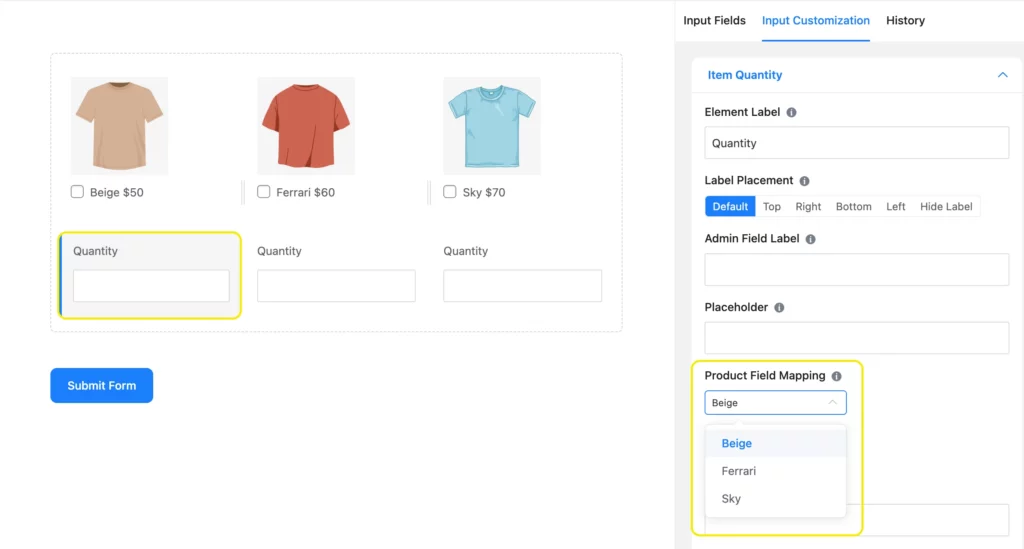
Now, we’ll drag & drop an Item Quantity field beneath each t-shirt. Let’s make sure the quantity fields link to the respective t-shirts. Click on an Item Quantity field to configure this. Navigate to Product Field Mapping and click on the dropdown. Select the label of the t-shirt that’s in the same column as that quantity field.
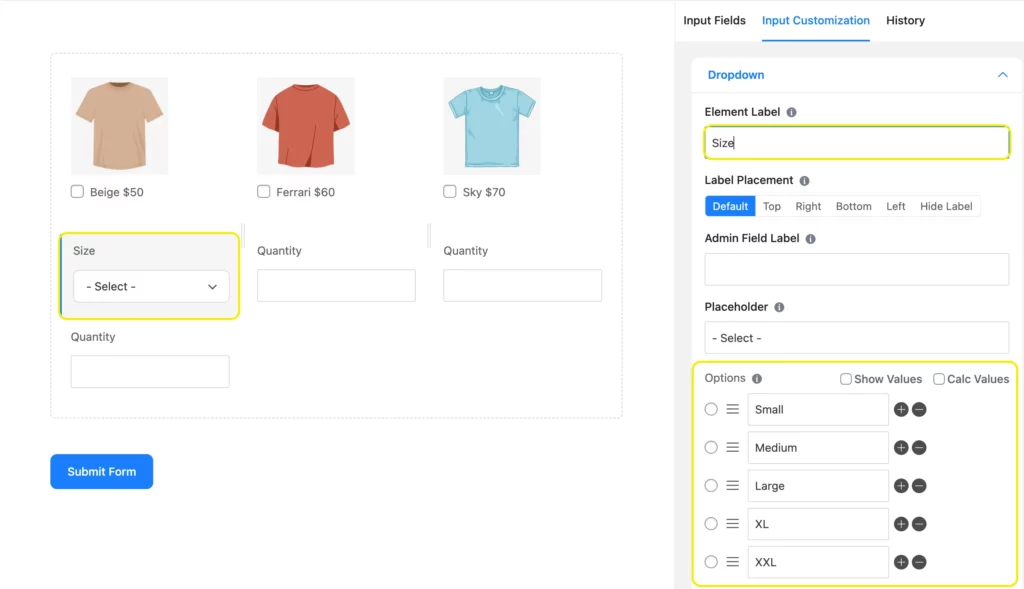
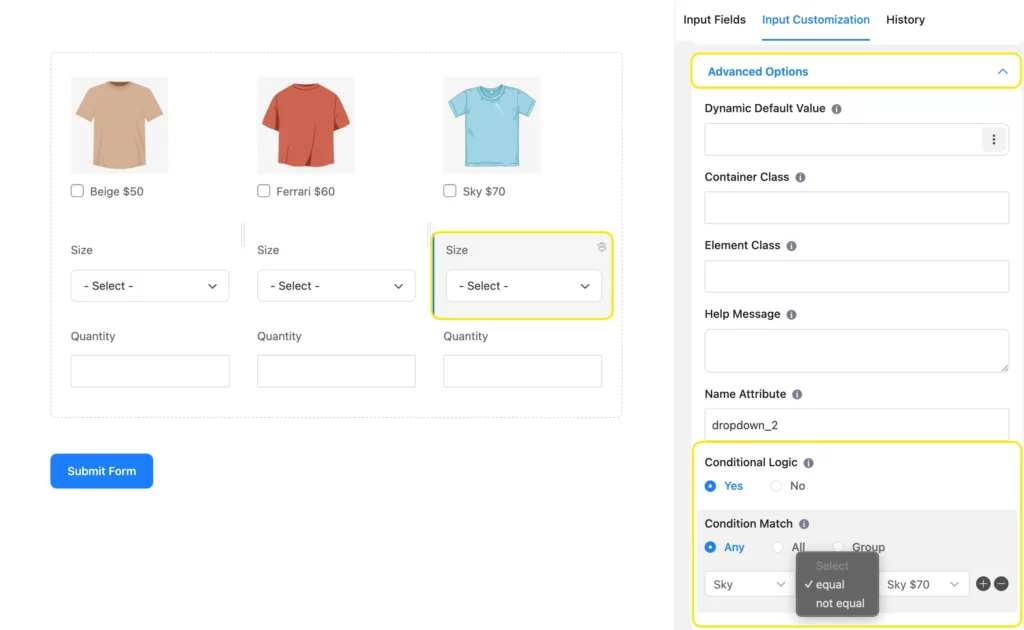
Next, we’ll drag a Dropdown field from the General Fields beneath each t-shirt to assign sizes to them. Then, click the dropdown fields to customize them. Add size options, edit the label text, etc. You can also customize one dropdown field, duplicate it, and drag it to other columns to save time.
Now, we’ll apply conditions to the dropdown fields, so a particular size field appears for a particular t-shirt. Scroll down to Advanced Options from Input Customization and click Yes under Conditional Logic.
For condition matches, choose the element label of a t-shirt in the first box, equal in the second box, and the t-shirt’s display name in the last box. Repeat this process for all three size fields.
Lastly, duplicate and edit this 3-column container to accommodate all your t-shirts in this t-shirt order form.
Now that we’re done with displaying our t-shirts along with sizes and quantities, let’s add shipping charges to our online t-shirt order form.
2. Add shipping charges and VAT to the t-shirt order form
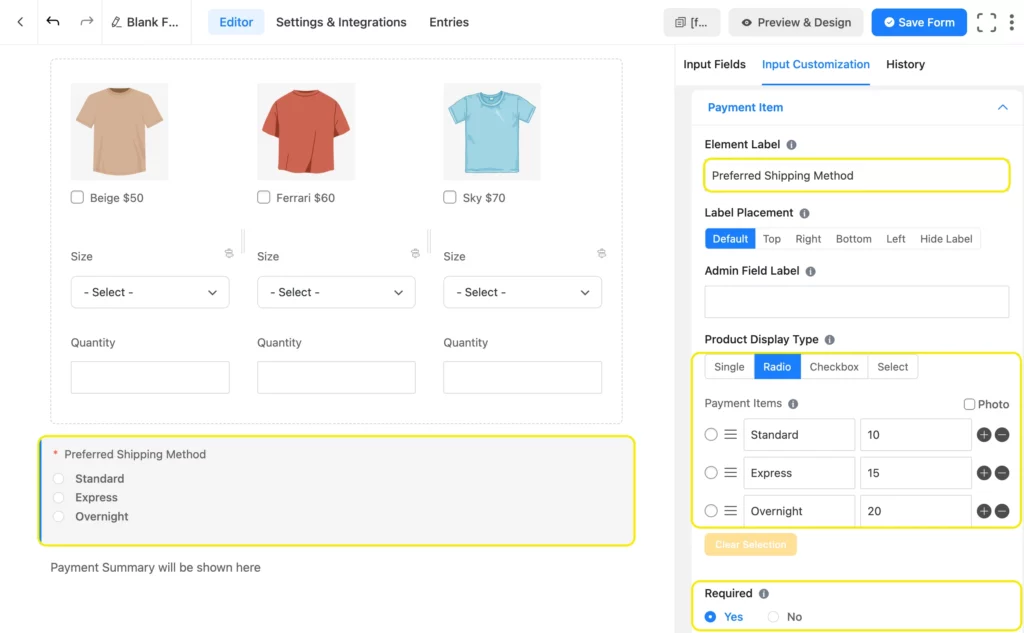
Let’s take another Payment Item field for the shipping charge. We’ll select Radio for Product Display Type, as we don’t want users to select multiple shipping methods. Customize the shipping options and their respective costs.
Finally, click Yes under required, as we don’t want anyone to submit their order without choosing a shipping method.
You can include VAT in the payment using the Custom Payment Amount field. For that, you need to navigate to Calculation Field Settings from Advanced Options and enable calculation.
You’ll find shortcodes of different fields in the calculation expression section. Create an equation by multiplying the shortcodes of each t-shirt and its respective quantity & multiplying the sum of the products by the percentage ratio.
For example, the equation to calculate a 5% VAT on a total of 3 t-shirts would be ( {payment.payment_input} * {input.item-quantity} + {payment.payment_input_1} * {input.item-quantity_1} + {payment.payment_input_2} * {input.item-quantity_2} ) * 0.05.
Be careful of the parentheses and spacing for the formula to work properly.
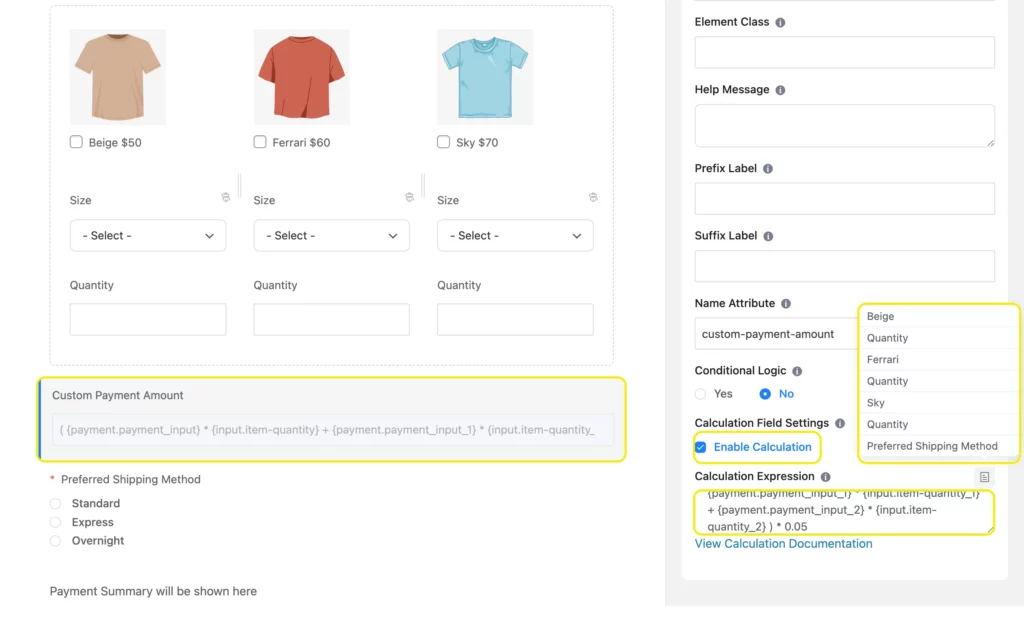
You can add the VAT to the payment summary without showing users this custom payment field. For that, write ff-hidden in the field’s Container Class from advanced options. This will give your form a more clutter-free look.
3. Display order summary
In this step, we’ll learn how to show users their order/payment summary. Add the Payment Summary input field from Payment Fields. Whenever a user selects t-shirts, they can view their order with quantity and price in a table. After reviewing their order summary, they can proceed to checkout.
You can also customize the message to show in place of the pricing summary before users select t-shirts.
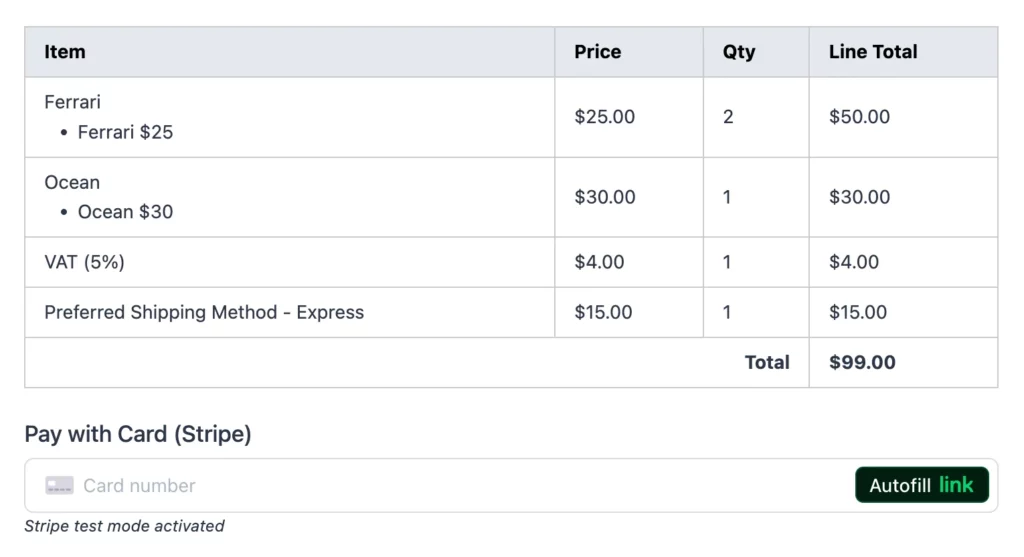
The payment summary field only works on the frontend once users select products.
4. Allow users to proceed to checkout
This is the final step of our order form. In this step, we’ll collect necessary customer information like names, emails/phone numbers, shipping addresses, etc., and receive payment.
You’ll find the necessary fields to capture customer information like names, phone numbers, shipping addresses, etc., in the General Fields section.
After that, add a Payment Method field from the Payment Fields. This step is crucial to automatically accept payment via your online t-shirt order form.
Fluent Forms Pro allows integration with multiple payment gateways (including Stripe, PayPal, Mollie, RazorPay, Paystack, Square, Authorize.net, and Paddle) free of charge, while the plugin’s free version allows you to accept payment via Stripe, with a 1.9% charge per transaction.
Let’s take a look at our t-shirt order form. We’ve also applied custom CSS to the order form to make it look more intuitive. You can download the form from our templates, import it, and customize it further.
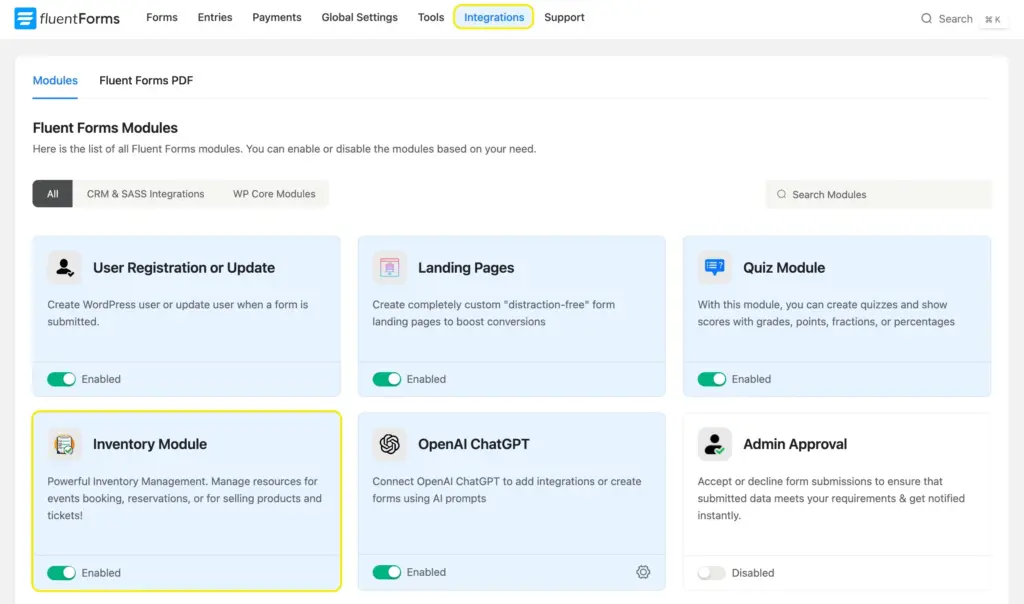
Show stock availability with inventory management
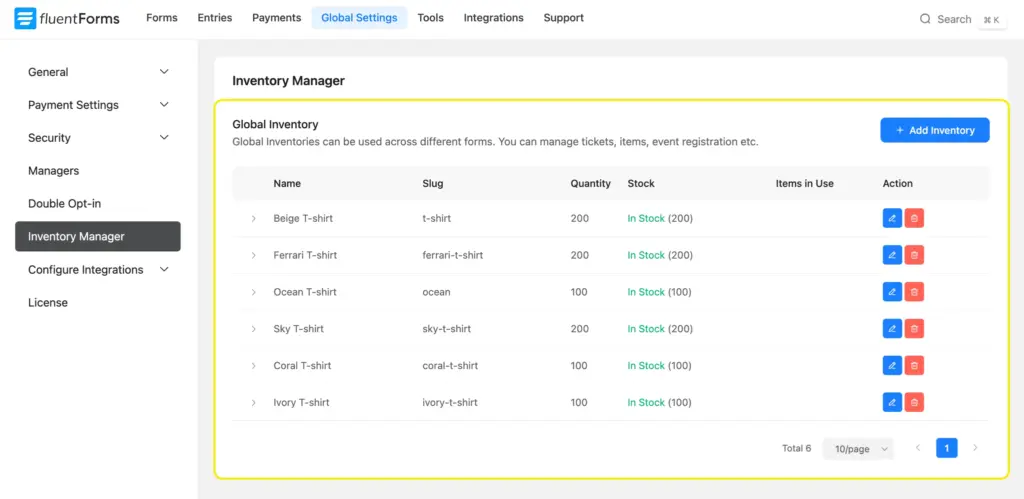
You can manage inventory from your dashboard through Fluent Forms. To do that, go to Fluent Form’s Integrations and enable the Inventory Module.
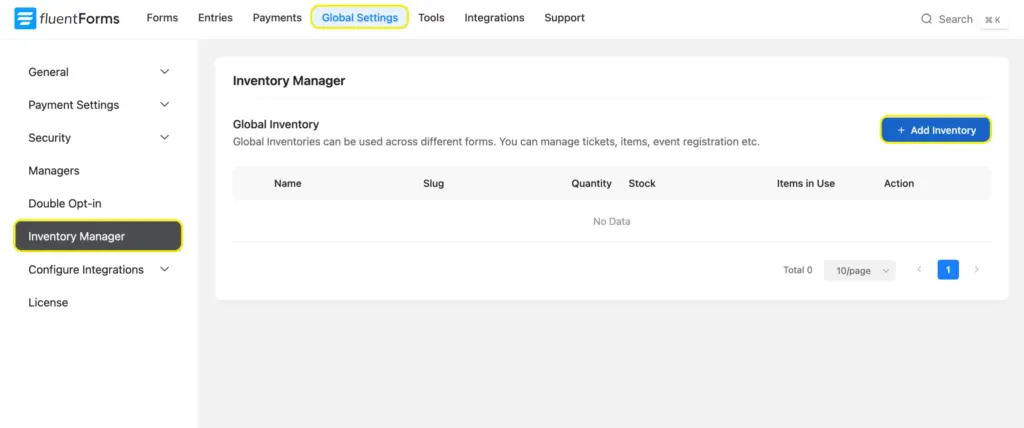
Next, navigate to Inventory Manager from Global Settings and click Add Inventory.
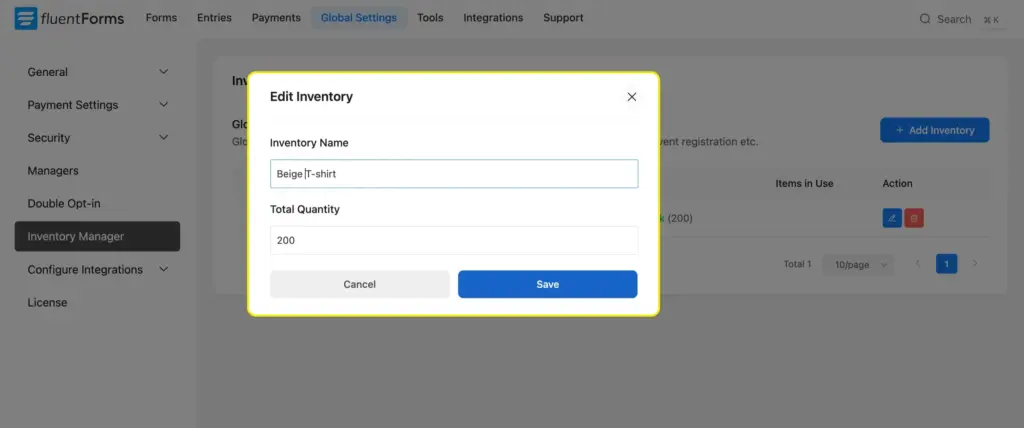
Add the product name in the Inventory Name and the quantity to the pop-up.
List the availability of all your t-shirts similarly. You can also set how many rows to show per page.
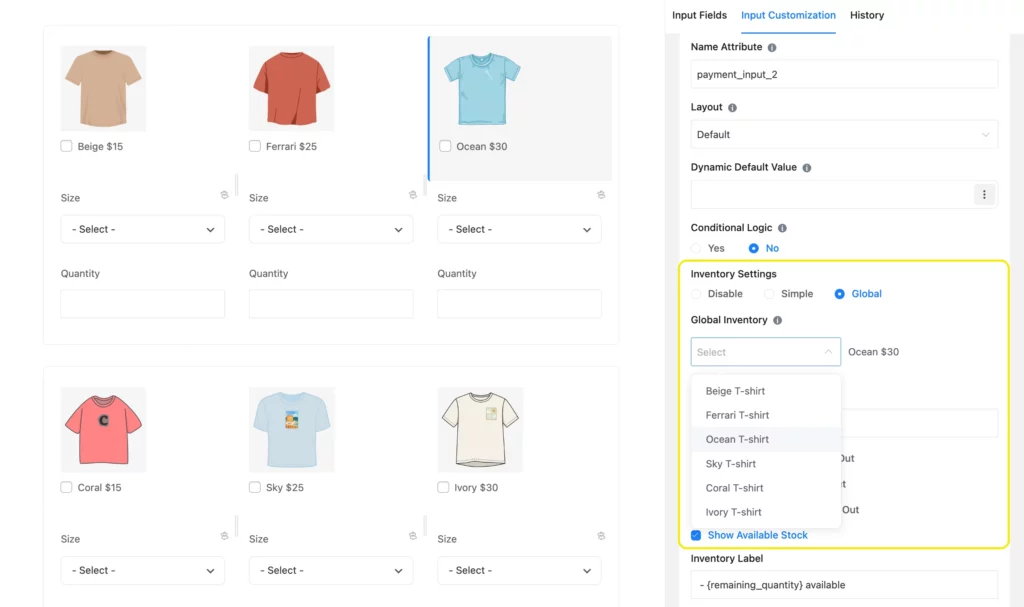
Now, your inventory is added. Let’s see how to apply this to your t-shirt order form. Open your form’s editor tab, click on an existing payment item, and navigate to the Inventory Settings from Advanced Options. Select Global and choose the t-shirt’s corresponding inventory from the dropdown. Check Show Available Stock. You’ll also find options to customize the stockout message.
You can use Fluent Forms’ Global Inventory across multiple forms. Add any inventory, and they’ll appear in all your forms once you check Global under Inventory settings. This way, you can manage your inventory centrally, and the updated number applies to all your forms automatically.
Build Smarter Forms for Free

Manage t-shirt orders seamlessly with Fluent Forms
This simple yet functional online t-shirt order form is intuitive and visually appealing. It’s so easy to create, and it enhances user experience to a great extent.
More importantly, the form is scalable and automates the entire process from t-shirt selection to payment. Sounds like a dream to have all the extra time that you can now invest in designing, right?
Start with this amazing t-shirt order form today, and you’ll see progress in no time. And if you face any teeny-tiny issues, we’re here to help.

Sarika writes for Fluent Forms and loves to offer insights into small businesses. She’s curious and enjoys discussing ideas, interests, and perspectives. In her free time, she’s either marvelling at architectural beauties or trying different cuisines.


Leave a Reply