
Allow File Upload Option to a WordPress Form Easily

A complete file upload option in a web form allows you to collect files from users.
If your form needs to collect resumes, assignment submissions, ID documents, or any other file, a standard text field won’t cut it. You need a dedicated file upload option, and adding one to a WordPress form is easier than most people think.
All it takes is a single field in a form plugin like Fluent Forms. No custom code. No file handling logic. No third-party workarounds.
TL;DR
- A file upload field lets your visitors attach files directly to a WordPress form submission
- It works for job applications, admissions, e-learning assignments, consultancy intake forms, and more
- Fluent Forms has a built-in File Upload field with multiple file types acceptance, which is available in the Pro version
- You can control accepted file types, file size limits, and how many files a user can upload
- Our official 3rd-party partner, Fluent Wiz cloud storage, gives you a better place to store those files than your WordPress server
Why allow a file upload option to a WordPress form
While text fields help you collect written information, file upload fields help collect audio, visual, or other forms of information.
Here’s when you actually need one:
- Job applications: candidates need to attach resumes, cover letters, and portfolios
- Student admissions: applicants submit transcripts, ID proof, or recommendation letters
- Freelance/consultancy intake: clients upload project briefs, brand assets, or reference documents
- E-learning platforms: students submit assignments or project files
- Medical or legal forms: patients or clients upload supporting documents before a consultation
- Photography or design feedback: clients share files for review
Without a proper file upload field, people end up emailing files separately, which means you’re managing two separate streams of information and spending time matching them up. A form that collects everything in one submission is cleaner for you and easier for your users.
Fluent Forms ‘file upload’ field: technical details
The File Upload field in Fluent Forms is part of the Pro version. Here’s what it can handle:
- Accepted file types: you choose which formats are allowed. Common options include Images (jpg, png, gif, etc.), Audio (mp3, wav, wma, midi, etc.), Video (avi, mov, mkv, etc.), PDF, Docs (doc, ppt, xls, docx, txt, etc.), Zip archives (zip, rar, etc.), exe, CSV. You can restrict it to specific types or open it up to multiple formats depending on your use case.
- Upload button interface: both the button and the dropzone are available
- Max file size: set a size limit per file so large uploads don’t eat your server storage
- Multiple file uploads: users can upload more than one file in a single submission if you allow it
- Upload count limit: you can cap how many files a single user can attach
- Required or optional: make it mandatory or leave it as an optional field
- Global error message: shows if the maximum file size or file count exceeds the limit
- Conditional logic is applicable, and the file location type can be selected as per the global settings or custom (Fluent Forms default or Media Library)
Files uploaded through Fluent Forms are stored in your WordPress media library by default, but if you’re collecting a high volume of files, Fluent Wiz cloud storage is a smarter option (more on that below).
Steps to collect files through a WordPress form
Here’s the full process from creating a form to collecting file uploads.
Step 1: create a form
From your WordPress dashboard, go to Fluent Forms → New Form. You can:
- Start with a blank form
- Pick a pre-built template (there are job application, contact, and inquiry templates that are ready to go)
- Build a conversational form
- Use the AI form builder

Here, I will show you a blank form as an example of using the file upload field.
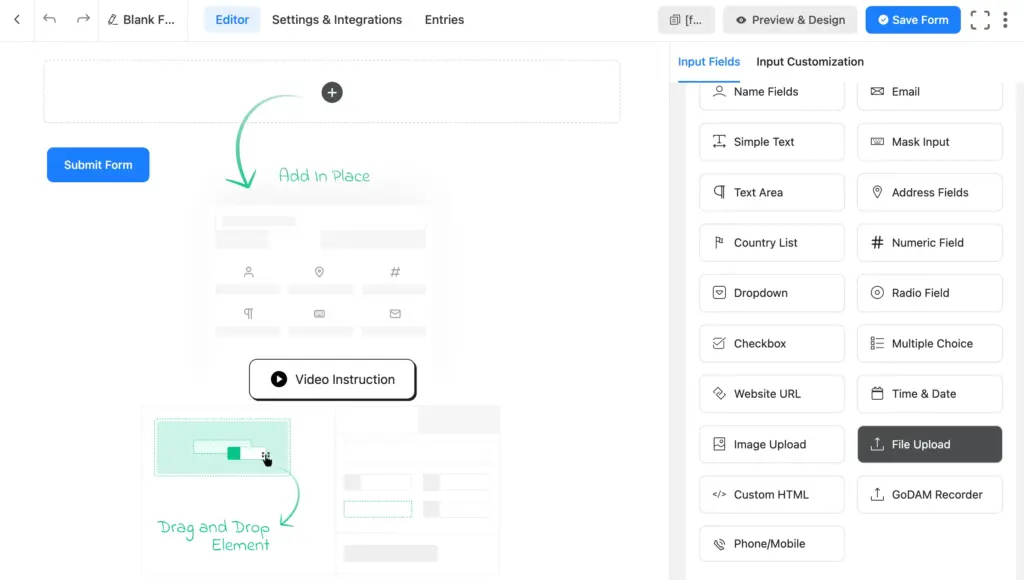
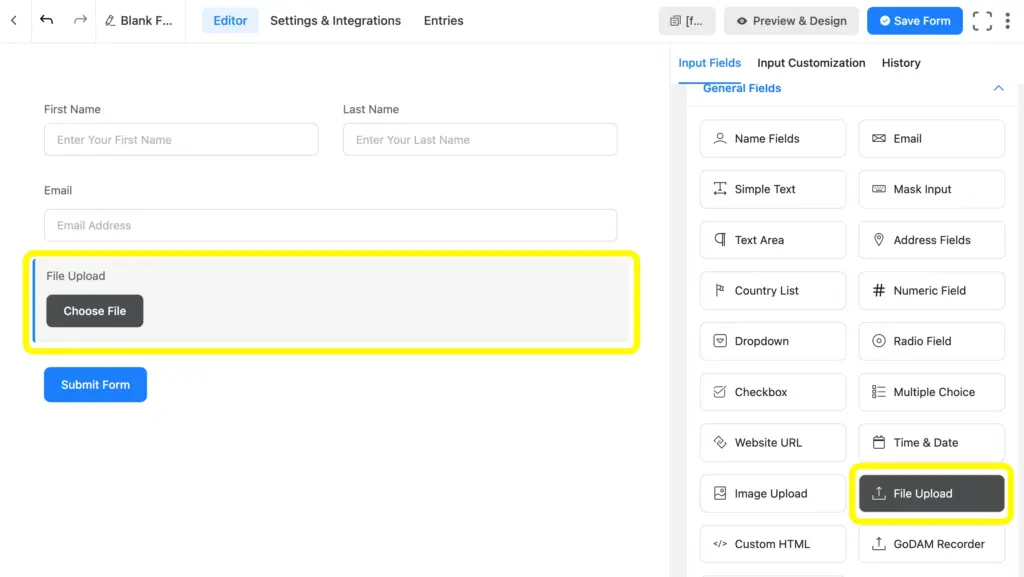
Step 2: add a ‘file upload’ field
In the form editor, look at the Input Fields panel on the right side. You’ll find the File Upload field under the Pro fields section.
Drag it into your form at the position where it makes sense.
NOTE: If you can’t find it in your editor, check that you’re on Fluent Forms Pro. The file upload field is not available in the free version. You can compare what’s included in each version on the free vs pro page.
Step 3: customize the ‘file upload’ field
As I have already discussed the technical details of Fluent Forms’ file upload field, you can find the customization options after clicking on the field
You can easily change the Element Label, Button Text, Upload Button Interface, Label Placement, Required status, Max File Size, Global Error Message, etc., which you will find at first glance.
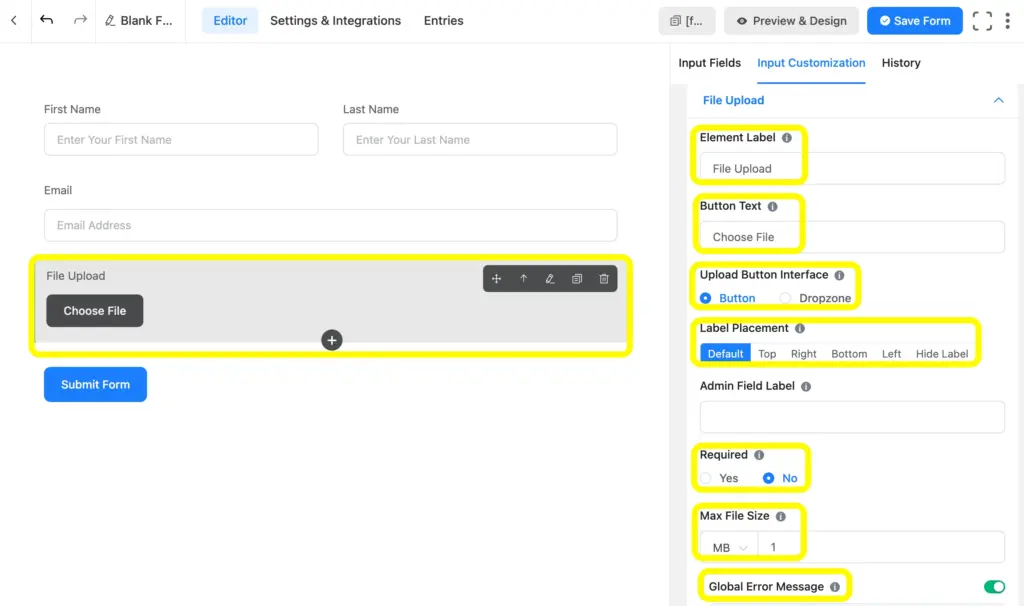
Now comes the Allowed Files option, where you can select multiple options using the checkbox.

Guess what?
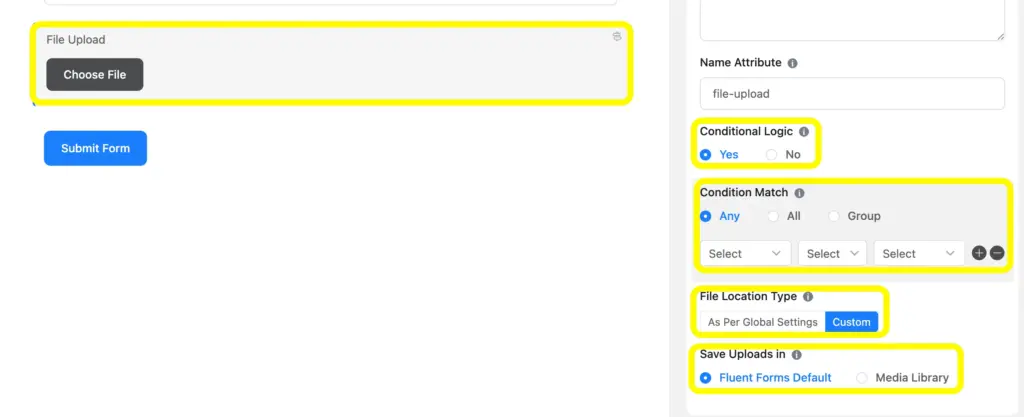
The customization doesn’t end here. In the Advanced Options, you can set up Conditional Logic, like other fields of Fluent Forms.
You can also choose the File Location Type, which can be selected As Per Global Settings or Custom. If Custom is selected, you can Save Uploads In:
Fluent Forms Default or Media Library.
Expand Files Storage Option With Fluent Wiz Cloud Storage Plugin
By default, uploaded files are stored in your WordPress media library on your server, for low-volume forms, that works fine.
But if you’re running a job board, an admissions portal, or any form that expects a steady stream of file uploads, your server storage fills up fast. Large files also slow down your site if they’re sitting in wp-content.
FluentWiz is our 3rd-party partner that developed the Cloud Storage Manager for Fluent Forms. It offloads uploaded files to cloud storage instead of your server, which means:
- Your WordPress server stays lean
- Files are stored reliably and accessible from anywhere
- You don’t have to move or manage uploads manually
If you’re collecting files at any meaningful volume, it’s worth setting up.
FluentWiz, our primary 3rd-party partner for cloud storage, supports Google Drive and Dropbox in the free version and Amazon S3, Cloudflare R2, and OneDrive in the pro version.
So, I suggest you have a glimpse of how to connect Fluent Forms to cloud storage for file management.
Relevant features
Image upload
If you need users to upload images specifically (profile photos, product images, ID cards), Fluent Forms has a dedicated Image Upload field. It works like the File Upload field but is optimized for image formats and can display a preview of the uploaded image in the form.
Media file attachments in email notifications
When someone submits a form with a file upload, Fluent Forms can include that file as an attachment so that you can send a confirmation email to the users. You can configure this in the form’s notification settings.
Rich text input
For use cases where users need to submit formatted text alongside a file, such as a detailed project brief or a cover letter with formatting, the Rich Text Input field gives them a proper text editor. Combine it with the file upload field for a more complete submission experience.
You can browse all available fields and features on the Fluent Forms features page.

Hi, this is Aparup. I am a Literature postgraduate, mixing my creative thoughts with my experience in the tech industry to surpass AI. Professionally, I am a content marketer seeking solutions to users’ problems regarding WordPress.


Leave a Reply