
Build Styled Checkout Page with Fluent Forms in 5 Steps
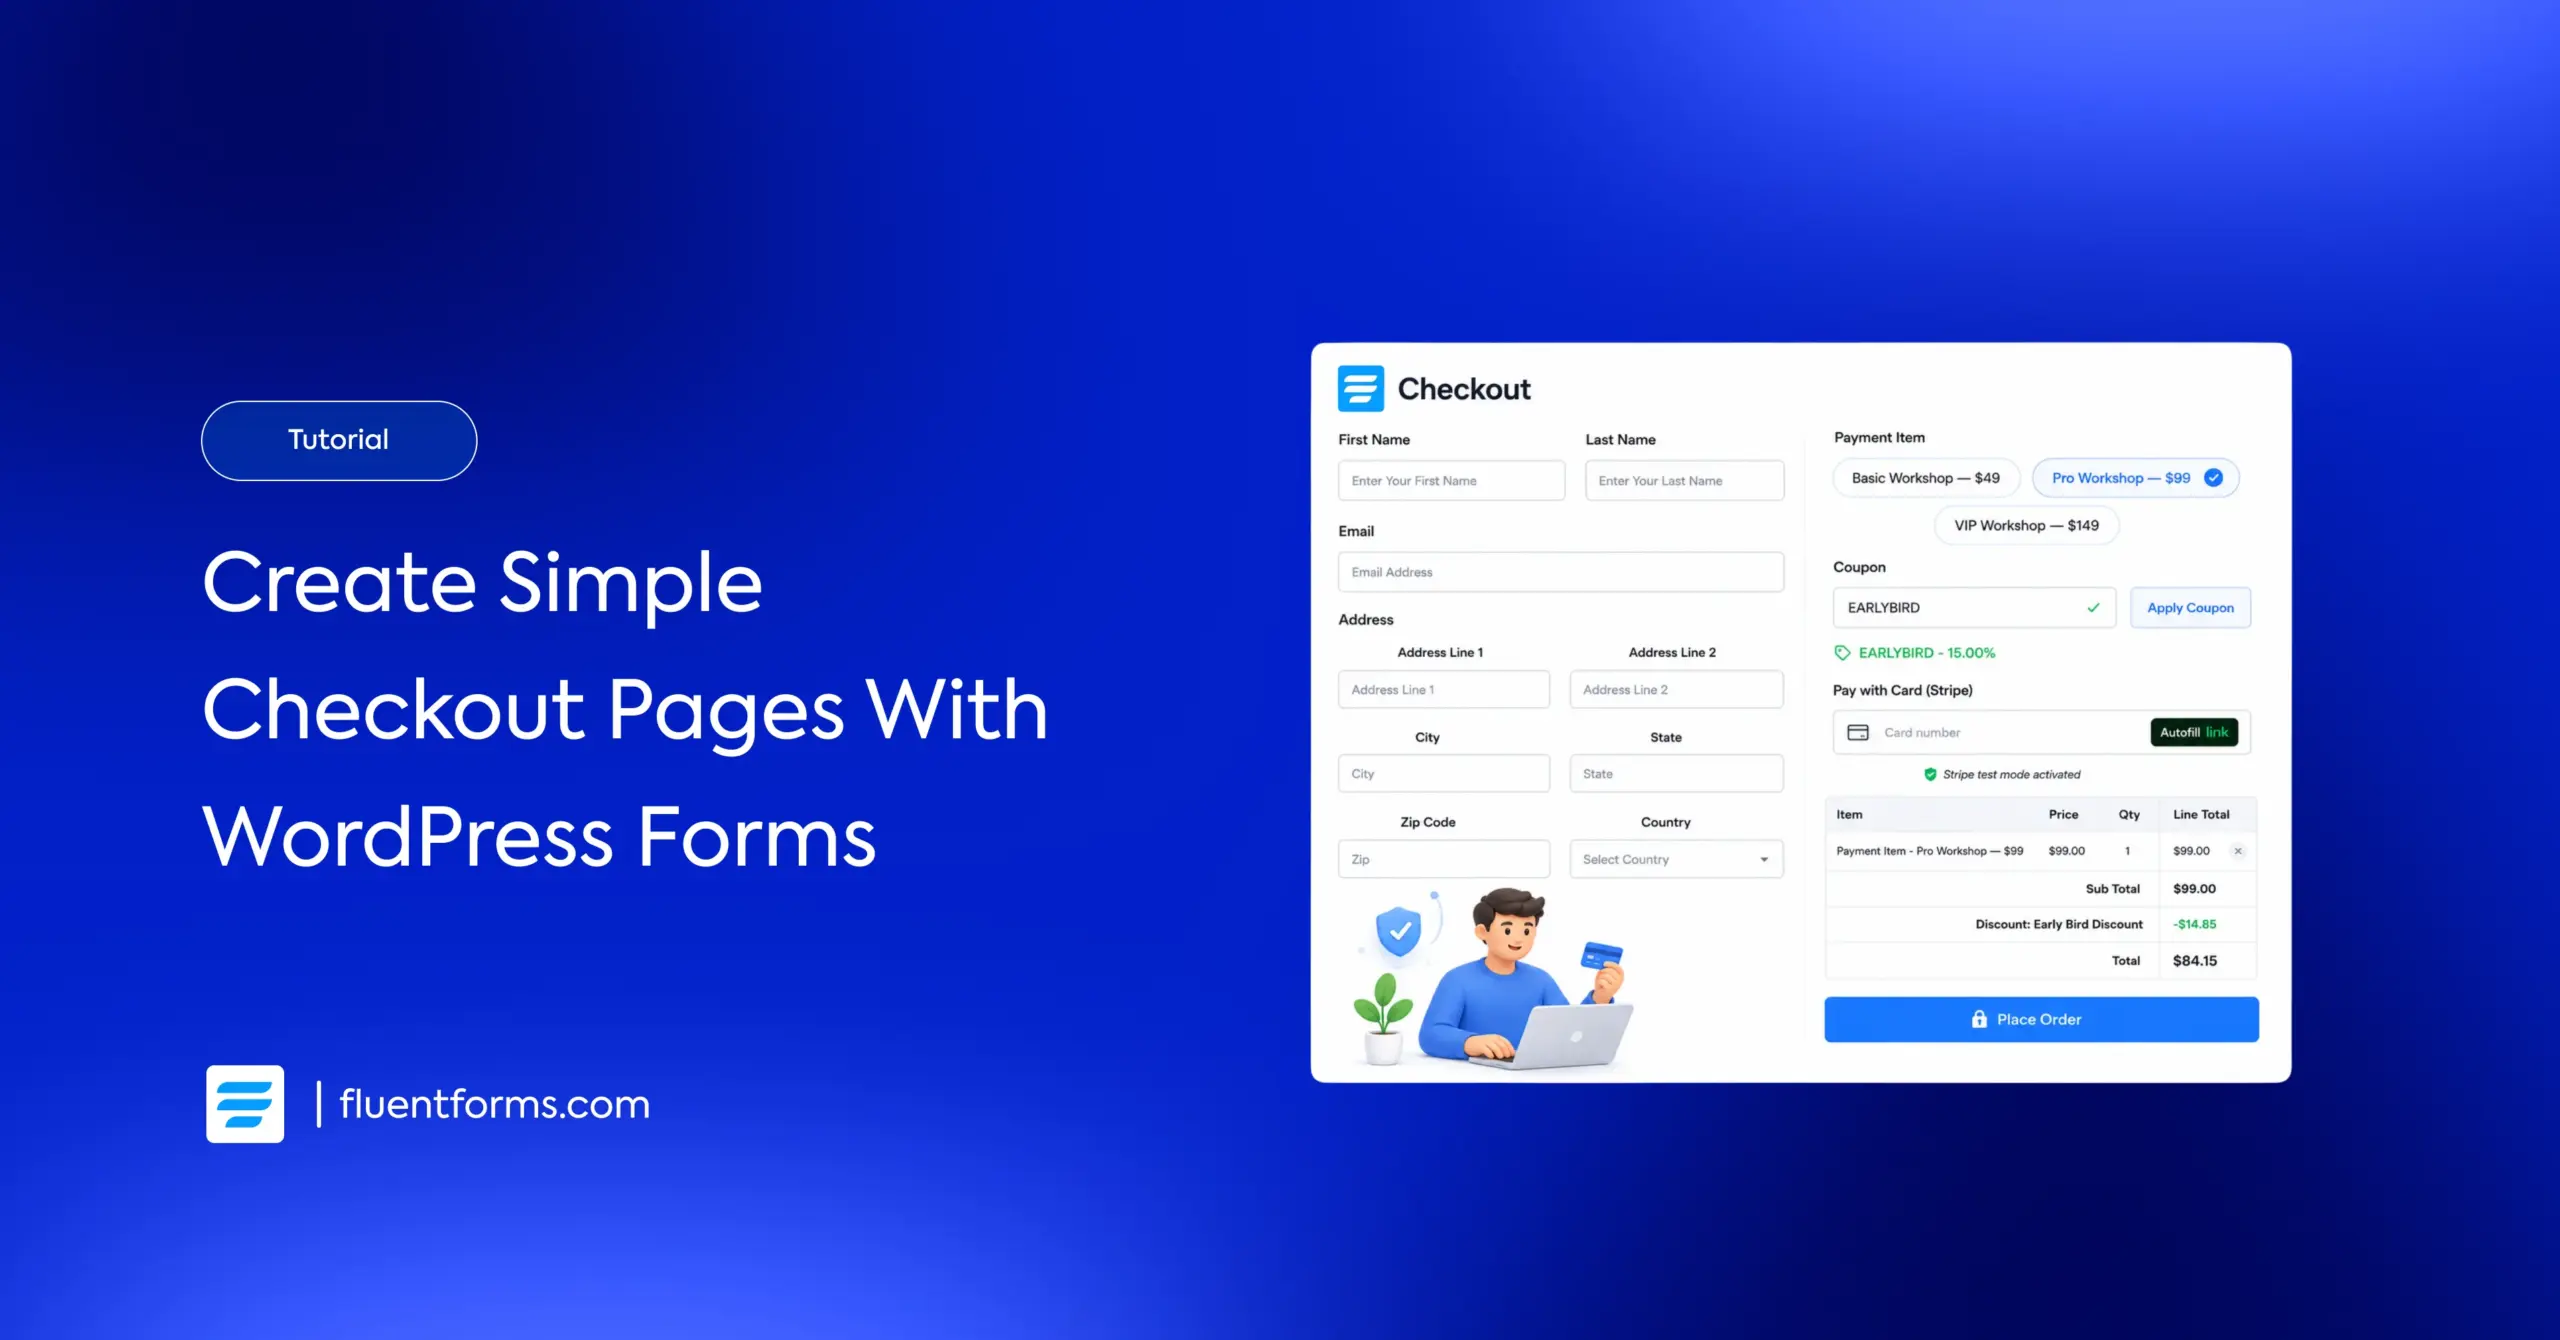
You don’t need a full ecommerce platform to sell a handful of products from your WordPress site. A styled checkout page built with Fluent Forms handles payments, collects addresses, tracks inventory, and looks exactly the way you want it to.
I’ve built these for our own use, and I’ve seen enough users do the same that it felt worth walking through the whole process here.
TL;DR
- Fluent Forms builds a full checkout page with payments, address fields, and inventory tracking.
- A two-column container splits customer details from order summary for a real checkout feel.
- The Inventory Module (Pro) tracks stock in real time and hides sold-out items automatically.
- Simple inventory works per-form. Global inventory shares stock across multiple forms.
- The built-in Coupon Module lets you create percentage or fixed-amount discount codes with start/end dates.
- Best for creators, service providers, and small shops selling under 20-30 products.
- Fluent Forms Pro supports Stripe, PayPal, Razorpay, and 5 other gateways across 700,000+ sites.
Who Is This For and Who Should Look Elsewhere
I want to be upfront about this. A checkout form built in Fluent Forms is not a replacement for a full ecommerce store. If you sell 200 products with multiple variants, need shipping calculators, and want a product catalog with search and filtering, you need a proper ecommerce solution built for that. We highly recommend FluentCart for this.
But a surprising number of people don’t need all that. They need a styled checkout page for a specific, contained use case.
This approach works well if you sell digital downloads like templates, courses, or PDFs. It works for event tickets, workshop registrations, consulting packages, or donation drives. It works for service providers who sell 3-5 tiers of a monthly retainer. It works for anyone selling a small, fixed set of products where a full store would be overkill.
I have seen users who run yoga studios, sell photography presets, and take conference registrations – use this setup. The common thread is simple: fewer than 20-30 items, no complex variant logic, and the priority is a clean checkout experience over a browsing experience.
If that sounds like your situation, keep reading.
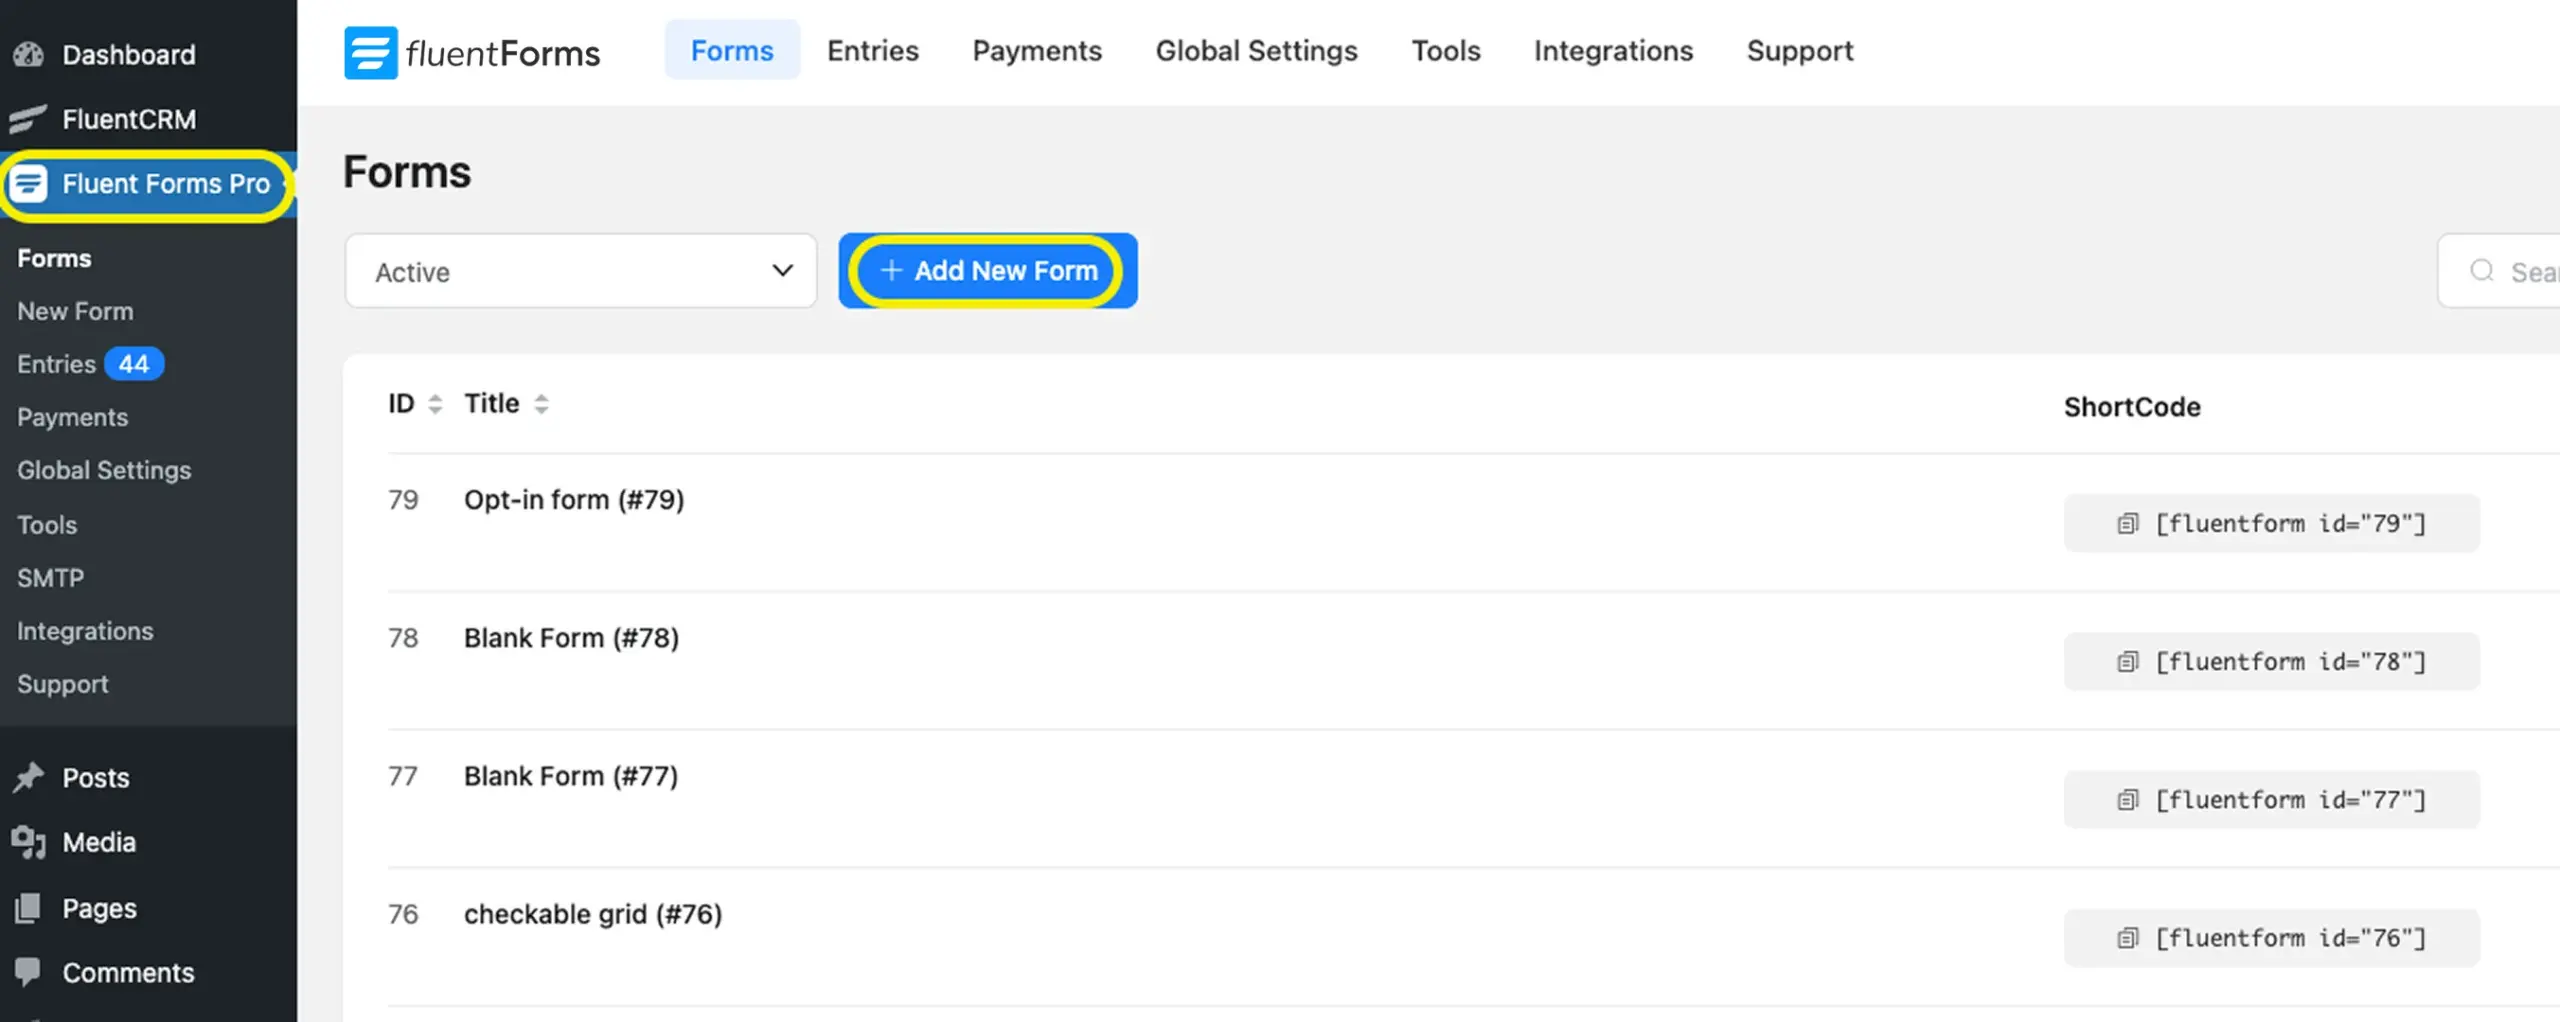
Step 1: Create the Checkout Form
Go to your WordPress dashboard. Navigate to Fluent Forms and click Add a New Form. Choose Blank Form to start fresh.
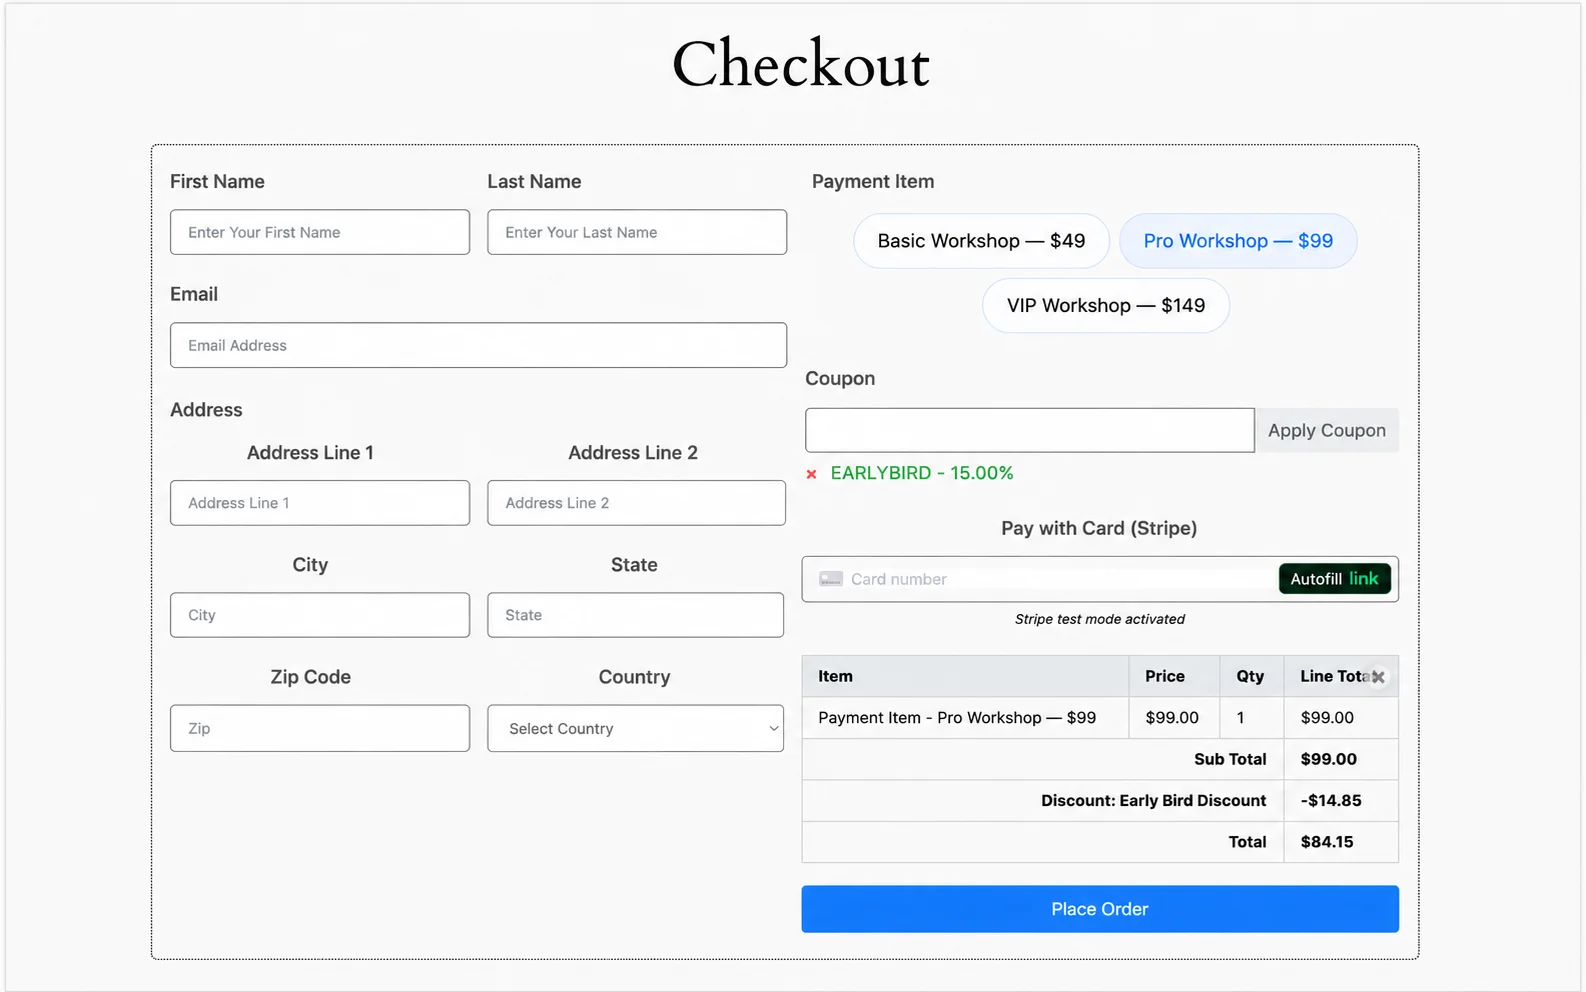
The first thing I do is add a Two Column Container from the Container Fields section. This splits the form into two side-by-side columns, which immediately makes your checkout form look like an actual checkout page instead of a long vertical survey.
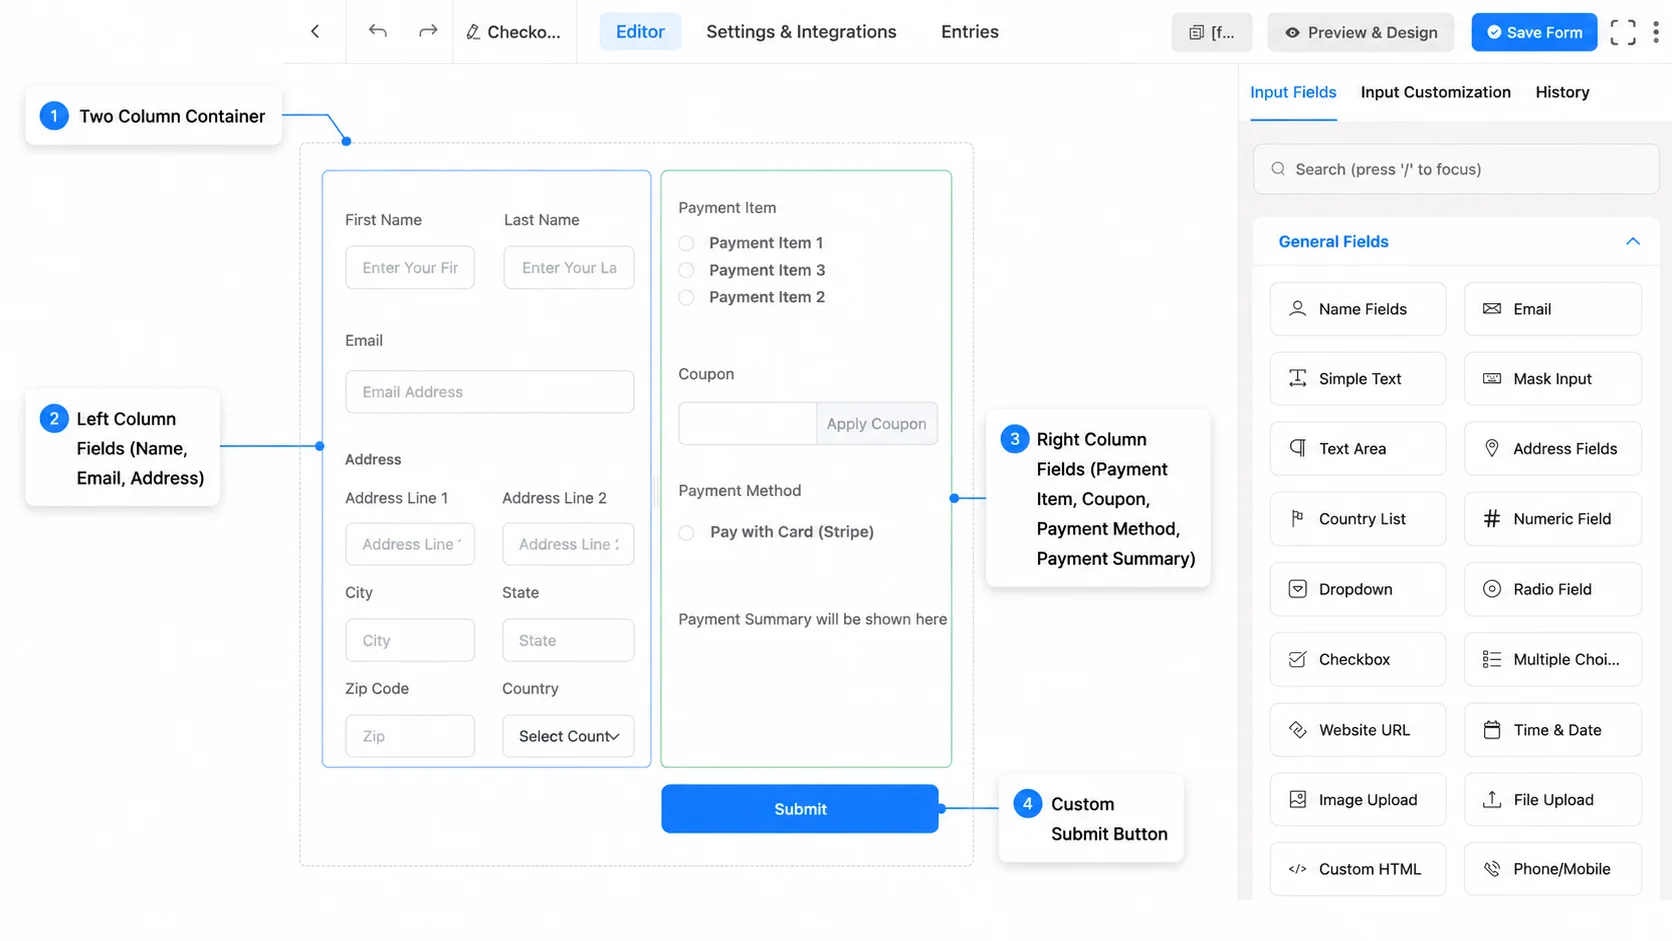
In the left column, drop in these fields:
- Name (from General Fields)
- Email (from General Fields)
- Address (from General Fields, which gives you street, city, state, zip, and country in one block)
In the right column, add the payment-related fields:
- Payment Item (from Payment Fields). This is where you define what you’re selling. You set the product name, price, and whether the buyer picks from a list or pays a fixed amount.
- Coupon (from Payment Fields). Optional, but if you plan to run discounts or promo codes, add it here. I’ll cover the setup in the next section.
- Payment Method (from Payment Fields). This shows the available gateways like Stripe or PayPal (Any gateway you’ve integrated will appear here automatically.).
- Payment Summary (from Payment Fields). This gives buyers a clear total before they submit.
At the bottom of the form, add a Custom Submit Button from Advanced Fields. You can rename the button text to something specific like “Complete Purchase” or “Pay Now” instead of the default “Submit.”
That is your base checkout form. The two-column layout alone changes the perception completely. It stops feeling like a contact form and starts feeling like a real checkout page.
Step 2: Configure Your Payment Items
Click on the Payment Item field you just added. In the field settings, you choose the product type.
For a single product at a fixed price, select Single Payment and enter the price. For multiple products where the buyer picks one, select Radio and add each option with its price. For multiple products where the buyer can select several, choose Checkbox.
Each option gets a label (the product name) and a value (the price). So if I’m selling workshop tickets at $49, $99, and $149 for three tiers, I add three radio options with those prices.
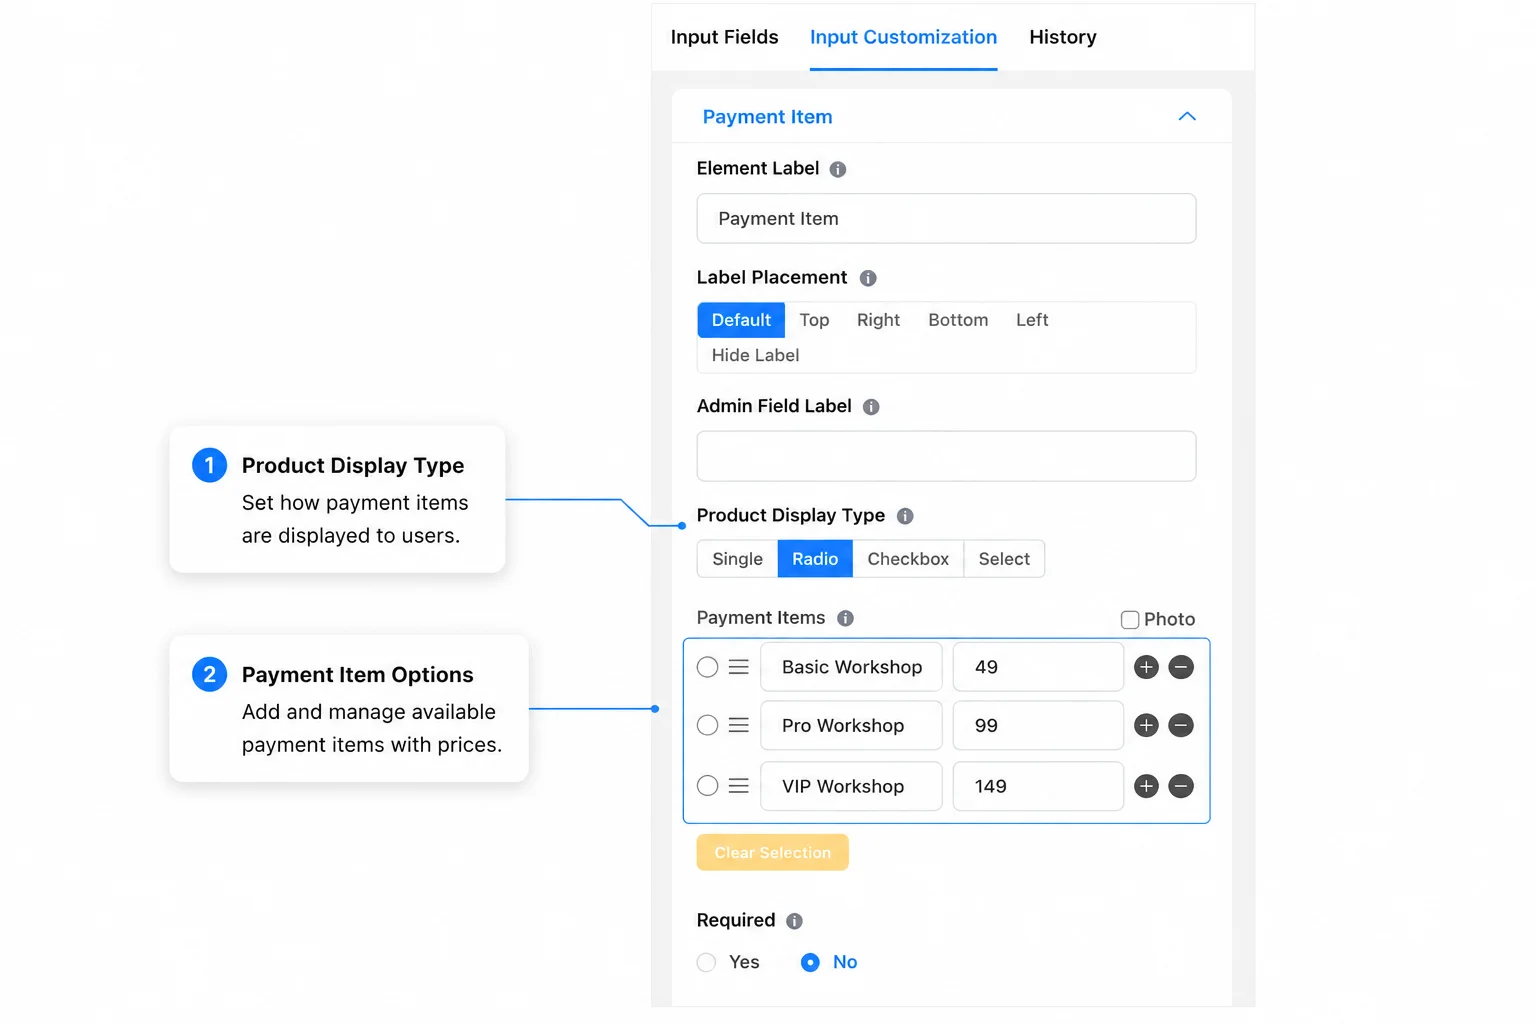
The Payment Summary field at the bottom auto-calculates the total based on the buyer’s selection. No custom code needed.
One thing to set up before this works: go to Fluent Forms > Global Settings > Payment Settings and connect your payment gateway. Stripe takes about 2 minutes. Paste your API keys, toggle it on, and you’re live.
Add a coupon code (optional)
If you added the Coupon field in Step 1, you need to create the actual coupon codes before they’ll work. Go to Fluent Forms > Global Settings > Payment > Coupons and click Enable Coupon Module. Then click Add New Coupon.
Each coupon has a few settings worth knowing. Coupon Title is the internal name you’ll use to find it later. Coupon Code is what buyers type into the form, like WORKSHOP10 or EARLYBIRD. Discount Type lets you pick between a percentage or a fixed dollar amount. Discount Amount is the actual number, entered without a % sign.
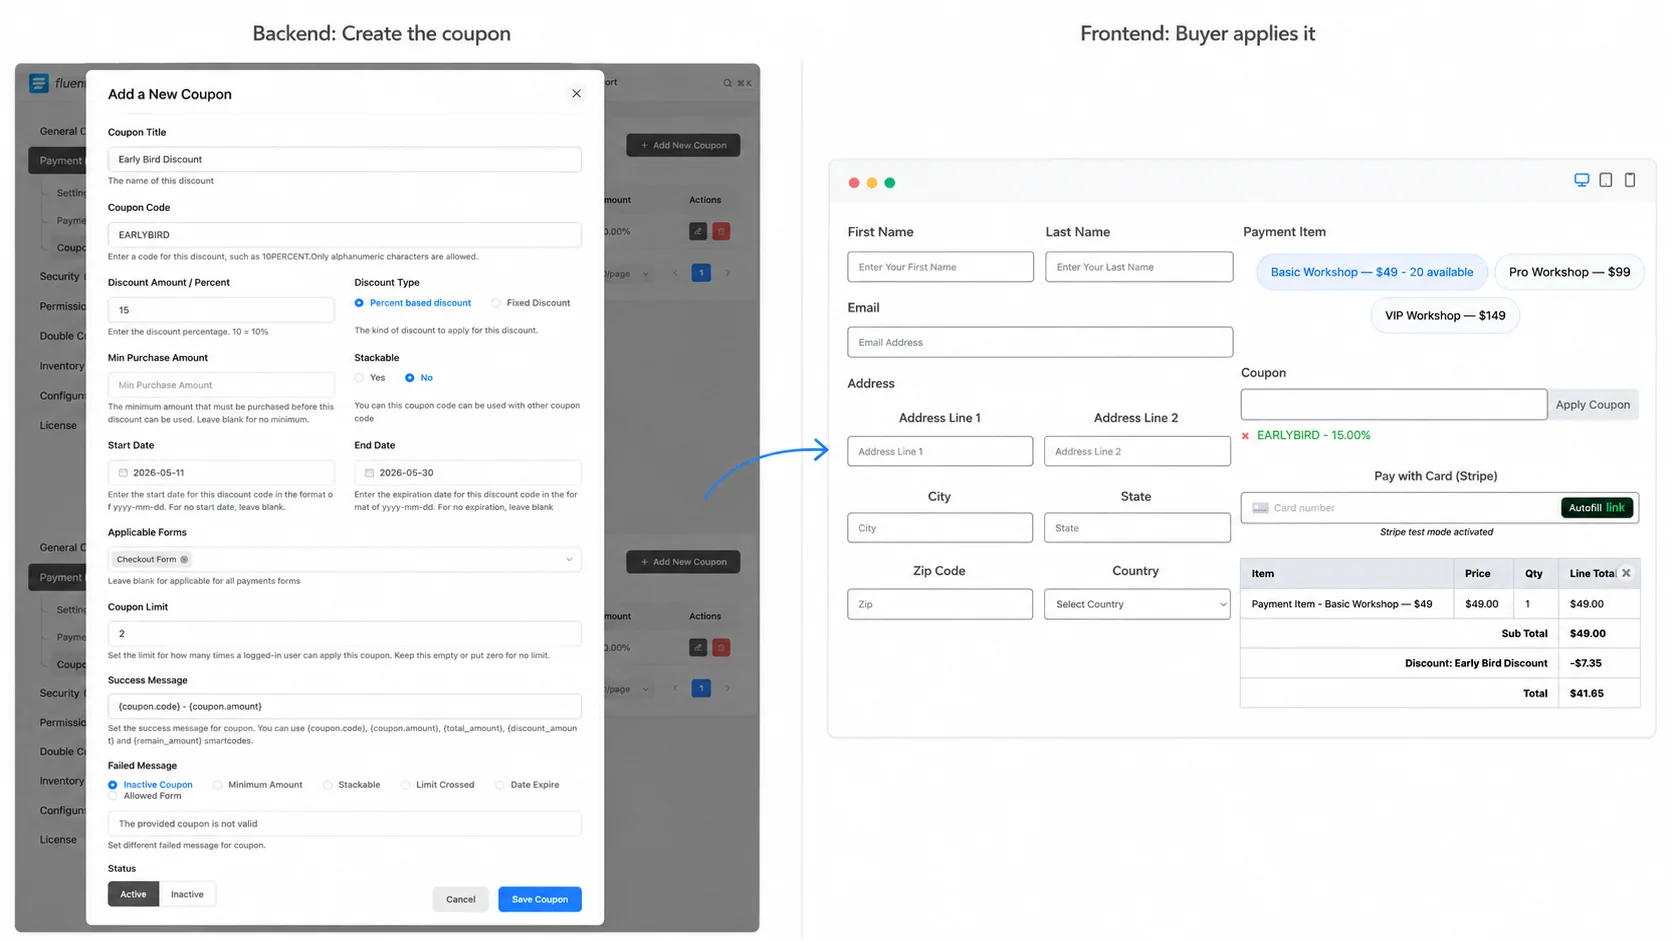
You can also set a Min Purchase Amount so the coupon only works above a certain order value. Start Date and End Date control when the code is valid. And the Stackable option lets buyers combine multiple coupons on a single order if you check it.
Once saved, the coupon works automatically. When a buyer enters the code in the Coupon field and clicks Apply Coupon, the discount shows up in the Payment Summary before they pay. No extra configuration needed on the form side.
I add coupons to most checkout forms even if I don’t plan to run a promo right away. The field sits quietly until you create a code, and having it ready saves you from editing the form later when you do want to offer a discount.
Step 3: Style the Checkout Page
Fluent Forms Pro includes a built-in Form Styler. Open your form, click Preview & Design, and you get controls for colors, fonts, spacing, borders, and input styles. No CSS required.
I set a white container background, light gray input borders with 4-6px rounded corners, and a high-contrast submit button. For deeper control, the Custom CSS option in form settings lets you target specific fields.
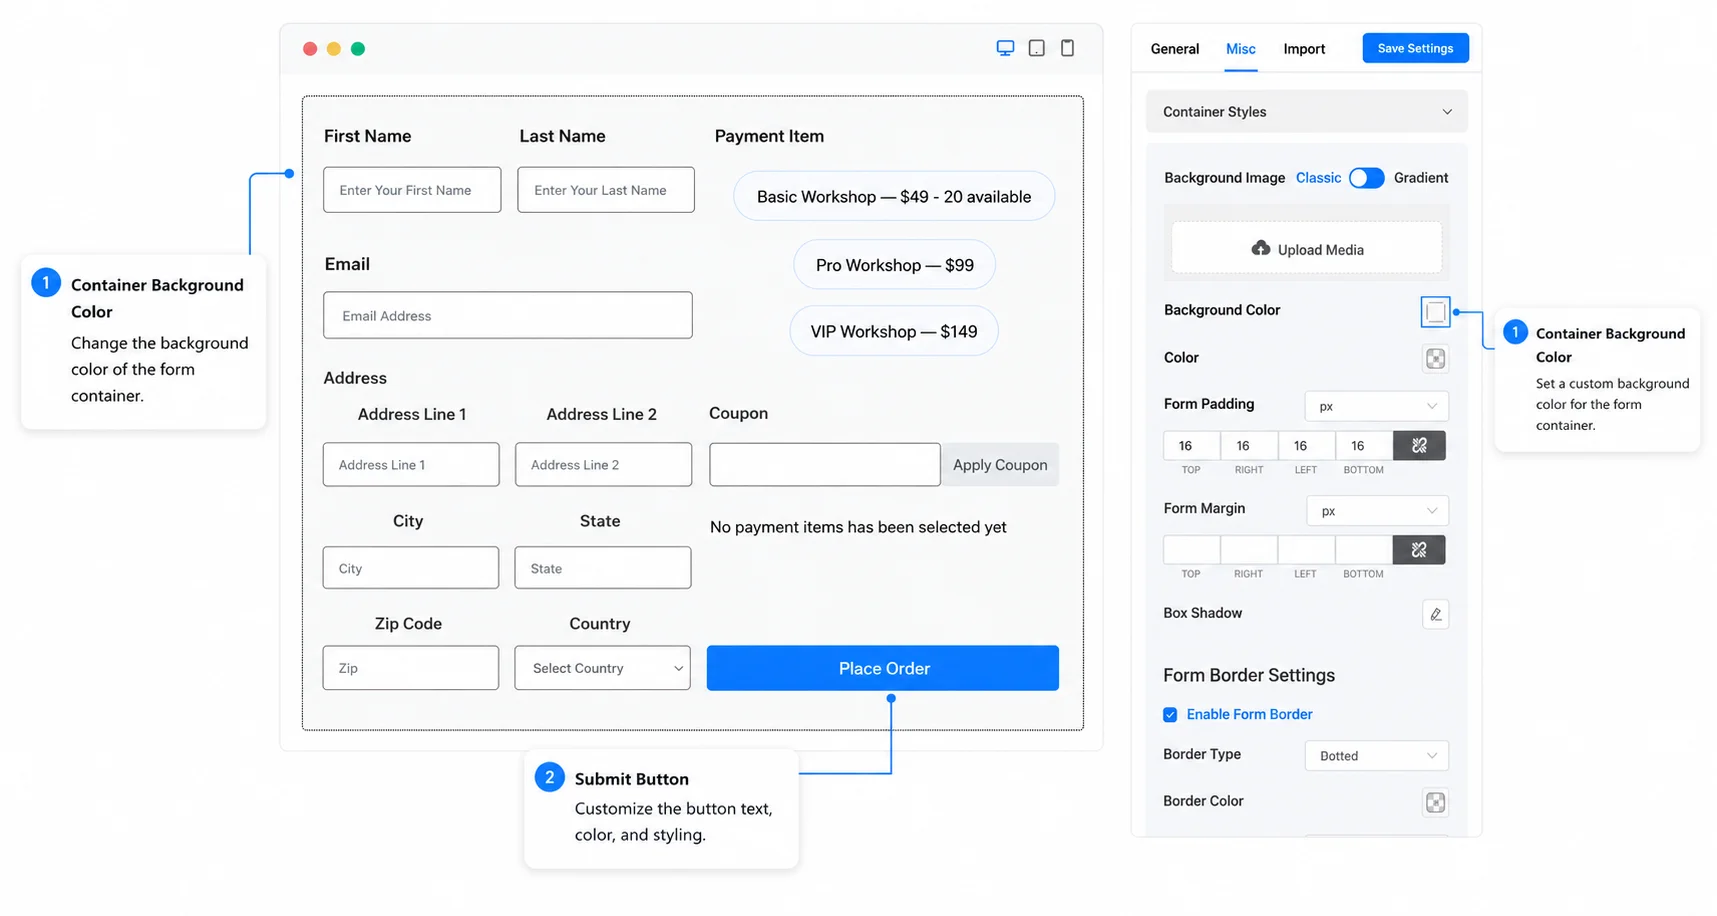
After styling, embed the form on a dedicated WordPress page. Paste the shortcode, strip the sidebar, and keep the page focused on one job: collecting the order.
Step 4: Set Up the Inventory Module
If you sell a limited number of items (event seats, product stock, service slots), the Inventory Module keeps the count honest without manual tracking.
First, enable it. Go to Fluent Forms > Integrations, search for Inventory Module, and toggle it on. This is a Pro feature.

Once active, open your form and click on the payment item field (or any checkbox, radio, or dropdown field that represents your products). Go to Advanced Options and you’ll see Inventory Settings, which is disabled by default.
You have two options here: Simple and Global.
Simple inventory tracks stock per form
Simple inventory is the straightforward choice. You set a stock quantity directly on the field inside one specific form. If I set “Workshop Seat” to a quantity of 30, the form accepts 30 orders and then shows a stock-out message.
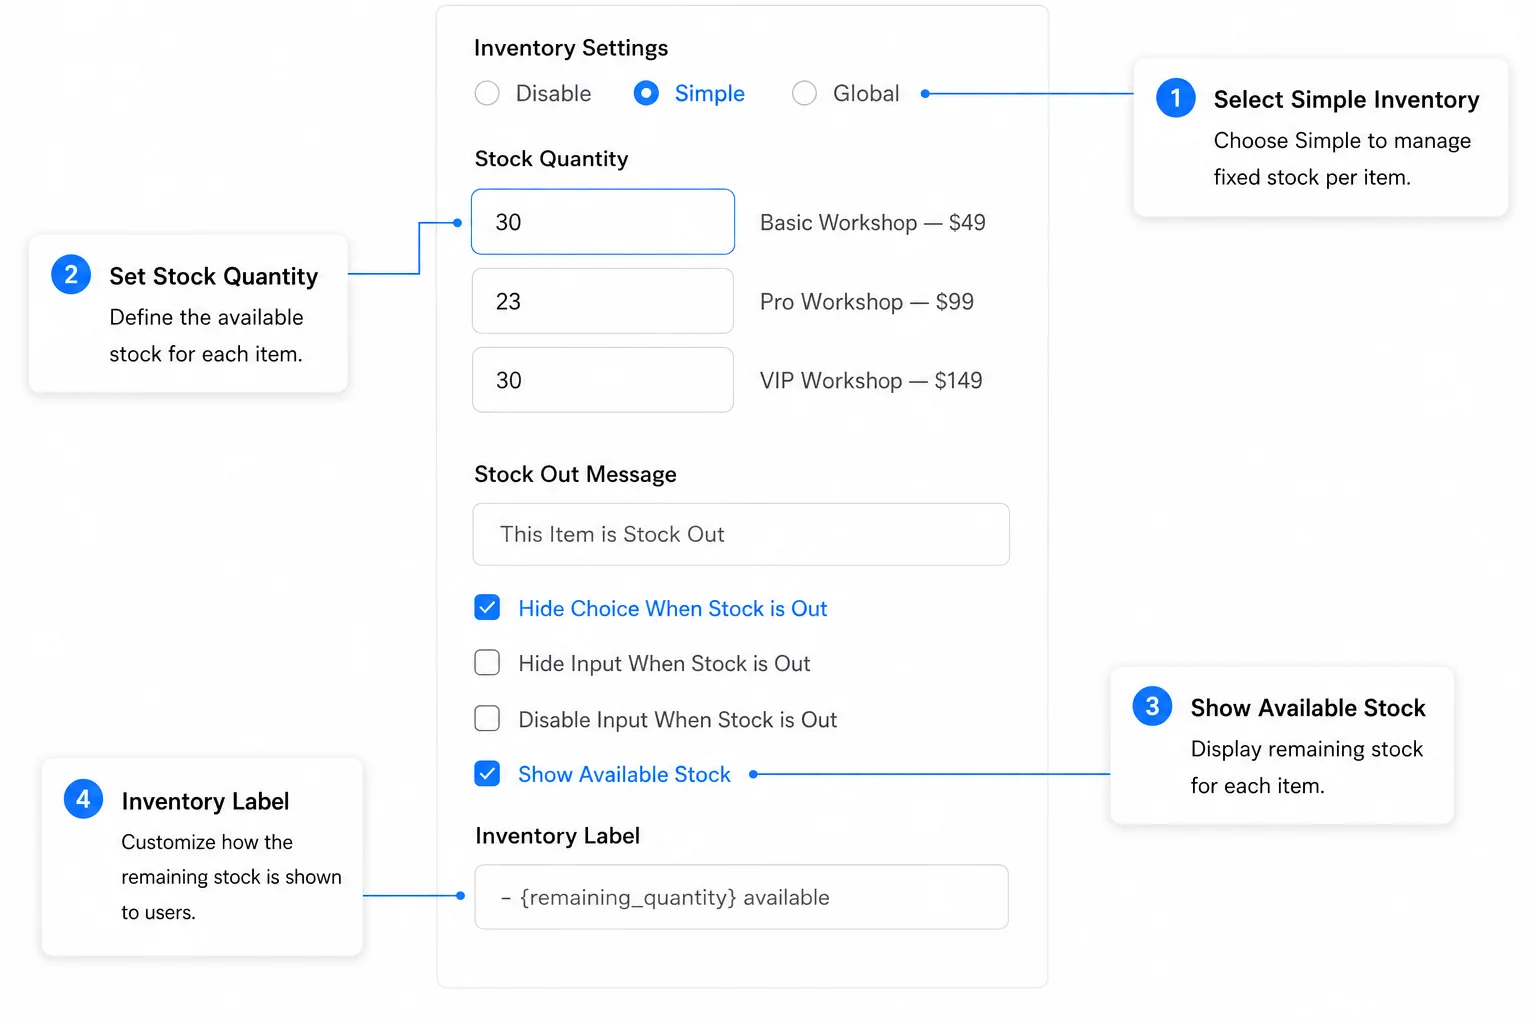
The settings let you control what happens at zero stock:
Stock Quantity sets the total available units for that item. Stock-Out Message is the text buyers see when the item is gone. I usually write something direct like “This item is sold out” rather than the default. Hide Choice When Stock is Out removes the item from the list entirely once it hits zero.
Disable Input When Stock is Out grays the item out but keeps it visible, so buyers can see it existed. Show Available Stock displays the remaining count next to each item using the {remaining_quantity} shortcode.
Simple inventory works well when one form sells one set of items and you don’t share stock across multiple pages.
Global inventory shares stock across forms
Global inventory solves a different problem. Say you sell the same product from two different forms on two different pages. You have 30 units total, not 30 per form.
To set this up, go to Fluent Forms > Global Settings > Inventory Manager and click Add Inventory. Enter the inventory name (e.g., “Workshop Seats”) and the total quantity (e.g., 30). Save it.
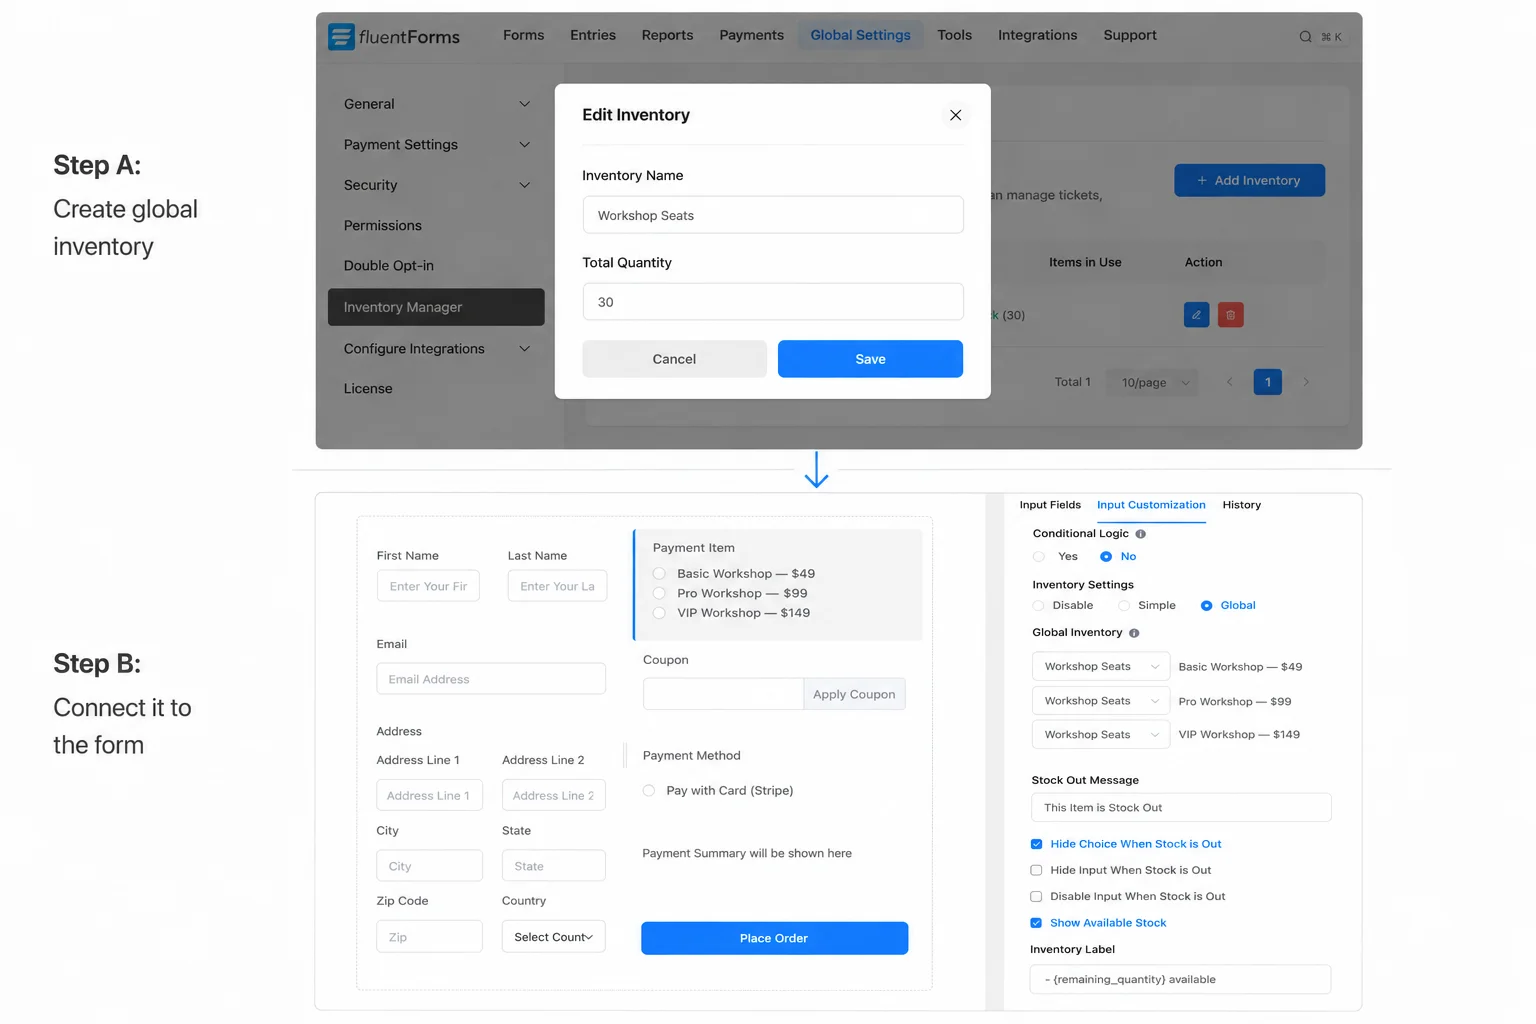
Now open each form that sells this item. In the field’s Advanced Options, set Inventory Settings to Global instead of Simple. A dropdown appears listing your global inventory items. Select the right one.
Every order from any form that references this global item deducts from the same pool. If Form A sells 20 and Form B sells 5, the remaining count across both is 5.
The Global Inventory Manager dashboard shows remaining stock levels and which forms are consuming inventory. You can reset inventory from there if needed.
Step 5: Embed and Test
Save your form. Click Preview & Design to check the layout one more time.
Copy the shortcode from the top right of the form editor. Paste it into a WordPress page. Publish the page.
Now test the full flow. Fill out the form as a buyer would. Pick a product, enter an address, select a payment method, and submit. Verify the payment processes correctly in your gateway dashboard. Check that inventory decrements by one. Confirm the confirmation message or redirect works.
I test every checkout form with a real Stripe test transaction before sending the link to anyone. The two minutes it takes to verify the flow saves hours of troubleshooting later.
Enjoying this article?
We regularly publish actionable content on our blog. Subscribe to get them delivered straight to your inbox.
We won’t spam you. You can unsubscribe whenever you want.
When to Move Beyond a Form-Based Checkout
Once your product count passes 30-40 items, or you need product pages with images, shipping calculators, tax rules, and customer accounts, a dedicated ecommerce plugin is the right call. Forms aren’t built for catalog browsing.
But you don’t have to decide that today. Start with a form-based checkout, validate the offer, and move to a full store when the volume justifies it.
Build Your Checkout Page Today
Pick one product or service you want to sell. Open Fluent Forms, create a blank form, add a two-column container, drop in your fields. Connect Stripe. Style the form. Embed it on a page.
You’ll have a working styled checkout page on your WordPress site before lunch. No storefront setup, no theme dependencies, no WooCommerce overhead.

This is Sumit. He’s a physics major who’s trying to understand both the physical as well as the WordPress worlds. Whenever he’s not busy, plays fifa or spends time with his family.


Leave a Reply