
How to Set Up FluentSMTP to Fix WordPress Email Delivery Issues
Your WordPress site sends emails every day. Password resets, form notifications, order confirmations, user registrations, and more. But if you’ve noticed these emails landing in spam or not arriving at all, your site is probably using PHP mail(). That’s the default mailing method in WordPress, and it fails more often than it works.
FluentSMTP fixes this. It’s a free plugin that replaces PHP mail() with a proper email service provider. In this guide, I’ll show you how to install FluentSMTP and connect it with Gmail or Google Workspace so your WordPress emails actually reach the inbox.
TL;DR
- WordPress uses PHP mail() by default, which lacks authentication and gets blocked by most email providers.
- FluentSMTP is a free WordPress plugin that connects your site with email service providers like Gmail, Google Workspace, Amazon SES, and others.
- To connect Gmail or Google Workspace: create a project in Google Cloud Console, enable the Gmail API, generate OAuth credentials, and paste the Client ID and Client Secret into FluentSMTP.
- Once connected, send a test email from FluentSMTP to confirm everything works.
- FluentSMTP logs every email your site sends, so you can spot delivery failures instantly.
Why WordPress Forms Email Notification Fail
WordPress relies on PHP’s built-in mail() function to send emails. This function has no authentication. It sends emails through your hosting server without proving that the email actually comes from your domain.
Email providers like Gmail, Outlook, and Yahoo have tightened their rules in recent years. Emails without proper authentication get flagged as spam or rejected outright. If your hosting server shares an IP address with hundreds of other sites (which is common on shared hosting), any one of those sites sending spam can get the entire IP blacklisted. Your emails get caught in the crossfire.
The result: form submissions disappear (unless your form has an entry management system), password resets never arrive, and users stop trusting your site. The worst part is that WordPress shows no error. It reports the email as “sent” even when it never reaches the inbox.
An SMTP plugin solves this by routing your emails through a trusted email service instead of your hosting server. The service authenticates your emails, so receiving servers know they’re legitimate.
What Is FluentSMTP
FluentSMTP is a free WordPress plugin loved and used by 600,000+ users that connects your site with your email service provider. It takes over the default WordPress mailing system and sends emails through authenticated channels instead.
Here’s what makes it a good choice:
- Free and lightweight: FluentSMTP is free, and it won’t slow your site down.
- Multiple email providers: Supports Gmail, Google Workspace, Amazon SES, Outlook, Mailgun, SendGrid, Brevo, Postmark, SparkPost, Elastic Email, SMTP2GO, and more.
- Email logging: Every email your site sends gets logged with status (sent or failed), subject, recipient, and timestamp. You can spot problems right away.
- Multiple connections: You can set up more than one email provider and route specific emails through different connections.
- Fallback support: If your primary provider fails, FluentSMTP can fall back to a secondary one automatically.
FluentSMTP is built by WPManageNinja, the same team behind Fluent Forms, FluentCRM, and other popular WordPress plugins. It works with any WordPress plugin that sends emails, including WooCommerce, Fluent Forms, Contact Form 7, and others.
How to Install and Activate FluentSMTP
You can install FluentSMTP directly from your WordPress dashboard. Here’s how.
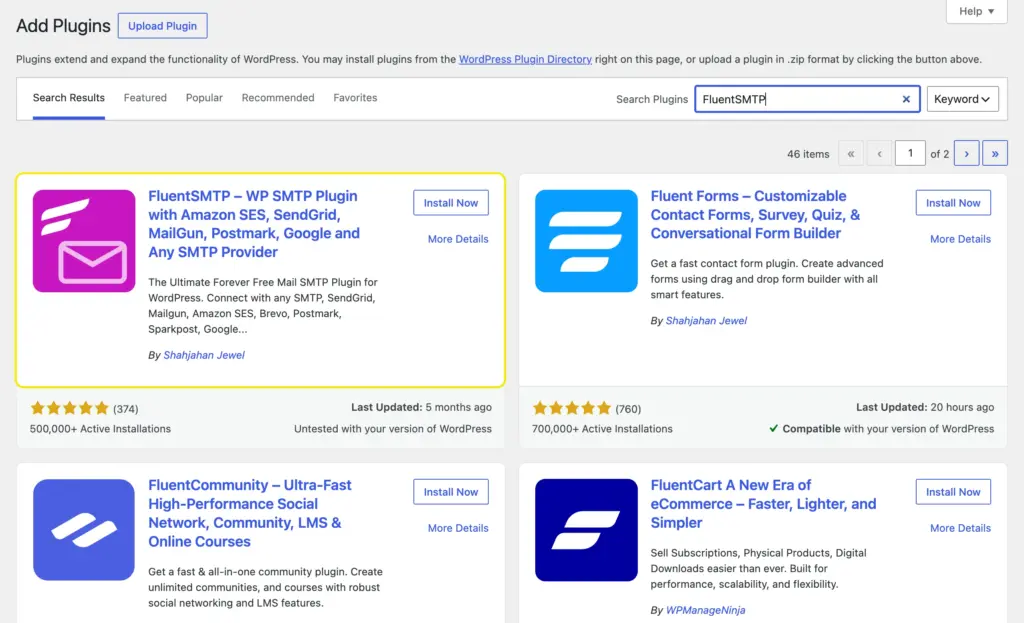
- In your WordPress dashboard, go to Plugins > Add New.
- Type FluentSMTP in the search bar.
- Click Install Now next to the FluentSMTP plugin.
- After installation, click Activate.
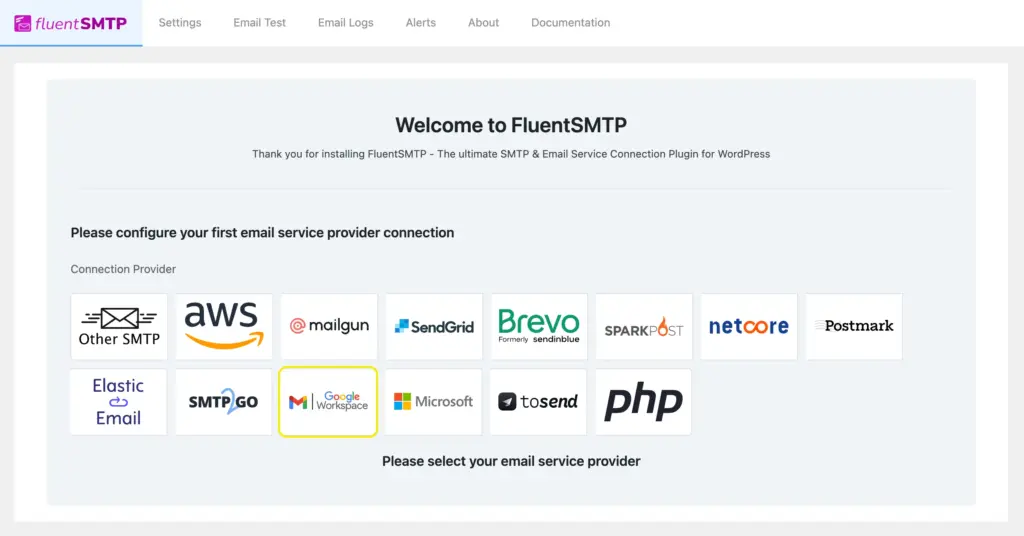
FluentSMTP is now active on your site. You’ll see a setup screen asking you to choose your email service provider. In this guide, we’re using Gmail / Google Workspace.
How to Connect Gmail or Google Workspace with FluentSMTP
You’ll create a project in Google Cloud Console, enable the Gmail API, generate OAuth credentials, and paste them into FluentSMTP.
It takes about 10–15 minutes. Follow each step carefully.
Step 1: Open FluentSMTP and select Gmail/Google Workspace
Go to Settings > FluentSMTP in your WordPress dashboard. You’ll see a list of connection providers.
Click Gmail/Google Workspace to select it as your provider.If you’ve already connected another provider, go to Settings in the FluentSMTP navbar and click + Add Another Connection. Then select the Gmail/Google Workspace tab.
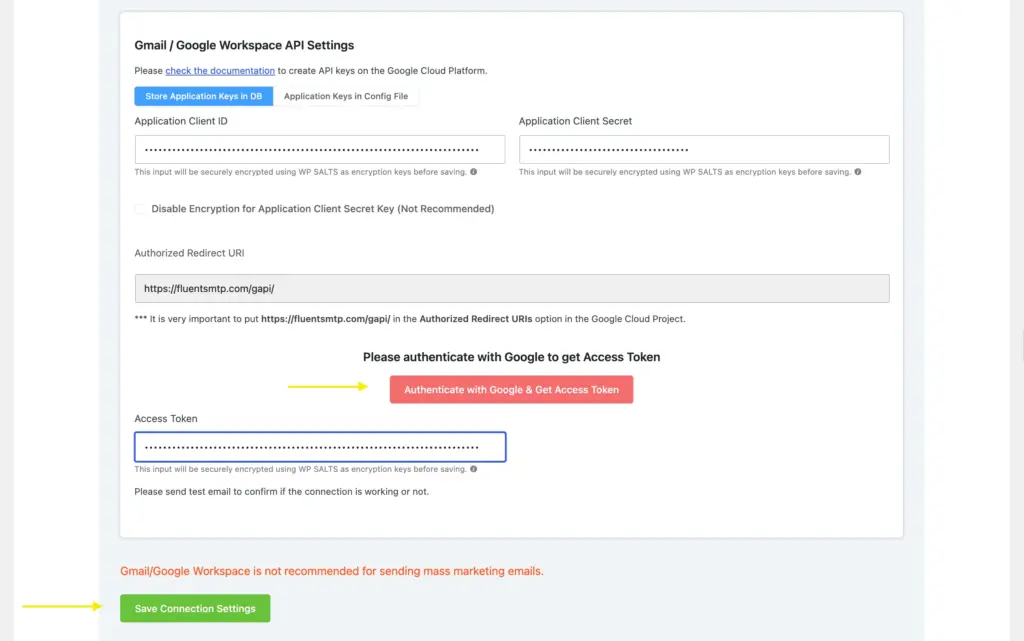
You’ll see the Add Connection page with these fields:
- From Email: Your Gmail or Google Workspace email address.
- From Name: Your site name. You can change it.
- Set the return-path to match the From Email: If you check this, bounce messages will go to your From Email address. If unchecked, bounce messages may be lost.
- Force Sender Name: Aligns the sender name across all outgoing emails.
- Application Client ID and Application Client Secret: You’ll get these from Google Cloud Console in the next steps.
Authorized Redirect URL: Copy this URL. You’ll need it when creating credentials in Google Cloud.
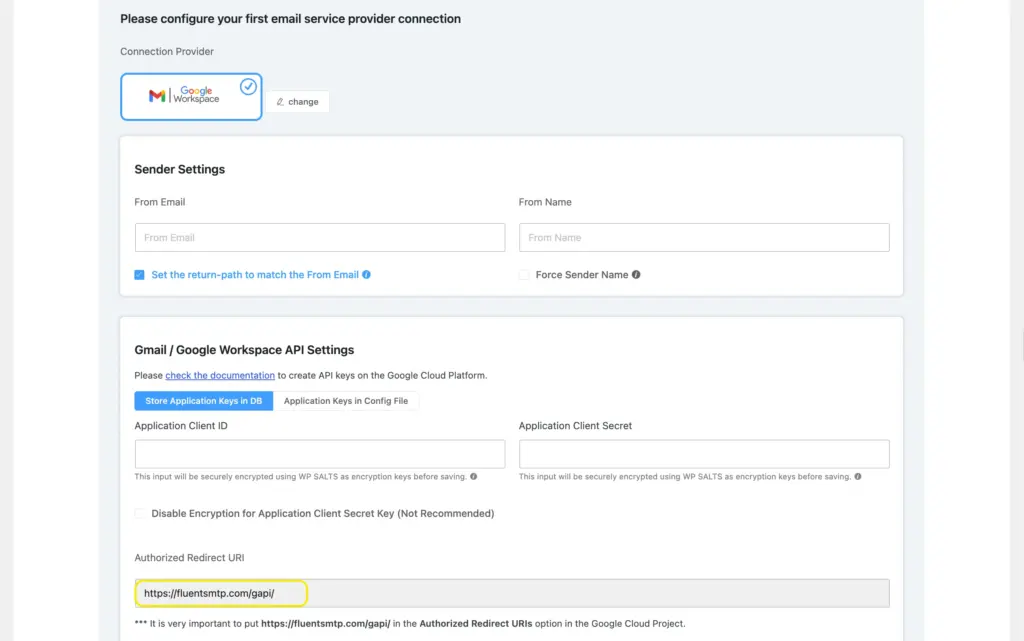
Keep this page open. We’ll come back to paste in the credentials.
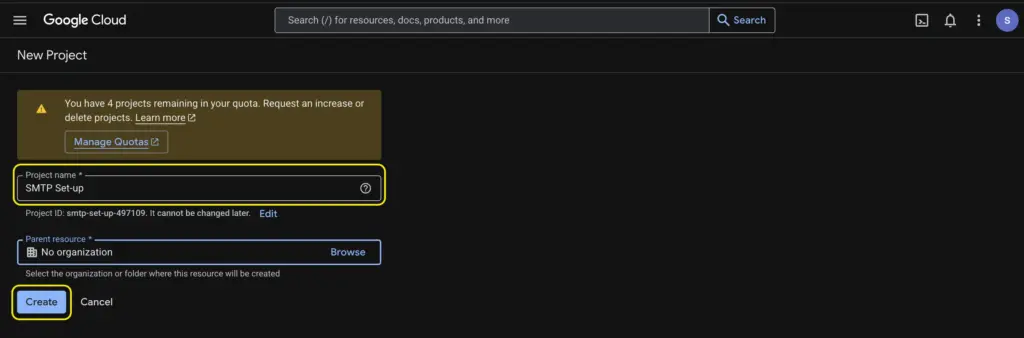
Step 2: Create a project in Google Cloud Console
Go to Google Cloud Console. If this is your first time, accept the Terms of Service and click Agree and Continue.
- Click the Select a project dropdown at the top of the page.
- Click New Project in the top right corner of the popup.
- Give your project a name (e.g., “FluentSMTP”). Location is optional.
- Click Create.
- Once created, click Select Project to open it.
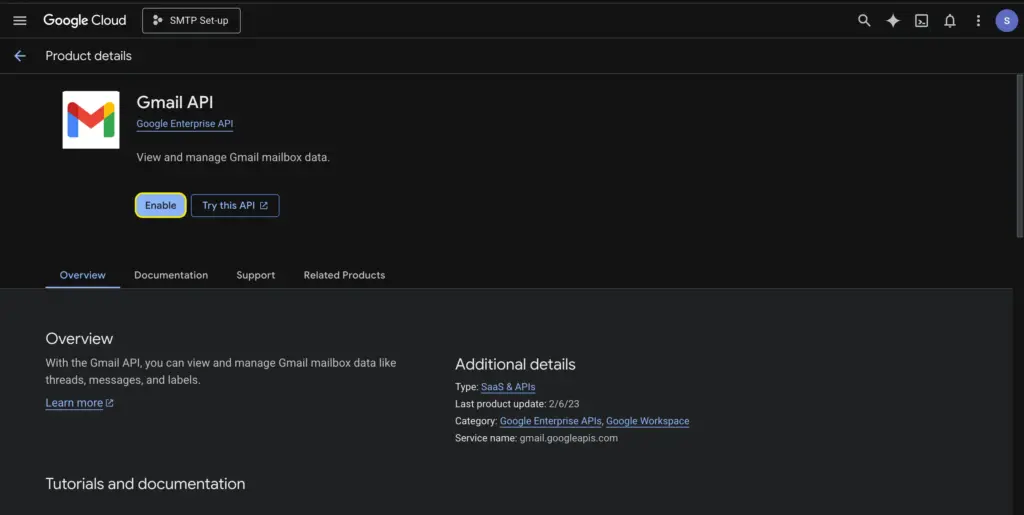
Step 3: Enable the Gmail API
With your project selected:
- Click APIs & Services in the left sidebar.
- Click Enable APIs & Services.
- Click the + Enable APIs and Services button at the top.
- Find Gmail API under Google Workspace (or search for it).
- Click Gmail API, then click Enable.
It takes a few seconds. Google will redirect you to the Gmail API dashboard once it’s enabled.
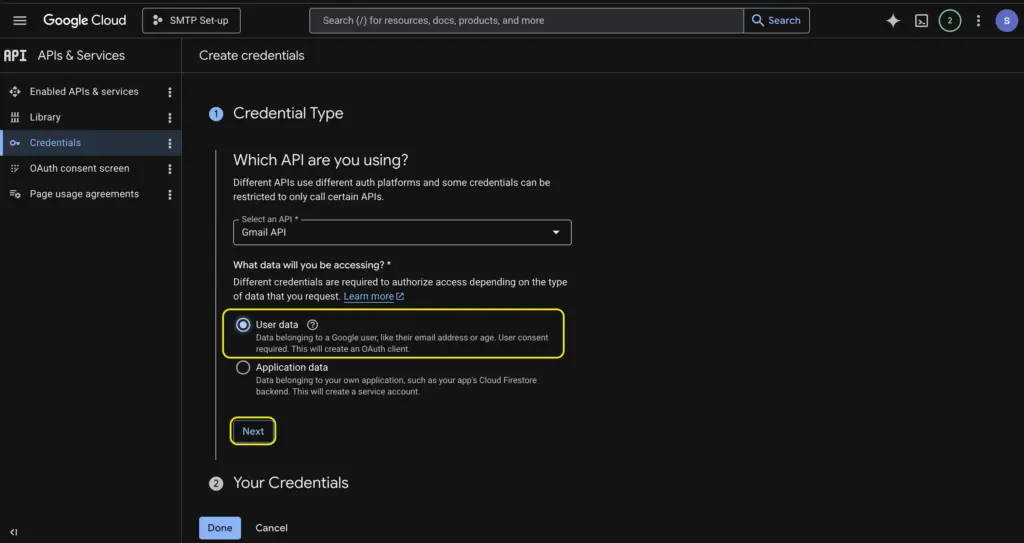
Step 4: Create OAuth credentials
On the Gmail API page, click Create Credentials in the top right. You’ll go through five steps:
1. Credential Type:
- Select Gmail API from the dropdown (it should be selected by default).
- Check User data as the type of data you’ll access.
- Click Next.
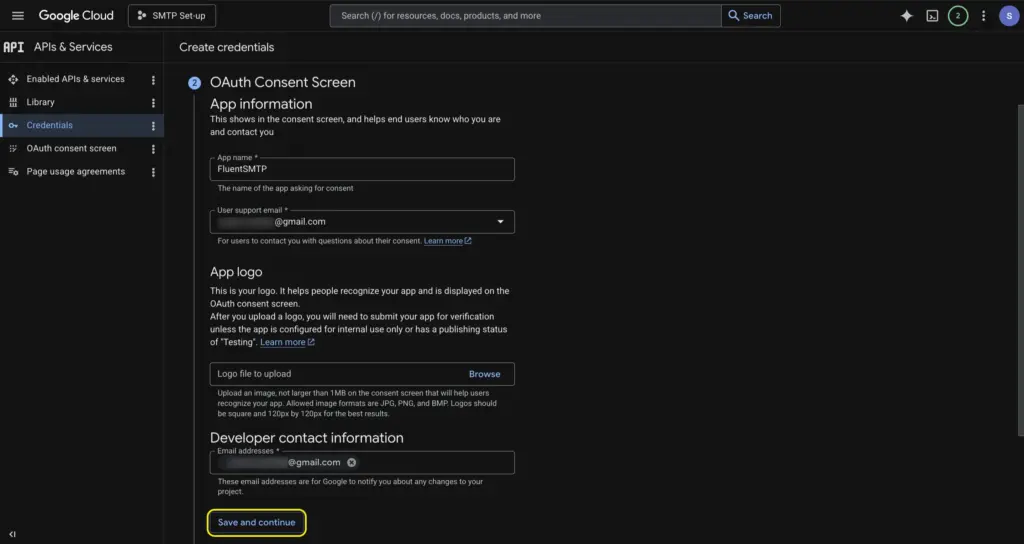
2. OAuth consent screen:
- Enter an App Name (e.g., “FluentSMTP”).
- Enter your email address for User support email.
- Enter your email again under Developer contact information.
- Click Save and Continue.
3. Scopes (optional):
You don’t need to configure anything here for FluentSMTP. Click Save and Continue to skip this step.
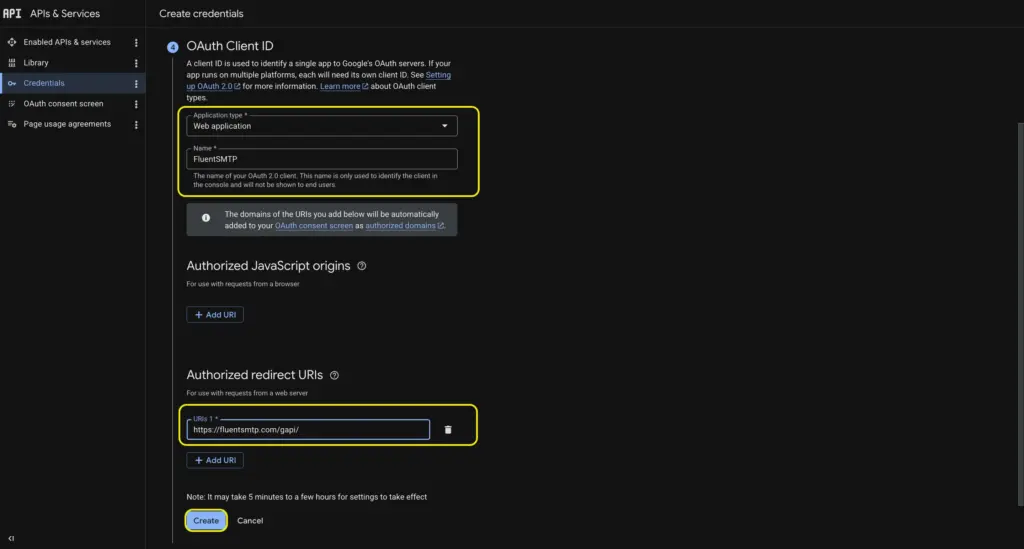
4. OAuth Client ID:
- Set Application Type to Web Application.
- Give it a name (e.g., “FluentSMTP”).
- Under Authorized Redirect URIs, click Add URI and paste the Authorized Redirect URL you copied from FluentSMTP earlier.
- Click Create.
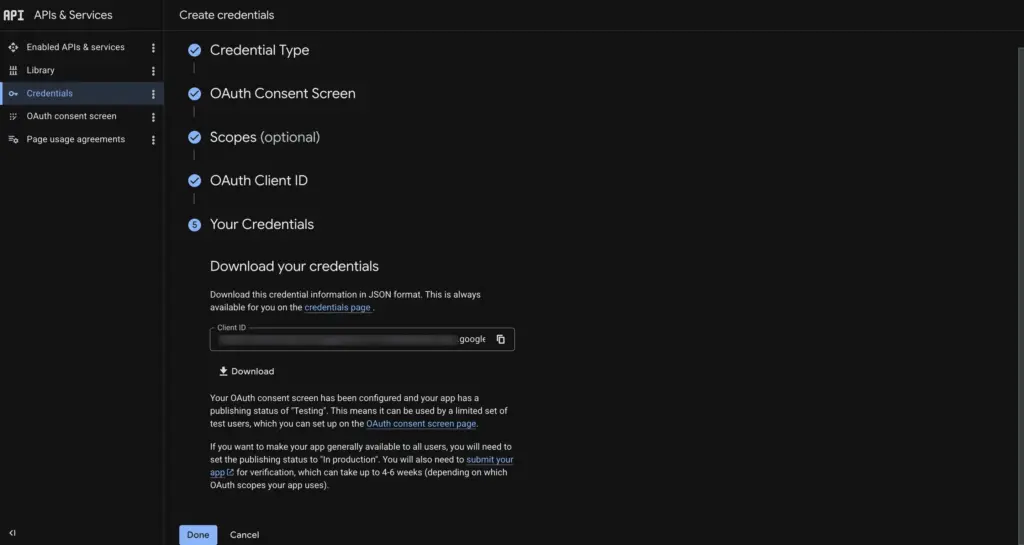
5. Your Credentials:
A Client ID will appear. You can skip downloading or copying it for now. Click Done.
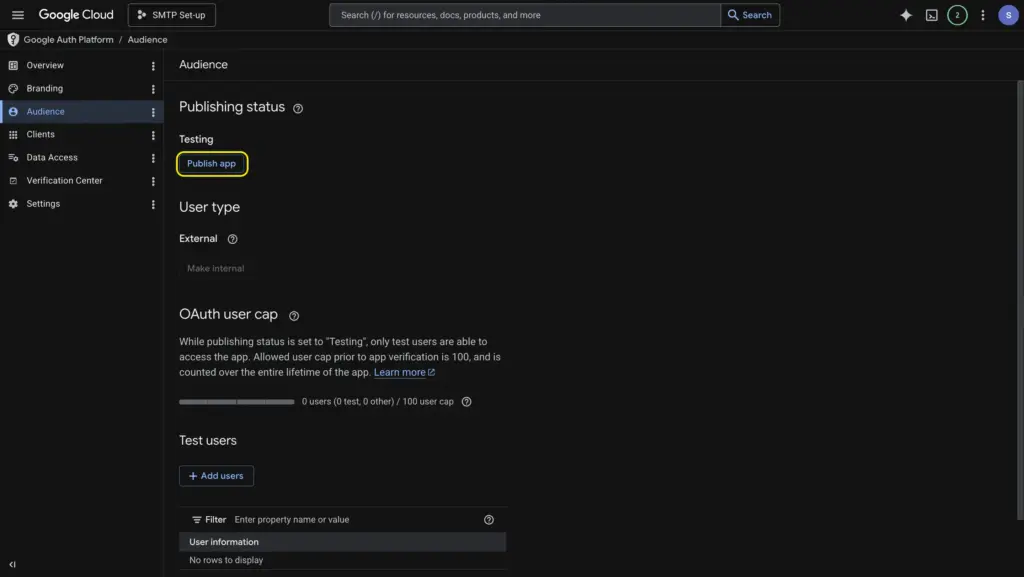
Step 5: Publish the OAuth app
Before you can use the credentials, you need to publish the app.
- In the left sidebar, click OAuth consent screen. In newer versions of the Google Cloud UI, click Audience instead.
- Find the Publishing Status section. It will say “Testing.”
- Click Publish App.
- Click Confirm in the pop-up if it appears.
Your app is now in production mode.
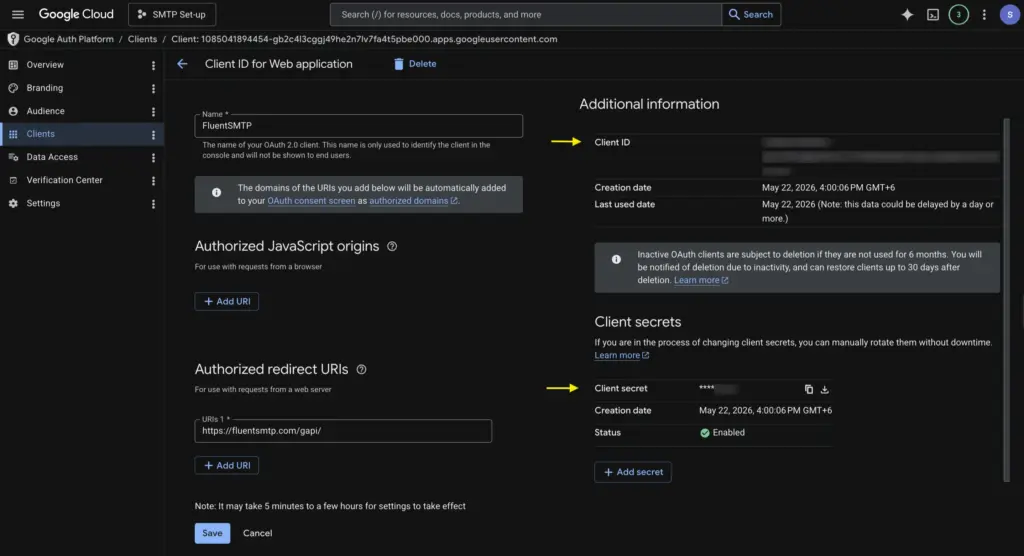
Step 6: Collect your Client ID and Client Secret
- Go to Credentials in the left sidebar of your Google Cloud dashboard.
- Under OAuth 2.0 Client IDs, find and click on the project name you created (e.g., “FluentSMTP”).
- Your Client ID and Client Secret are shown on the right side of the page.
- Copy both values. You’ll paste them into FluentSMTP next.
Step 7: Connect FluentSMTP with your Google account
Go back to your WordPress dashboard and the FluentSMTP Add Connection page you left open.
- Paste the Client ID and Client Secret into the corresponding fields.
- Click Authenticate with Google & Get Access Token.
- Google will ask you to select the account you want to authorize. Choose the Gmail or Google Workspace account you’re using.
- You’ll see an approval screen. Click Continue to grant access.
- You’ll be redirected to the FluentSMTP server, where an Access Token is generated. Click Copy to copy the token.
- Go back to FluentSMTP and paste the Access Token in the corresponding field.
- Click Save Connection Settings.
Your Gmail or Google Workspace account is now connected to FluentSMTP.
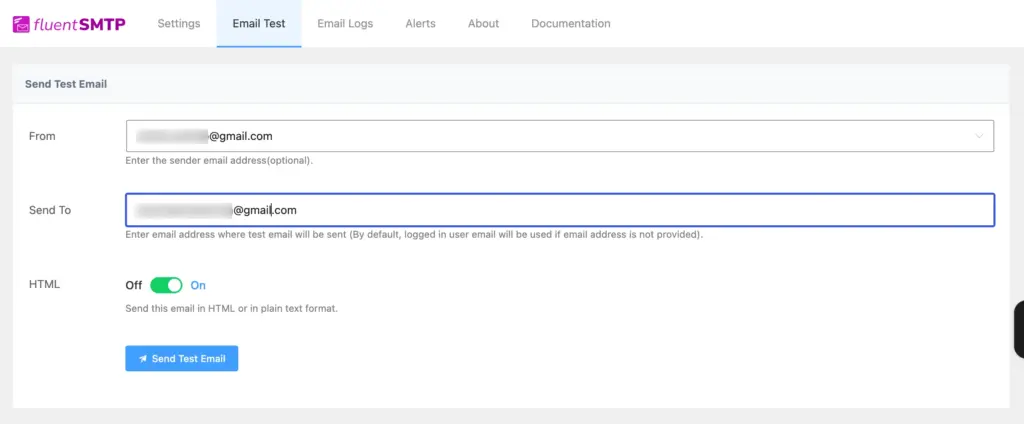
Send a Test Email
First, verify that your setup works.
Go to FluentSMTP > Email Test in your WordPress dashboard. Enter a recipient email address and click Send Test Email.
Check your inbox. If the test email arrives, your setup is working. If it doesn’t, double-check your Client ID, Client Secret, and Access Token for any copy-paste errors. Also make sure the Authorized Redirect URL in Google Cloud matches the one in FluentSMTP exactly.
Monitor Your Emails with FluentSMTP Logs
One of FluentSMTP’s most useful features is email logging. Every email your WordPress site sends gets recorded with:
- Status: Whether the email was sent successfully or failed.
- Subject and recipient: What was sent and to whom.
- Timestamp: When it was sent.
Go to FluentSMTP > Email Logs to view the log. If any email fails, you’ll see the error message right there. This is especially useful if you’re using Fluent Forms for contact forms or FluentCRM for email marketing. You can trace every notification and marketing email from one dashboard.
Quick Troubleshooting Tips
“Invalid authentication credentials” error during test email
Your Client ID or Client Secret might have a typo. Go back to Google Cloud Console > Credentials and copy them again. Also confirm that the Authorized Redirect URL in Google Cloud matches the one in FluentSMTP exactly.
Test email button keeps spinning
Try a hard reload (Ctrl+Shift+R on Windows, Cmd+Shift+R on Mac). If it still spins, clear your browser cache and try again. Caching plugins can sometimes interfere with the FluentSMTP interface.
Emails still going to spam after setup
FluentSMTP handles the sending, but your domain also needs proper DNS records. Make sure your domain has SPF and DKIM records configured for Google. If you’re using a free Gmail account, Google handles authentication on its side.
“Access token expired” error
FluentSMTP refreshes access tokens automatically. But if this error shows up, go to your FluentSMTP settings, remove the existing connection, and re-authenticate to get a new access token.
Fix WordPress Email Delivery with FluentSMTP
WordPress’s default mailing system is unreliable. Emails silently fail, and you won’t know until a customer complains or a lead goes cold.
FluentSMTP fixes that in one setup. Connect it with your Gmail or Google Workspace account, and your emails go through Google’s servers, authenticated, encrypted, and delivered.
With email logging, you’ll always know what’s happening. Every sent email, every failure is on record.
Download FluentSMTP (free) and set it up today. If you’re also looking for a form plugin that works seamlessly with FluentSMTP, Fluent Forms handles everything from contact forms to quizzes to payment forms. All your form notifications will go through FluentSMTP automatically.
Build Smarter Forms for Free


Sarika writes for Fluent Forms and loves to offer insights into small businesses. She’s curious and enjoys discussing ideas, interests, and perspectives. In her free time, she’s either marvelling at architectural beauties or trying different cuisines.


Leave a Reply