How to Add Coupon Codes to WordPress Sites
A well-placed coupon code can encourage hesitant buyers to complete their purchase, reward loyal customers, and create urgency around time-sensitive offers. But if you search “how to add coupon codes to WordPress,” most results point you straight to WooCommerce.
That means setting up a product catalog, configuring store settings, and installing a coupon plugin on top of that. You’re looking at managing an entire shop just to give someone 10% off a coaching session or a downloadable template.
Here’s the truth: You don’t need an entire e-commerce store to offer discount codes on your website.
You can add professional coupon functionality using a comprehensive payment form plugin. Fluent Forms offers you complete flexibility over coupons, including expiry dates, usage limits, minimum purchase requirements, and more, without writing a single line of code.
In this guide, I’ll show you how easily you can add coupon codes in WordPress using Fluent Forms.
TL;DR
- Fluent Forms handles coupons natively inside any payment form; there’s no need to make your site heavy with add-ons.
- Requires Fluent Forms Pro. The coupon module is off by default; enable it under Global Settings > Payment Settings > Coupons. Once enabled, add & customize your coupons.
- Each coupon supports percentage or fixed discounts, expiry dates, minimum purchase amounts, per-user usage limits, and form-level restrictions.
- The coupon input field must be added to each form via the form editor (drag the coupon field from payment fields).
- You can show or hide the coupon field conditionally using Fluent Forms’ built-in conditional logic.
- Always test in Preview mode before going live: check valid codes, invalid codes, expired codes, and below-minimum-spend scenarios.
How to add coupon codes to WordPress with Fluent Forms
Fluent Forms is the fastest WordPress form builder that handles payments natively. When you add a payment field to any form, your customers can pay directly through it, using popular payment gateways. The coupon system is built right into this payment module.
You can set percentage discounts, fixed-amount discounts, expiry dates, minimum purchase thresholds, per-user limits, and even restrict coupons to specific forms.
Note: The coupon feature is part of Fluent Forms Pro. You’ll need an active Pro license to use it.
Here’s how to set it up from scratch.
Step 1: Enable the coupon module
First things first.
If you don’t have Fluent Forms installed yet, go to your WordPress dashboard, navigate to Plugins → Add New, and search for “Fluent Forms.” Install and activate the free version, then add your license key to upgrade to Fluent Forms Pro.
Before you can create or use coupons, let’s switch the module on.
From your WordPress dashboard, go to Fluent Forms Pro in the left sidebar. Click Global Settings. In the left panel, click Payment Settings. Enable the Payment module.
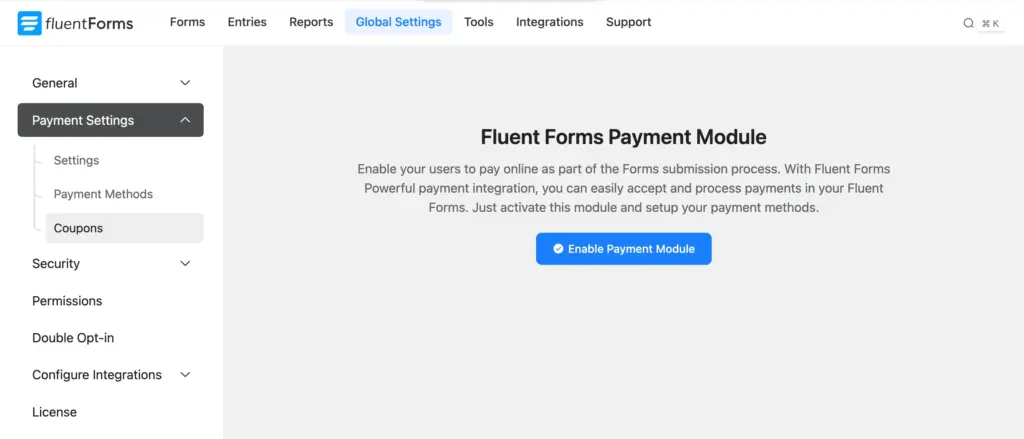
Configure payment settings and gateways. You’ll need them to collect payments via order forms. Once you’re done, select the Coupons tab. Click Enable Coupon Module.

That’s it. The coupon tools are now available across all your payment forms.
Step 2: Create your first discount code
Once the module is enabled, you’ll see the coupons management area. Click + Add New Coupon to open the coupon editor.

Fill in the following fields:
Coupon Title
This is your internal label. Users won’t see it. Use a descriptive label, such as “Spring Sale 20%,” so you can find it quickly later.
Coupon Code
This is what your customers will type into the form. Only letters and numbers are allowed (alphanumeric); no spaces or special characters. Keep it short and memorable. For example: SAVE20 or LAUNCH10.
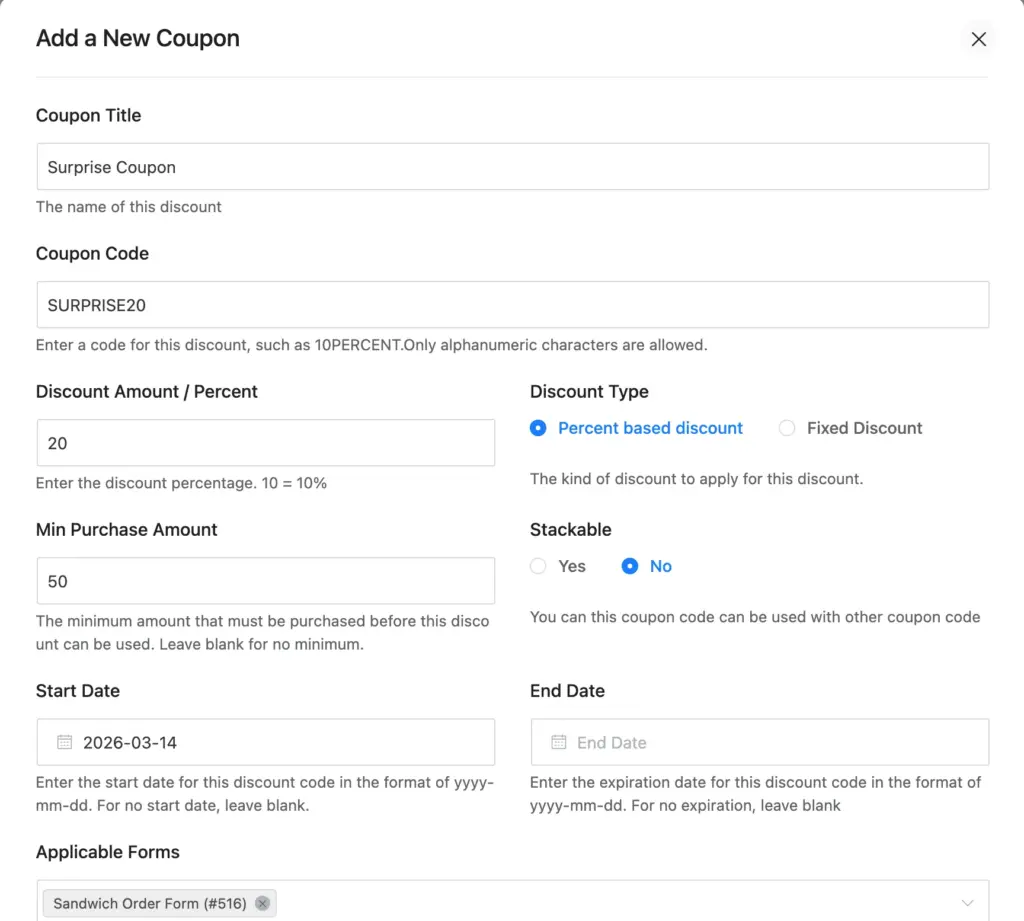
Discount Type
Choose between two options:
- Percent reduces the total by a percentage. For example, 20% off a $100 order saves the customer $20.
- Fixed Amount deducts a set dollar amount regardless of order size. For example, $15 off any order.
Discount Amount / Percent
Enter the value that matches your discount type. For a percentage, enter 20 for 20% off. For fixed, enter 15 for $15 off.
Stackable
Set this to “Yes” if you want this coupon to be usable alongside other coupons at the same time. Set it to “No” to keep it exclusive. This is useful for offering multiple discounts without the coupons stacking beyond your intended offer.
Once you’ve filled in the basics, let’s look at some more customization flexibilities that come with Fluent Forms’ coupon feature.
Step 3: Set smart restrictions
These features separate a professional coupon setup from a basic one. Fluent Forms gives you complete control over how, when, and where each coupon can be used.
Start Date and End Date
Set an exact date range for the coupon to be active. After the end date, the coupon automatically stops working. You don’t need to remember to turn it off manually. This is ideal for flash sales, Black Friday promotions, or any time-limited offer. And it’s really easy to pick dates with the visual calendar UI.
Minimum Purchase Amount
Prevent the coupon from being applied to small orders that make the discount unviable. If you enter 50 here, the coupon will only apply when the cart total is $50 or more.
This is a smart way to encourage larger orders while still making customers feel rewarded.
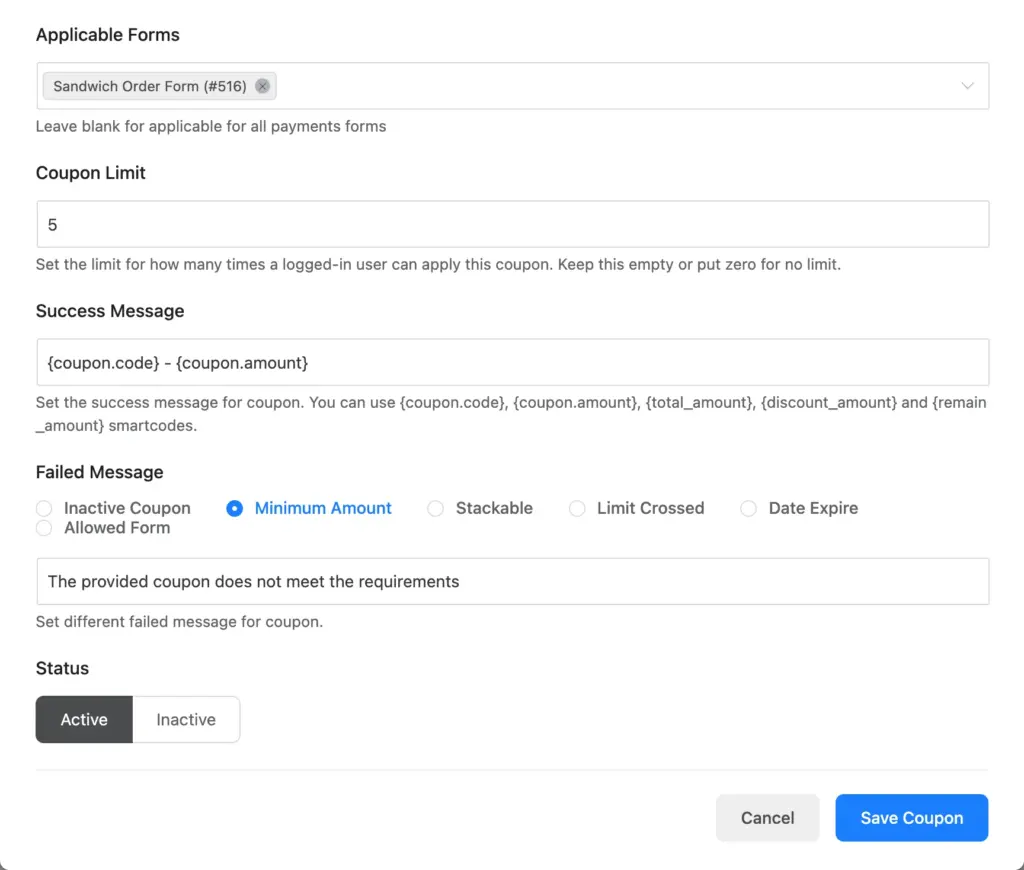
Coupon Limit
Control how many times a single user can apply the coupon. Enter 1 to make it a one-time-use code per user. Leave it blank for unlimited uses.
This is critical for exclusive welcome offers or referral codes that should only be used once per customer.
Applicable Forms
Restrict the coupon to specific forms only. Click the field and select the form names where this coupon should work. If you leave it blank, the coupon will be valid across all your payment forms.
This lets you run different promotions for different products without worrying about overlaps. For example, your “Event Registration” form can have a 15% early bird discount, which is completely unrelated to your “Consultation Booking” form.
Active/Inactive Status
At any time, you can toggle a coupon between Active and Inactive without deleting it. This is useful for coupons you plan to reuse in the future. Pause them between campaigns instead of recreating them each time.
Success Message and Failed Messages
Before saving, fill in the messages customers will see when they apply a code.
- Success Message: Shows when the code is valid and applied. Make it friendly and confirm the discount amount. For example: “Your 20% discount has been applied!”
- Failed Messages: Fluent Forms lets you write different messages for different failure scenarios, such as an expired code, a code that doesn’t meet the minimum purchase requirement, or a code that’s been used too many times. Customizing these messages helps users understand what went wrong and what to do next, instead of just seeing a generic error.
Once all your customizations are set, click Save Coupon.
Step 4: Add the coupon field to your form
Creating a coupon in global settings doesn’t automatically add the input field to your forms. You need to add the coupon field manually to each form where you want customers to enter their code. This way, there are no unintended coupon fields on your forms.
Here’s how:
- Go to Fluent Forms and open the order form you want to edit.
- In the right sidebar, look for Payment Fields.
- Find the Coupon field and drag it into your form layout.
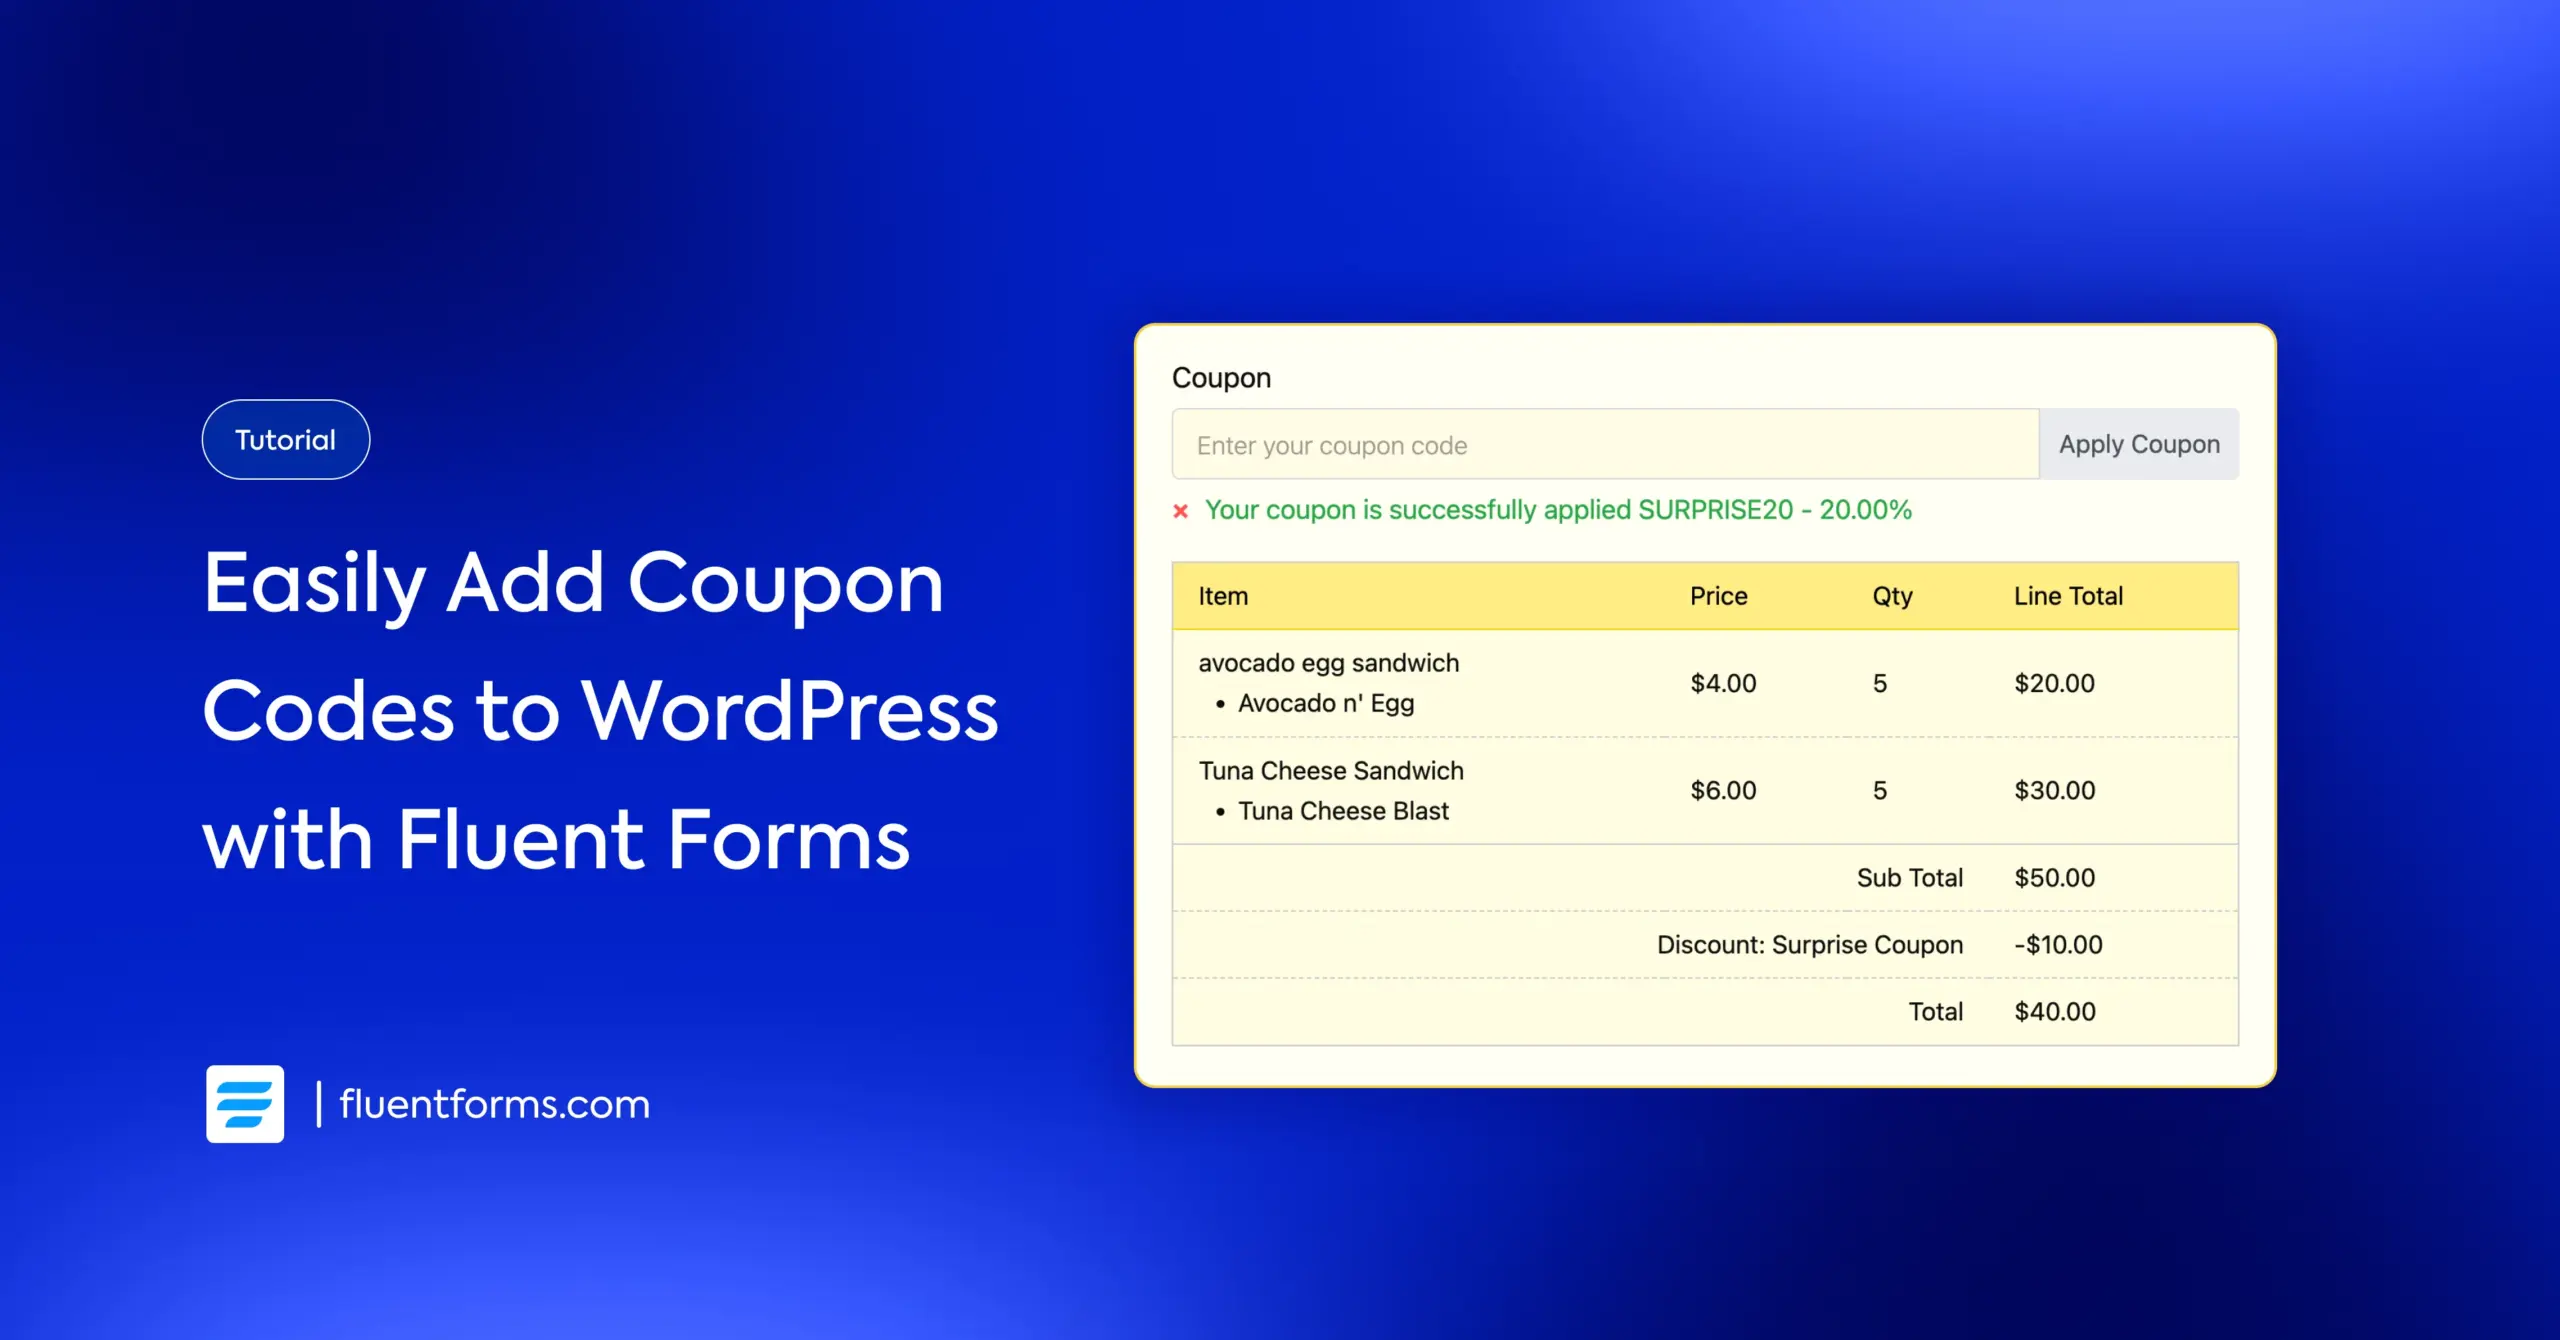
- Position it close to the payment summary so customers can see the discount applied in real time.
Click Save Form.
Customizing the Coupon Field
Once the field is in your form, you can edit its label, placeholder text, and more. Click the pencil icon on the coupon field to open customization options:
- Element Label: The heading users see above the field. Default is “Coupon.” You can change it to “Discount Code” or “Promo Code” to match your brand language.
- Placeholder: The greyed-out hint text inside the input box. Use something like “Enter your code here.”
- Suffix Label: Text that appears inside the field after the input, useful for visual cues.
- Help Message: A small helper note to guide users.
Pro Tip: Use conditional logic to show the Coupon Field selectively
You don’t have to show the coupon field on every order. With Fluent Forms’ conditional logic, you can make the coupon field appear only when certain conditions are met.
For example, if your form has a product dropdown, you can set the coupon field to only show when a customer selects a specific product. This keeps your form clean and prevents coupons from being attempted on products where they don’t apply.
To set this up, click the coupon field’s edit icon and navigate to Advanced Options. Scroll down to Conditional Logic. Build your rule under the condition match.
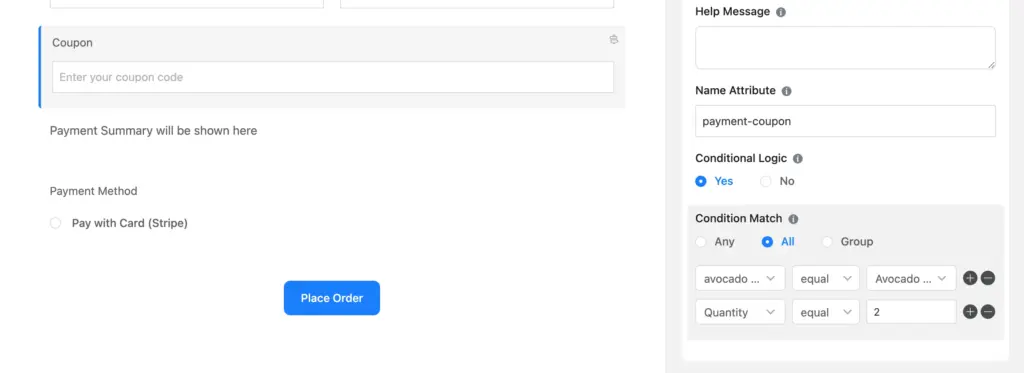
The label of the field on which the coupon field depends should go in the first box; its relation to the field value should go in the second box; and finally, the desired value (could be the product name) should go in the last box.
When your form is complete, click “Save Form.”
Step 5: Test before you go live
Before you start promoting your discount, always test it in Preview mode.
- Click Preview & Design from the form editor tab.
- Add items to your form to generate a payment total.
- Type your coupon code into the coupon field and click Apply Coupon.
- Confirm the discount amount is correct in the payment summary.
Check your custom messages as well. Try entering an invalid code to see what the failed message looks like. Try a code that doesn’t meet the minimum purchase amount or one that’s been deliberately set to inactive.
Each failure scenario should return a specific message, not a generic error. If any message feels confusing or abrupt, go back and edit it in the coupon settings before you go live.
Once everything checks out, you’re all set to go live with your promotion. All that’s left is to embed the form on a page, publish it, and start sharing your offer.
Boost your sales with coupon codes
Coupons are one of the simplest and most effective tools in any marketer’s toolkit. With Fluent Forms, you don’t need a full WooCommerce setup or a dedicated coupon plugin to use them professionally on your WordPress site.
You get everything you need in one place: flexible discount types, smart restrictions, form-level targeting, conditional display, and more. It’s a complete coupon system built into the form builder you’re already using.
Whether you’re running a limited-time promotion, rewarding loyal customers, or giving affiliates unique codes to share, Fluent Forms has you covered.
Try the coupon feature on your next payment form. Set up a code, add the field, preview the discount, and see your conversion boost in real time.

Sarika writes for Fluent Forms and loves to offer insights into small businesses. She’s curious and enjoys discussing ideas, interests, and perspectives. In her free time, she’s either marvelling at architectural beauties or trying different cuisines.


Leave a Reply