Organize Your Data with Airtable Integration in WordPress

If you are a business owner, lead generation is one of the top priorities. Lead generation will include gathering information through a web form and then transferring it to a database so that it is readily available for the sales and marketing teams to do their part. Doing this in two steps can be a bit troublesome.
But Airtable integration with a WordPress form builder plugin can help you get rid of this burden. This integration enables you to populate your Airtable bases and tables directly through the forms on your website. When someone fills out your form, their response will automatically be added to your Airtable table.
In this article, we will dive into the details of how to integrate Airtable with Fluent Forms.
What is Airtable
Airtable is a spreadsheet-like tool that helps you manage projects, track data, and automate workflows. With Airtable, you can make powerful, custom databases that help your team with their most important workflows. You can organize and edit your data in real time.
Also, you can present data as a grid, calendar, kanban, gallery, and other formats. Airtable lets you collaborate with teammates by creating custom interfaces containing the relevant information they need.

Here are a few of Airtable’s features:
- Transform your data into actionable views, like List, Timeline, Gantt, and more.
- Design custom apps in minutes from your existing data using drag-and-drop elements.
- Streamline how your team gets work done and cut out clutter by automating your processes.
- Build with confidence when data is verified and up-to-date.
- Support large-scale data, workflows, and teams—all in one place.
- Store different types of file attachments in your database records.
- Using third-party Airtable integration in WordPress, you can automate your workflow.
Why Fluent Forms
Fluent Forms is one of the most lightweight form-builder plugins in WordPress. It lets you create excellent forms for your WordPress website. It provides a ton of fantastic features to meet your data collection and lead generation requirements.
Fluent Forms allows you to design a wide range of forms, from simple contact forms to more advanced payment forms.
The key features of Fluent Forms are –
- 60+ input fields to collect any type of information
- Numeric calculation to create forms with calculators
- Multi-step forms to break long forms into multiple steps
- Conversational forms to provide a better form-filling experience
- Advanced post creation to collect user-generated content
- Conditional logic to show/hide input fields based on user behavior
- Integration with popular payment gateways to collect payments and donations
- Spam protection using hCaptcha, reCAPTCHA, Turnstile, Honeypot, Akismet
- Quiz and survey with advanced scoring
- Advanced form styler to align form with your brand identity
- Custom CSS and JS to create more advanced forms
- Export entries in CSV, Excel, ODS and JSON format
- PDF add-on to turn form submissions into PDF files
- Form scheduling and restriction based on different rules
- Double opt-in confirmation to ensure efficient data collection
- Email notification after form submission
- Conditional confirmation to show confirmation messages based on predefined conditions
- Advanced form validation to accept eligible submissions
- Fully responsive and accessible to ensure inclusivity
- 55+ integrations to expand core functionalities
Currently, more than 500K websites use this form builder plugin, and the number is constantly growing. Although the free version of Fluent Forms can handle most of your basic needs, the Pro edition further pushes the limit.
Integrate Airtable with Fluent Forms in 4 steps
To integrate Airtable with Fluent Forms, you have to follow the steps below –
- Enable the Airtable integration
- Get Airtable Access Token
- Paste the Access Token in the Airtable integration settings
- Setup the integration feed
These steps are elaborated for you below (You can also check our Airtable documentaion here).
Step 1: Enable the Airtable integration
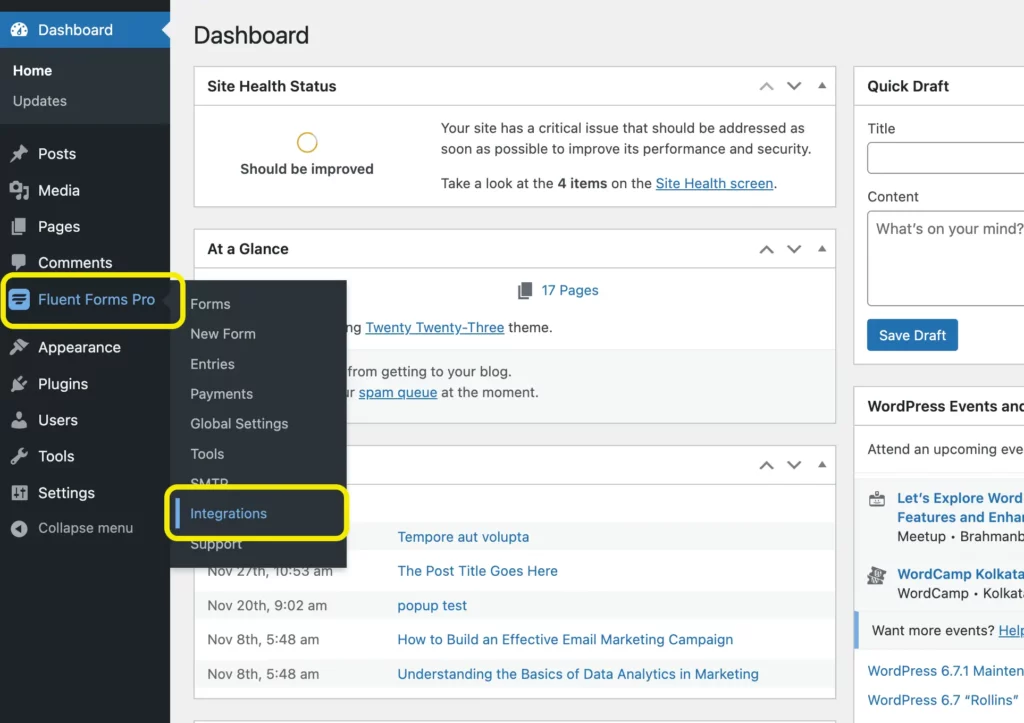
Hover over Fluent Forms Pro from the WordPress dashboard sidebar and click on Integrations.
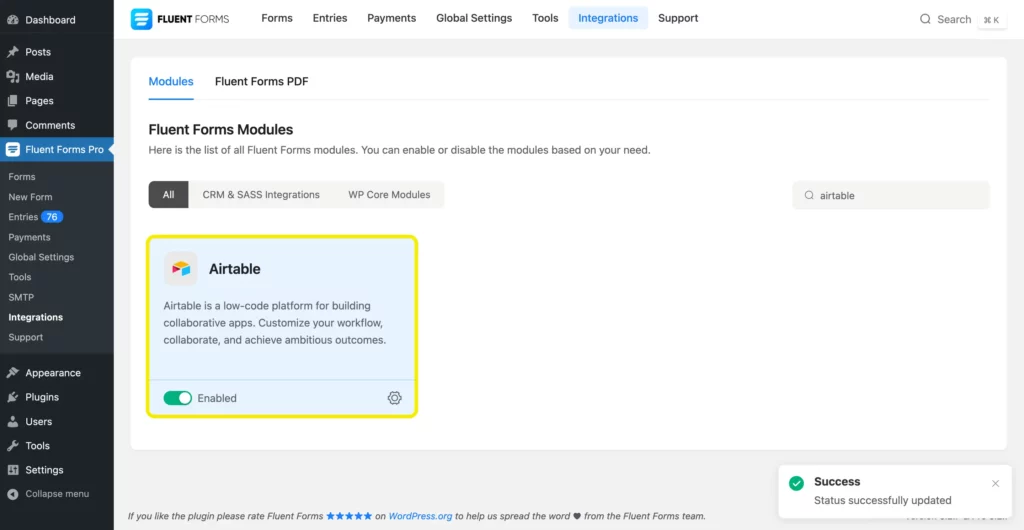
Search for Airtable and toggle the button to enable the integration.
Step 2: Get Airtable Access Token
Now go to Global Settings > Configure Integrations > Airtable.
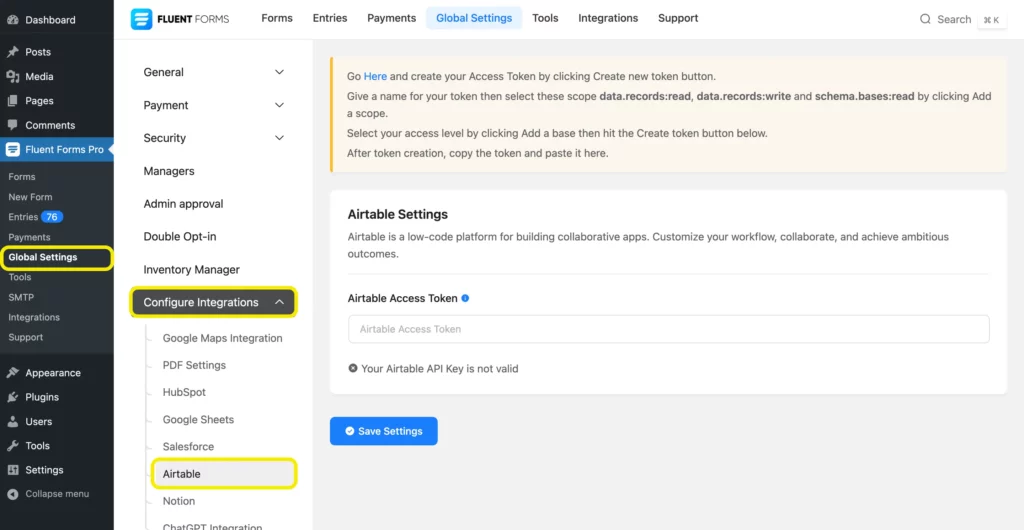
In this window, you will be asked for the Airtable Access Token to activate the Airtable integration.
To create an Access Token, go to Airtable. Create an account or sign in if you already have one.
After logging in, you will see an interface like the one below.
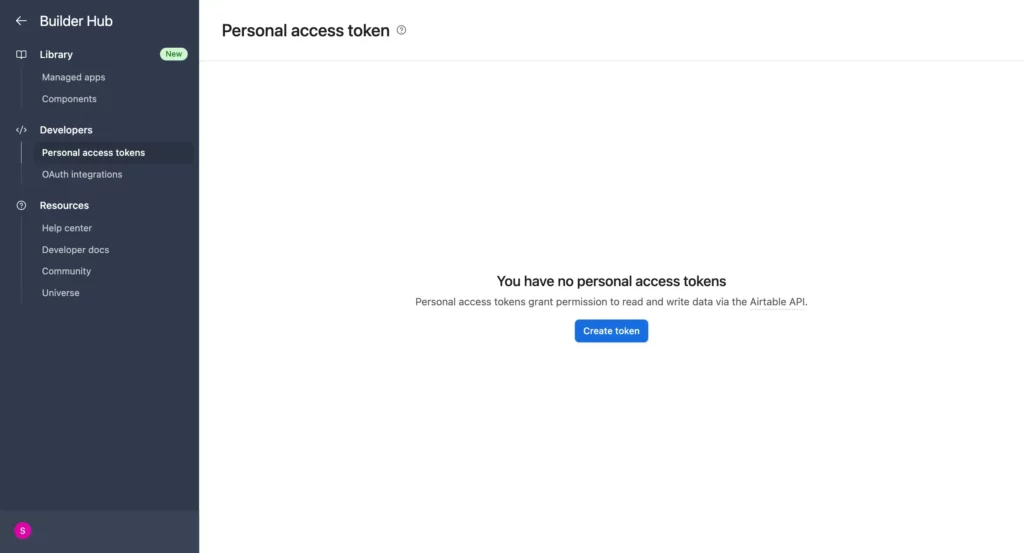
Click the Create Token button.
Give the token a name. Then, add the following scopes (data.records:read, data.records:write, schema.bases:read). Now select a workspace or a base from the access section.

Select the Create Token button and you will have your token created.

Click on the clipboard icon beside the token to copy it.
Step 3: Paste the Access Token in the Airtable integration settings
Go to Fluent Forms Pro > Global Settings > Configure Integrations > Airtable. Paste the access token that you have just copied and click on Save Settings.

Step 4: Setup the integration feed
Now go to the Settings & Integrations tab of the particular form that you want to connect with Airtable. Click on Configure Integrations > Add New Integration and select Airtable Integration.

Give a Feed Name, choose preferred Airtable Configuration and map the input fields.
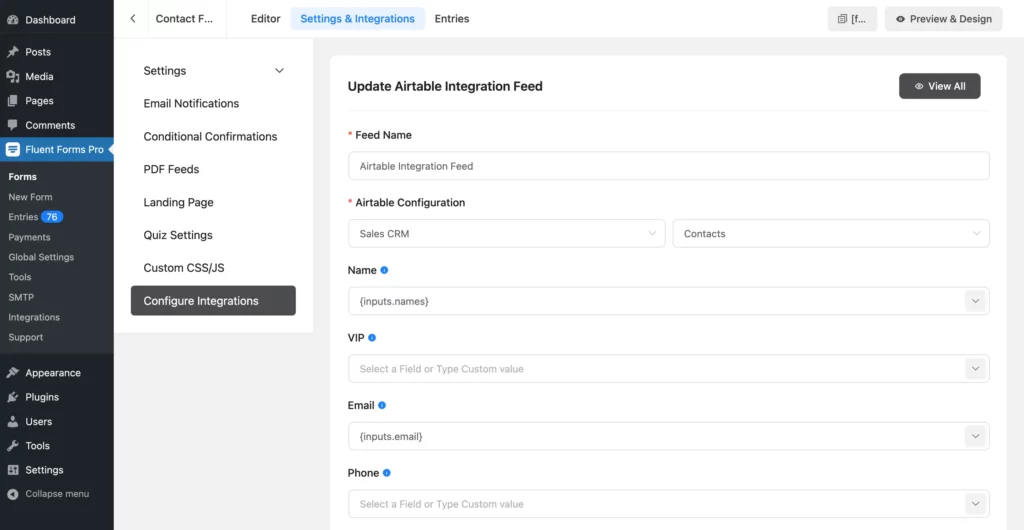
Once done, click on the Save Feed button.
There you go! You have just integrated Fluent Forms with Airtable.
Final words
Integrating Fluent Forms with Airtable is a great way to automate the process of populating your Airtable database. It can save you tons of time and increase your team’s efficiency.
Have you tried it yet? Please let us know in the comments section below.
60+ Third-party Integrations
Expand your form functionality with seamless integrations.






Leave a Reply