

How to Create a Course Registration Form in WordPress

Managing course sign-ups through email or a shared spreadsheet becomes difficult after a while. A generic contact form doesn’t fix this either, since it wasn’t built to ask which course someone wants or to accept a payment. You can build a proper course registration form in WordPress with Fluent Forms, and it works whether you’re running one free workshop or selling seats in five different courses. I’ll show you how to build one from scratch, add course selection, and turn on payment collection for the courses you charge for.
TL;DR
- A course registration form should capture student details, course choice, and payment (if you charge) in one submission, not three separate emails.
- Fluent Forms plugin for WordPress lets you build this from scratch or start from a ready-made course registration template.
- Use the Payment Item field with checkbox display so students can select one or more courses, each priced on its own.
- Stripe works on the free version of Fluent Forms, though Fluent Forms keeps a 1.9% fee on those transactions; Pro removes that fee and adds gateways like PayPal, Mollie, and Razorpay.
- Not charging for your courses? Skip the payment fields entirely. The same form structure works for free registration.
- The Subscription field, also free, lets students split a course fee into installments instead of paying it all at once.
- Confirmation messages and email notifications close the loop so students know their spot is booked.
- Fluent Forms can also create a WordPress account for each registrant and hand them off to FluentCRM for follow-up emails, both from the same form.
What Kind of Course This Works For
“Course” covers a lot of ground, and this form structure holds up across most of it. A live class with a fixed start date, a self-paced set of videos someone buys once and works through on their own schedule, one-on-one coaching sessions booked as a package, and an in-person workshop with a physical seat: all of these are really the same problem underneath. Someone tells you who they are, what they want, and (usually) pays. The fields change slightly by use case, but the form you’re about to build adapts to any of them.
What Your Course Registration Form Needs to Capture
Before you create the form, decide what you actually need from a registrant. Most course registration forms need to capture:
- The student’s name and a working email address
- Which course (or courses) they’re registering for
- Any course-specific detail that affects placement, like skill level or prior experience, if that’s relevant to what you teach
- Payment, if the course isn’t free
- Confirmation that the student agrees to your terms, if you require one
That’s it. A shorter form gets more completed registrations, and you can always follow up with students individually once they’ve signed up.
Why Build It With Fluent Forms
Fluent Forms is the fastest form builder plugin for WordPress that keeps submissions in your own site’s database rather than routing them through a third party. For a course registration form, that matters for two reasons: your student data stays on infrastructure you control, and you’re not paying a separate service just to collect basic information.
The free version already covers most of what a course registration form needs: name, email, and dropdown fields for student details, section breaks to organize the form, conditional logic to show or hide fields based on an earlier answer, and payment fields connected to Stripe. You only need Pro if you want extra gateways beyond Stripe, file uploads, or a multi-step layout. Check the full free vs. pro breakdown before you start, so you know which parts of this guide apply to your plan.
Step 1: Install Fluent Forms
If you haven’t installed the plugin yet, it takes about a minute.
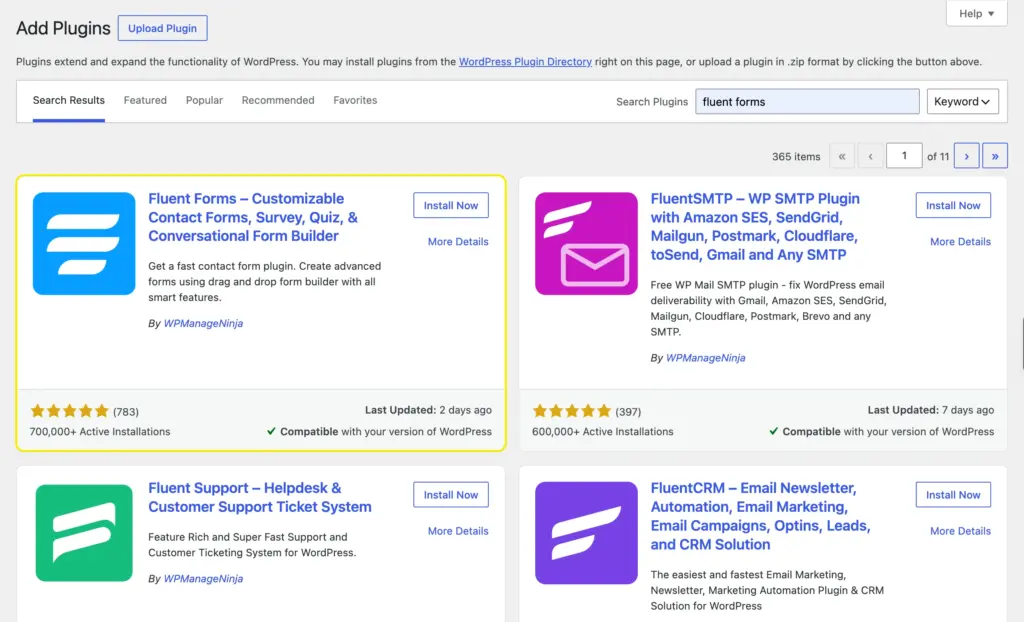
- From your WordPress dashboard, go to Plugins → Add New.
- Search for “Fluent Forms.”
- Click Install Now, then Activate.
Step 2: Start From a Template or a Blank Form
You don’t have to build a course registration form field by field. Fluent Forms ships with a library of course-related templates, including a dedicated Course Registration Form template with student name, email, and a course selection field already laid out. There’s also a Course Enrollment Form template built around collecting payment and an Online Course Registration Form template for capturing contact details and preferences.
To use one, go to Fluent Forms → New Form, search “course” in the template gallery, and pick the one closest to what you need. You’ll still customize the fields, but you’re editing instead of starting from nothing.
If none of the templates fit, choose Create a Blank Form instead and build it up field by field, which is what the rest of this guide walks through.
Step 3: Add the Core Registration Fields
Whether you’re starting blank or adjusting a template, every course registration form needs the same basic student details first.
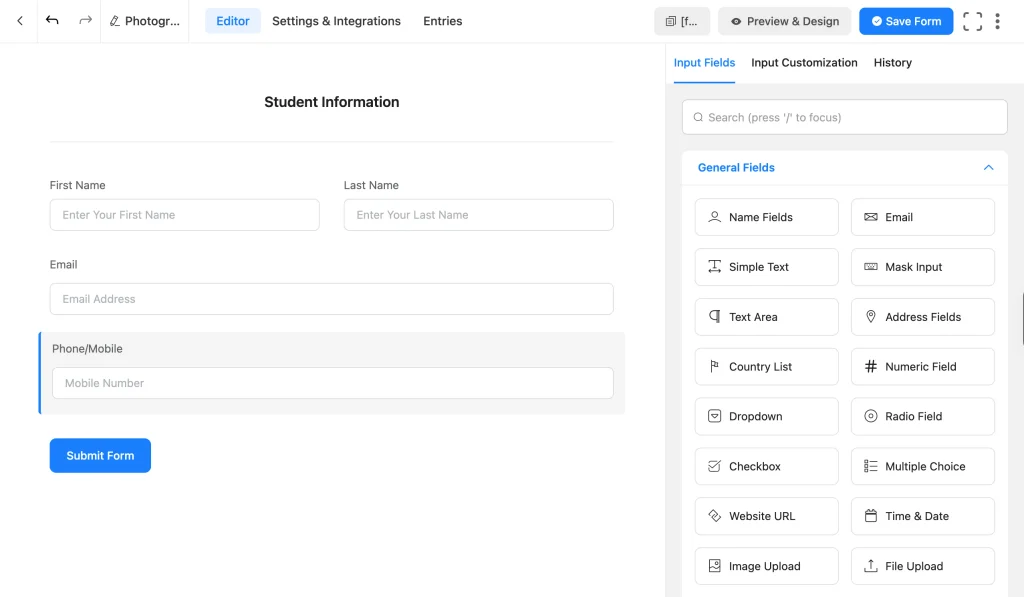
- In the form editor, drag a Name field onto the canvas. Click it to open Input Customization and decide whether you need separate first and last name inputs or a single field.
- Add an Email field below it. Fluent Forms validates the format automatically.
- Add a Phone field if you plan to text or call registrants, though this is optional for most courses.
- Drop in a Section Break above these fields and label it “Your Details,” so the form reads as organized sections instead of a long list.
Step 4: Let Students Choose a Course
How you build this field depends on whether your courses are free or paid.
Free courses (single course selection)
If a student can only register for one course per submission, you have two field options, and the difference comes down to how the choices are displayed.
- Dropdown field: options stay hidden behind a menu until the student clicks it open. Use this when you have five or more courses on the list, since it keeps the form short.
- Radio field: every course is shown on the page at once, each with its own selectable button. Use this when you only have two to four courses, since seeing them all side by side is faster than opening a menu. And it reduces clicks.
Either field works the same way to set up. Add it, label it “Select Your Course,” and list your course names as options.
Free courses (multiple course selection)
If a student can register for more than one course in the same submission, you again have two options, and it’s the same hidden-versus-displayed choice as above.
- Checkbox field: every course is shown on the page at once, and a student ticks as many as apply. Best when the list is short enough to show in full without crowding the form.
- Multiple Choice field: options stay collapsed behind a dropdown menu, like the Dropdown field, but a student can pick more than one. Best when you have a longer course list and want to keep the multi-select option without the form taking up extra vertical space.
If none of your courses cost money, you can skip ahead to Step 8 once whichever field you picked is in place.
Paid courses (including multiple selections)
If students pay to register, use the Payment Item field instead of a plain dropdown. This field does two jobs at once: it lets students pick a course, and it attaches a price to that choice, which then feeds into the payment total automatically.
- Drag a Payment Item field onto the canvas and label it “Select Your Course(s).”
- In the field’s settings, set Display Type to Checkbox. This is the part that matters if you offer more than one course: checkboxes let a student select multiple courses in a single registration, while radio buttons or a dropdown would limit them to one.
- Add an option for each course, with its own price. For example, “Beginner Web Design, $199” and “Advanced Web Design, $249.”
- Save the field.
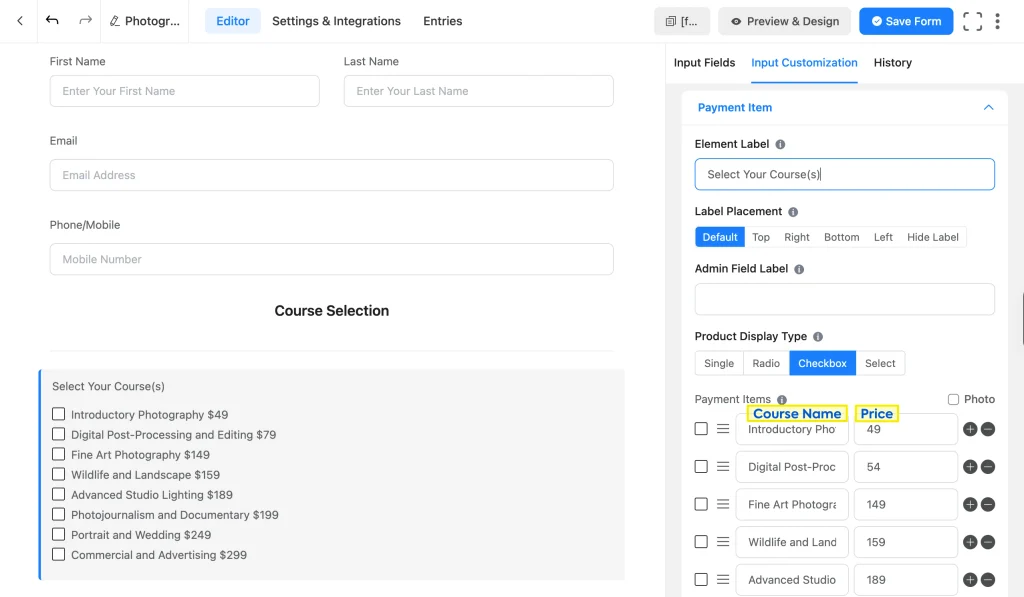
With this field configured, you don’t need to build separate pricing logic. If a student selects multiple courses, their pricing is added automatically.
Step 5: Collect Payment for Paid Courses
Add additional payment fields to allow students to complete checkout and collect the payment.
- Add a Payment Summary field below the course selection field. It shows the student a running total based on what they’ve selected, before they submit.
- Add a Payment Method field so the student can choose how to pay.
Now connect a gateway to route the payment through.
- Go to Fluent Forms → Global Settings → Payment → Payment Methods.
- Enable Stripe, choose test or live mode, and click Connect with Stripe to log into your Stripe account.
- Save the settings.
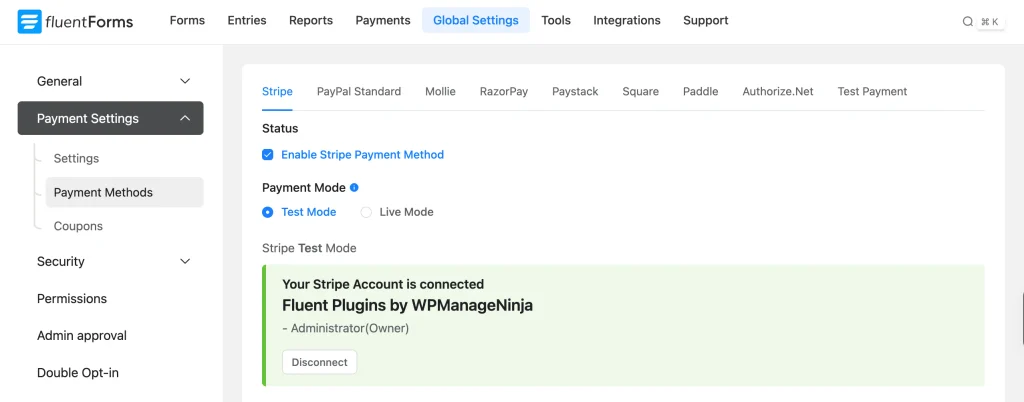
Stripe works with the free version of Fluent Forms, but Fluent Forms keeps a 1.9% fee on those transactions, on top of Stripe’s own processing charges. Fluent Forms Pro removes that fee and adds other gateways, including PayPal, Mollie, Razorpay, Paystack, Square, Paddle, and Authorize.net.
Step 6: Offer Installment Payments
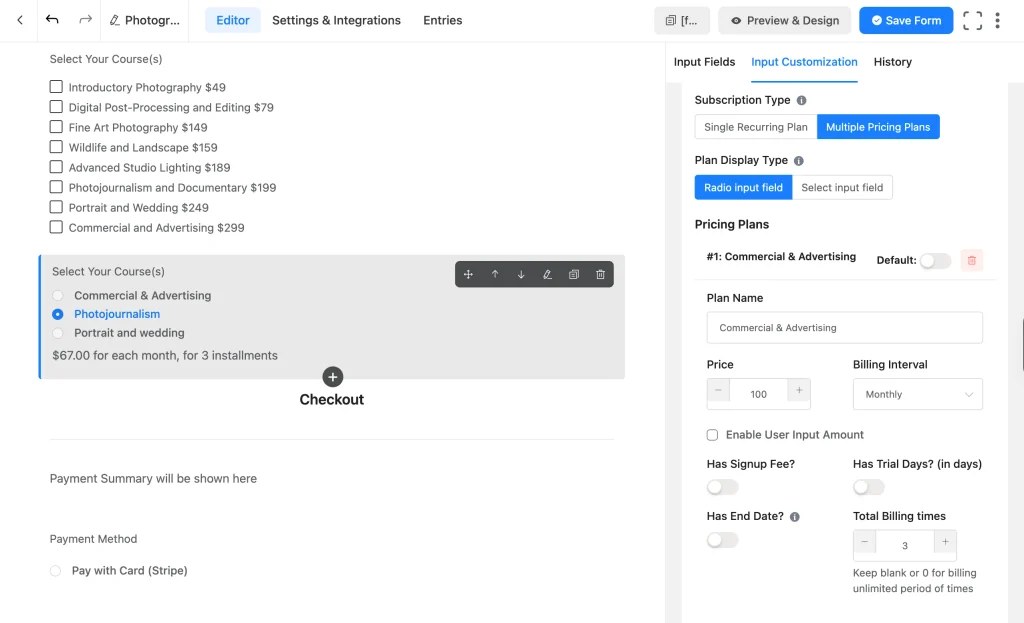
Not every student wants to pay a course fee at once, especially for anything priced above a few hundred dollars. The Subscription field, which is free in Fluent Forms, lets you split a course fee into recurring payments instead.
To let students pick between the two, add a Radio field asking something like “How would you like to pay?” with “Pay in full” and “Pay in installments” as the options, then use Conditional Logic to show the matching payment field based on their answer: your Payment Item field for “Pay in full,” the Subscription field for “Pay in installments.”
The subscription field doesn’t allow multiple option selection, so students can pick only one course to pay for in installments.
- Add a Subscription field to the form.
- Set the Billing Interval, such as monthly.
- Set Total Billing Times to the number of installments, for example, 3 for a course split into three monthly payments.
- Turn on Has Signup Fee if you want an upfront amount separate from the recurring charge, or Has Trial Days if you want to offer a free trial period before billing starts.
This is optional. Plenty of course creators charge a single upfront fee and skip this field entirely, and that’s a reasonable call too.
Step 7: Group a Long Form Into Steps
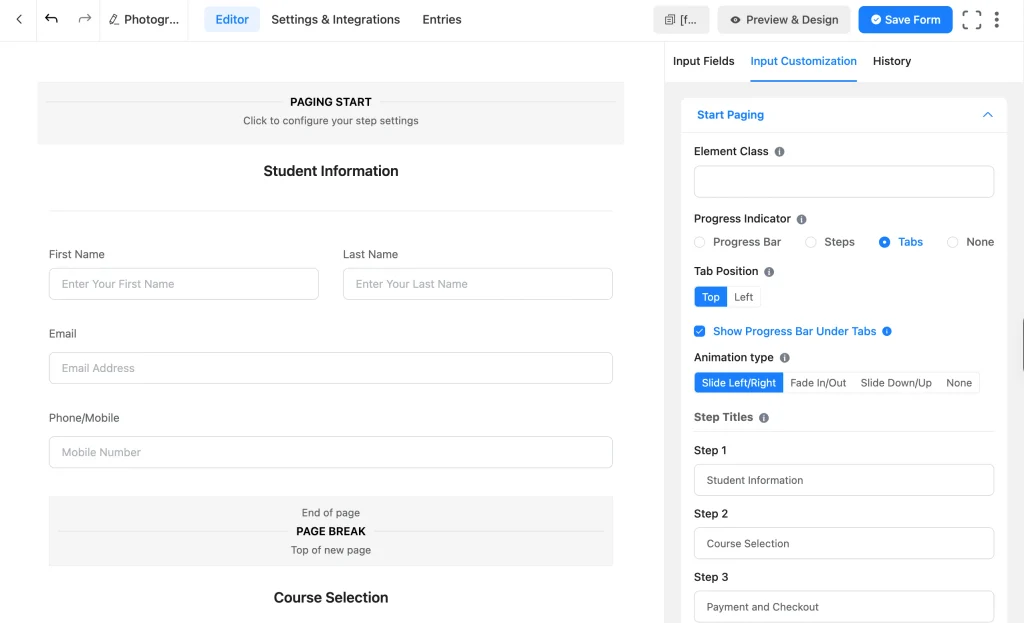
A registration form with student details, course selection, and payment fields can get long on one screen, particularly on mobile. The Form Step field, a Pro feature, splits the form into stages, so a student sees “Your Details” first, then “Choose a Course,” then “Payment,” instead of scrolling through everything at once.
This isn’t required to launch a working form. It’s worth adding once you notice registrants abandoning a long single-page version.
Step 8: Set Up Confirmations and Notifications
A student who just paid for a course or just registered for a free one, wants confirmation that it actually went through.
- Go to Settings & Integrations → Confirmation Settings and write a short thank-you message, or redirect to a dedicated confirmation page with next steps.
- Go to Settings & Integrations → Email Notifications and set up two notifications: one to the student confirming their registration, and one to you or your team so you know a new student signed up.
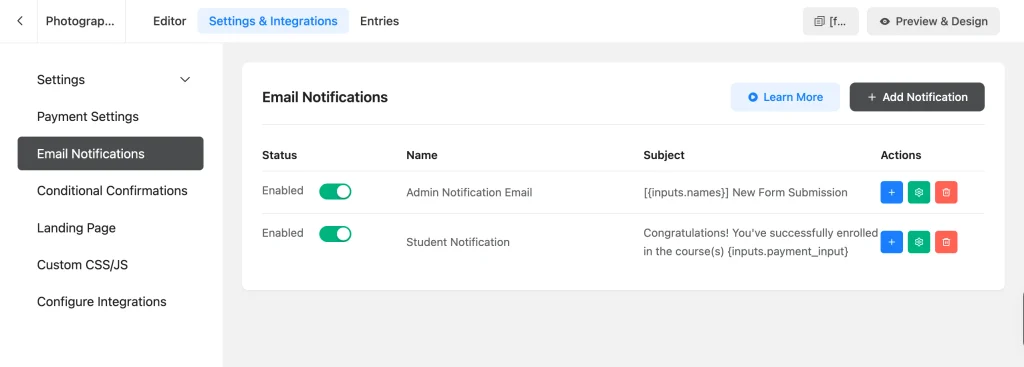
If you teach multiple courses with different instructors, you can use Configure Routing under Send To to send the notification to a specific instructor based on which course was selected, though that routing option is a Pro feature.
Step 9: Test and Publish
Before you point students to this form, check it yourself.
- Preview the form and submit a test registration, including a test payment if you have payments enabled.
- Check Fluent Forms → Entries to confirm the submission landed with the right course and payment details attached.
- Confirm that the notification and confirmation emails arrived as expected.
- Embed the form on a page using the Fluent Forms block or shortcode, and publish the page.
Step 10: Create a WordPress Account for Registrants (Optional)
On its own, a form submission just saves as an entry in Fluent Forms, not a WordPress account, so it won’t get anyone logged in. If your course lives behind a members area, an LMS, or any other gated content, that matters: without this step, a student would have to register on your form and then create a separate WordPress account just to get a login. Fluent Forms’ User Registration module, a Pro feature, does both from the same submission.
- Go to Fluent Forms → Integrations → Modules and enable User Registration or Update.
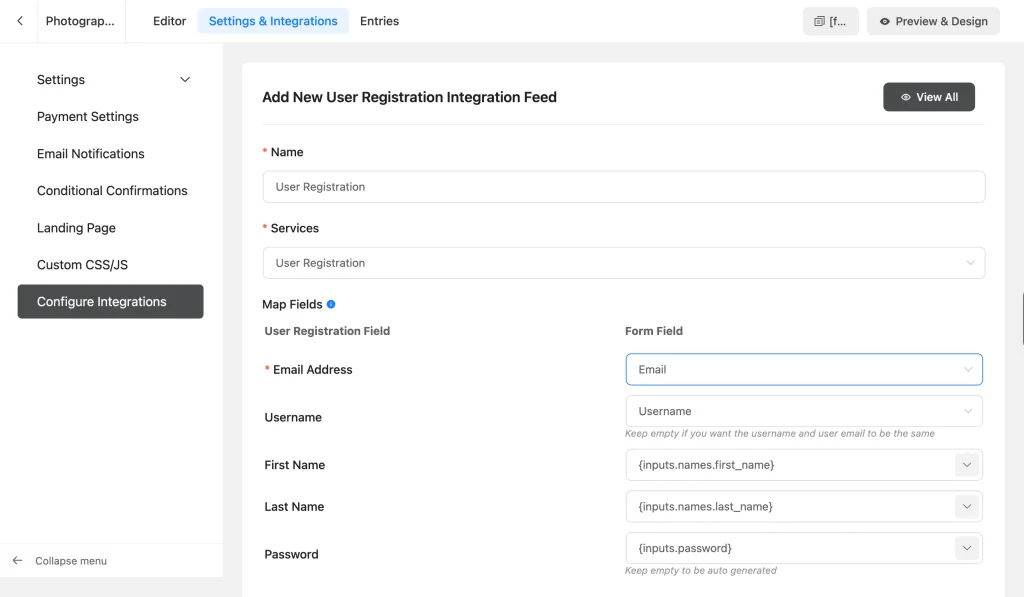
- On your form, go to Settings & Integrations → Configure Integrations → Add New Integration → User Registration or Update Integration.
- Map the form’s Email field to the WordPress email field, and map a Password (after adding it in the form) field to the account password.
- Choose the default role assigned to new users, and turn on auto-login if you want students signed in immediately after they register instead of having to log in separately.
- Under Settings & Integrations → Confirmation Settings, redirect to a welcome page or your course access page instead of a plain thank-you message.
Test this one in a private or incognito window before you publish as you want to see exactly what a brand-new student sees.
Step 11: Follow Up With FluentCRM
Once someone registers, you’ll probably want to email them again: a reminder before the course starts, test results, or just a welcome sequence. The FluentCRM integration, which is free, connects registrations to your email list without you re-entering anyone by hand.
- Go to Fluent Forms → Integrations, search for FluentCRM, and enable the module.
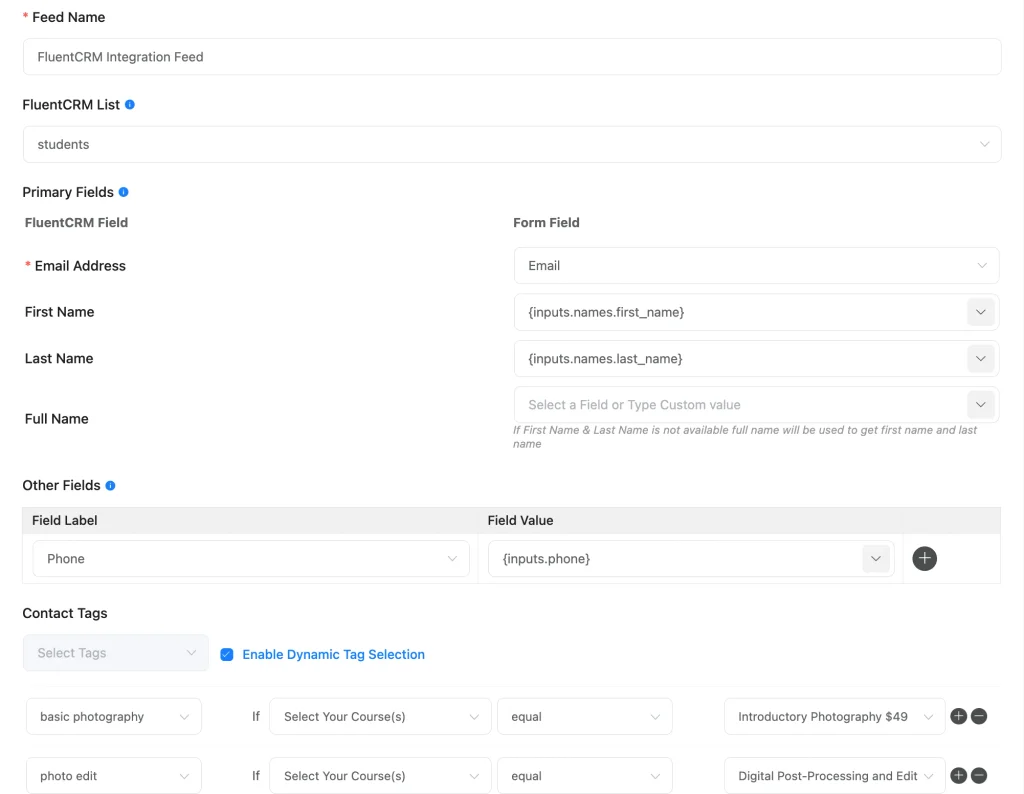
- On your form, go to Settings & Integrations → Configure Integrations → Add New Integration → FluentCRM.
- Map the student’s name and email to the matching FluentCRM contact fields.
Now decide how you want registrants tagged. If your course field is a simple one-choice dropdown, turn on Enable Dynamic Tag Selection in the feed’s Contact Tags section, then map each course option to the tag it should apply. Once that mapping is set, Fluent Forms applies the matching tag automatically every time a student registers, without you touching the feed again.
If you need more than that, such as tagging someone only when they select a specific course and pay in full, add Conditional Logic to the feed instead. This lets you set up one or several feeds, each with its own condition (or combination of conditions joined by AND/OR), and only the feed whose conditions match a given submission fires and applies its tags.
To be more precise, dynamic tag selection allows you to assign a tag when someone picks a certain course, and conditional logic can narrow it further, for example, when someone picks that course and also pays the deposit.
Managing Registrations After Students Sign Up
Every submission lands in Fluent Forms → Entries, where you can filter by course, search by student name, and export the list as CSV or Excel for your own records. If you need a PDF copy of individual registrations, such as for a printed roster or a receipt, the free Fluent Forms PDF add-on for WordPress generates one directly from each entry.
Bonus Features and Workflow Integrations
Coupon codes for discounts
If you run early-bird pricing or referral discounts, Fluent Forms Pro includes a Coupon field that applies a discount code to the total before checkout. You might not need it on day one, but it’s worth knowing about once you want to run a promotion. There’s a full walkthrough in this guide on adding coupon codes to a WordPress site.
Delivering video lessons with FluentPlayer
If your course is video-based, FluentPlayer is a separate video player plugin from the same team built for that. It plays videos from YouTube, Vimeo, or your own server and connects to Fluent Forms so you can drop a signup or feedback form directly inside the video or gate a lesson behind a completed registration. You don’t need it to register students. But it provides the students with a great viewing experience with chapters, controls, playlists, and more.
Instant course access with FluentMembers (coming soon)
Fluent Forms also has an integration with FluentMembers, a native membership plugin from the same team (coming soon). Once it’s live, a student who pays through your registration form will get their membership access granted automatically, right after checkout, instead of you adding them to a membership level manually. Worth considering if you’re planning to move toward a members-only course library.
Frequently Asked Questions
Do I need Fluent Forms Pro to build a course registration form?
No. The free version handles name, email, and course selection fields, section breaks, conditional logic, and Stripe payments. Pro adds extra gateways beyond Stripe without the platform fee, file uploads, multi-step layouts, coupon codes, and conditional email routing.
Can a student register for more than one course at once?
Yes, if you set the Payment Item field’s display type to Checkbox instead of radio buttons or a dropdown. That lets students select multiple courses in one submission, with each course’s price added to the total.
Which payment gateways does Fluent Forms support?
Stripe is available on the free version, with a 1.9% fee that Fluent Forms Pro removes. Pro also adds PayPal, Mollie, Razorpay, Paystack, Square, Paddle, and Authorize.net.
Can students pay a course fee in installments?
Yes, using the Subscription field, which is free. You set a billing interval and a total number of billing cycles, so a course fee can be split into monthly or weekly payments instead of one charge.
Where does the registration data get stored?
In your own WordPress database, since Fluent Forms is self-hosted. Entries are viewable and exportable from Fluent Forms → Entries at any time.
Can I use this same form for a free workshop?
Yes. Build the name, email, and course selection fields (Radio/Checkbox) as described, and leave out the Payment Item, Payment Summary, and Payment Method fields entirely. The rest of the form, including confirmations and notifications, works the same way.
Can this form create a WordPress account for each student automatically?
Yes, using the User Registration or Update module. It’s a Pro feature, and it lets you map form fields to a new WordPress account, set a default role, and optionally log the student in right after they register.
Can I email students after they register, not just at signup?
Yes, by connecting the free FluentCRM integration. It adds each registrant to a list or tag you choose, so you can send reminders, welcome sequences, or payment follow-ups without manually managing a separate email list.
Can I automatically tag students by the course they registered for?
Yes. Turn on Dynamic Tag Selection in the FluentCRM integration feed to match a tag to the course the student picked, or use the feed’s Conditional Logic (Pro) if you want tags based on more than one condition, like course choice combined with payment status.
You now have everything needed to build a course registration form that actually fits how you run your courses, free or paid, single course or several. If you haven’t installed the plugin yet, grab the free version of Fluent Forms and start from the Course Registration Form template to get a working form up faster.
Your Course Registration Form Is Ready to Take Students
You now have everything needed to build a course registration form that actually fits how you run your courses, free or paid, single course or several. The pieces are all here: the right selection fields for how students pick a course, payment and installment options for the courses you charge for, and confirmations, accounts, and follow-up emails so every student who submits the form actually hears back from you.
If you haven’t installed the plugin yet, grab the free version of Fluent Forms and start from a template to get a working form up faster.
Build Smarter Forms for Free


Sarika writes for Fluent Forms and loves to offer insights into small businesses. She’s curious and enjoys discussing ideas, interests, and perspectives. In her free time, she’s either marvelling at architectural beauties or trying different cuisines.




Leave a Reply