

How to Create a Restaurant Order Form on WordPress
A customer wants to order dinner from your website. Right now, that means calling in, texting your Instagram page, or filling out a generic contact form that gives you a name and a vague message like “2 burgers and a Coke, please call to confirm.” Someone on your end has to translate that into an actual order, work out the total by hand, and follow up for payment. Multiply that by a busy Friday night, and orders start slipping through the cracks.
You don’t need a full eCommerce plugin to fix this. A well-built order form can show your menu, calculate totals as customers add items, take payment on the spot, and hand back a receipt, all without WooCommerce or a specialized restaurant plugin. With Fluent Forms, this comes together as one workflow instead of juggling multiple separate tools.
TL;DR
- A restaurant order form needs product-style item selection, quantity fields, automatic total calculation, a payment method, and a confirmation step, all in one place.
- Fluent Forms brings menu display, dynamic pricing, multi-step navigation, payment processing, and PDF receipts together without a dedicated eCommerce setup.
- Build the form with Payment Item and Item Quantity fields organized by section, connect a payment gateway, and enable a downloadable PDF confirmation so customers get an instant receipt.
- The result works for restaurants, cafes, food trucks, and any small business that needs to take orders and payment directly from WordPress.
What a Restaurant Order Form Should Include
Before opening the form builder, you need to know what a functional order form actually needs. Skip any of these and customers either get confused or your kitchen gets an order that’s missing details. A functional restaurant order form needs these components to work end-to-end:
Payment item and item quantity
Every dish needs to be its own selectable item with a fixed price attached, and customers need a way to say how many they want. This pairing is what turns a form into an order form instead of a comment box.
Product name, image, and pricing
People order with their eyes first. A dish name and price help, but a photo next to each item makes the menu feel like an actual menu rather than a checklist.
Section break, page break, accordion, or tab
A menu with appetizers, mains, sides, and drinks all in one long scroll is exhausting to browse. Breaking the menu into categories, whether through section breaks, tabs, or form steps, keeps the ordering experience organized.
Payment summary and payment method
Customers should see their running total update as they add items, along with a clear way to choose how they’ll pay.
Other necessary information
Name, phone number, email, and either a delivery address or a pickup/dine-in preference. This is the information your staff needs actually to fulfill the order.
Confirmation and receipt
Once someone pays, they need proof of it. A confirmation message and a downloadable PDF receipt close the loop without extra work on your end.
Order notes
A simple textarea for special requests (“no onions,” “extra spicy,” “ring the doorbell twice”) saves a phone call later.
Steps to Create an Online Restaurant Order Form on WordPress
Here’s how to put all of that together using Fluent Forms.
Step 1: Add a new form
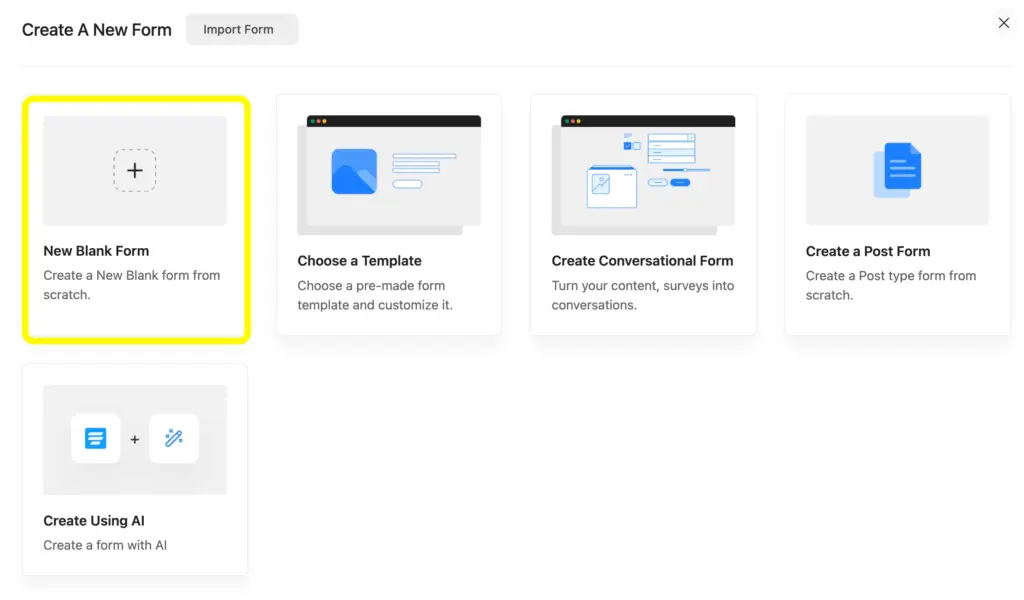
From your WordPress dashboard, go to Fluent Forms → Forms → Add New Form. You can start from a blank form, but Fluent Forms already has a restaurant order form template built with categorized menu sections, images, quantity fields, and payment integration, so it’s usually faster to start there and customize it than to build from scratch.
Step 2: Add and customize the required fields
This is where most of the actual menu-building happens.
Add your Payment Item fields
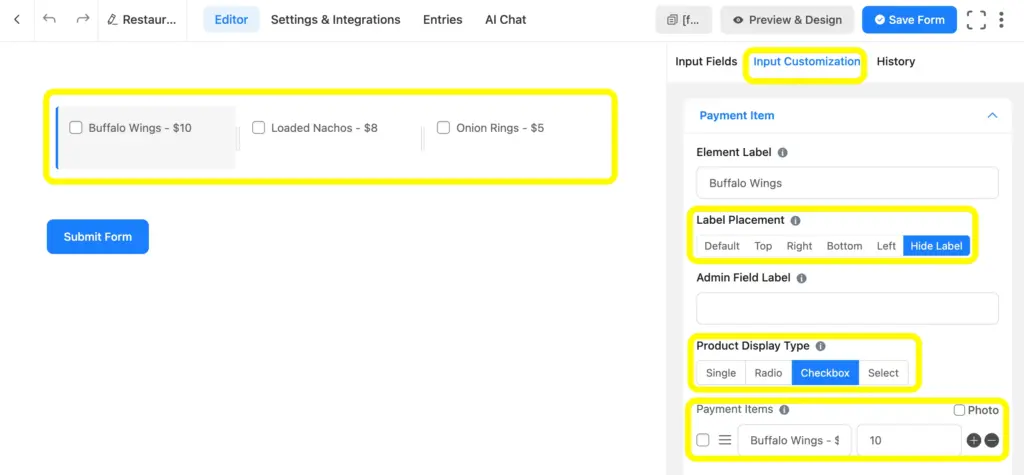
Each dish gets its own Payment Item field with its name and price attached. If a dish comes in variations (say, a burger with a choice of side), you can add options within the same field rather than creating a separate item for each combination.
Here I’ve chosen a three-column container and selected Product Display Type: Checkbox, while choosing Label Placement: Hide Label. This will help the customer decide quickly and choose items with a comparative view.
Add product images
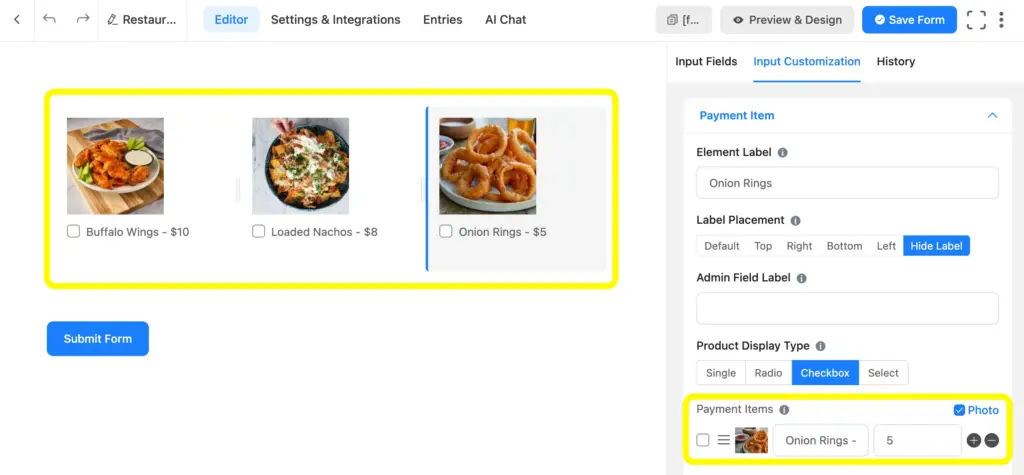
Most field types in Fluent Forms support image uploads, so you can attach a photo to each dish. This is one of the details that makes an order form feel like a menu rather than a spreadsheet.
Checkmark the Photo button at the right side of the Payment Items.
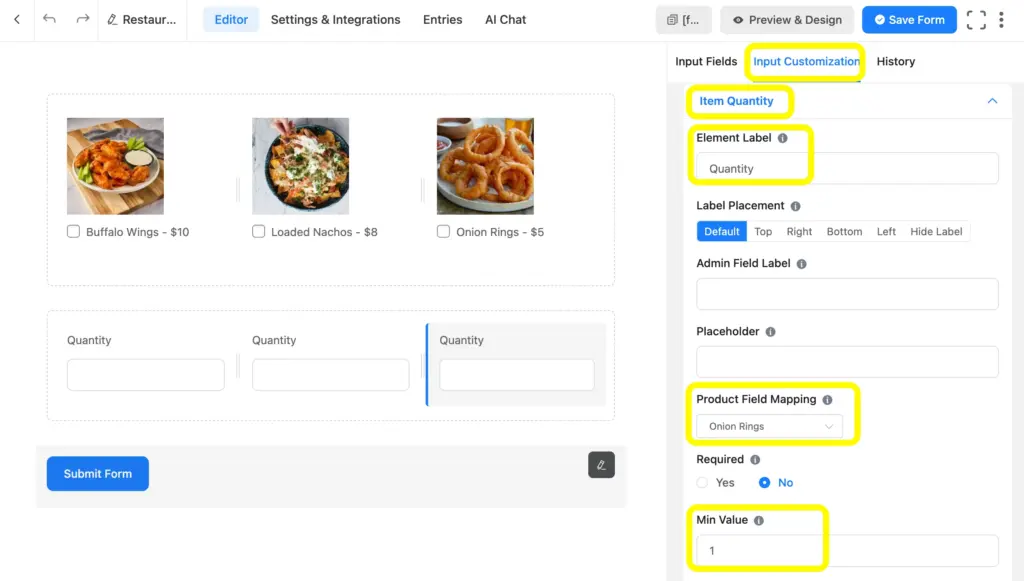
Pair each item with Item Quantity
This lets customers specify how many of a dish they want, and Fluent Forms uses it to calculate the line total automatically.
I’ve selected another three-column container to place the Item Quantity field, and placed it below the Payment Items fields. Now, from here, I’ve selected the Product Field Mapping as the preferred one for each Item Quantity field. This will help the calculation get done dynamically.
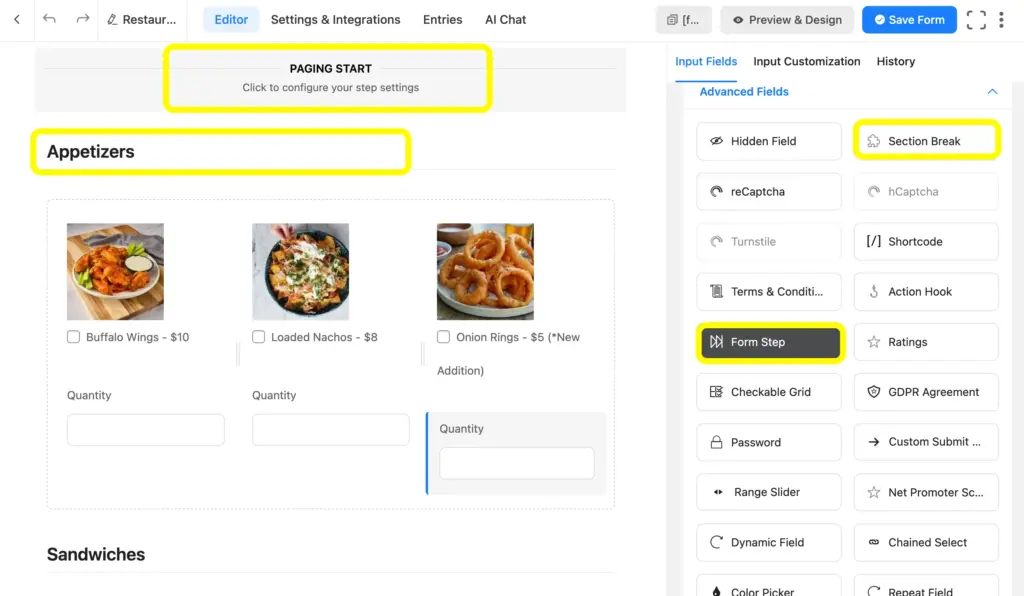
Organize with Section Break or Form Step
Group items by category, appetizers, sandwiches, burgers, mains, sides, salads, beverages, and so on, and separate each group with a Section Break or push categories into their own steps using multi-step forms. For a longer menu, steps work better since customers move through categories at their own pace instead of scrolling one long page. You can also use the Accordion/Tab field.
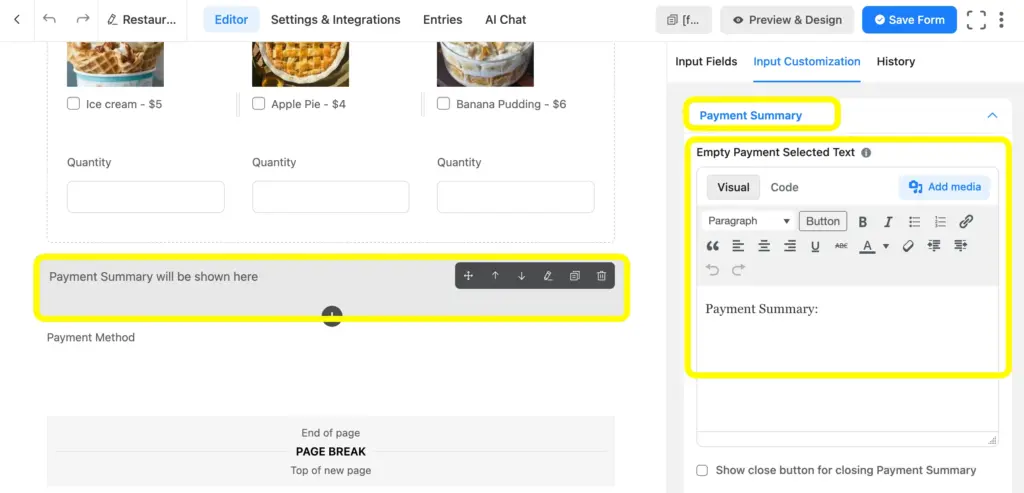
Add the Payment Summary field
This field totals everything the customer has selected in real time, so they always know what they owe before submitting.
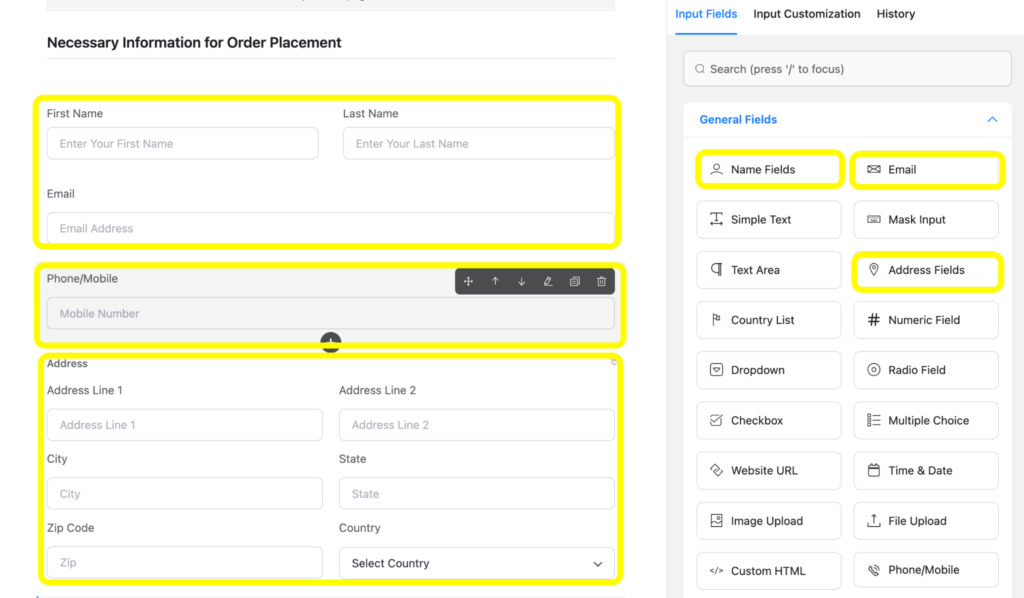
Add fields for necessary information
Name, email, Address, and phone number are standard. Use the Phone/Mobile field for built-in number validation.
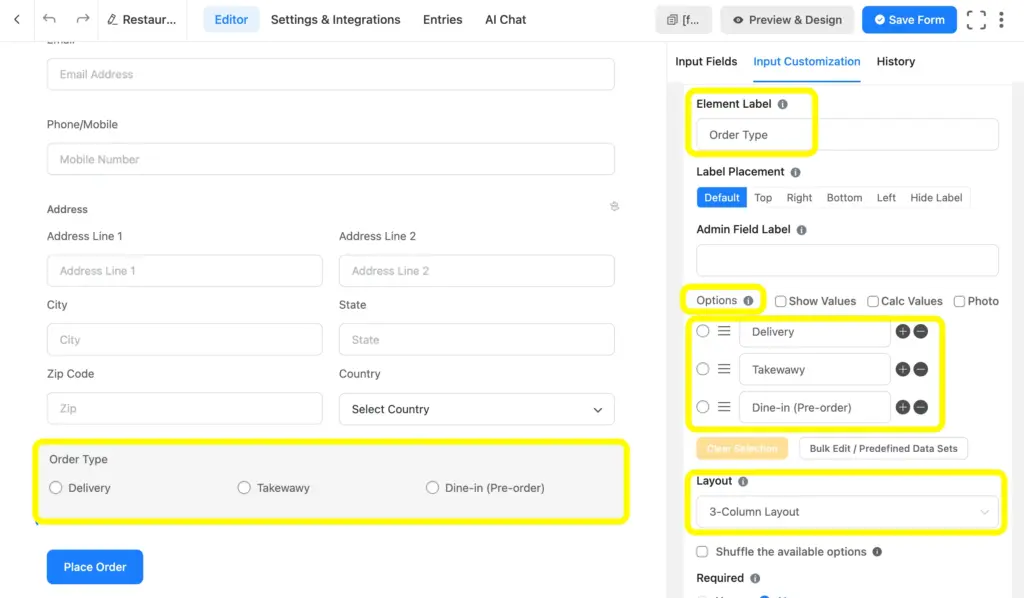
Add order type
A Radio field for “Delivery,” “Takeaway,” or “Dine-in” works well here. Pair it with conditional logic so the address fields only appear when someone selects delivery. Nobody ordering a pickup coffee needs to fill out a zip code.
Add an order notes field
A simple textarea covers dietary notes, delivery instructions, or anything that doesn’t fit into a Checkbox.
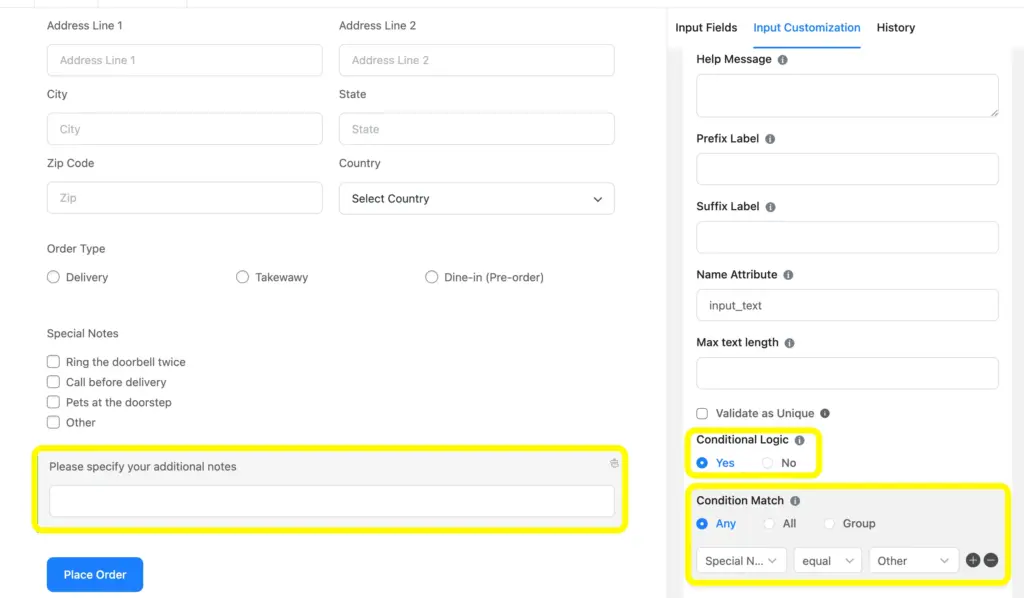
Fluent Forms includes dozens of input fields beyond these, so there’s room to adjust the structure to match how your specific menu works.
Step 3: Set up confirmation and notification
Once someone submits an order, two things need to happen: they need to know it went through, and you need to know an order just came in.
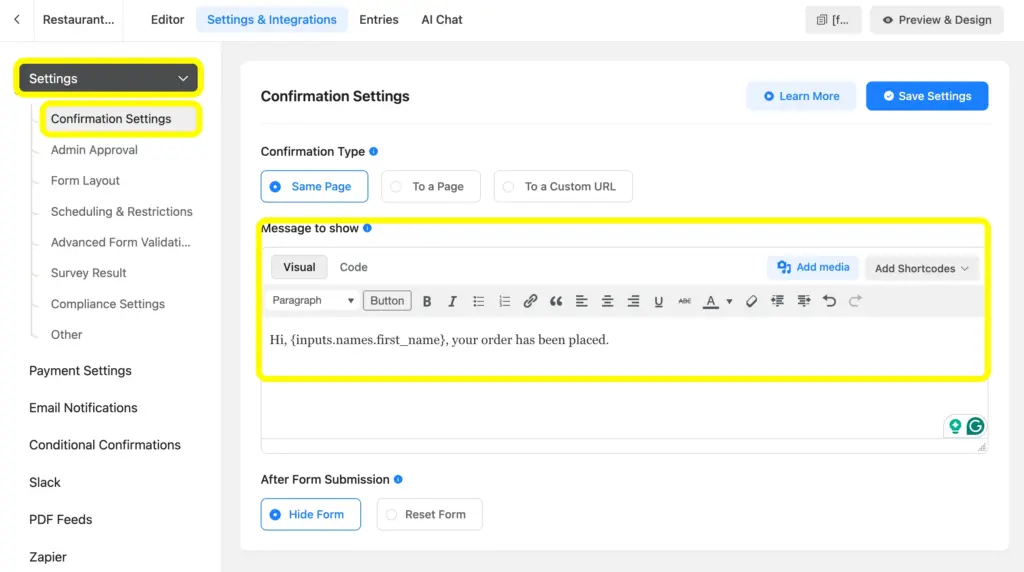
Head to Settings & Integrations → Confirmations to set the message customers see right after they pay. You can also set up conditional confirmation messages so a delivery order shows different confirmation text than a dine-in one.
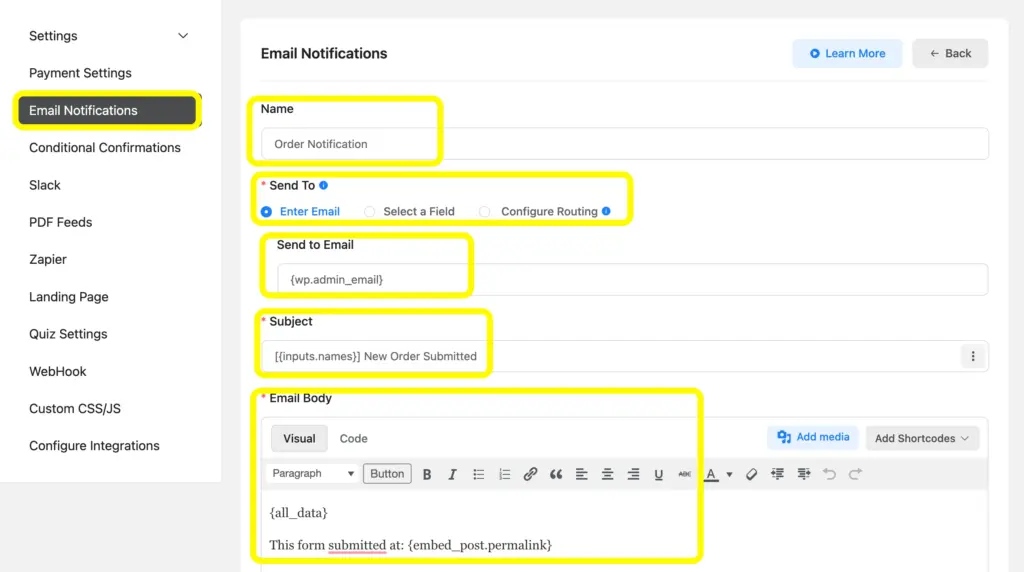
To enable the email confirmation, go to Settings & Integrations → Email Notifications and set up a notification pointed at your restaurant’s inbox so staff gets notified the moment an order lands. If you also want to keep the customer in the loop by email, Fluent Forms lets you send email notifications to both the submitter and your team from the same form.
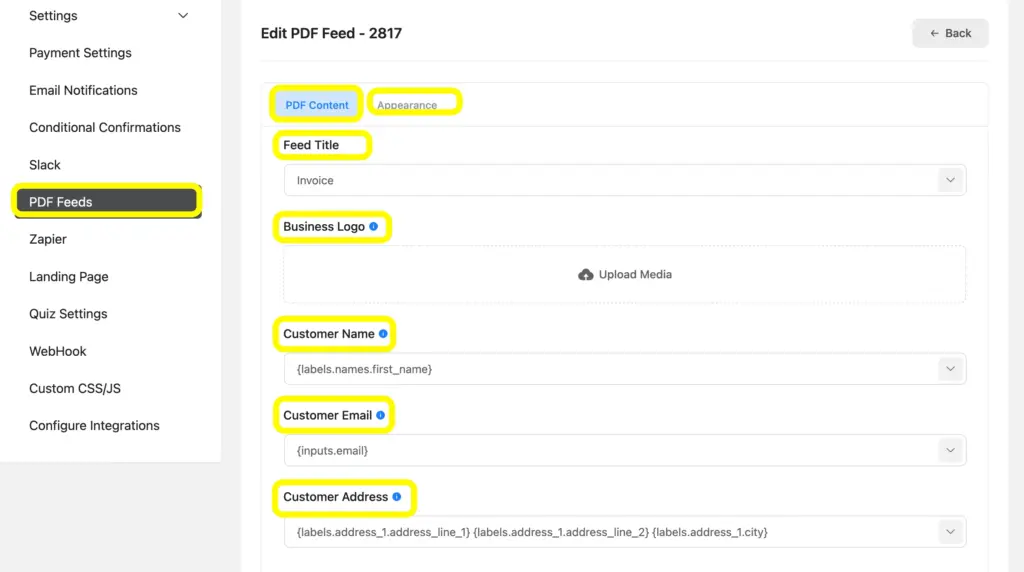
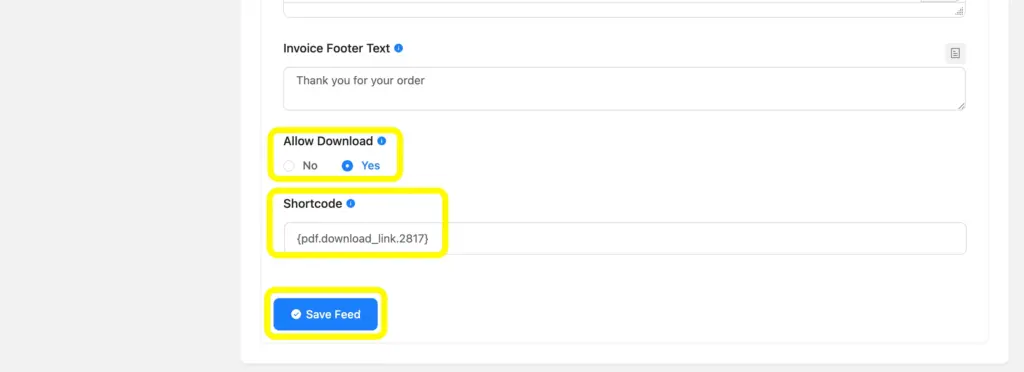
Enable the PDF confirmation download. With the free PDF Generator add-on active, go to Settings & Integrations → PDF Feeds and add a new feed. Pick a template, map your form fields into the PDF body (order items, quantities, total, customer name), and add your logo for a branded receipt. Once the feed is set, check Yes under Allow Download and copy the shortcode into a button on your confirmation message. You can find the full walkthrough in this guide on adding downloadable PDFs to WordPress form confirmations.
The result: customers get a receipt they can download the second they order, no waiting on an email that might land in spam.
At first, set up the PDF Content and the Appearance.
Allow users to download the PDF by enabling Allow Download. Here, you can copy the Shortcode to use this in a button.
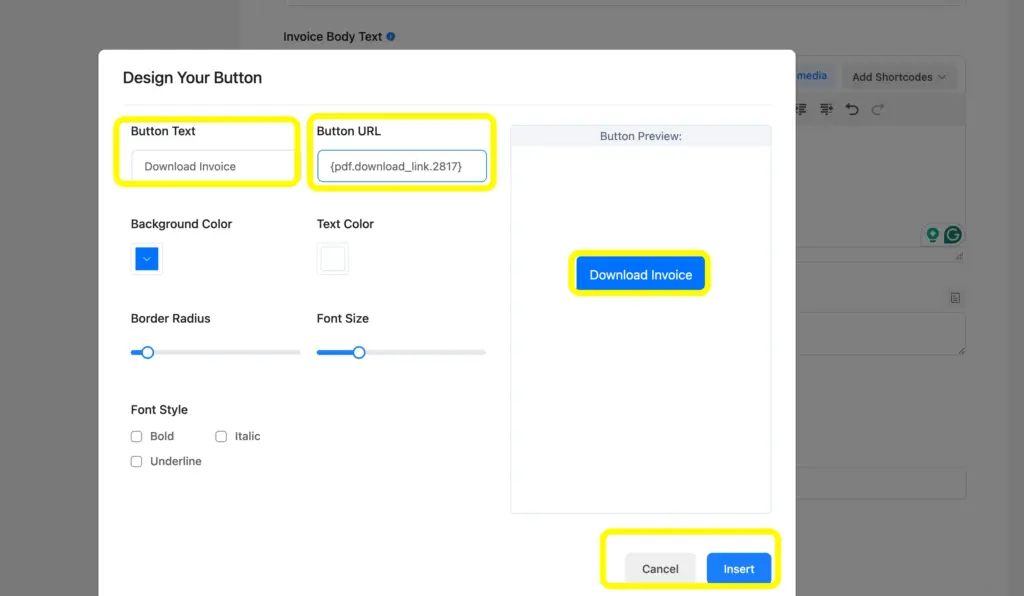
While designing your button in the confirmation message, use a Button Text and use the shortcode you copied earlier as the Button URL.
Step 4: Configure the payment settings
Go to Settings & Integrations → Payment Settings and connect a gateway. Fluent Forms supports Authorize.net, Stripe, PayPal, Mollie, Square, Paddle, Razorpay, and Paystack, so you can offer whichever method fits your customer base, or offer more than one and let customers pick at checkout. Once a gateway is connected, add a Payment Method field to your form so customers can choose how they’d like to pay, and the Payment Summary field will handle the math behind it. Full setup details for each gateway live in the payment feature guide.
Step 5: Publish the restaurant order form
Before publishing the form, check the preview as well as device responsiveness. You can also apply the Fluent Forms Advanced Form Styler to make your forms on brand.
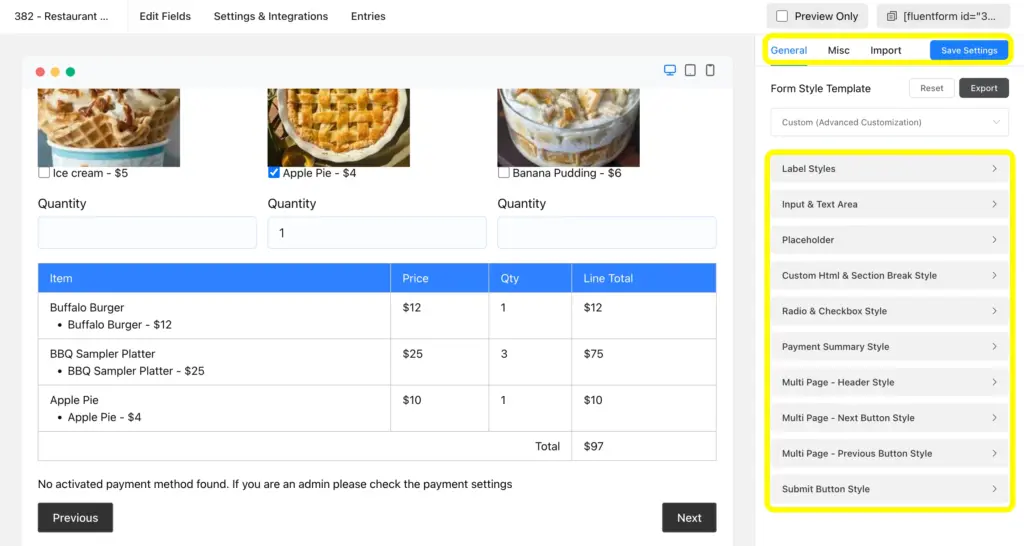
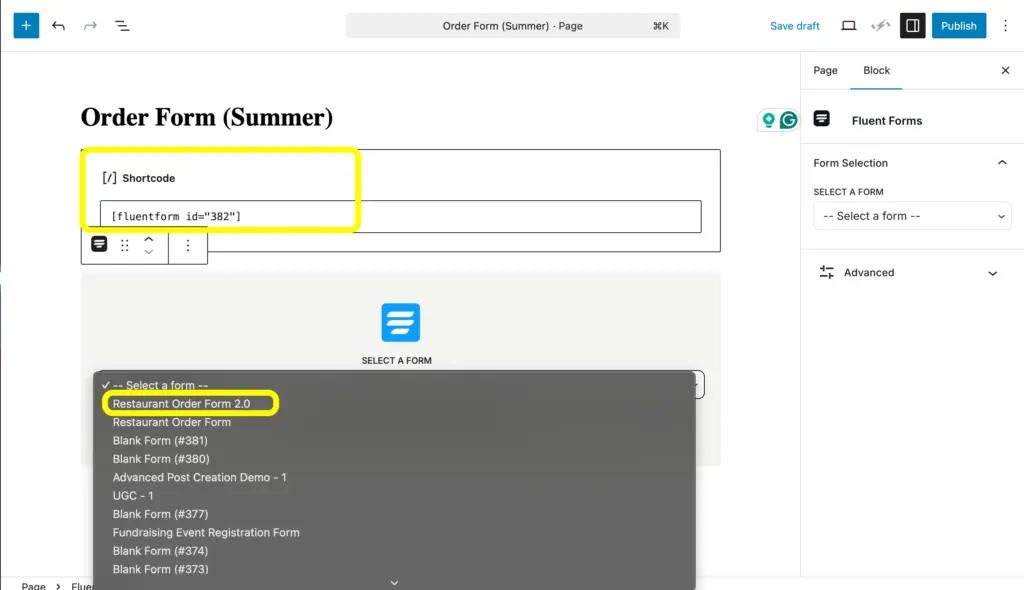
With the form built, drop it onto any page using the Fluent Forms block or shortcode.
Landing Page Form:
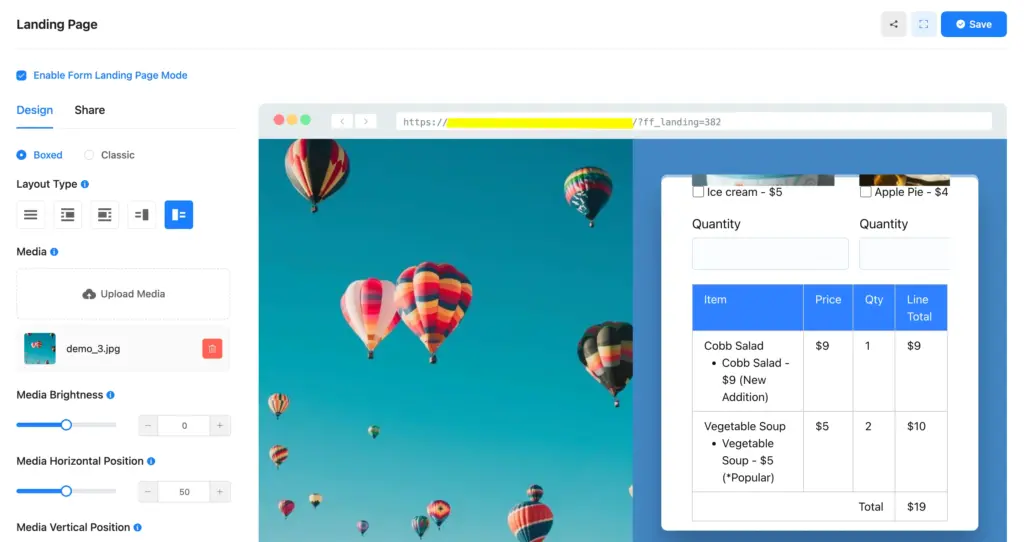
Many restaurants give the order form its own dedicated landing page, something like “Order Online,” linked directly from the main navigation so it’s easy to find. Keep the page itself simple: a short intro, the form, and nothing else competing for attention.
To enable the landing page form, go to the Settings and Integrations of the form and then click on the Landing Page. You can customize the landing page form by applying your brand style as well.
Best Practices for Restaurant Order Forms
A few habits separate an order form that gets used from one that gets abandoned halfway through.
Keep the menu organized
Group by category and use steps or tabs for anything beyond a handful of items. This helps customers find the most relevant items easily.
Use product images
A photo next to a dish name consistently increases how comfortable people feel ordering something they haven’t tried before.
Show live totals
Customers should never have to guess what they’ll be charged before they submit. Use the dynamic payment summary and help users get the clear calculation before placing an order.
Offer multiple payment methods.
Not everyone has a PayPal account, and not everyone wants to enter a card number for a $12 order. Giving a choice reduces drop-off.
Minimize required fields
Ask for what you need to fulfill the order and nothing more. Every extra required field is a chance for someone to give up partway through.
Optimize for mobile
A large share of food orders come from mobile. Fluent Forms forms are responsive by default, but it’s worth testing your specific layout on a phone screen before launch.
Test the complete ordering flow
Place a real test order yourself, all the way through payment and the PDF receipt, before sending customers to the form. It’s the easiest way to catch a broken step before someone else does.
Automate Ordering with Fluent Forms
Once you automate your restaurant order with Fluent Forms set up, the entire process runs without you touching it. A customer browses the menu, adds items, pays, and gets an instant receipt. You get a notification with the full order details the moment it comes through. No plugin juggling, no manual math, and no WooCommerce setup for a business that just needs to take food orders online.
This same Fluent Forms workflow works well beyond restaurants, too. Cafes, food trucks, bakeries, catering services, and even non-food businesses like flower shops or small subscription boxes can use the same combination of Payment Item, Item Quantity, and Payment Summary fields to sell directly from a WordPress page.

Hi, this is Aparup. I am a Literature postgraduate, mixing my creative thoughts with my experience in the tech industry to surpass AI. Professionally, I am a content marketer seeking solutions to users’ problems regarding WordPress.



Leave a Reply