
Fluent Forms Shortcodes: Learn How to Utilize Them Properly
Shortcodes in Fluent Forms can be used to add complex functionalities to your forms, without any prior coding knowledge. It can be of great use for non-technical users.
While, primarily shortcodes can be used to embed Fluent Forms anywhere on your website, you can also customize the form’s behavior.
Inserting tables within the form, pre-filling form fields, conditional logic & confirmations, or pulling CRM data – all of these can be done using simple shortcodes.
I will try to guide you through all kinds of shortcodes that are used in Fluent Forms, how and where to use them, along with industry specific usage, and troubleshooting tips.
Let’s get started with a very basic question, what are shortcodes?
TL;DR
- Fluent Forms shortcodes unlock flexibility beyond basic embeds. You can place forms anywhere, control behavior, and surface dynamic data without extra plugins or custom code.
- Embedding forms is the simplest use case. Copy the shortcode from the form list or editor, paste it anywhere shortcodes are supported, and you’re done.
- Smart shortcodes help you pre-fill fields with data you already have, like dates, user info, IP address, browser name, URL parameters, or FluentCRM contact data.
- Shortcode input fields let you inject dynamic content inside forms, such as tables, notices, or outputs from other plugins.
- Pop-up forms can be created directly with Fluent Forms shortcodes, without relying on separate popup builders.
- Conditional shortcodes allow dynamic messages in confirmations, emails, and PDFs, but in most cases the built-in conditional logic is easier and enough.
- Confirmation shortcodes are where things get powerful. You can show submitted data, payment details, quiz results, PDFs, and entry metadata automatically.
- Helper shortcodes surface live form-level data like submission counts, remaining slots, payment totals, and entry status, useful for public or admin-facing pages.
- Payment management shortcodes let users view payment history, receipts, and manage subscriptions through simple, self-service pages.
- When shortcodes don’t work, it’s usually due to missing context: wrong placement, missing form ID, logged-out state, unavailable data, or using Pro-only features on Free.
What are shortcodes in WordPress
Shortcodes are created to do a specific task or add content on WordPress. They are short (obviously) and carry parameters within them.
A single shortcode looks like this –
[fluentform_info id="00" info="submission_count"]After breaking it down we get:
- Opening bracket – The shortcode begins with a square bracket ‘[‘.
- Name – This is the identifier for the shortcode, telling WordPress which function to execute. fluentform_info is the name in this case.
- Attributes – Optional parameters that modify the shortcode’s behavior, usually in key=”value” format. Here info=”submission_count” is an attribute.
- Content – Some shortcodes can wrap around content, affecting how it’s displayed.
- Closing bracket – The shortcode ends with a square bracket ‘]’.
Why shortcodes are used
Shortcodes exist to let plugins place their content anywhere WordPress normally wouldn’t allow by default.
In Fluent Forms, shortcodes are one of the most flexible ways to embed forms across your site. While the block editor and built-in embed options cover most common cases, shortcodes step in when you want more control over where and how a form appears.
You can use a Fluent Forms shortcode to embed forms inside page builders like Elementor, Divi, Oxygen, or any builder that supports shortcodes.
You can also drop them directly into widget areas, theme files, or plugin settings where blocks aren’t available.
One practical example is pop-ups. Fluent Forms lets you create pop-up forms using shortcodes without relying on a separate popup builder plugin. You place the shortcode where the trigger or container lives, and the form renders exactly where it’s needed.
Shortcodes also open the door to more advanced workflows. You can control
- Form visibility
- Dynamically display submission data
- Pull CRM data automatically
These are things that don’t always have a toggle or UI setting, but become possible once you understand how shortcodes work.
It’s worth noting that Fluent Forms already provides built-in options for many common shortcode use cases. In many situations, you won’t need to write or touch a shortcode at all.
But knowing how they work helps you understand what’s possible – and gives you a fallback when you hit a layout or integration edge case.
You might not need shortcodes every day. But when you do, they’re often the cleanest way to solve problems that would otherwise require extra plugins or custom work.
How to embed Fluent Forms using shortcodes
Let’s learn the simplest usage of a shortcode first, embedding a form using the shortcode. Here’s how to do it:
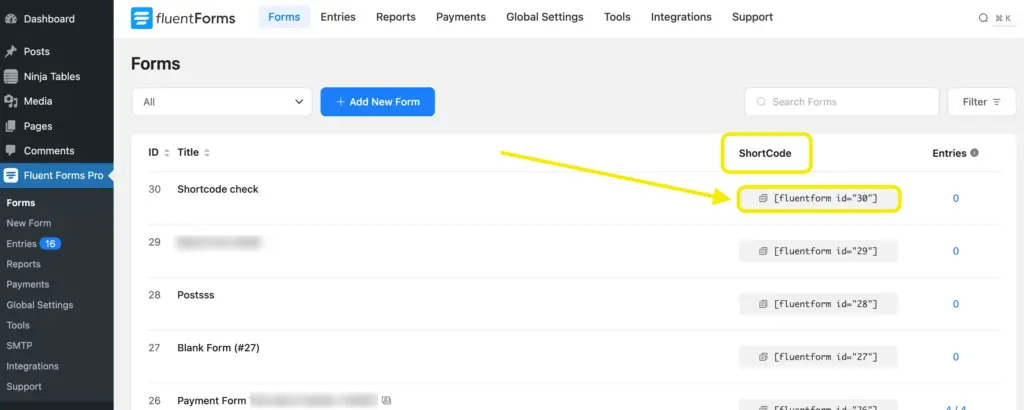
Start by going to Fluent Forms from your WordPress dashboard. You’ll see a list of all the forms you’ve created.
In that table, there’s a Shortcode column. Each form has its own shortcode, and you can click on it to copy it instantly.
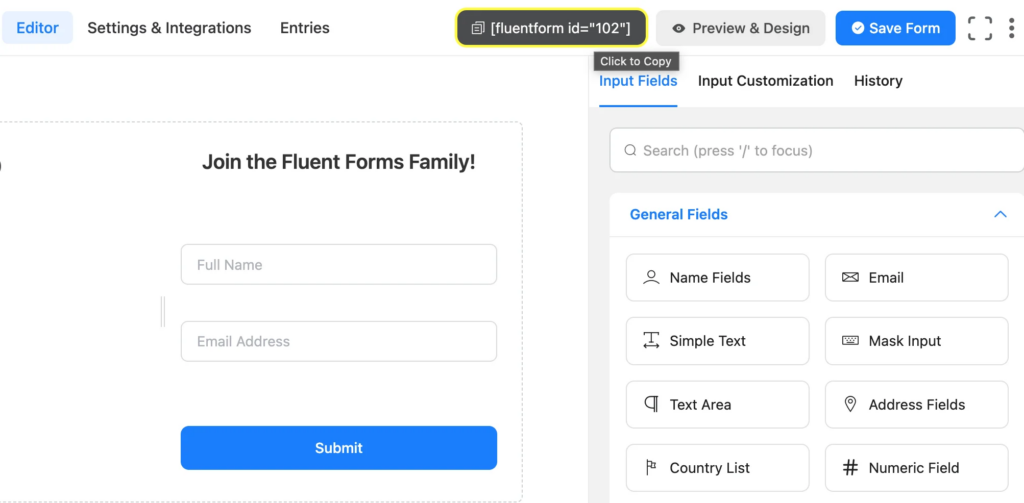
Another way to grab the shortcode is from inside the form editor. Open the form you want to embed, and you’ll see the shortcode displayed at the top of the editor. Click it once, and it’s copied to your clipboard.
Once you have the shortcode, create a new page or open an existing one where you want the form to appear. Paste the shortcode directly into the content area. This works in the block editor, classic editor, and inside any shortcode-supported block or widget.
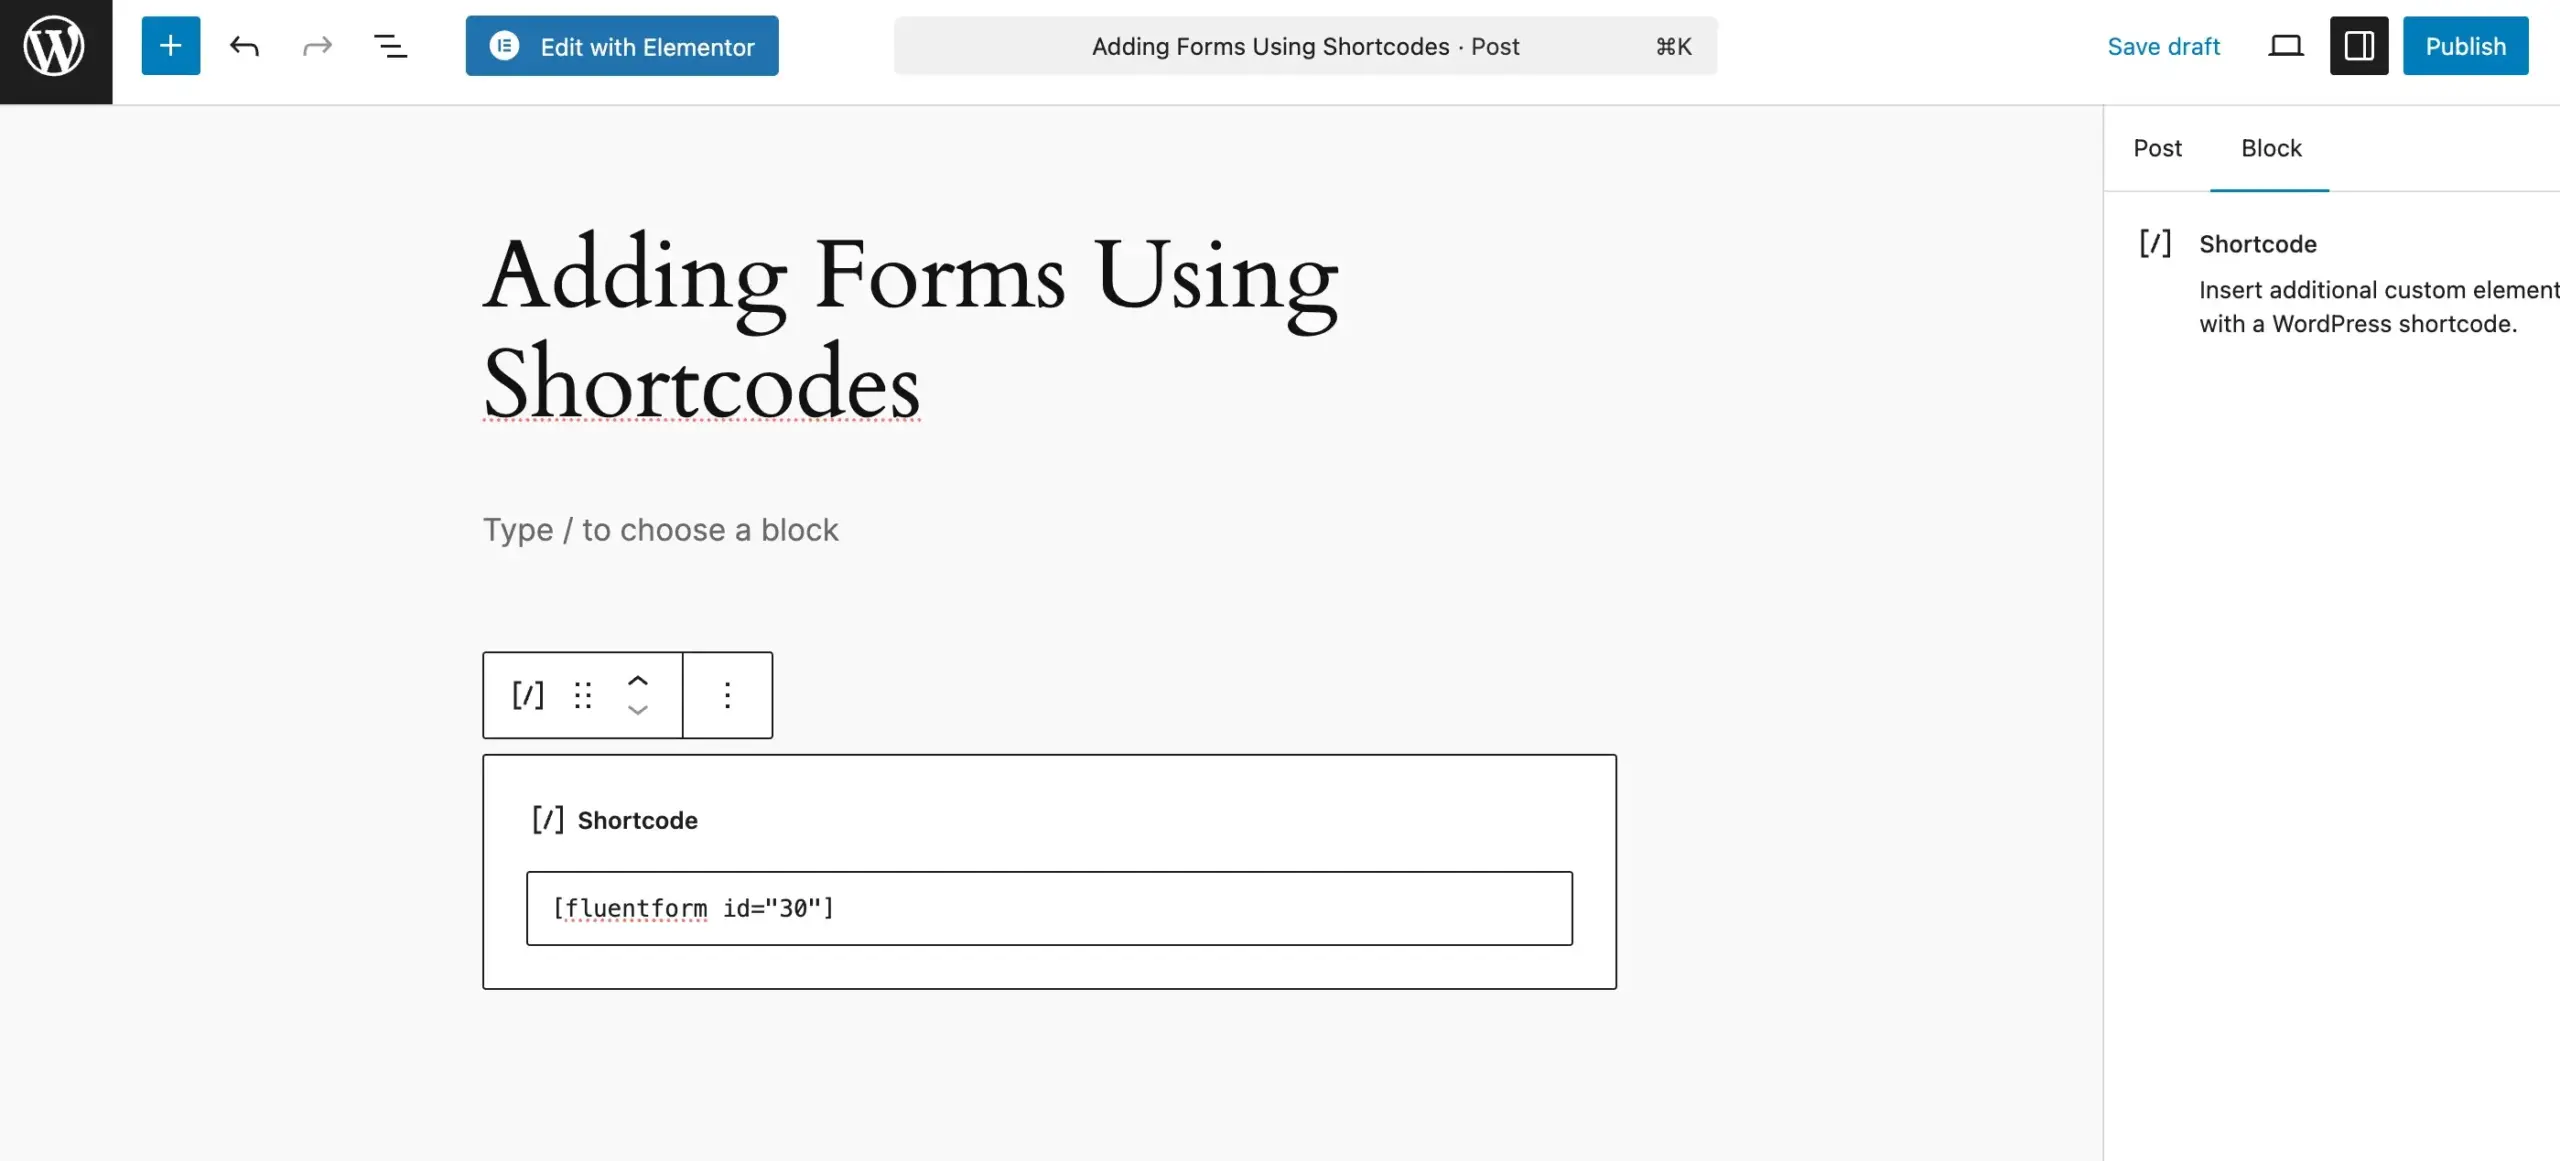
Hit Preview if you want to double-check the layout, or Publish when you’re ready. That’s it. The form is now live on the page.
Shortcodes are especially useful here because they don’t depend on the editor you’re using. Whether the page is built with blocks, a page builder, or a plugin setting screen, the shortcode will render the form the same way.
But there’s an easier option if you are using the Gutenberg editor. Let’s take a look at that.
Embed forms using dedicated block
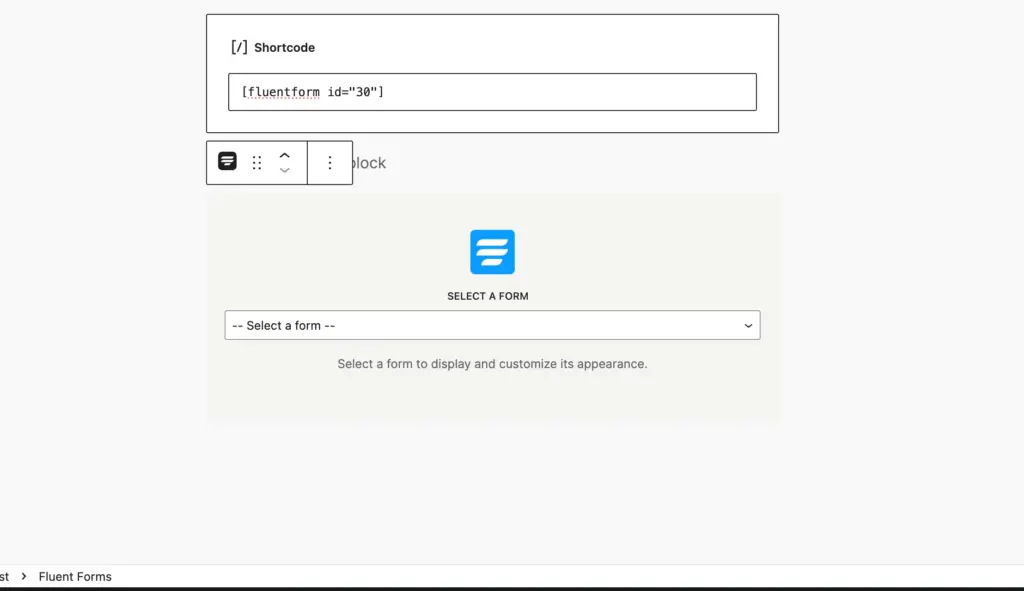
Fluent Forms also offers a gutenberg block to embed forms easily on your website. To use this, just open a page or post, search for Fluent Forms in the blocks, and select it.

Select the form you want to put here from the block.
And your form will be shown like this:
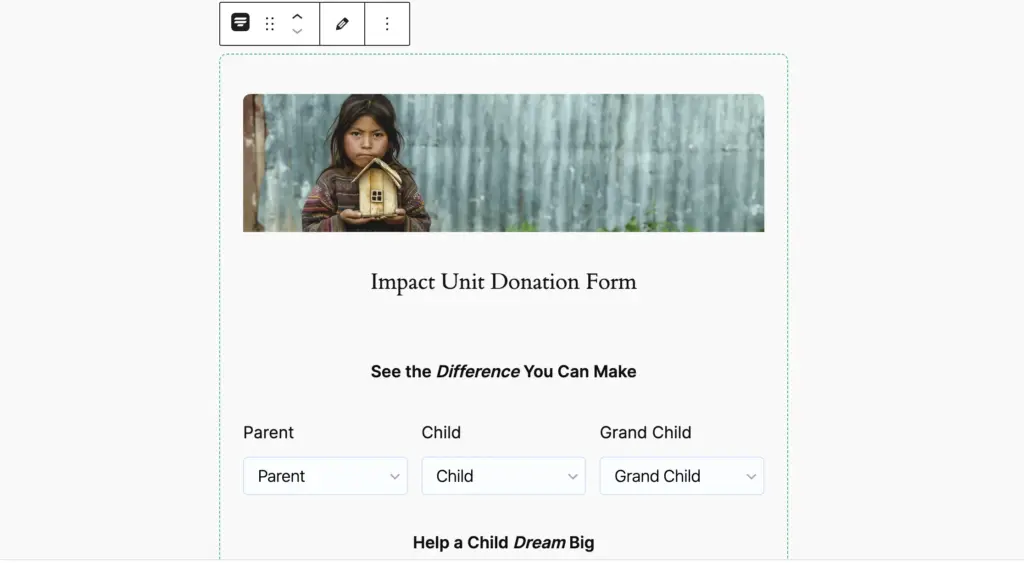
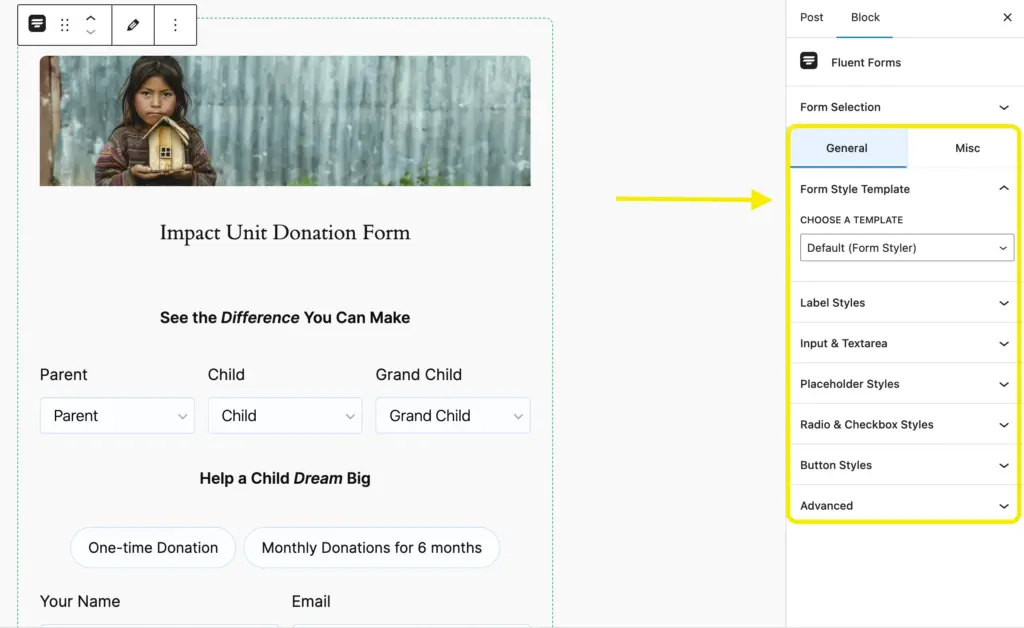
An added functionality you can find here is, the Gutenberg form embedding comes with the Gutenberg form styler, which allows you to design your form’s label, input & text area color, placeholder style, button style and other customizations.
Which type of shortcodes are available in Fluent Forms
Fluent Forms shortcodes fall into a few clear categories, each solving a different problem. You don’t need to memorize them all, but knowing what each type is meant for helps you reach for the right one when needed.
Smart Shortcodes are about pulling data from elsewhere and reusing it inside your forms or confirmations. That could be user information, post details, or contact data from FluentCRM. Instead of hardcoding values, you let the site fill things in dynamically based on context.
Confirmation Settings Shortcodes focus on what happens after a form is submitted. They’re used to display submitted data on confirmation pages, emails, PDFs, quizzes, or payment summaries. If you’ve ever wanted a “Here’s what you submitted” view that updates automatically, this is where it comes from.
Helper Shortcodes work more quietly in the background. They help you filter or process form data, count submissions, check payment statuses, or capture values from URLs after submission. These are less about display and more about making form data usable.
Conditional Shortcodes are about logic. They let you show or hide content based on user selections, field values, or conditions. You’ll mostly see them used in confirmations, email notifications, or PDFs where the content needs to adapt based on how someone filled out the form.
Together, these shortcode types cover most advanced form scenarios. You might only use one or two regularly, but knowing they exist makes it easier to design forms that respond to users instead of staying static.
How to use shortcodes for different actions in Fluent Forms
Shortcodes in Fluent Forms are not only for embedding forms. They are also used to control what happens before submission, after submission, and based on user input.
In this section, we’ll look at how different shortcodes are used in real situations, with practical examples you’re likely to encounter. The focus is on showing where each shortcode fits and what problem it helps solve.
Shortcode input field
Before we jump into how different shortcodes are used, it’s worth looking at the Shortcode input field first. This field is different from other form inputs because it doesn’t collect data from users. Instead, it pulls data from the site and injects it into the form automatically.
That makes it one of the most powerful and easy-to-miss fields in Fluent Forms. You can use it to display dynamic values, pass information silently, or reuse existing data without asking users to type anything.
Within the form editor you can find the Shortcode input field, in the Advanced Fields section. Just drag and drop or click on it.
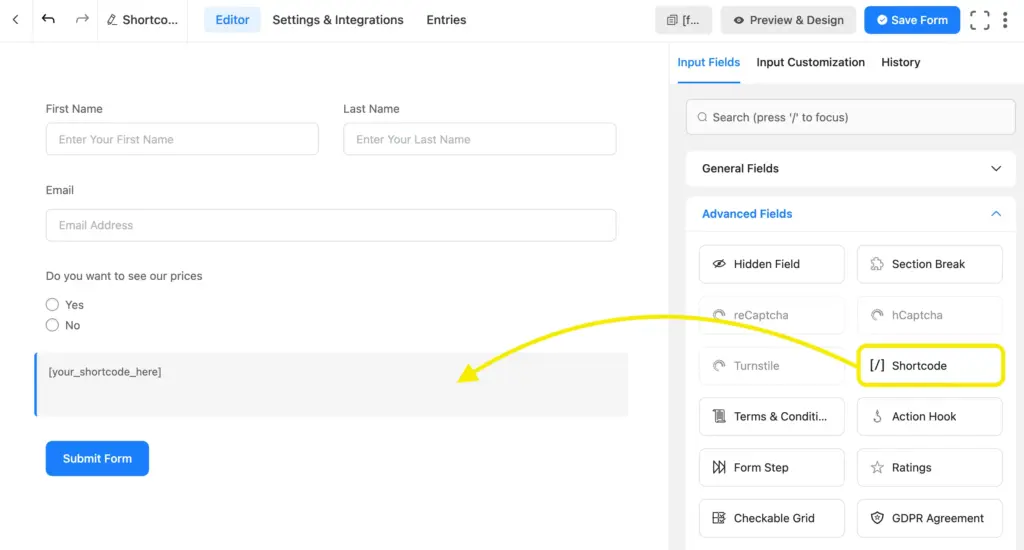
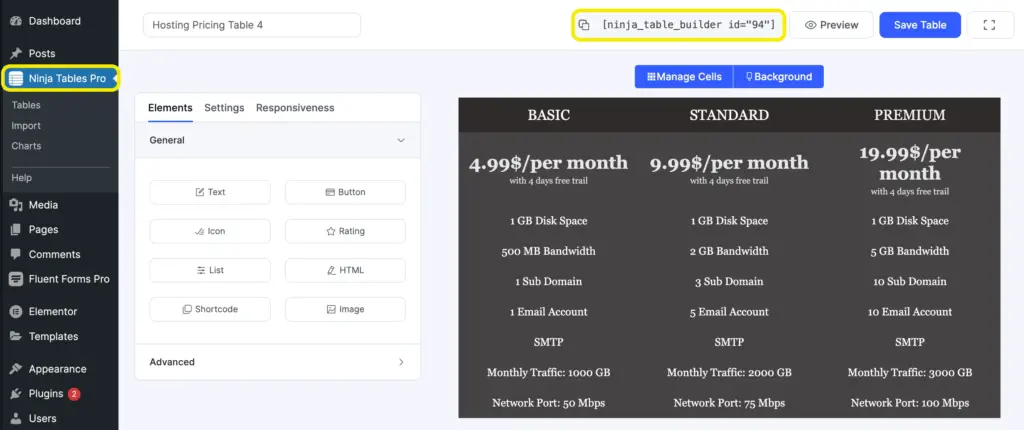
To see it in action, let’s say we want to embed a pricing table within the form so that customers can recheck pricing while placing the order. In that case we created a table with Ninja Tables, and copied the shortcode first, for demonstration.
Then we head back to the form editor, and paste the shortcode in the Shortcode input field.
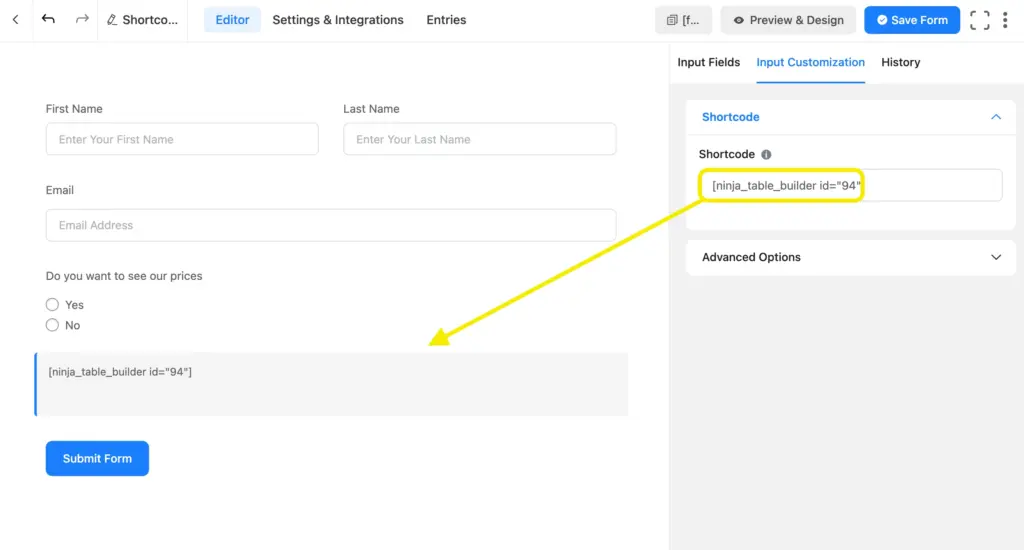
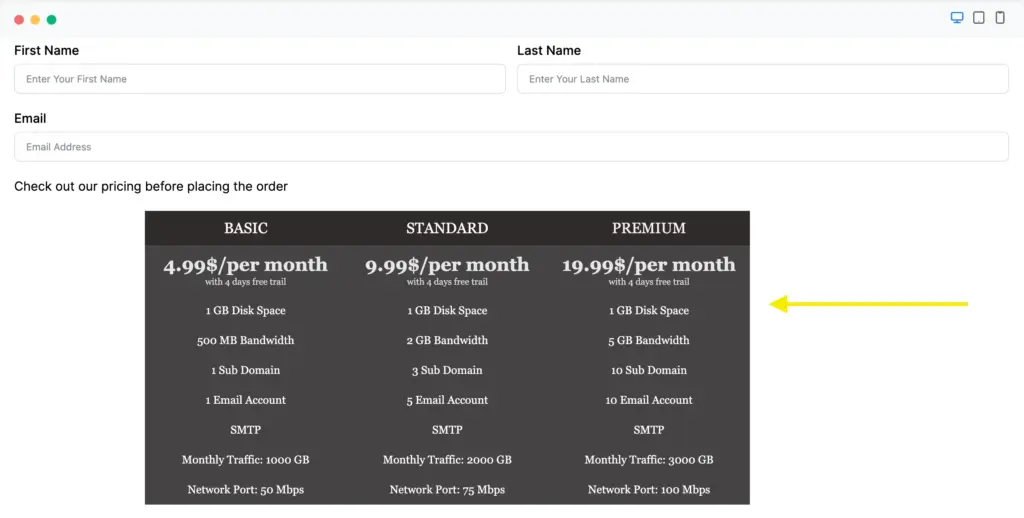
After saving the form, going to the preview section, we can see a pricing table is embedded within the form. Thus we can seamlessly add content from different relevant plugins within the form with shortcodes.
You can also add conditional logic to this field to hide or show when necessary.
Form editor smartcodes to set default input values
Fluent Forms gives you a set of smartcodes that can automatically fill in form fields for you. Instead of asking users for information you already have, you let the form handle it in the background.
In most cases, these smartcodes work with the majority of input fields. Text fields, hidden fields, email fields, and a few others can all be pre-filled using smartcodes. It’s one of those features that saves effort for both you and the person filling out the form.
You’ll see a full list of available smartcodes below. For now, it’s enough to focus on the general ones. The others, like embedded post data or FluentCRM-related smartcodes, usually make more sense once you start building slightly more advanced setups.
| ShortCode | Description |
| {get.input_text} | Shows the text. |
| {wp.admin_email} | Shows the site admin’s email. |
| {wp.site_url} | Displays the website link. |
| {wp.site_title} | Shows the website name. |
| {ip} | Displays the user’s IP address. |
| {date.m/d/Y} | Shows the date ( 02/25/2025). |
| {date.d/m/Y} | Displays the date (23/02/2025) |
| {user.ID} | Displays the logged-in user’s ID. |
| {http_referer} | Shows the page the user visited before this one. |
| {user.display_name} | Shows the user’s display name. |
| {user.first_name} | Displays the user’s first name. |
| {user.last_name} | Shows the user’s last name. |
| {user.user_email} | Displays the user’s email. |
| {user.user_login} | Shows the user’s username. |
| {browser.name} | Displays the user’s web browser (example: Chrome) |
| {random_string.your_prefix} | Creates a random string with your chosen prefix. |
| {cookie.cookie_name} | Shows the cookies |
Learn more about Fluent Forms ‘Form Editor’ Smartcodes
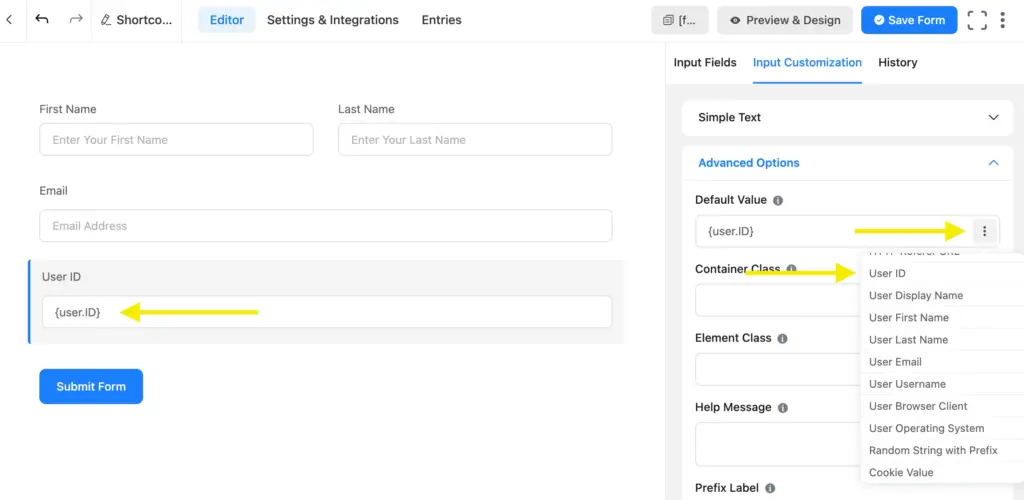
When you want to use a smartcode, open any supported input field in the form builder. Under Input Customization, you’ll find the Default Value option.
This is where smartcodes are typically added. Paste the shortcode there, and Fluent Forms will replace it with the actual value when the form loads.
A few examples you’ll likely use often:
Display the date
If you want to capture the current date automatically, {date.m/d/Y} fills it in for you. This is useful when you want to record when a submission was made without relying on the user.
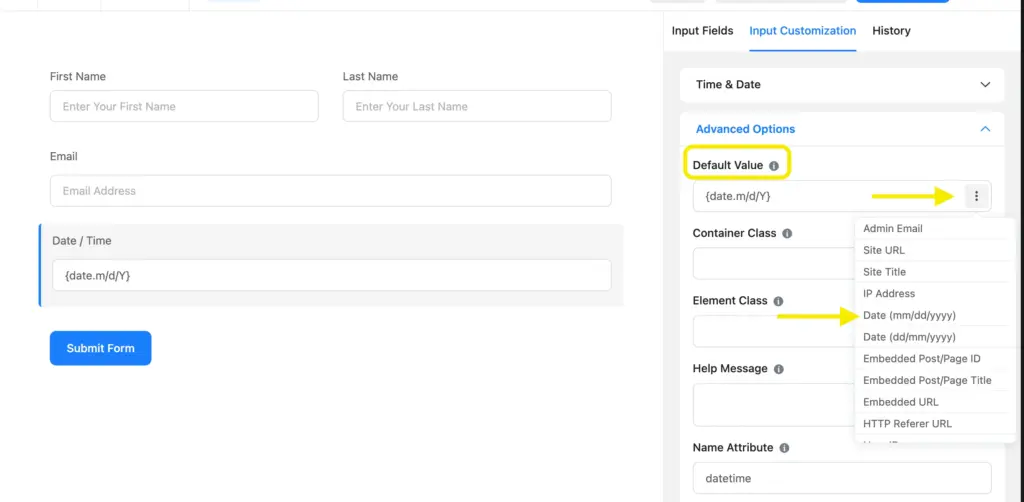
Go to the form editor and choose any field, I used the Time & Date field for convenience. From the Advanced Options click the three dots on the Default Value section, you’ll get the names of the smartcodes you want to use.
We used the Date shortcode, you can paste {date.m/d/Y} code in here as well.
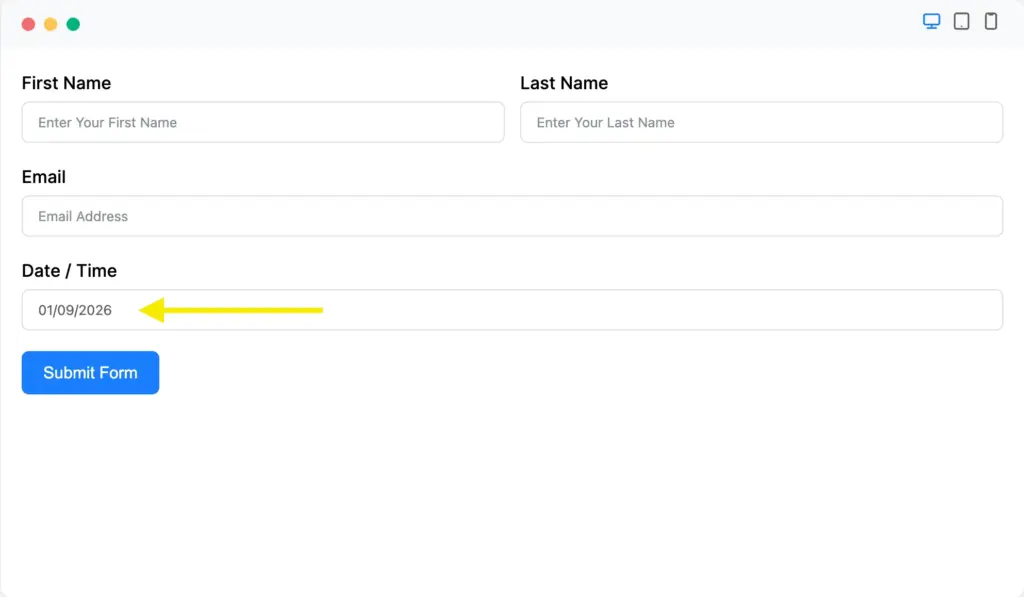
Save the form, and test in the preview or publish it. Dates will be auto captured accordingly.
Display the logged-in user’s ID
If your form is only for logged-in users, {user.ID} lets you attach each submission to a specific user account without showing anything on the form.
Follow the same steps as before and paste the shortcode in the Default Value section.
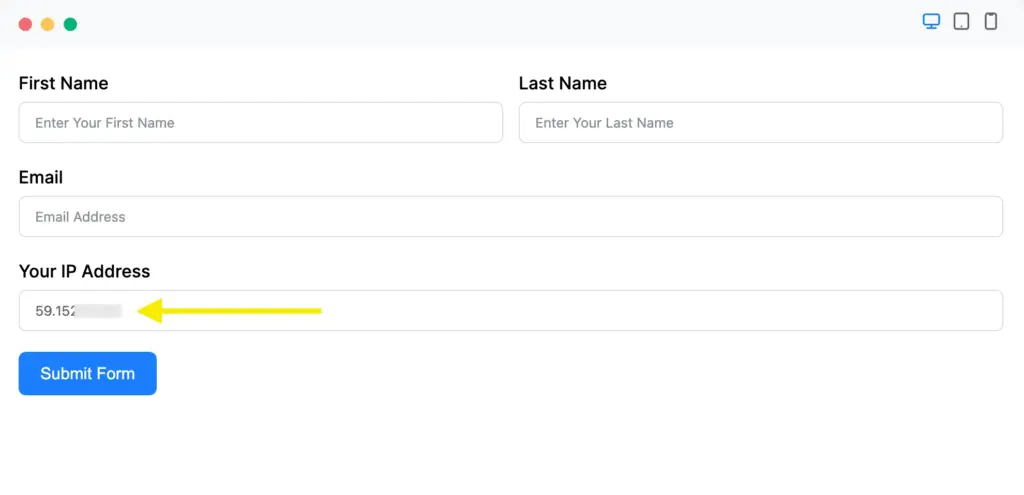
Displays the user’s IP address
If you need basic request context, {ip} captures the user’s IP address automatically. It’s commonly used for moderation or internal reference.
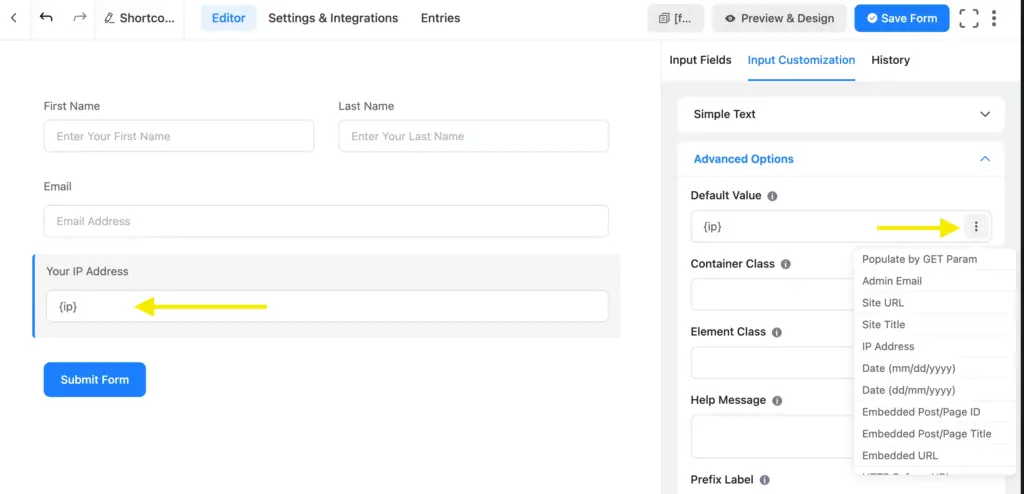
IP address will be automatically filled within the field.
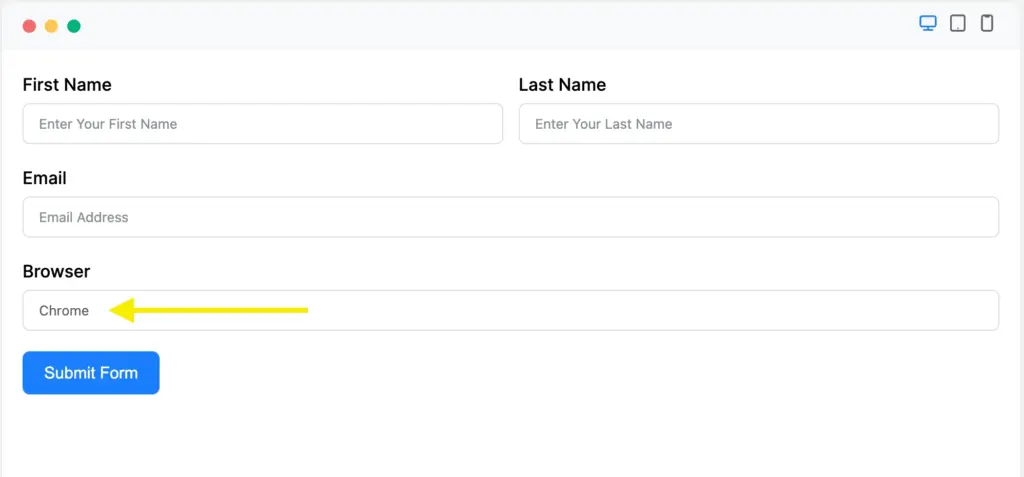
Displays the user’s web browser
And if browser context matters, {browser.name} records whether the user is on Chrome, Firefox, or another browser. This comes in handy for support or bug report forms.
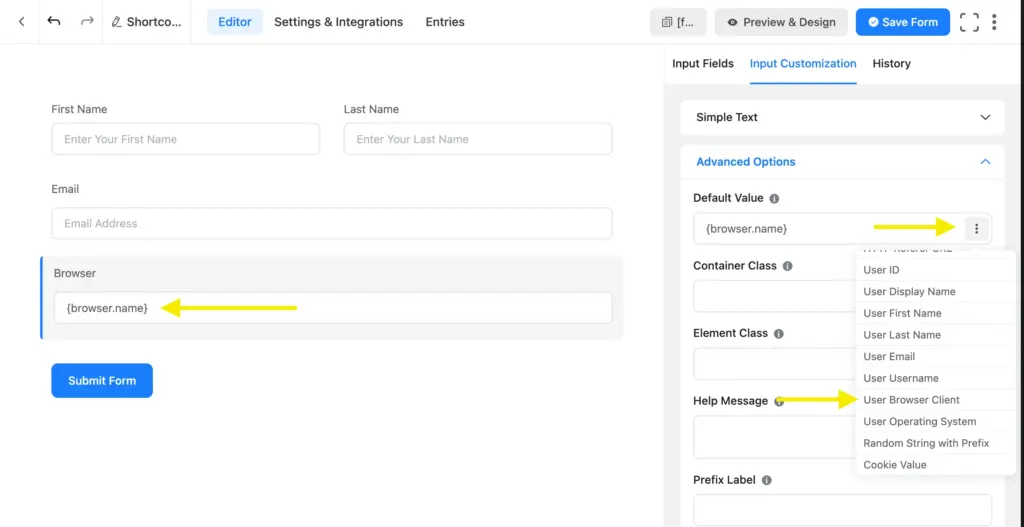
The name of the browser shows instantly when the user is filling out the form.
Once you get comfortable using smartcodes in default values, a lot of form automation starts to feel obvious. You stop asking users for things you already know and let the form do the work instead.
Build Smarter Forms for Free

Creating a pop-up form
It is possible to create pop-up forms using Fluent Forms shortcodes. In case you use pop-up builders like Popup Maker or Elementor Popup, you can just copy the form’s shortcode and paste it within the builder.
But you can also use Fluent Forms to create the pop-up form. In that case a little bit of modification will be needed. Start with copying the form shortcode first.
Move to the page you want to create the popup and modify the copied shortcode like this:
[fluentform_modal form_id= "228"]Remember to replace the form id with yours.
Then you need to add other attributes such as:
- btn_text=”value” – to define the text of the button.
- css_class=”value” – to define the css class for button customization

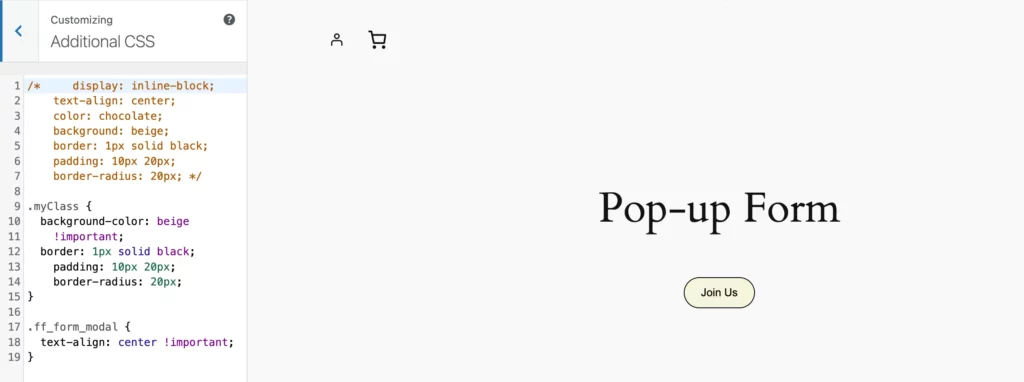
Now for customizing buttons, go to the page your form will be in, and click on Customize.
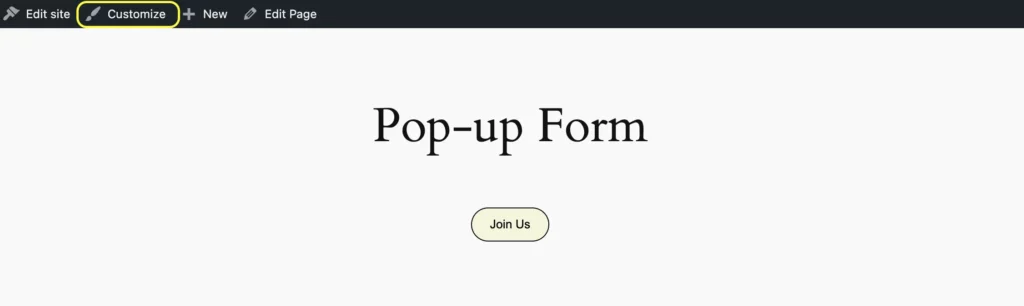
Choose the Additional CSS option from the side bar, and drop your css for customization. And you’re good to go with the pop-up form.
Here’s how our pop-up form looks like:
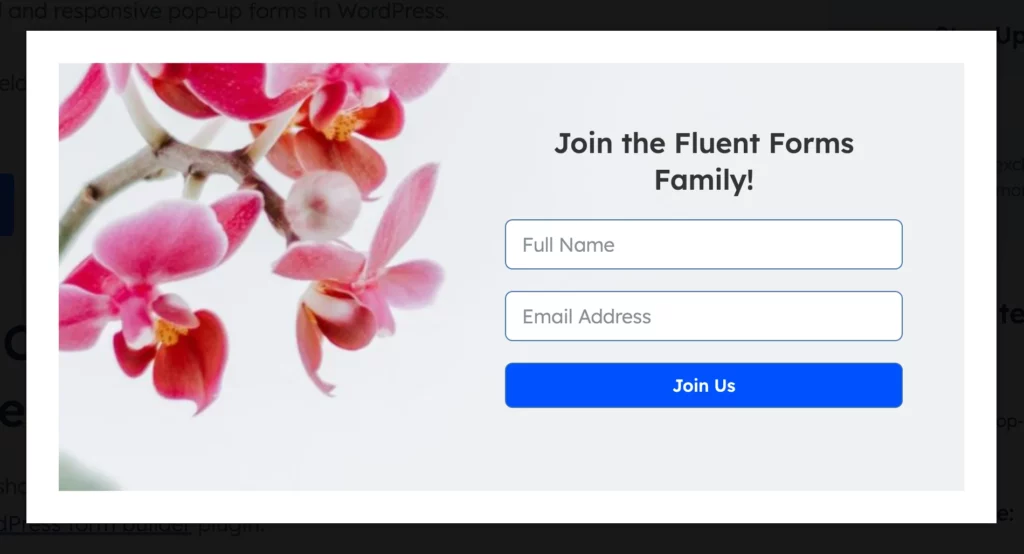
Click the button below to see the pop-up form in action.
This is the shortcode we used:
[fluentform_modal form_id="363" btn_text="Join Us" border-radius:10px] Conditional shortcodes to show/hide content dynamically
Conditional shortcodes in Fluent Forms let you show or hide content based on how someone fills out a form. You can use them in form confirmations, email notifications, and PDF documents to make the experience more personal and context-aware.
That said, it’s worth setting expectations early. Fluent Forms already has built-in conditional logic for most form-level use cases.
In many situations, you won’t need to touch conditional shortcodes at all. They’re mainly useful when you want conditional behavior outside the form itself, like in confirmation messages or emails.
To use a conditional shortcode, you wrap the content you want to control inside the shortcode –
[ff_if]The content inside will only appear if the condition you define is met.
Here’s a simple example. Suppose you have a radio field where users answer whether they’re satisfied.
[ff_if field="input_radio" is="equal" to="yes"]
Glad to hear that you loved our product!
[/ff_if]
If the user selects “yes,” they’ll see the message. If they select anything else, they won’t.
You can also show different messages based on different values. For example:
[ff_if field="feedback" is="equal" to="bad"]
We’re sorry to hear that. We’ll work to improve.
[/ff_if]
Behind the scenes, every conditional shortcode works with three things:
the field you want to check, the condition you want to apply, and the value you want to compare against. Once you understand that pattern, the rest feels straightforward.
Fluent Forms also supports nested conditional shortcodes, where one condition depends on another. These are useful for more complex messaging, but in practice, they’re needed far less often than people expect.
For most form logic, the built-in conditional settings in the form builder are faster and easier. Conditional shortcodes shine when you want dynamic behavior in confirmations, emails, or PDFs, where the visual builder doesn’t reach.
Shortcodes in confirmation settings
Confirmation settings are where Fluent Forms shortcodes start to feel genuinely useful. This is the layer that controls what users see after they submit a form, and what gets sent out via emails, PDFs, or stored in custom posts.
Fluent Forms provides smart shortcodes that let you dynamically display submitted data on confirmation pages, email notifications, PDFs, custom post entries, and quiz result screens.
Instead of writing static messages, you can reflect back exactly what the user submitted, along with contextual details like submission time, payment status, or form metadata.
The most common use case is confirmation pages. For example, you might want to show a simple “Here’s what we received” message using input-related shortcodes like a name, email address, or message field.
In many cases, {all_data} or {all_data_without_hidden_fields} is enough to display a clean summary without manually mapping every field.
These are the shortcodes you can use in this case –
| ShortCode | Description |
| {inputs.names} | Displays the full name field. |
| {inputs.names.first_name} | Retrieves the first name from the name field. |
| {inputs.names.last_name} | Retrieves the last name from the name field. |
| {inputs.email} | Displays the email address entered by the user. |
| {inputs.description} | Shows the message input field (a textarea where users enter text). |
| {inputs.payment_input} | Shows the payment item selected or entered in the form. |
| {inputs.payment_method} | Displays the payment method selected by the user. |
| {form_title} | Shows the title of the form. |
| {all_data} | Displays all submitted data from the form |
| {all_data_without_hidden_fields} | Displays all submitted data but excludes hidden fields. |
Email notifications work the same way. You can combine input shortcodes with label shortcodes so emails stay readable even if field labels change later. This is especially helpful for internal notifications, invoices, or automated follow-ups.
PDFs and custom post submissions are another strong use case. Submission attributes such as entry ID, submission date, payment method, or total amount let you generate structured documents or records without extra logic.
| ShortCode | Description |
| {pdf.download_link} | Generates a downloadable PDF link for users. Admins can restrict access or share encrypted URLs. |
Payment-related shortcodes are particularly useful here when you need receipts, order summaries, or transaction details. We’ll demonstrate it a bit later.
Quiz submissions also benefit from confirmation shortcodes. Instead of sending users to a generic thank-you screen, you can show their results dynamically using quiz-specific shortcodes.
| ShortCode | Description |
| {quiz_result} | Display the results of the Quiz. |
If you need to go deeper, Fluent Forms also supports entry-specific shortcodes, which let you pull a specific field from a specific submission. These are more advanced, but useful when you want to display submission data elsewhere on your site.
[ff_entry form_id='1' entry_id='{submission.id}' field='url' is_html=false]You don’t need to use every shortcode listed in the documentation. In practice, most confirmation setups rely on a small subset: input values, labels, submission metadata, and payment details.
Once you understand where confirmation shortcodes apply, the rest tend to fall into place naturally.
Pre-fill forms with shortcodes (also pull FluentCRM data)
Pre-filling forms is one of those small things that quietly improves conversion. When users don’t have to retype information you already have or just passed along, forms feel faster and more intentional.
Fluent Forms supports this through smart shortcodes, and the most commonly used one is the GET parameter shortcode.
Pre-filling fields using GET parameters
GET parameters let you pass values through a URL and automatically fill form fields when the page loads. This is especially useful for campaign links, onboarding flows, or internal tools.
The shortcode format is simple:
{get.input_text}
The important part here is the get. prefix. Without it, the shortcode won’t work.
For example, if you have a form field with the name email, and your page URL looks like this:
https://yoursite.com/contact?event= New Year Party
You can set the Default Value of the Event Name field to:
{get.event}
When someone opens that link, the Event Name field will already be filled in.
This works well for:
- marketing campaigns where the email or source is known
- redirecting users from one form to another
- passing context from landing pages to internal forms
As long as the URL parameter matches the field name, Fluent Forms will handle the rest.
Pulling FluentCRM contact data into forms
If you’re using FluentCRM, you can also pre-fill form fields directly from a contact’s profile. This only works when the user is logged in and their contact record exists in FluentCRM.
To pull data from FluentCRM, you start with the base shortcode and then specify the field you want.
For example, to pre-fill an email field with the contact’s email address, use:
{fluentcrm.email}
Set this shortcode as the Default Value of the email field, and Fluent Forms will automatically fetch the value from FluentCRM.
The same approach works for other contact fields. If you’re using custom fields in FluentCRM, you can pull those too by using the field slug:
{fluentcrm.custom_field_slug}
Once the slug is correct, the value will be pre-filled without any extra configuration.
GET parameters are ideal when data comes from the URL or external sources. FluentCRM shortcodes make more sense when the user is already known and logged in.
Helper shortcodes for displaying dynamic form data
Helper shortcodes are used when you want to show live form-level data outside the form. Things like submission counts, remaining spots, payment totals, or form metadata.
These don’t work on individual submissions. They work on the form as a whole.
Showing total submissions
If you want to display how many times a form has been submitted, you can use:
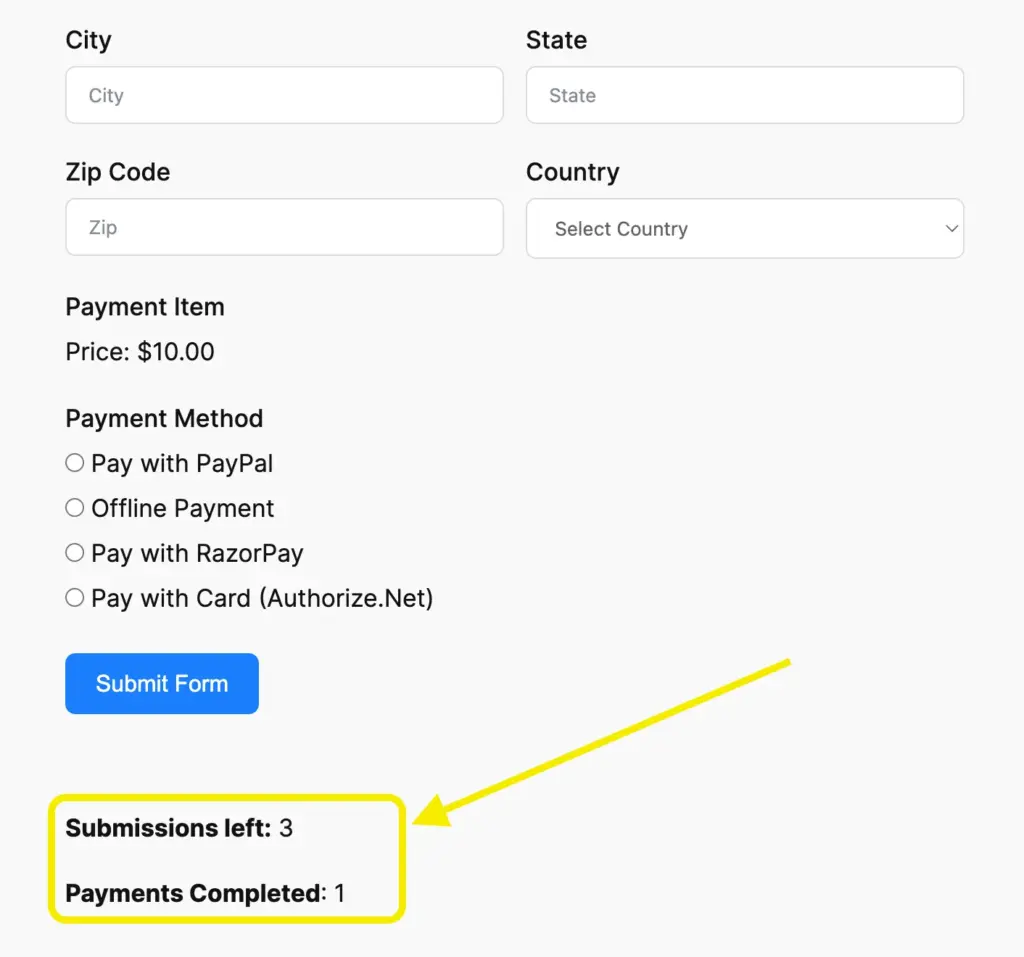
[fluentform_info id="354" info="submission_count"]And you’ll see the submission count like below –

This is commonly used below surveys, polls, or public forms to show participation.
Showing form creation or update date
You can also display when a form was created or last updated.
[fluentform_info id="354" info="created_at"]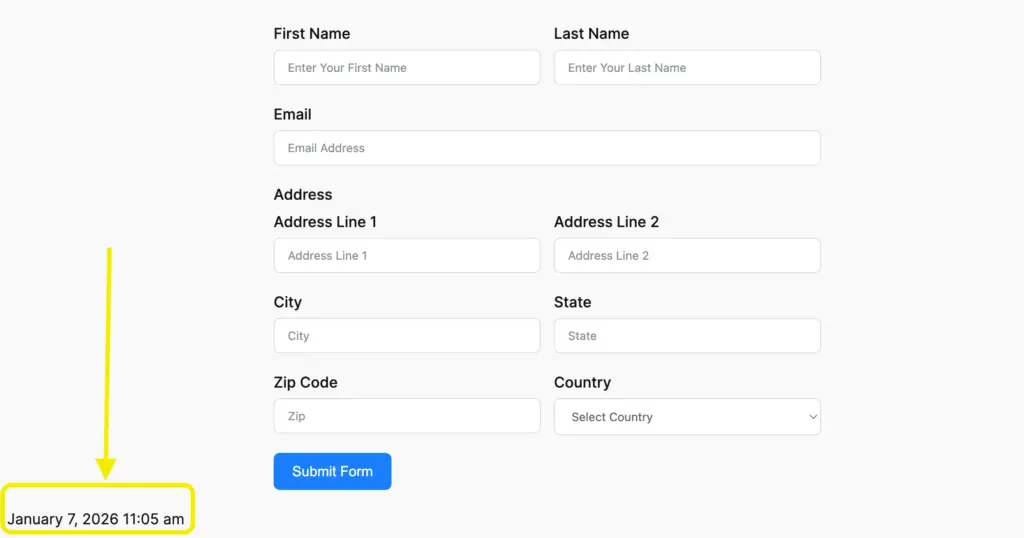
If you want the date formatted in a more readable way:
[fluentform_info id="354" info="created_at" date_format="l d F Y g A"]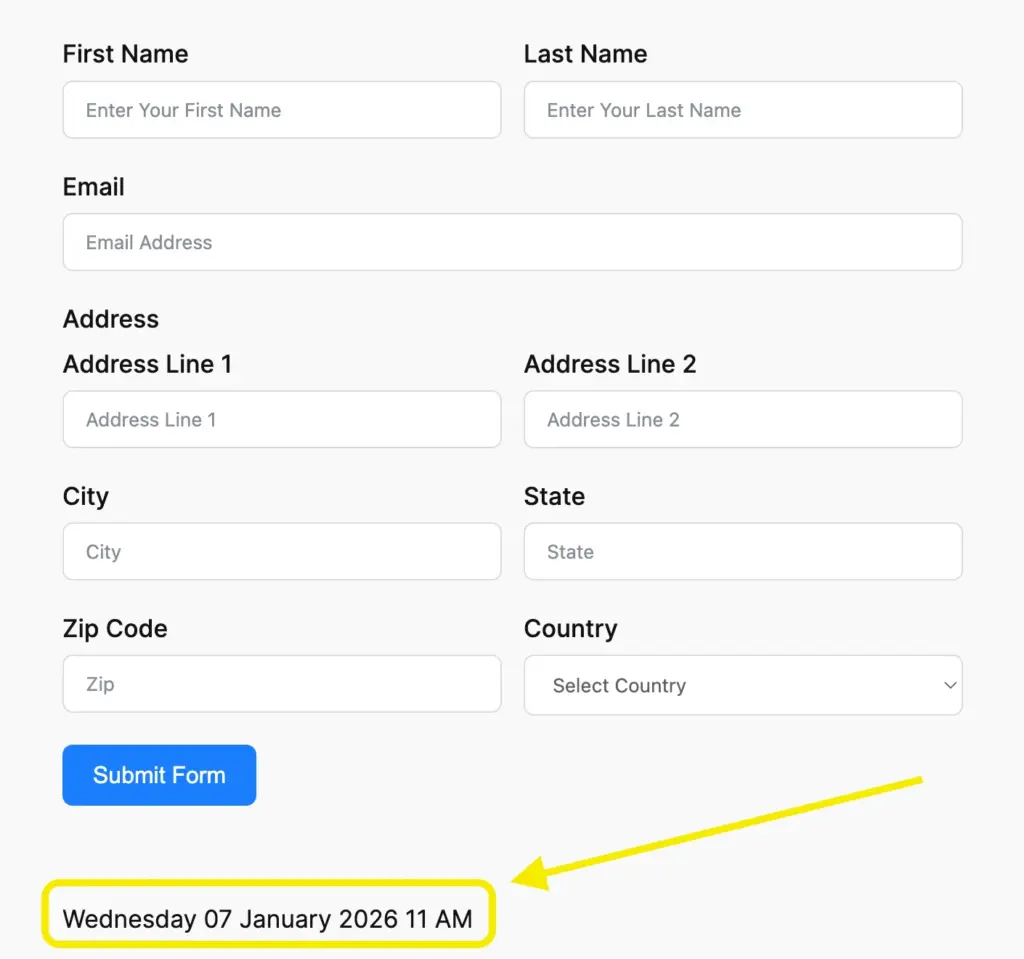
Useful for internal tools, application pages, or forms that change frequently.
Showing submissions by read status
Fluent Forms tracks whether entries are read or unread. You can filter submission counts using that.
Show all submissions:
[fluentform_info id="354" status="all"]Only read entries:
[fluentform_info id="354" status="read"]Only unread entries:
[fluentform_info id="354" status="unread"]This is mostly useful for admin-facing pages or internal dashboards.
Including or excluding trashed entries
By default, trashed entries can be excluded or included.
Exclude trashed entries:
[fluentform_info id="354" with_trashed="no"]Include trashed entries:
[fluentform_info id="354" with_trashed="yes"]Showing remaining submission slots
If your form has a submission limit, helper shortcodes can show how many spots are left.
First, set a maximum entry limit in the form settings.
Then use:
[fluentform_info id="354" info="submission_count" substract_from="20"]This will show how many submissions remain.
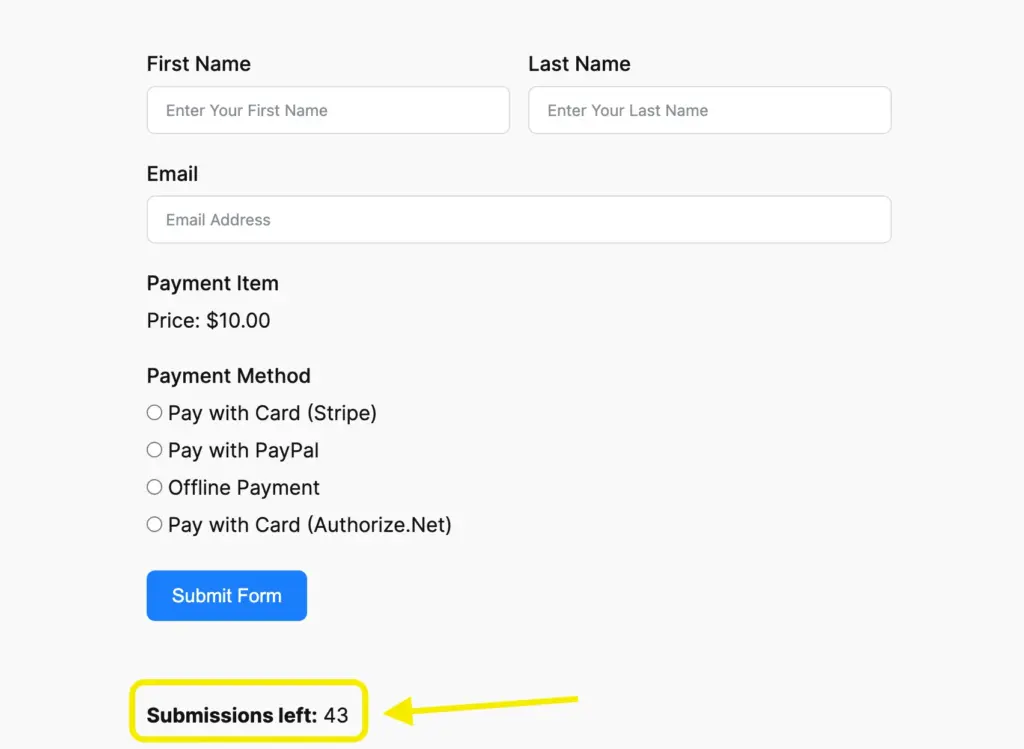
To automatically hide the form when the limit is reached:
[fluentform_info id="354" info="submission_count" substract_from="20" hide_on_zero="yes"]This works well for applications, registrations, or limited-capacity forms.
Showing payment totals by status
For payment forms, you can display totals based on payment status.
Show all payments:
[fluentform_info id="354" payment_status="all"]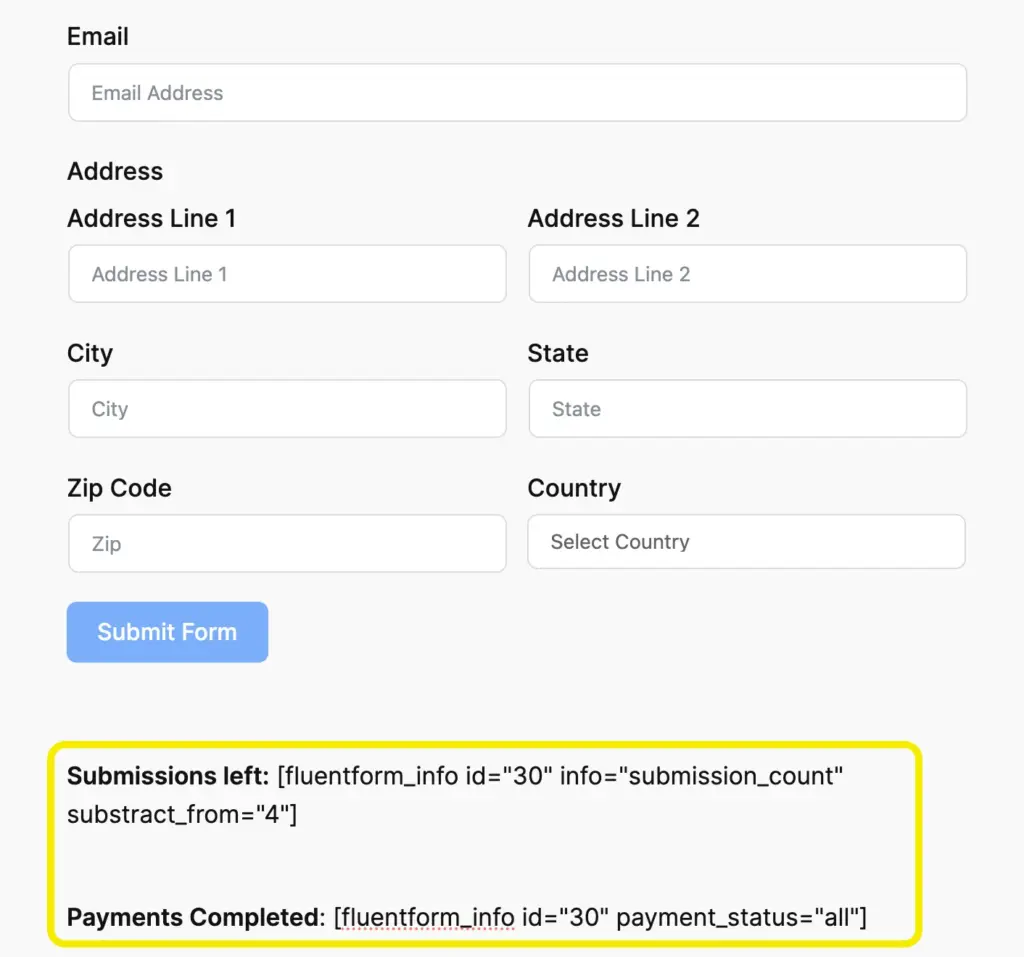
Properly label it before publishing the page.
You can also show-
Only paid payments:
[fluentform_info id="354" payment_status="paid"]Only pending payments:
[fluentform_info id="354" payment_status="pending"]Only failed payments:
[fluentform_info id="354" payment_status="failed"]Showing a specific field from a specific submission
If you ever need to pull a specific field value from a specific submission, you can use:
[ff_entry form_id="1" entry_id="{submission.id}" field="url" is_html="false"]This is more advanced, but useful when submission data needs to appear elsewhere on the site.
Helper shortcodes are not something you’ll use on every form. But when you need to surface live form data without exporting reports or writing custom logic, they’re usually the simplest solution.
Shortcodes for payment management
Once forms start handling payments, the experience shouldn’t stop at submission. Users will want to see what they paid for, check their payment status, download receipts, or manage subscriptions without contacting support.
Fluent Forms handles this through payment management shortcodes and dedicated pages. These let you build simple, self-service payment views directly on your site, using shortcodes instead of custom dashboards.
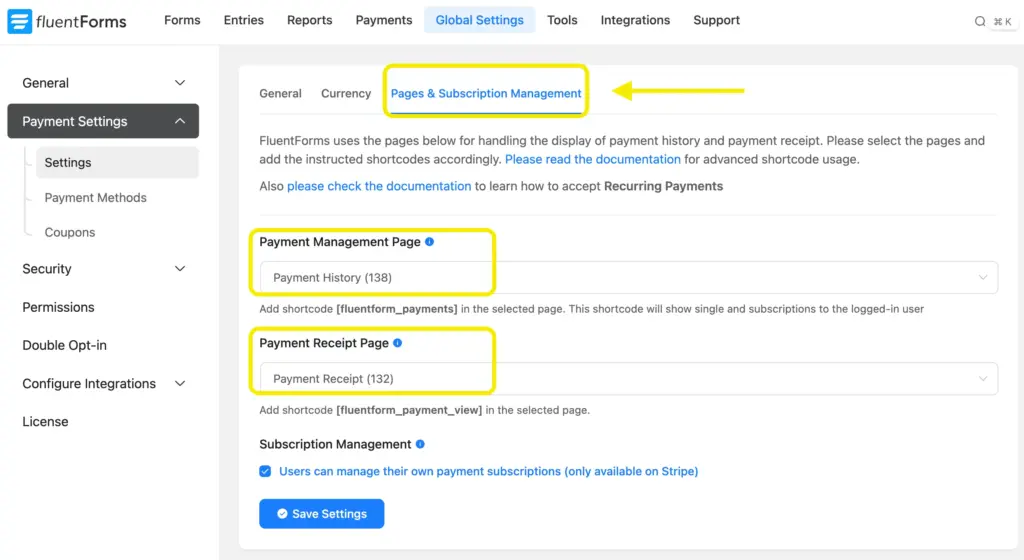
All payment-related pages are configured from the Page and Subscription Management tab in Fluent Forms.
These settings apply globally across your forms, so once they’re set up, you don’t need to repeat the process for each payment form. Remember to click Save Settings after making changes.
Payment History page
The Payment History page shows logged-in users a list of their payments and subscriptions in one place.
From the settings, you can select an existing WordPress page and assign it as the Payment History Management Page. Only logged-in users can access this page.
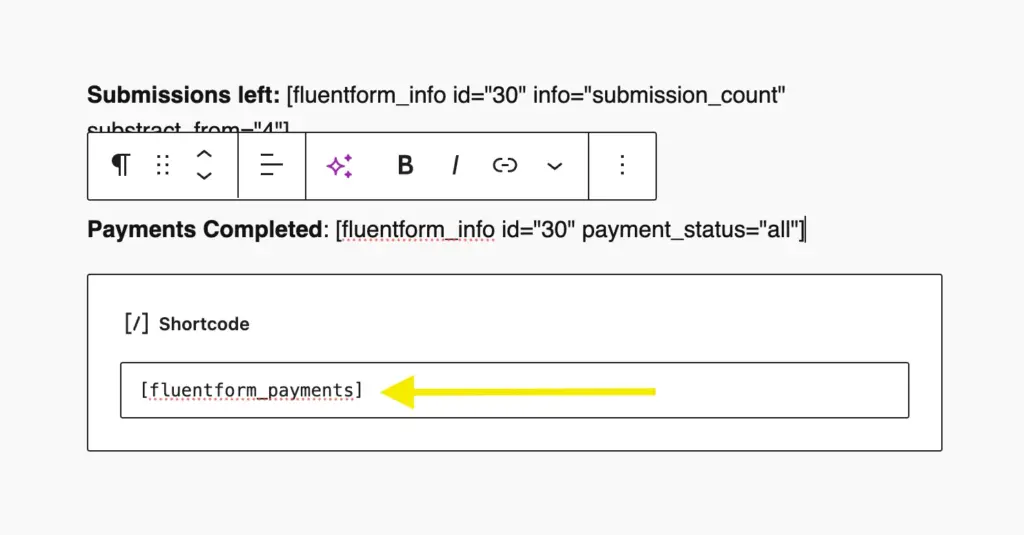
You can also add the Payment History directly to a page using a shortcode. Use this shortcode to do the job –
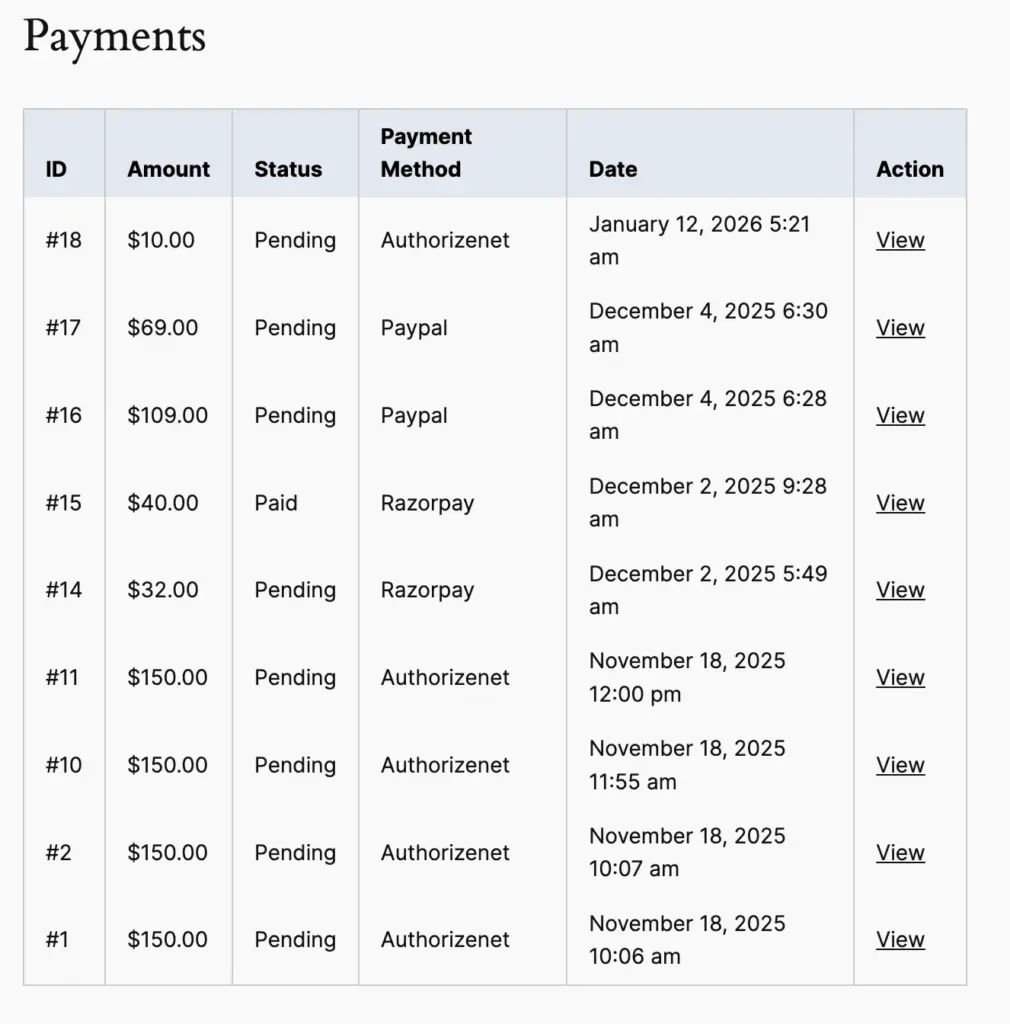
[fluentform_payments]Once added, users will see a table that includes payment amount, status, method, date, and an action link to view details.
On this page, users can:
Check payment status such as paid, pending, or failed –
See subscription payments grouped together –
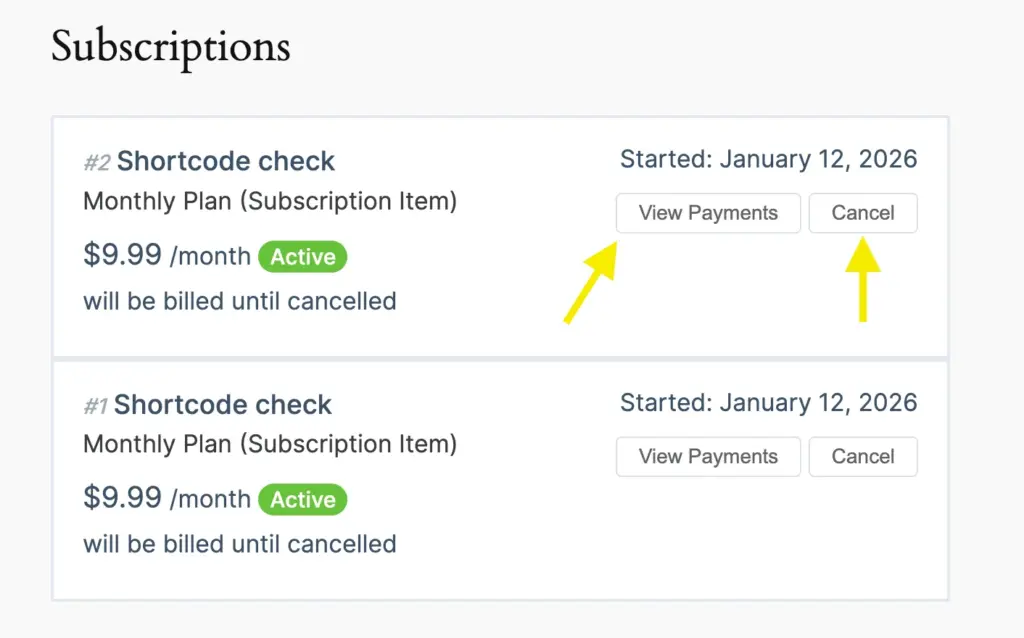
For subscription payments, users can also view all related transactions and cancel subscriptions if needed.
Payment Receipt page
The Payment Receipt page is used to display details for a single payment.
You can assign an existing page as the Payment Receipt page or insert the payment receipt shortcode manually using this shortcode:
[fluentform_payment_view]This page shows transaction-level information like payment method, status, items, and totals.
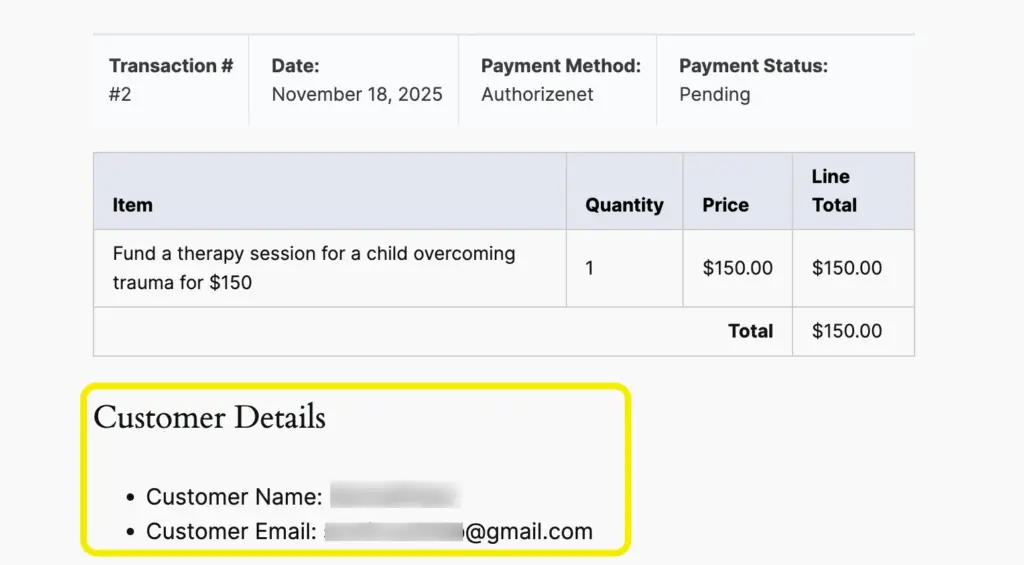
Users usually reach this page by clicking the View link from the Payment History page, keeping navigation simple and consistent.
Both one-time and subscription payments are supported, and access is limited to logged-in users.
What to do if shortcodes are not working
Before you proceed to see the shortcodes in action, keep in mind that you might face situations where shortcodes won’t work.
If a shortcode doesn’t work, it’s usually not broken. It’s just missing context.
Most shortcode issues in Fluent Forms come down to where the shortcode is placed, what data it expects, or whether all required parameters are present. Here’s how I usually debug it.
Start with placement. Make sure the shortcode is used inside an area that actually parses shortcodes. The WordPress editor, text blocks, confirmation messages, emails, and PDFs are all safe. Some page builder elements or theme widgets don’t render shortcodes unless explicitly enabled.
Next, check whether the shortcode depends on a submission. Shortcodes like {inputs.*}, {submission.*}, {payment.*}, or {all_data} will not output anything on a normal page load. They only work after a form has been submitted or inside confirmations, receipts, or logged-in user views.
Then check the form ID. This one is easy to miss.
Helper shortcodes like fluentform_info, payment history, entry lookups, or submission counters require a valid form ID. If the ID is missing or incorrect, the shortcode won’t fail loudly. It will just return nothing.
If something looks right but outputs nothing, double-check that the form ID exists and matches the form you’re testing against.
Login state is another common blocker. Payment history, receipts, user data, and FluentCRM-related shortcodes require the user to be logged in. Testing these while logged out will always make them look broken.
For conditional and helper shortcodes, verify field keys and values. Field names are case-sensitive, and labels won’t work in conditions. One mismatched value is enough to stop output.
For pre-fill shortcodes, confirm the data actually exists. {get.param} won’t work unless the URL contains that parameter. FluentCRM shortcodes won’t work unless the user is logged in and the contact profile contains that field.
Finally, confirm feature availability. Conditional shortcodes, payment management, PDFs, and some helper shortcodes require Fluent Forms Pro. Free installations won’t process Pro-only shortcodes.
When in doubt, simplify. Test the shortcode on a clean page, with one form, one shortcode, and no extra logic. Once it works there, build up again.
Most shortcode issues aren’t bugs. They’re missing pieces. Once you understand what each shortcode needs to run, Fluent Forms shortcodes become predictable, reliable, and genuinely useful.

This is Sumit. He’s a physics major who’s trying to understand both the physical as well as the WordPress worlds. Whenever he’s not busy, plays fifa or spends time with his family.


Leave a Reply