

How to Create a Medical Consent Form in WordPress
A medical consent form gives your practice a clear, dated record that a patient understood a treatment and agreed to it. Move that form online, and you reduce paperwork, skip manual data entry, and let patients complete the consent form from any device before they arrive.
In this guide, I’ll show you how to create a medical consent form in WordPress using Fluent Forms, the fastest form builder for WordPress. You’ll learn which fields to include, how to write the consent language, how to capture agreement, and how to keep the data secure.
TL;DR
- What you’re building: an online medical consent form that collects patient details, states what the patient is consenting to, and records their agreement with a name and date.
- Fastest start: begin from a healthcare template in the Fluent Forms library, or build a blank form when you want full control over every field.
- Capture consent clearly: use a Custom HTML field for the consent statement and a Terms & Conditions or GDPR agreement field for the recorded yes.
- Handle minors: use conditional logic to reveal guardian fields only when the patient is under 18.
- Adapt to any type: the same build reshapes into general treatment, surgery, telehealth, minor, vaccine, and records-release consent forms.
- After submission: set a confirmation message, send admin and patient email copies, and store every entry in your dashboard with an optional PDF.
- Keep it secure: turn on Fluent Forms’ spam protection and role permissions, and cover your site basics like SSL, strong passwords, and updates.
- Publish anywhere: drop the form onto a page with the Gutenberg block or a shortcode, then link it from your intake emails.
Medical Consent Forms: What They Are and When You Need One
A medical consent form is a document a patient reads and agrees to before a provider delivers care. It records informed consent, meaning the patient was told what the treatment involves, the risks, and the alternatives, and then chose to go ahead.
When your practice needs one
You’ll want a consent form on hand in several common situations:
- Before a procedure or treatment that carries risk, so the patient acknowledges what’s involved.
- When the patient is a minor, a parent or guardian must authorize care.
- For telehealth visits, where you need a patient’s documented agreement to remote care.
- When you release or share medical records with another provider or a family member.
Once you know which of these you’re covering, you can decide what the form should ask.
Why an online form beats paper
Paper consent forms might get lost. They also force patients to fill them out in your waiting room. A digital version fixes that:
- Patients complete the consent form from home or on a phone before they arrive, so check-in moves faster.
- Every submission lands in your dashboard, timestamped and searchable, with no manual data entry.
- You keep an exact record of the consent text each patient agreed to and can still print or save a PDF when you need a hard copy.
What to Include in a Medical Consent Form
A good consent form collects enough to identify the patient and prove informed agreement, and nothing extra. You can divide the fields in three groups: who the patient is, what they’re consenting to, and how they confirm it.
Patient and guardian information
Start with the details that identify the patient and give you a way to reach them:
- Full name
- Date of birth (Date & Time field)/Age (Numeric field)
- Phone and email
- Home address
- Emergency contact name and number
- Parent or guardian name and relationship when the patient is a minor
Medical and consent details
Next, capture the care being authorized and the statement the patient is agreeing to:
- The procedure, treatment, or service
- The treating provider or clinic name
- A short acknowledgment that risks and alternatives were explained
- The consent statement itself, written in plain language
- The date of consent
Capturing agreement
Finally, record the yes. You have a few options, and you can combine them:
- A Terms & Conditions or GDPR agreement checkbox tied to your consent text
- The patient’s typed full name as confirmation
- An optional drawn signature, if you use the Signature add-on (sold separately)
With the field list mapped out, you’re ready to build it.
How to Create a Medical Consent Form in WordPress Using Fluent Forms
Install and open Fluent Forms
From your WordPress dashboard, go to Plugins > Add New. Search for Fluent Forms, then click Install Now and Activate.
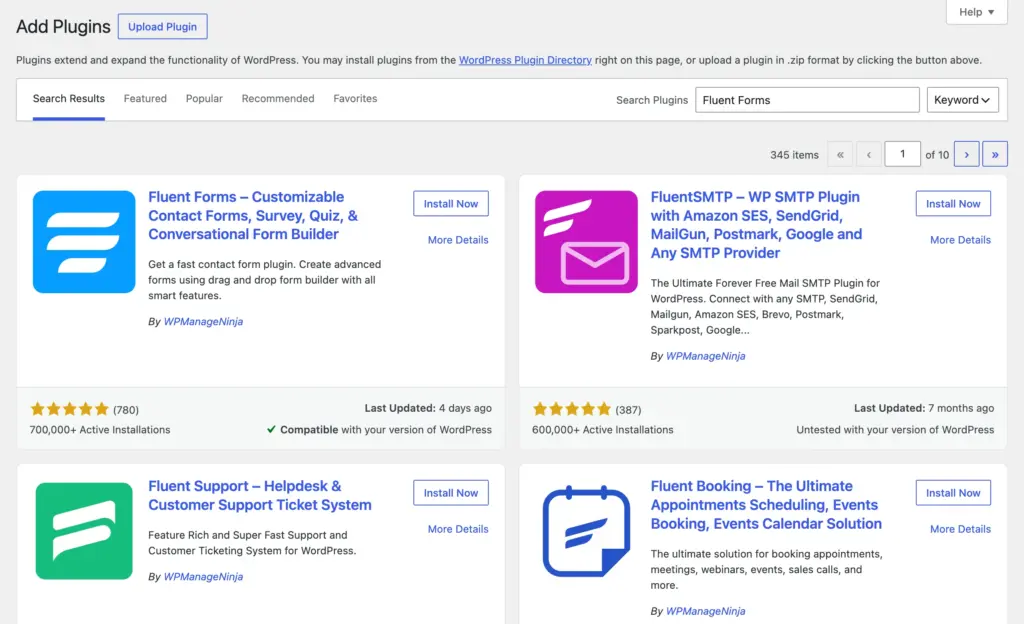
Once it’s active, Fluent Forms appears in your admin menu, and you can start building right away.
Start from a healthcare template or a blank form
You have two ways to begin. If you want speed, start from a template. If you want full control, start blank.
Fluent Forms offers a library of healthcare form templates, including patient intake, medical history, and vaccine consent forms. Any of these gives you a structured starting point you can edit to match your practice.
To build from scratch instead, click Fluent Forms > New Form, then select New Blank Form. I’ll take this approach so you can follow the process step-by-step.
Add and arrange your fields
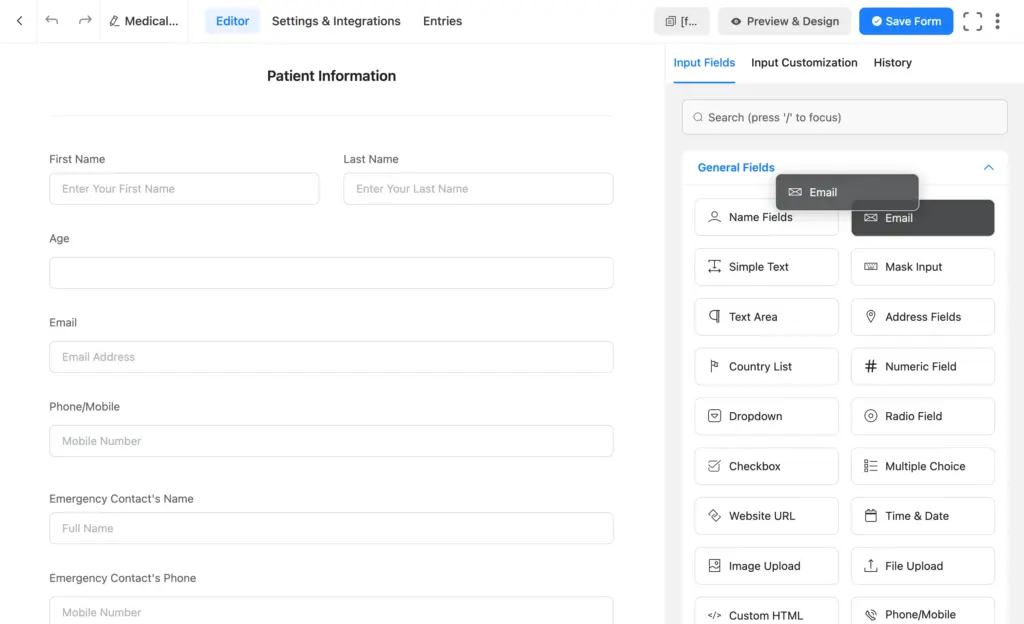
In the editor, the Input Fields panel sits on the right and the form canvas on the left. Drag the fields you mapped earlier onto the canvas, then click any field to edit its label and settings.
Follow these steps to structure the form:
- Add a Name field for the patient, plus Email, Phone, and Address.
- Add a Date field for the date of birth.
- Use a Section Break to separate patient details from medical details, so the form reads in clear blocks.
- Add a Dropdown or Simple Text field for the procedure or treatment, and one for the provider or clinic name.
Keep the form clean. Ask only for what the consent record needs.
Add your consent statement and agreement
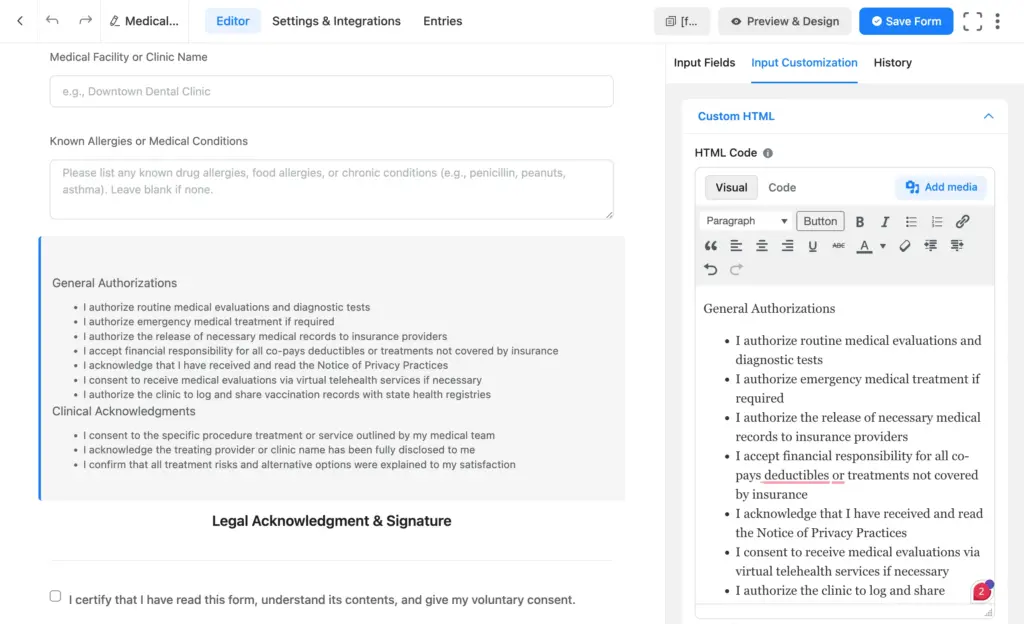
The consent language is the core part of the form. Add a Custom HTML (visually editable, no code) field and write your statement in plain terms, for example, that the patient understands the procedure, its risks, and the alternatives, and agrees to proceed.
Below that, add a Terms & Conditions field (or a GDPR Agreement field) so the patient ticks a box to record their agreement. Add a Date field for the date of consent and a Name field where the patient types their full name to confirm.
Collect a patient signature
For many consent forms, a ticked agreement box and a typed name are enough to record consent. But if your practice requires a handwritten signature on file, especially for procedures or surgery, you can capture it.
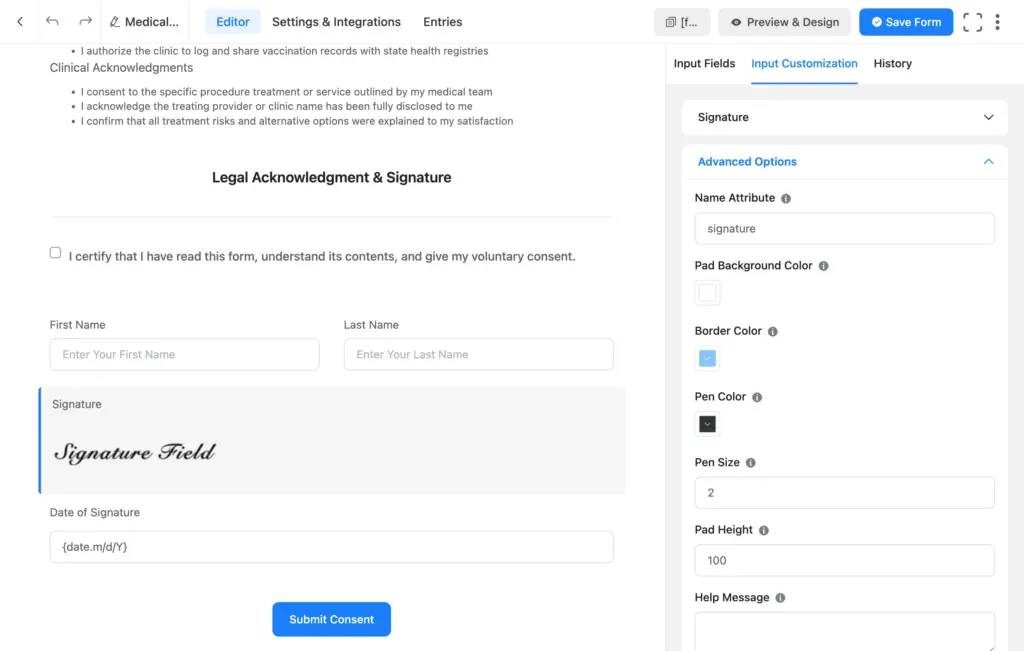
The Signature add-on adds a field where patients sign with a mouse, trackpad, or finger on a touchscreen. Drag the Signature field below your consent statement, and the signature saves with the entry like any other answer. The add-on is sold separately, so add it when a drawn signature matters and skip it when the checkbox and typed name will do.
Show guardian fields with conditional logic
When a patient is a minor, you need a parent or guardian to authorize care. Rather than showing guardian fields to everyone, reveal them only when they apply.
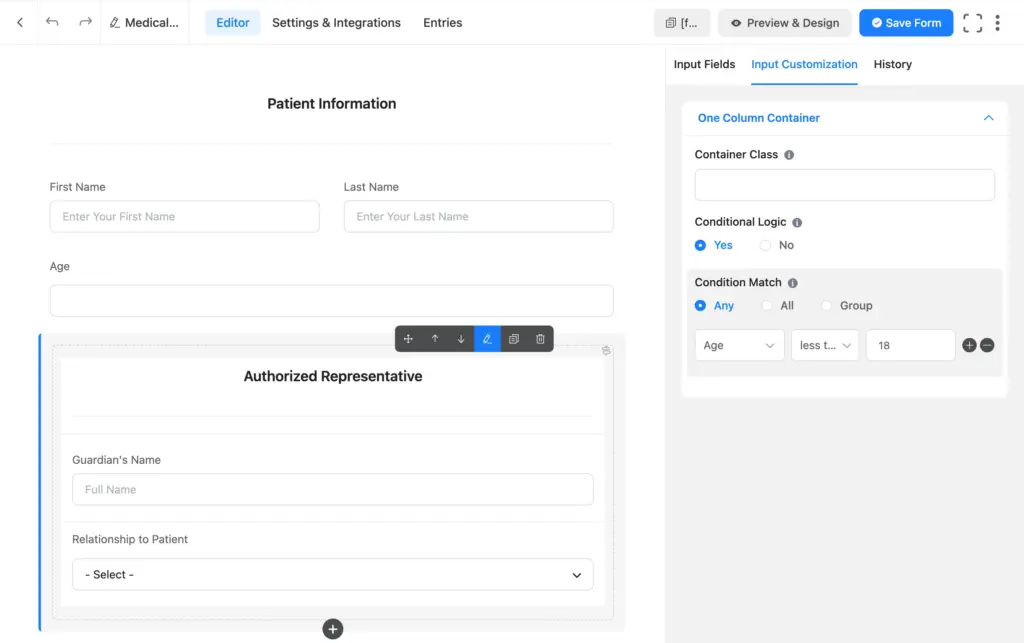
Conditional logic is a rule that says: if the user answers this way, show that field. Add a numeric field to collect the patient’s age. Then set the guardian fields to appear only when the answer is below 18.
To set it up, take a one-column container. Add a name, contact (email/phone), and relationship field to the container. Hover over the container and click the pencil icon to configure the container’s settings. Check Yes under Conditional Logic. Under Condition Match, point it at your “age” question and set the logic as “less than” and the value as “18”.
When you’re done editing, click Save Form in the top right. With the form built, let’s set up what happens after a patient submits it.
Set Up What Happens After Submission
Once the form is built, you need to automate a form-submission message to the patient, set up notifications for your team, and create any additional workflows as needed.
Confirmation message
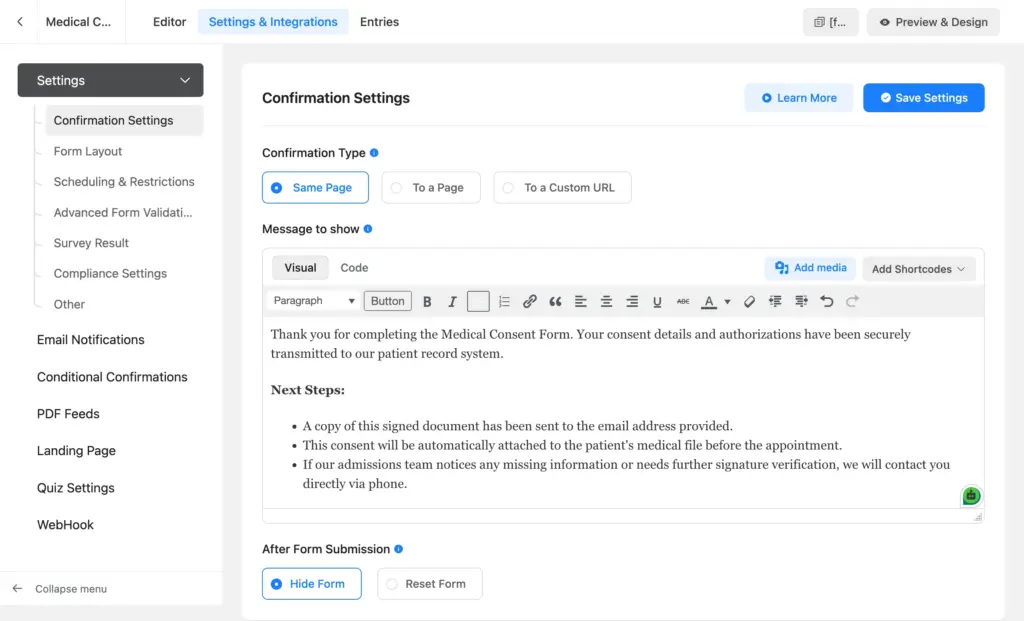
Go to Settings & Integrations > Settings > Confirmation Settings. You can show a message on the same page, redirect to a thank-you page, or send the patient to another URL.
For a consent form, a clear on-page message such as “Your consent has been recorded” works well, and a redirect to a thank-you page lets you add next steps like appointment details.
FluentBooking, the scheduling plugin for WordPress, allows you to insert your booking calendar on the thank-you page (or any other page) with a shortcode. Patients finish consent, then book their appointment on the spot. And since the two plugins integrate directly, FluentBooking shows up as a field you can add right inside Fluent Forms when both are installed, so you can even collect consent and a booking in a single form.
Email notifications
Notifications make sure the right people see each submission. Usually you’ll want two:
- One to your team, so the front desk knows a new consent came in.
- One to the patient, as a confirmation copy of what they agreed to.
You can route notifications to different staff too. A pediatric consent form could alert one team, while a records release form could alert another.
Store and export entries
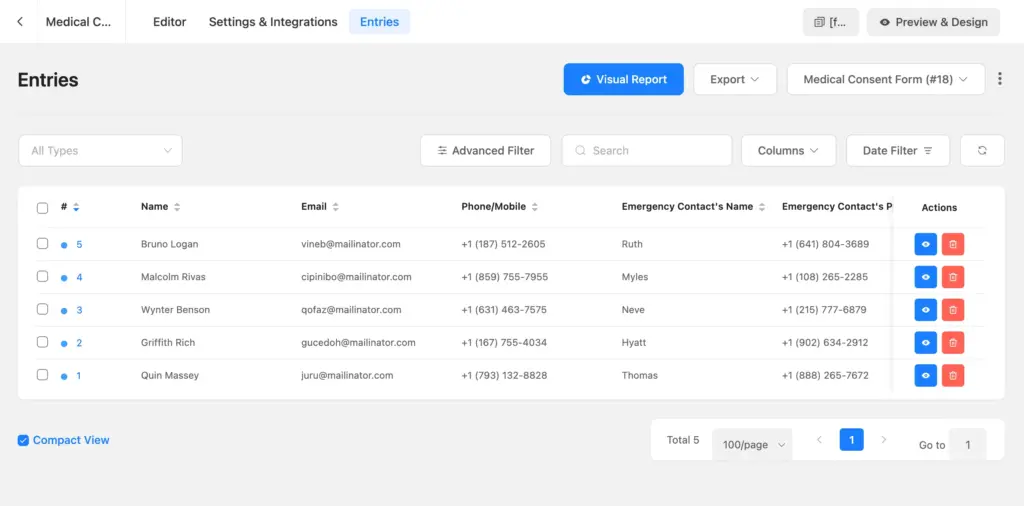
Every submission is saved under your form’s Entries tab inside WordPress, timestamped and exportable. You can download entries as a CSV for your records or generate a PDF copy of each consent, which is handy when a patient or another provider asks for one.
Since a consent form carries sensitive patient details, it’s worth protecting before making it live.
Keep Your Consent Form Secure
Fluent Forms is self-hosted, so every submission stays in your own WordPress database rather than on a third party’s servers. That puts you in control of the data. A few settings just make sure only the right people reach it.
Turn on Fluent Forms’ built-in protection
Enable these inside Fluent Forms to protect the form:
- Honeypot and token-based spam protection, both under Fluent Forms > Global Settings > General > Miscellaneous, to block bot submissions.
- Cloudflare Turnstile, reCAPTCHA, or hCaptcha from Fluent Forms > Global Settings > Security when a form draws heavier traffic.
- The role manager under Fluent Forms > Global Settings > Permissions, so only chosen staff can view or manage consent entries.
- A login requirement from the form’s Settings & Integrations > Scheduling & Restrictions for patient-portal or member forms, which ties every submission to a user account.
- Restricted file upload types, so a document field accepts only formats like PDF and never executable files.
Fluent Forms also sanitizes submitted data before storing it, converting suspicious scripts into harmless text, so the form can’t be used to inject code into your site.
Secure your site
It’s more important to protect your site to prevent unauthorized access to your patient data:
- Install an SSL certificate so data is encrypted in transit and your site runs on HTTPS.
- Use strong passwords, enable two-factor authentication, and limit login attempts to slow down brute-force bots.
- Keep WordPress core, your theme, and plugins updated, and remove anything you no longer use.
- Choose a reputable host, and back up your site regularly so you can recover if anything goes wrong.
- For sensitive patient data, route entries to a dedicated destination with a webhook over HTTPS, or confirm your hosting and email setup with a compliance professional if rules like HIPAA apply to your practice.
With your form and site secured, you’re ready to publish it to collect patient consents.
Publish Your Consent Form
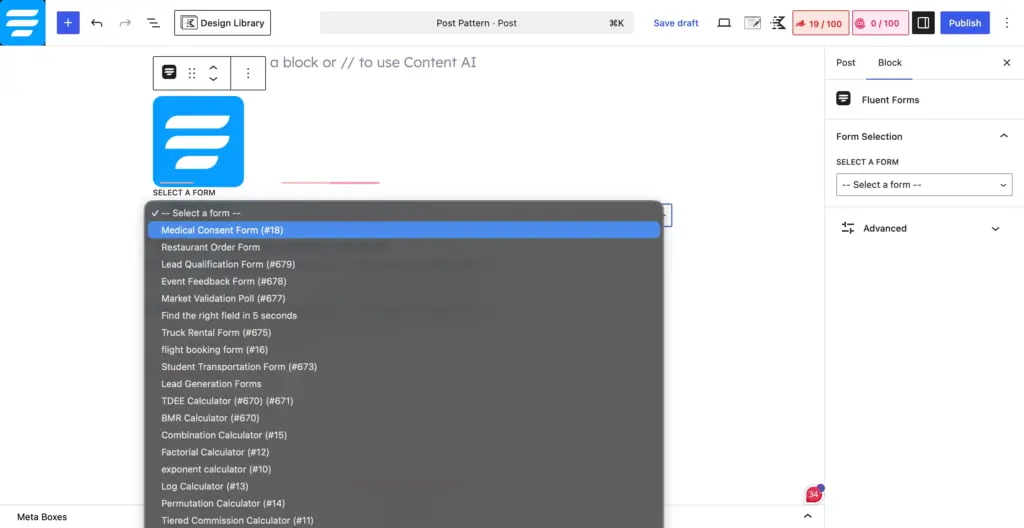
If you use the block editor, add the Fluent Forms Gutenberg block to any page or post and pick your form from the dropdown. You can also copy the form’s shortcode and paste it anywhere WordPress accepts shortcodes, which is useful for custom page templates.
You can share the form as a standalone landing page as well, then send the link via your intake or appointment emails so patients complete consent before they arrive.
Common Types of Medical Consent Forms
The steps you just followed create a template you can reshape for almost any consent scenario. Swap in a few fields, and the same form serves a different purpose. Here are some consent categories that practices need most.
General treatment consent
This is the everyday form, where a patient authorizes routine care or examination. Keep it short: patient details, the treatment being authorized, and the agreement. Most practices use this as their default and branch out from here.
Surgery and procedure consent
Informed consent matters most before an operation or invasive procedure. Spell out the specific procedure, the provider performing it, the risks and alternatives, and any separate anesthesia agreement. A typed name with the date, and a drawn signature if your practice uses one, gives you a firm record.
Telehealth consent
Virtual visits need their own agreement. A telehealth consent form confirms the patient accepts remote care and understands its limits. Add the platform used, the patient's location during the visit, and a note that they can move to in-person care when needed.
Child and minor consent
When the patient is under 18, a parent or guardian authorizes care. Lead with the guardian and relationship fields and an emergency contact. The conditional logic from the walkthrough fits well here, so one form can serve both adults and minors and reveal the guardian section only when it applies.
Vaccine consent
A vaccine consent form pairs a short health screening with agreement to a specific immunization. It asks about allergies, prior reactions, and current health before capturing consent. You can start from the ready-made vaccine consent form template and adjust it to your clinic.
Medical records release
This form authorizes you to share a patient's information with another provider, an insurer, or a family member. Capture who receives the records, exactly what's shared, and how long the authorization lasts.
Whichever version you need, the build, the after-submission setup, and the security steps stay the same. Pick the fields that fit and reuse the rest.
Build Your Medical Consent Form Today
Creating a medical consent form in WordPress comes down to a few clear moves: add the patient and medical fields, write a plain consent statement, record agreement with a checkbox and a typed name, and then handle notifications, storage, and security.
The consent form that saves your front desk time, keeps every consent record in one searchable place, and lets patients agree before they walk in the door. You can start simple and expand as your practice grows.
Build Smarter Forms for Free

Sarika writes for Fluent Forms and loves to offer insights into small businesses. She's curious and enjoys discussing ideas, interests, and perspectives. In her free time, she's either marvelling at architectural beauties or trying different cuisines.



Leave a Reply