

How to Create a Nonprofit Membership Form in WordPress
A membership form does four things at once: it signs a person up, creates their account, sets their member role, and collects their dues. WordPress gives you a registration form by default, but it stops at creating a basic account. It can’t take payment, can’t tell a board member apart from a general supporter, and looks nothing like the rest of your site.
Fluent Forms covers all four jobs from your own WordPress dashboard. You build the form, connect a payment gateway, and map the fields to member roles, and the signup runs itself. I’ll show you how, step by step, with no code and no third-party membership plugin.
TL;DR
- A good nonprofit membership form does four jobs: registers the member, assigns a role, collects dues, and guides them to a member area.
- You’ll need Fluent Forms Pro (the User Registration module is a Pro feature) and a connected payment gateway like Stripe or PayPal.
- Enable the User Registration or Update module, build your form, then map fields to WordPress user roles in the registration feed.
- Use the Payment Item field for one-time dues and the Subscription field for recurring dues, with conditional logic to link tiers to billing cycles.
- Turn on auto-login and set a redirect so new members land on a welcome or member page right after signing up.
- Frame each tier as a real outcome, add spam protection, style it to your brand, then test and publish.
Why a Dedicated Membership Form Beats the Default WordPress Setup
The built-in WordPress registration form only creates an account. For a membership program, that’s not enough.
You can’t ask for a phone number, a chapter, or a membership level. You can’t collect dues. You can’t make the form look like your organization. And every new signup lands with the same generic role, so a lifetime patron and a first-time volunteer look identical in your dashboard.
With Fluent Forms, you control the whole experience. Here’s what you get to shape:
- A branded signup form that matches your site
- Custom fields for the details that matter to your program
- Membership tiers with their own pricing
- One-time or recurring dues collected right on the form
- The correct WordPress role for each member
- A smart redirect to a welcome page or member area
- Spam protection so bots stay out
What Your Nonprofit Membership Form Needs to Do
Register the member and create an account
A membership form creates a WordPress user account so the member can log in, access member content, and manage their profile later. Fluent Forms handles account creation through its user registration add-on.
Assign the right membership role
Not every member gets the same access. You might have general supporters, membership-fee-paying members, volunteers, and board members. Each maps to a WordPress user role, so you can gate content and permissions correctly from day one.
Collect dues, one-time or recurring
Most membership programs charge something, whether it’s a yearly fee or a monthly contribution. Your form should take that payment on the spot through a connected gateway. You reduce abandonment by collecting payments directly from the form.
Send members somewhere useful after signup
The moment after someone joins is when they’re most engaged. A good redirect sends them to a welcome page, a member dashboard, or an onboarding guide instead of a blank confirmation. That small step sets the tone for the whole membership.
Before You Start: What You’ll Need
Make sure you have these in place before you build:
- A working WordPress site
- Fluent Forms Pro (the User Registration or Update module is a Pro feature)
- A payment gateway connected, such as Stripe or PayPal, if you’re collecting dues
- A published page where the form will live
Fluent Forms Pro integrates with eight gateways: Stripe, PayPal, Mollie, Razorpay, Paystack, Square, Authorize.net, and Paddle. Of those, Stripe and PayPal support recurring subscription payments.
The free version supports Stripe for both one-time and recurring payments, with a 1.9% per-transaction fee. This fee doesn’t apply to Fluent Forms Pro users.
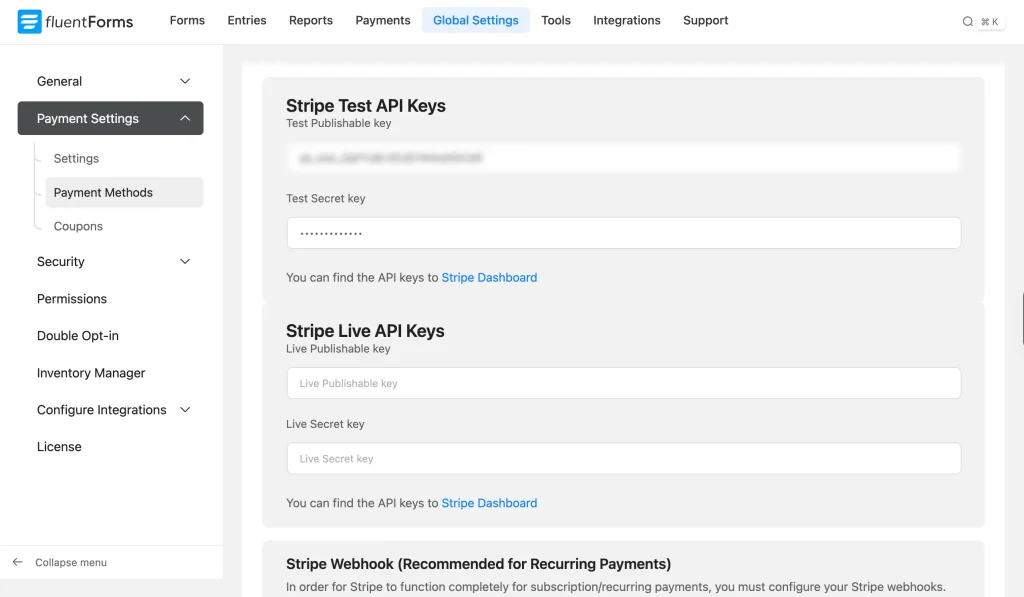
Once your gateway is connected, you’re ready to build.
How to Create a Nonprofit Membership Form in WordPress
We’ll set up registration, add member fields, create membership tiers with dues, wire up the logic, and finish with the account and redirect settings.
Enable the user registration module
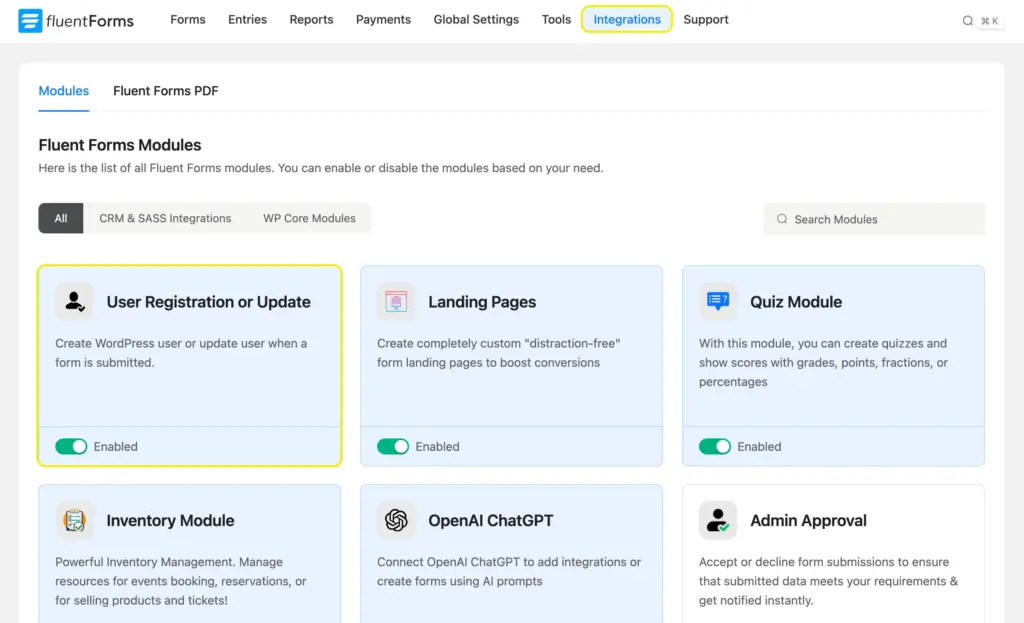
With Fluent Forms Pro active, go to Fluent Forms > Integrations > Modules and enable the User Registration or Update module. This connects your form with WordPress account creation. Without it, your form collects data but never creates a member.
Build the member details section
Create a new form with Fluent Forms > Add New Form, then choose a blank form or a template. Rename it from the top-left corner so you can find it later.
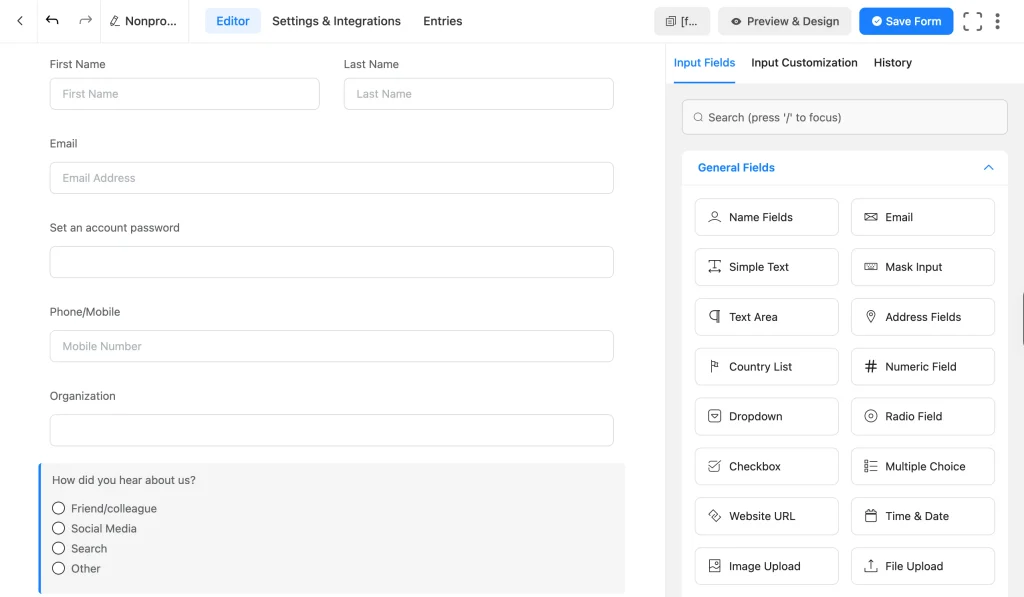
Add the fields that create the account and capture who the member is. For most programs you’ll want:
- First name and last name
- Email address
- Password
- Username, if your setup needs one
Then add the nonprofit-specific fields that help you run the program:
- Phone number
- Organization or affiliation
- Chapter or region
- How they heard about you
- Newsletter or communication opt-in
Keep it lean. Every extra field adds friction, so ask only for what you need and make the rest optional.
Add your membership tiers and fees
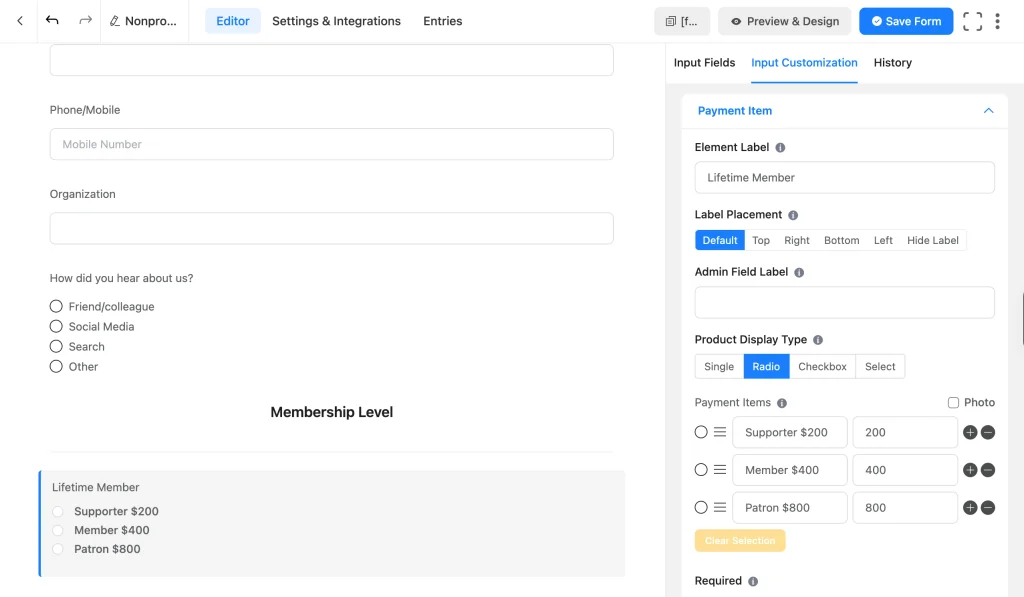
Use a section break field to open a clear “Membership Level” section. Then decide how members pay.
For one-time dues (say, a one-time/lifetime membership), add a Payment Item field. Set the display type to radio so members pick one tier, then list each level and its price:
- Supporter, $200
- Member, $400
- Patron, $800
Offer recurring membership payments
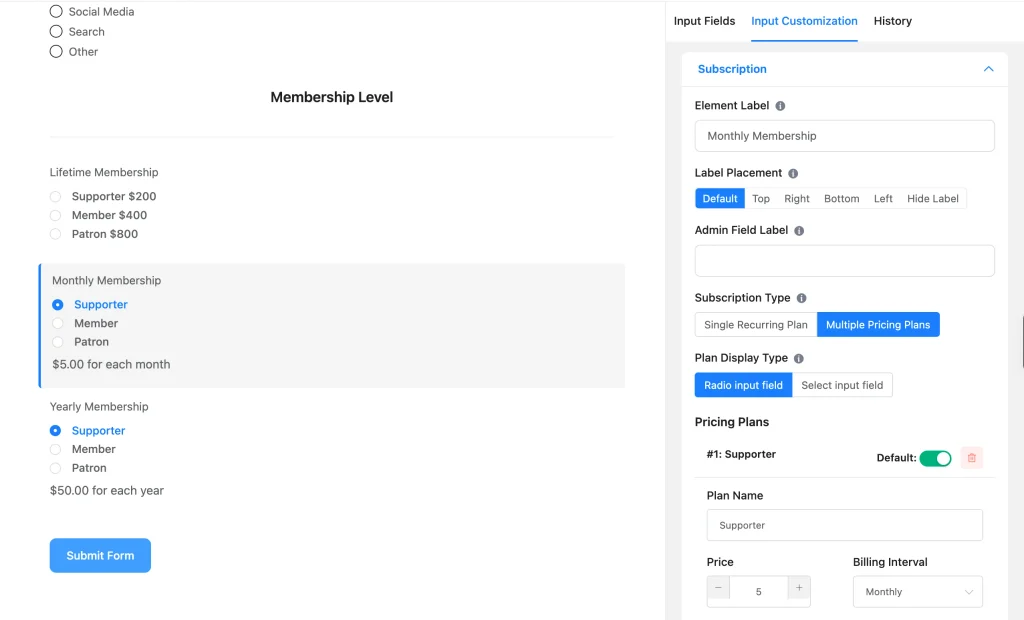
Recurring dues bring your organization steady, predictable income, and they save members from renewing manually every year. To offer them, add a Subscription field from the payment fields.
Each plan in the subscription field has these settings:
- Plan Name: shows as the option members choose (for example, “Monthly Member”)
- Price: the amount charged each cycle
- Billing Interval: daily, weekly, monthly, or yearly
- Enable User Input Amount: lets members set their own contribution, ideal for a “give what you can” tier
- Has Signup Fee: adds a one-time joining fee on top of the recurring charge
- Has Trial Days: offers a free trial period before billing starts
- Total Billing Times: caps the number of cycles, or leave it blank for an ongoing membership
Include all three ways to pay: one-time, monthly, and yearly. Add one subscription field with monthly tiers, then a second with yearly tiers priced at a small discount to reward the longer commitment.
Link tiers to billing cycles with conditional logic
You now have three ways to pay: one-time, monthly, and yearly. You don’t want all three showing at once. Conditional logic shows only the one that matches the member’s choice.
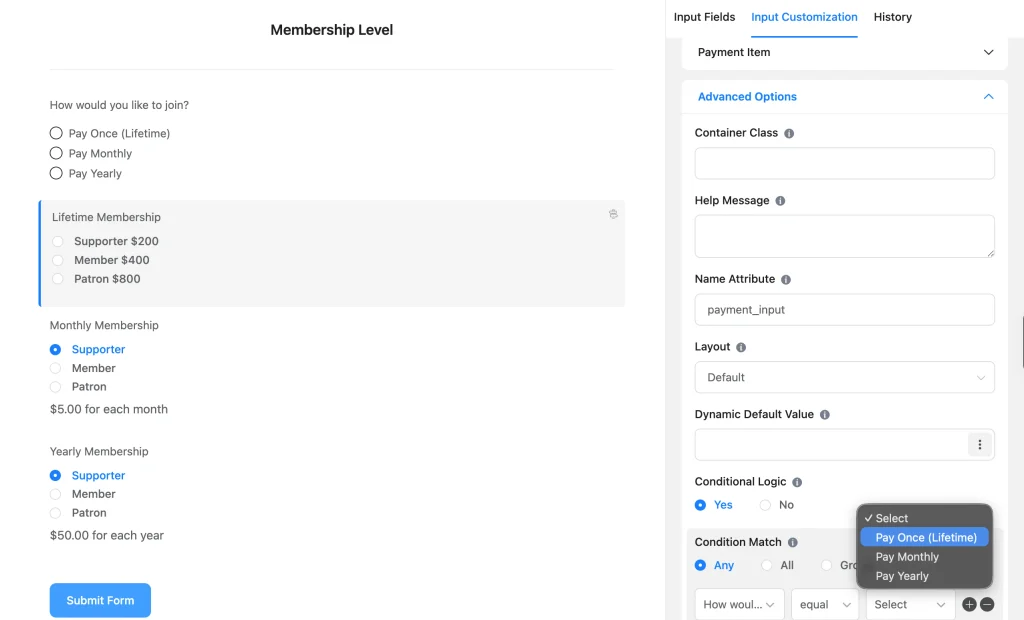
Add a radio field at the top of the payment section labeled “How would you like to join,” with three options: Pay Once (Lifetime), Pay Monthly, and Pay Yearly. This choice controls which tier set each member sees.
Then set the conditions. Click your one-time Payment Item field, scroll to Advanced Options > Conditional Logic, and set it to Yes. In the condition, select that radio field’s label, choose “equal,” then pick the “Pay once” option. Now the one-time tiers appear only when a member chooses to pay once.
Repeat for each subscription field: the monthly field matched to “Bill monthly,” the yearly field matched to “Bill yearly.” The form now shows one clean set of options at a time, based on what each member picks.
You can use the same technique with custom HTML fields to display each tier’s perks (member newsletter, event access, voting rights) as the member selects it.
Add optional processing fee coverage
Dues aren’t always a flat number. You might let members add a donation on top, or invite them to cover the payment processing fee so their full membership amount reaches the cause. Make it their choice, not a forced charge.
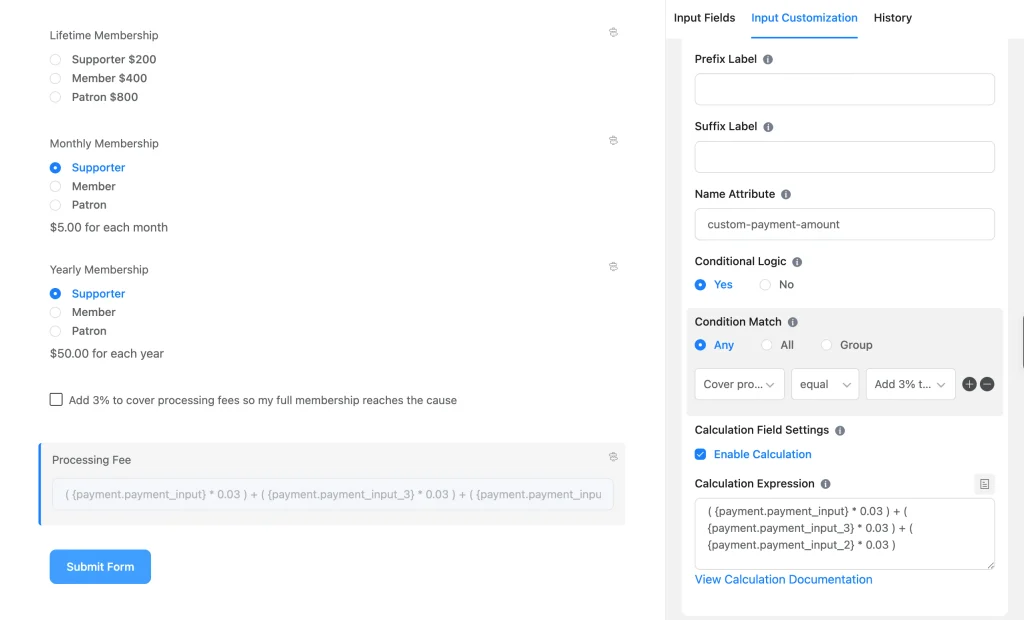
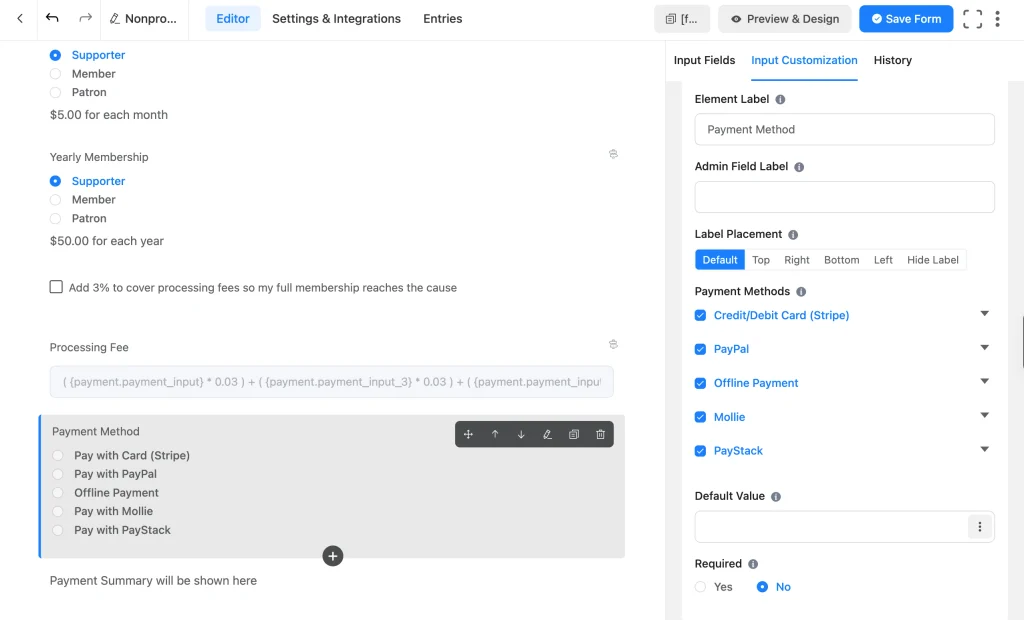
First, add a checkbox field labeled “Add 3% to cover processing fees so my full membership reaches the cause.” This is the opt-in.
Fluent Forms handles this with a calculation. Add a Custom Payment Amount field for the math. Open Advanced Options > Calculation Field Settings and click Enable Calculation. Build the expression by connecting your payment fields with math operators. Click the clipboard icon above the expression box to grab each field’s shortcode. To add 3% on a selected tier, your expression looks like this:
{payment.payment_input} * 0.03
Then make it optional. Still in Advanced Options, open Conditional Logic, set it to Yes, and add the rule: show this field when the checkbox equals “checked.” Now the fee is added only when a member opts in, and it stays at zero when they don’t.
Watch your parentheses and spacing so the formula runs cleanly. If you’d rather keep the field out of view and only feed it into the total, add ff-hidden to the field’s Container Class under advanced options.
Add the payment method field
Drop in the Payment Method field. Every gateway you’ve connected shows up as an option, so check the ones you want to offer, such as Stripe and PayPal. Offering more than one payment method builds trust and reduces form abandonment.
Add a Payment Summary field too, so members see a clear breakdown of their dues before they submit.
Configure the user registration feed
This is where the form starts creating members. Click the Settings & Integrations tab, scroll to Configure Integrations in the left panel, then click Add New Integration > User Registration or Update Integration.
Map each form field to its matching WordPress user field. Pick the relevant form field from the dropdown for email, username, first name, and so on. If the fields aren’t mapped, the account won’t be created correctly, so check this carefully.
Set the role each member gets. The Default Role applies to everyone unless you tell the form otherwise. For most public signups, Subscriber is a sensible baseline.
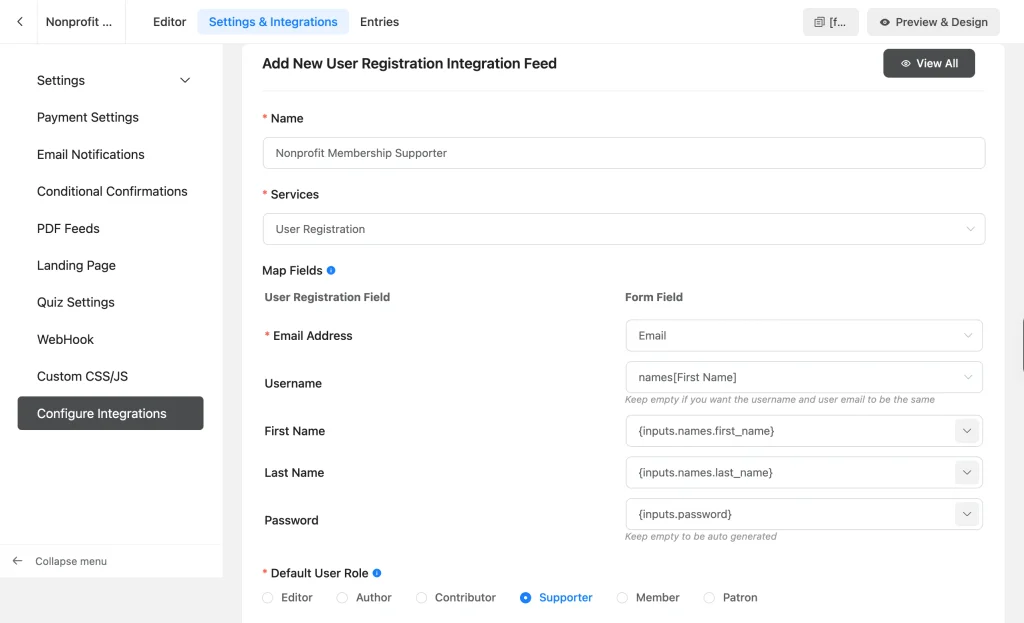
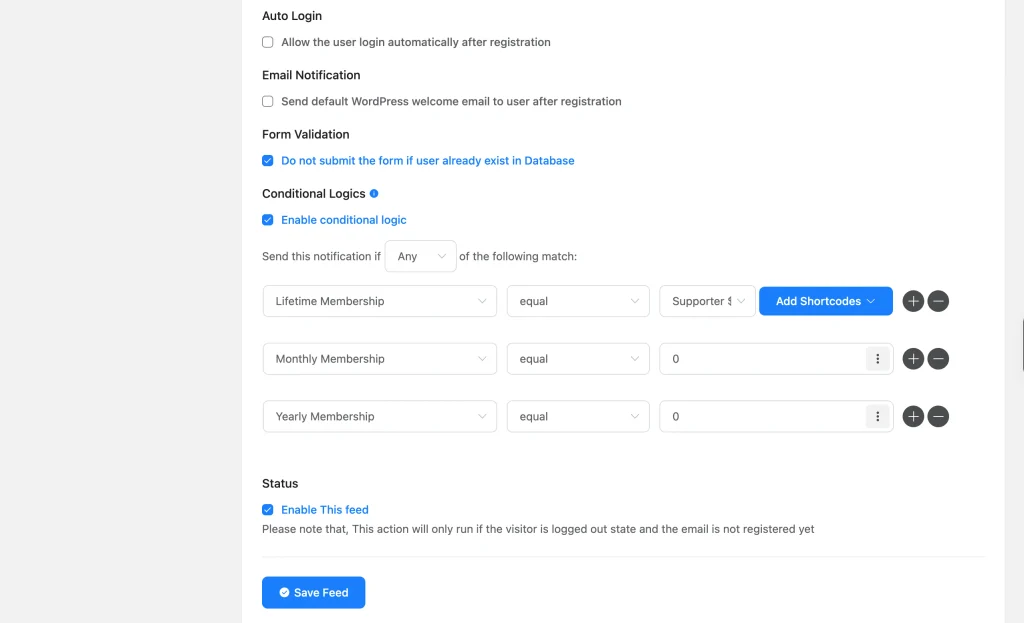
To assign different roles by tier, use more than one registration feed. Create a feed for each role, then add conditional logic so it runs only for the matching tier. For example, one feed sets a “Member” role when someone picks the member tier, while a separate feed sets a “Patron” role for the patron tier. Each feed fires only when its condition is met, so a lifetime patron and a first-time volunteer no longer land with the same access.
Set auto-login and the post-signup redirect
Decide what happens when someone joins. Auto-login signs the new member in right away, so they move straight into your site without a second login step. It’s the smoothest option for most membership programs. If you need to verify members first, skip auto-login and use account activation instead.
Then set where they land. Go to the form’s Confirmation Settings, choose To a Page, and select your destination from the dropdown. Good choices for members include:
- A welcome page
- A member dashboard
- An onboarding guide
- The member area or profile page
With registration, dues, and redirects handled, let’s set up the emails that go out the moment someone joins.
Set up member and team notifications
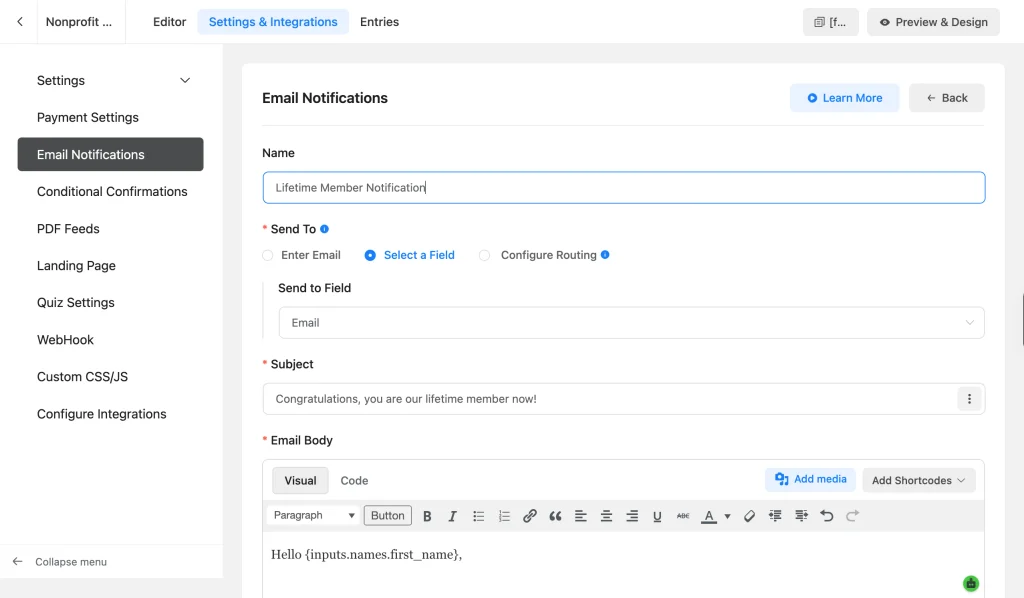
Two emails matter at signup: one to the new member, one to your team. Fluent Forms handles both natively under Settings & Integrations > Email Notifications.
The default admin notification is already there. Enable it and set the Send To address to your team inbox so someone gets alerted every time a member joins. Then add a second notification, set Send To to Select a Field, and pick your form’s email field. That one welcomes the new member and can carry their membership details and next steps.
If different members should reach different people, use Configure Routing in the Send To setting. You can route a board-tier signup to your director and a general membership to your coordinator, based on the tier they picked.
Frame Your Dues as Impact, Not Just a Fee
A membership fee is easier to say yes to when members see what it does. Translate the dollar amount into outcomes to incentivize members.
Compare these two tier labels:
| Plain fee | Impact framing |
| Member, $100/year | Member, $100/year, funds a week of after-school meals |
| Patron, $200/year | Patron, $200/year, sponsors a family’s clean water for six months |
The second version invites members to picture a result, not a charge. To do this well, base each figure on real numbers from your budget, keep the copy short enough to grasp at a glance, and speak directly to the member with verbs like “provide,” “fund,” and “sponsor.”
You can display this framing inside the tier’s plan name, or use a custom HTML field beside each option. Members are no longer choosing a price. They’re choosing the difference they want to make.
Enjoy up to 50% Discount on WPManageNinja Products
for Non-profits
Protect and Polish the Form Before You Publish
Add spam protection
A public membership form will attract bots. Turn on the security tools Fluent Forms offers so people get through and spam doesn’t:
- Honeypot
- Token-based spam protection
- CAPTCHA or Turnstile if you need it
- Strong validation rules on your fields
For extra login features like social login, two-factor authentication, and limited login attempts, you can add FluentAuth, a free plugin that connects to Fluent Forms with no custom code.
Style the form to match your brand
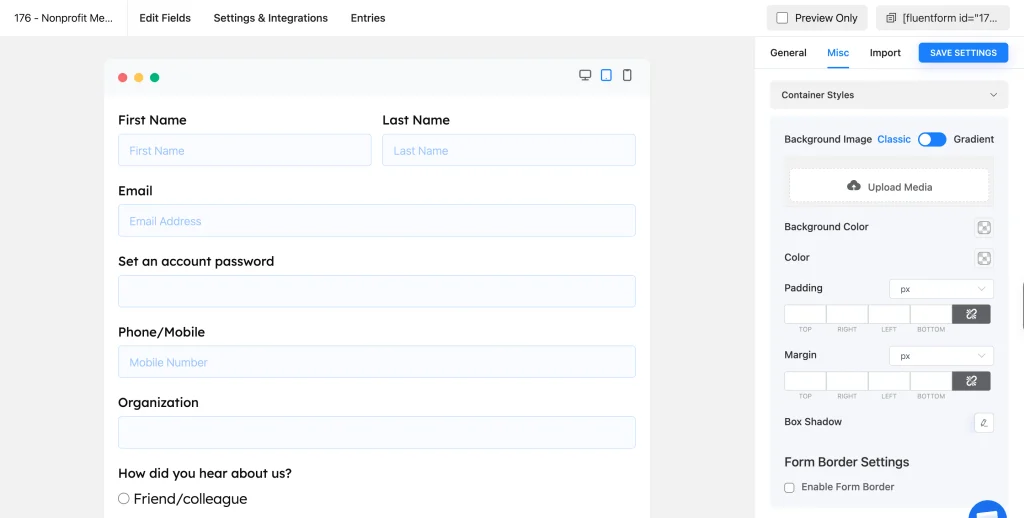
Your membership form is often a member’s first close interaction with your organization. Make it feel like part of your site with the Advanced Form Styler in Fluent Forms Pro. It’s a visual tool, so you can adjust:
- Background and element colors
- Typography
- Button style
- Margin and padding
- Field layout and box shadow
Use your brand colors and fonts, add your logo through a custom HTML field, and keep the button text warm and specific, like “Join as a Member.”
Test everything, then publish
Copy the form shortcode, paste it into your membership page, then test it while logged out or in an incognito window so you see what a real member sees. Confirm that:
- The form submits successfully
- The user account gets created
- Field mapping works, and the default role is correct
- The dues charge processes through your gateway
- Auto-login behaves the way you expect
- The redirect sends members to the right page
When it all checks out, publish the page and add it to your navigation or onboarding flow. Your membership form is live.
Manage Your Members After They Join
Once members start signing up, you’ll want to see who joined and handle the occasional change. Fluent Forms keeps this simple.
View and export member entries
Every signup lands in Fluent Forms > Entries. Pick your membership form from the dropdown to see the full list. You can search, filter, and open any entry to view a member’s details and payment. To pull the list into a spreadsheet for your records or board reports, export entries as CSV, Excel, or JSON.
Handle refunds and cancellations
Members sometimes need a refund or want to cancel a recurring membership. You have two easy paths. Point them to a support ticket through Fluent Support, which connects to your forms so requests land in one place. Or add a short refund request form built with Fluent Forms, so members submit the request themselves and it routes to your team. Either works. Pick the one that fits how your organization already handles member questions.
Automate member emails with FluentCRM
Aside from the signup and welcome email, FluentCRM handles the ongoing relationship. It connects to Fluent Forms directly, so new members flow in as contacts automatically.
From there you can:
- Send a welcome sequence that onboards members over their first few days
- Tag and segment members by tier, chapter, or interest
- Schedule renewal reminders before a membership lapses
- Run campaigns to a specific member segment, like an event invite for local members
This keeps members engaged long after they join, which is where recurring support actually comes from.
Turn Sign-ups into Long-Term Members
A nonprofit membership form collects a fee, creates the account, sorts members by role, and welcomes them in, all in one submission. Without a proper system, you have to do these steps manually. Fluent Forms removes those repetitive tasks to help your nonprofit grow.
You can build this in WordPress without touching code, control the fields, the tiers, the payments, and where members go next. Recurring dues give your organization steady income, and impact framing gives members a reason to stay.

Sarika writes for Fluent Forms and loves to offer insights into small businesses. She’s curious and enjoys discussing ideas, interests, and perspectives. In her free time, she’s either marvelling at architectural beauties or trying different cuisines.


Leave a Reply