reCAPTCHA v3 in WordPress: How to Improve the Security?
If you have already read dozens of articles on protecting your online forms from being spammed, tried each of those solutions, and are still facing the issue, Google’s improved reCAPTCHA v3 has got you covered.
Protection from spam is always a concern for any form, and you certainly do not want your form entries loaded with spam. So if you want to use reCAPTCHA v3 in WordPress forms, look no further.
In this article, we are going to introduce you to the new version of reCAPTCHA that Google has to offer. Also, we will walk you through the steps on how to add reCAPTCHA v3 in WordPress forms.
So, without any further delay, let’s get introduced to reCAPTCHA v3.
What is reCAPTCHA v3?
Google reCAPTCHA is a free security solution that protects against fraud and abuse on your website. You can cut down on automated program submissions while still maintaining a user-friendly form experience for “human” users by including reCAPTCHA in your forms.
reCAPTCHA v3 is the new and improved version of Google reCAPTCHA. Unlike reCAPTCHA v2, it never gets in the way of your users submitting a form as it works in the background. Users will no longer have to click through a puzzle, solve a math problem, or read blurred text ever again to submit a form on your website.
That means filling up forms is a more effortless and frictionless process for your users but difficult for bots designed to spam form entries. Let’s see how reCAPTCHA v3 differs from its predecessor, reCAPTCHA v2.
reCAPTCHA v3 vs reCAPTCHA v2
reCAPTCHA v2 asks the users to tick the box that says “I’m not a robot” and may provide an image recognition challenge to the users. On the other side, reCAPTCHA v3 calculates a score in the background based on a user’s actions. The chances that a user is human increases with the score that reCAPTCHA v3 calculates, with 1.0 indicating a probable positive action and 0.0 denoting certainly a bot. When a user’s score falls below a certain level, the webmaster must choose whether to ban, challenge, or take no action.
Now you must be thinking if reCAPTCHA v3 is better than v2. We can’t be 100% certain while answering this. While reCAPTCHA v3 is less bothersome for users than v2, the webmaster has to make difficult decisions about whether to let users through or to challenge or restrict them.
What is Fluent Forms?

Fluent Forms is the most lightweight WordPress form builder plugin with the capacity to give you a great user experience. This drag-and-drop form builder provides so many astounding features to get your work done. Fluent Forms allows you to design a variety of forms. It is also the quickest form builder plugin available on the market right now.
This form builder plugin is now used by more than 500K websites, and the number is continually increasing. Some of the key features of Fluent Forms are:
- 60+ input fields to collect any type of information
- Numeric calculation to create forms with calculators
- Multi-step forms to break long forms into multiple steps
- Conversational forms to provide a better form-filling experience
- Advanced post creation to collect user-generated content
- Conditional logic to show/hide input fields based on user behavior
- Integration with popular payment gateways to collect payments and donations
- Spam protection using hCaptcha, reCAPTCHA, Turnstile, Honeypot, Akismet
- Quiz and survey with advanced scoring
- Advanced form styler to align form with your brand identity
- Custom CSS and JS to create more advanced forms
- Export entries in CSV, Excel, ODS and JSON format
- PDF add-on to turn form submissions into PDF files
- Form scheduling and restriction based on different rules
- Double opt-in confirmation to ensure efficient data collection
- Email notification after form submission
- Conditional confirmation to show confirmation messages based on predefined conditions
- Advanced form validation to accept eligible submissions
- Fully responsive and accessible to ensure inclusivity
- 60+ integrations to expand core functionalities
How to add reCAPTCHA v3 in Fluent Forms
Fluent Forms users can easily set up and add reCAPTCHA v3 in their forms. You need a Site Key and a Secret Key from Google to add reCAPTCHA v3 to your form. Follow the steps below to get the required keys.
Step 1: Getting the API keys
Go to Google reCAPTCHA website to get the API keys.
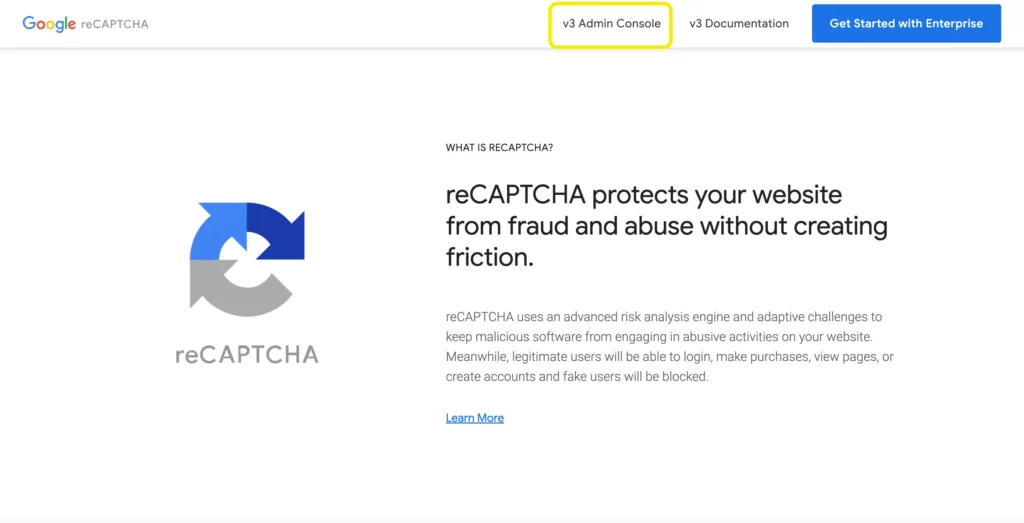
Click on v3 Admin Console to register your website. Here, you have to do the following –
- Provide a label
- Select reCAPTCHA v3 as the reCAPTCHA type
- Enter the domain
- Accept the reCAPTCHA Terms of Service and
- Click on the submit button.
You will be provided with the Site Key and Secret Key on the next page. Copy these API key pairs as you will need them in the next step.
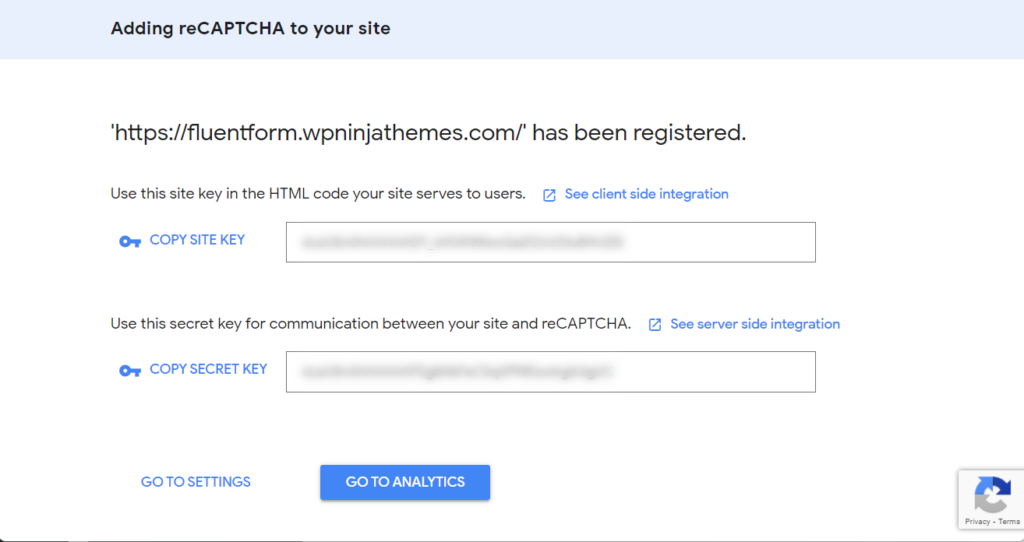
It should be mentioned that the API keys for reCAPTCHA v2 and v3 are different. The v2 API doesn’t work with v3 keys. To get new keys for v3, you have to re-register your websites.
Step 2: Setting up reCAPTCHA with Fluent Forms
The next step is to integrate reCAPTCHA with Fluent Forms. To do that, go to your WordPress dashboard and from the left sidebar, hover over Fluent Forms and go to Global Settings. You will get the Fluent Forms Global Settings window.
From this window, click on reCAPTCHA from the left panel. Select reCAPTCHA version 3 (Invisible reCAPTCHA), paste the Site and Secret Keys provided in the previous step, and click on Save Settings.

You will see a message that says, “Your reCAPTCHA is valid.” Now you are all set to use Google reCAPTCHA v3 in your form.
How to add reCAPTCHA to your form
To add reCAPTCHA to your form, create a new form or edit an old one. After adding the necessary fields, add the reCAPTCHA field from the Advanced Fields section.

Never forget to save the form after editing.
That is it! Your form now has reCAPTCHA v3 added to protect it from spam entries. That is how easy it is to set up and add reCAPTCHA to your form.
Conclusion
Online forms are excellent tools for collecting information, but they may also be used as a doorway by cunning spammers to peddle their unwanted goods or even steal data from your device.
You can do many things to stop spam form submissions, but it’s crucial to remember that no method is 100 percent effective. If you add Google’s invisible reCAPTCHA to your forms, spambots won’t be able to misuse them. It works invisibly, so most people won’t even notice the added security.
Are you ready to give reCAPTCHA’s v3 a try? Adding it to every form you create is a smart and often effective approach to tackling spam. Are you going to give it a shot?
Let us know in the comments section below. Don’t forget to follow us on our social media handles to get more amazing tutorials like this.
12 responses to “reCAPTCHA v3 in WordPress: How to Improve the Security?”
-
I can’t see the reCaptcha v3 on the form. It says it’s added globally but I don’t see it. API key was valid. ??
-
Make sure you added the correct Site Key and Secret Key in the following directory: Global Setting > Security > reCAPTCHA > reCAPTCHA > Version 3 (Invisible reCAPTCHA)
-
-
Como posso alinhar o selo à esquerda?
-
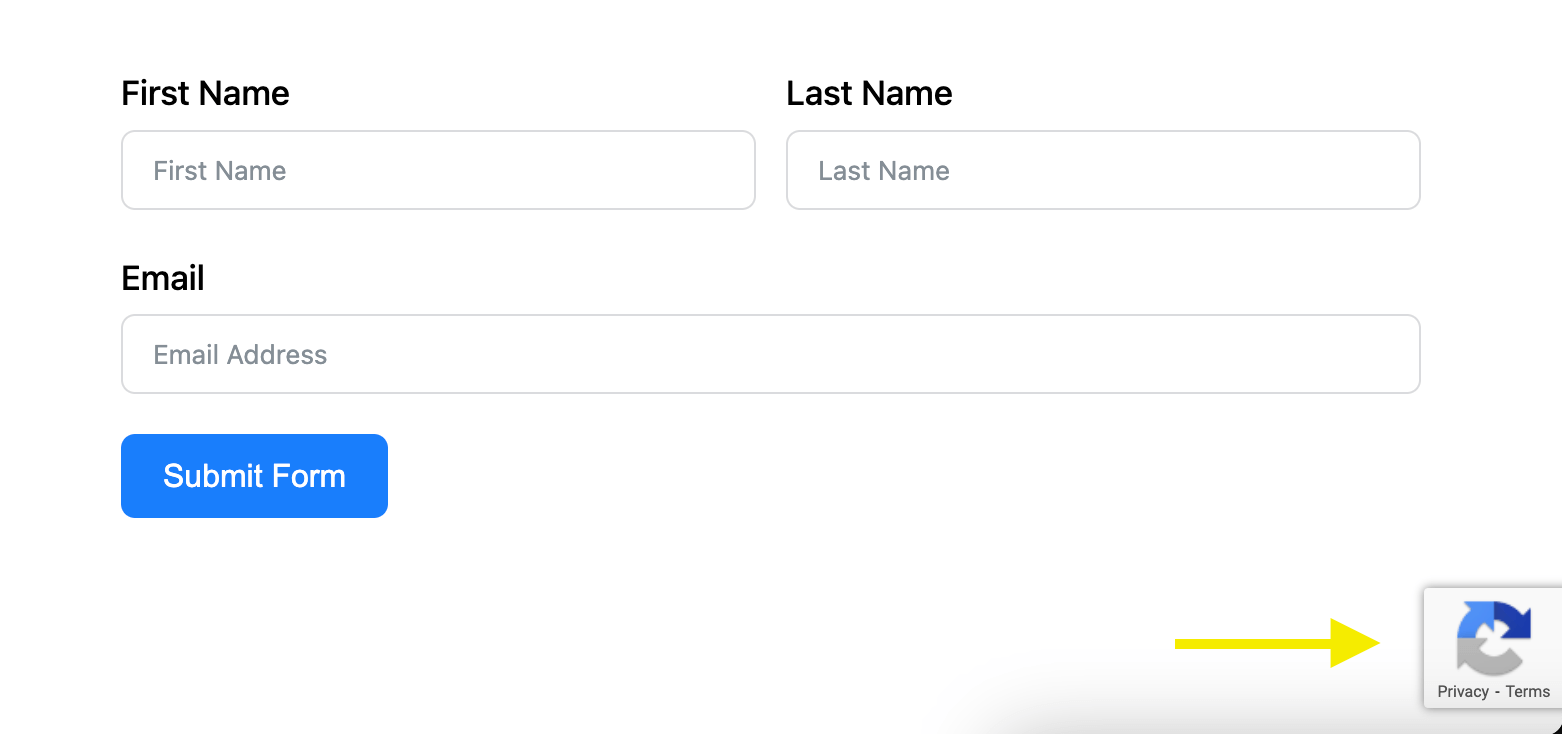
reCAPTCHA v3 is an invisible captcha. Users can not see it in the front-end.
-
-
I would rather hide the Google ‘floating’ badge and put the disclaimer text directly on the form. How can I hide the floating badge?
-
You can hide this using custom CSS. It is not recommended though.
-
-
It doesn’t work for me, it keeps saying is not a valid reCaptcha.
-
Make sure you have used the right API keys.
-
-
Is recaptcha only for pro?
-
reCAPTCHA is also available in the free version of Fluent Forms.
-
i’m using the fluent form recaptcha is not available in free version. it requires an api key for recaptcha.
-
Getting the API keys for reCAPTCHA doesn’t cost you any money. It’s completely free from Google.
-
-
-


Leave a Reply