How to Track WordPress Form Submissions from Facebook Ads Using Meta Pixel

Pouring money into Meta ads without tracking form submissions? That’s not marketing – that’s gambling.
If your small or medium business uses WordPress to collect leads, bookings, or inquiries, you need to know what’s converting – and what’s not. Otherwise, you’re just burning cash on campaigns you can’t measure.
In this tutorial, we’ll show you how to track WordPress form submissions from Facebook ads using Meta Pixel (formerly Facebook Pixel).
Before we begin: What Meta Pixel actually does
Meta Pixel is a tracking tool provided by Facebook (now Meta) that helps you monitor user actions on your website after they click on your ads. It works by placing a small piece of JavaScript code on your site. It allows you to capture specific events, such as form submissions, page views, or purchases.
For businesses collecting leads through forms on WordPress, Meta Pixel is essential to see which ads are generating real conversions, not just clicks. This data helps you optimize campaigns, reduce wasted ad spend, and make informed marketing decisions.
Now, let’s walk you through how to set up Meta Pixel to track form submissions on your website.
Set up Meta Pixel to track form submissions
To accurately track form submissions from your Meta ads, you’ll be using a thank you page and setting up a custom conversion. Follow these simple steps to set up Meta Pixel to track how visitors interact with your forms.
Step 1: Create a dedicated Thank You page
Start by building a separate page that users will land on only after they submit a form. This makes it easier to track actual submissions.
In your WordPress dashboard, go to Pages → Add Page.

Give the page a simple title like “Thanks for Reaching Out”, “Form Submitted”, or something brand-appropriate.
Add a short confirmation message on the page (e.g., “We’ve received your message and will be in touch soon.”).
For the URL slug, use something relevant and easy to remember like /form-submitted or /submission-success. These work well when setting up tracking rules later.

Make sure this newly created page is not indexed by search engines. Because you would want to prevent random traffic or bots from triggering your conversion event and producing misleading data. If you use an SEO plugin, you’ll find a setting called No Index in the page editor that lets you discourage search engines from indexing this page.
Publish the page and copy the URL. You’ll need it in the next steps.
Step 2: Redirect users to that page after form submission
Now, configure your form to send users to the newly created page right after submission.
To do this, go to Fluent Forms → Forms.

Now you will see the list of all the forms you have created using Fluent Forms. Open the Settings of the form you want to track.

You will see the Confirmation Settings section on top of this page.

Select To a Page as the Confirmation Type. Select the page you created in Step 1.

Now click on Save Settings.
From now on, only users who complete the form will land on that page. This makes it an ideal signal for Meta Pixel tracking.
Step 3: Create your Meta Pixel
In this step, we’ll go through the basic process of setting up a Meta Pixel ID. While Meta’s tools can get a bit overwhelming, you only need the basics to start tracking form submissions effectively.
To set up Meta Pixel, go to Ads Manager and log into your business account. If you’re handling more than one ad profile, use the selector at the top corner to switch to the one that’s tied to your website.
Once inside the Ads Manager, go to Events Manager from the left sidebar.

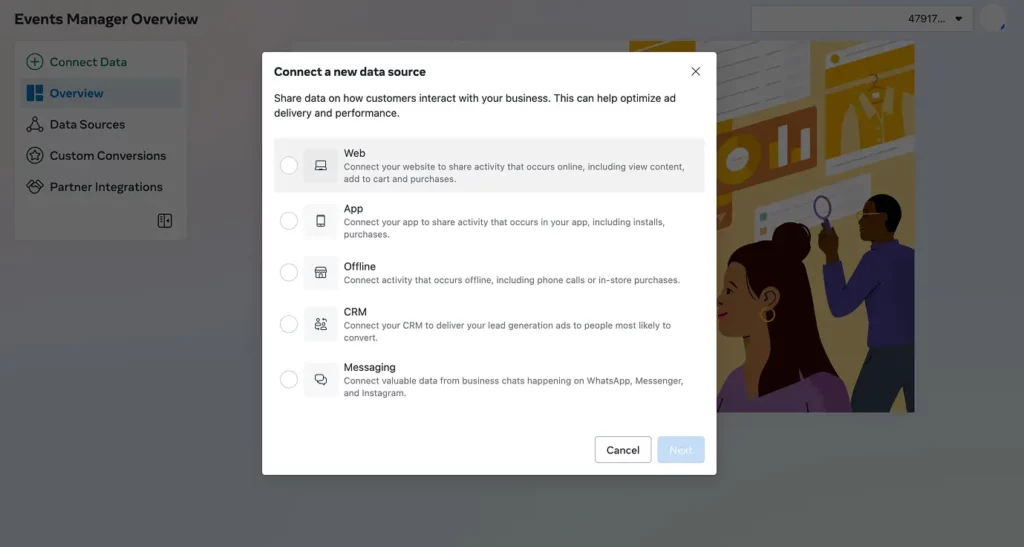
If you haven’t set up tracking before, you won’t see anything here yet. Click Connect data to begin the process.

In the window that appears, you’ll be asked what kind of source you’re connecting. Select Web and proceed by clicking Next.
You’ll now be asked to give your dataset a name. Keep it simple and relevant.
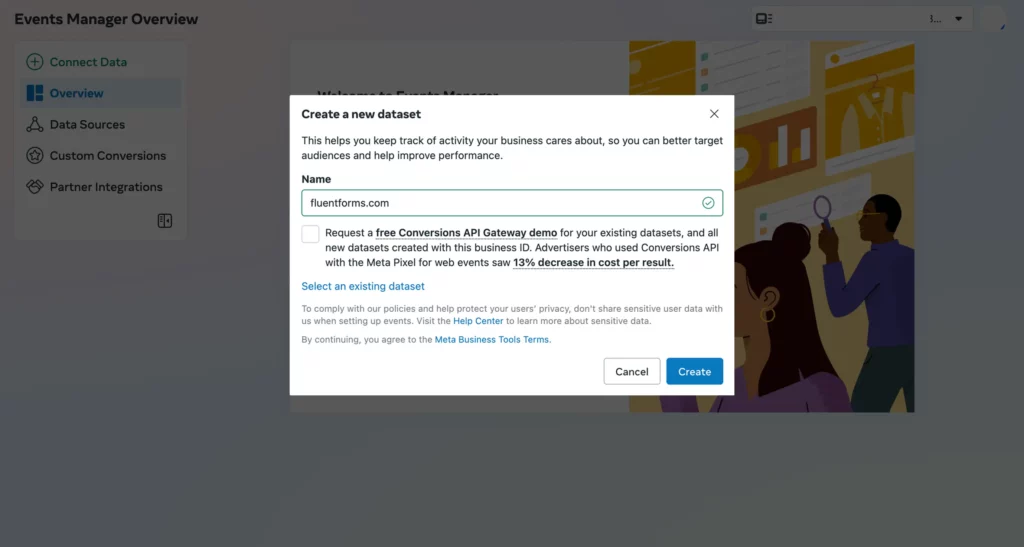
Then select Set up with partner integration and click Next.
Now select WordPress as your integration partner in the following window.
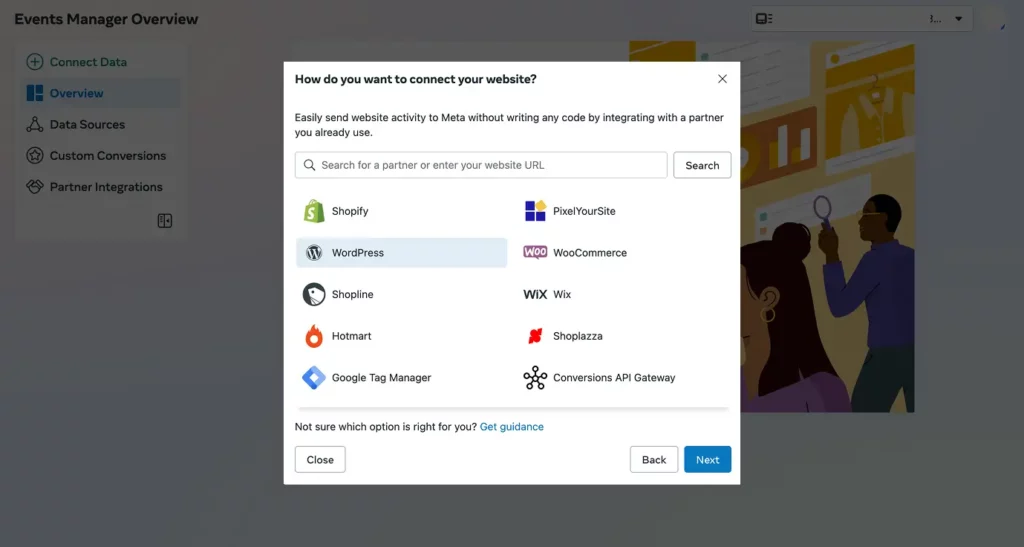
At this point, a guided setup flow will appear. It’ll show you how to add the Pixel to your site.
With your Pixel created, the next step is to connect it to your WordPress site so it can start tracking activity.
Step 4: Add the Meta Pixel to your website
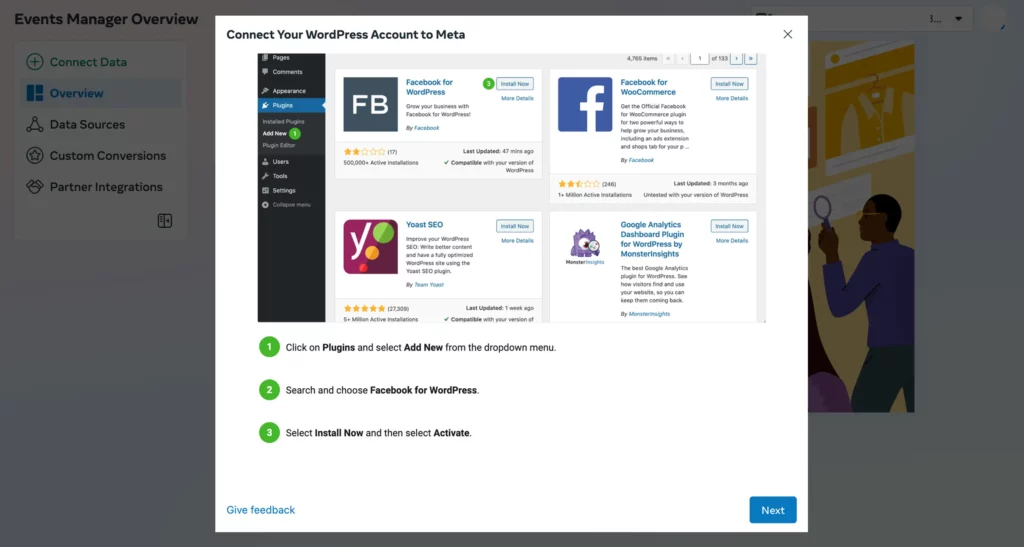
From your WordPress dashboard, go to Plugins → Add Plugin. Type Meta Pixel in the search bar. You’ll see the official Meta pixel for WordPress plugin in the results.
Click Install Now, then hit Activate once it’s installed.

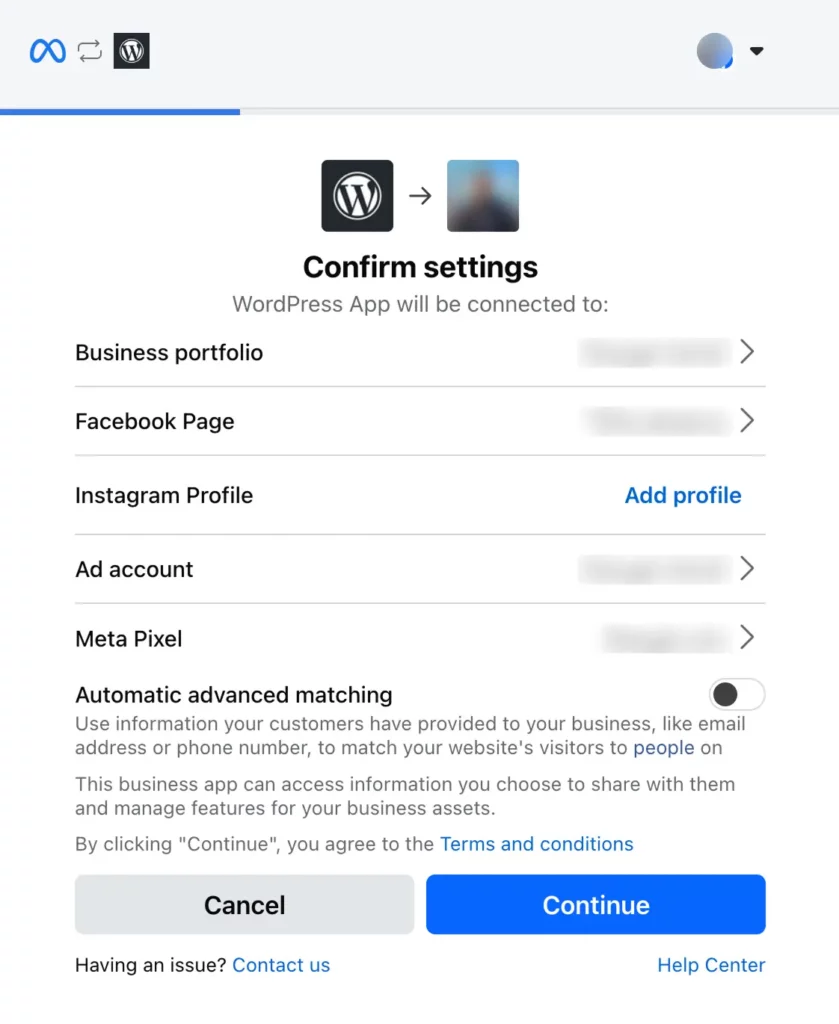
Once the plugin is activated, go to Settings → Meta. You’ll be prompted to log into your Meta Business account.
After logging in, make sure to select the same Business Portfolio used in Step 3. This ensures everything stays in sync. Follow the on-screen steps to confirm the connection between your WordPress site and your Pixel.
After linking your website to the Meta Pixel, it’s important to make sure everything is working as expected.
Go back to the Events Manager window where you left off in step 3. Click on the Send test traffic button.
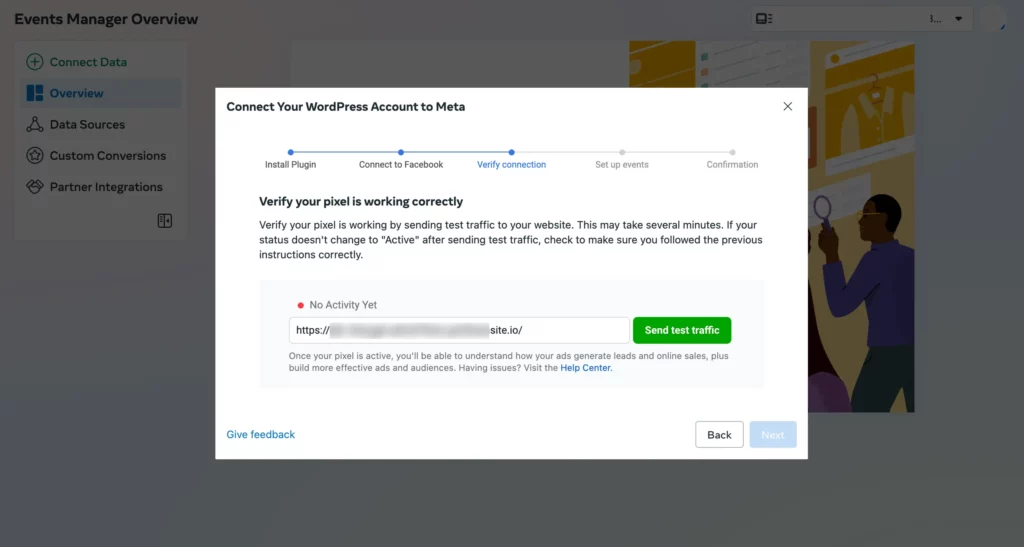
This tells Meta to ping your site and check whether the Pixel is firing correctly. Your website will be opened in a new tab. Submit a form on the website just like a regular user would.
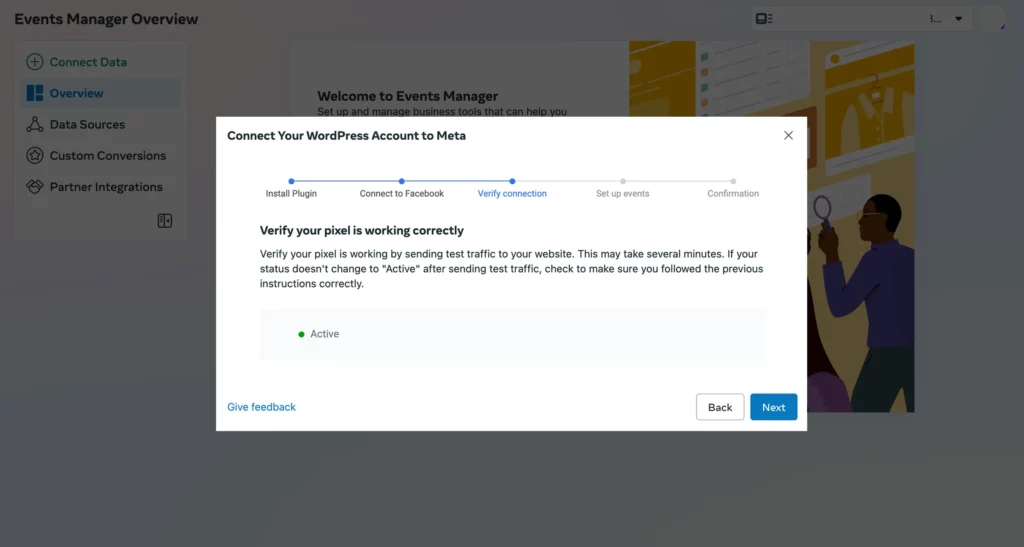
If the connection is set up properly, you’ll see the status in Events Manager switch to Active. That means Meta is now receiving real-time data from your website, and you’re good to move on to tracking actual conversions.
If it doesn’t show as Active, double-check that you followed the previous steps correctly.
Step 5: Track WordPress form submissions from Facebook ads with a custom conversion
Now that the Pixel is live, it’s time to tell Meta exactly what counts as a successful action. In this case, the desired action is a visitor submitting your form and landing on the thank-you page.
Head over to Ads Manager, and open Events Manager. Next, click the Create button and select Create custom conversion.
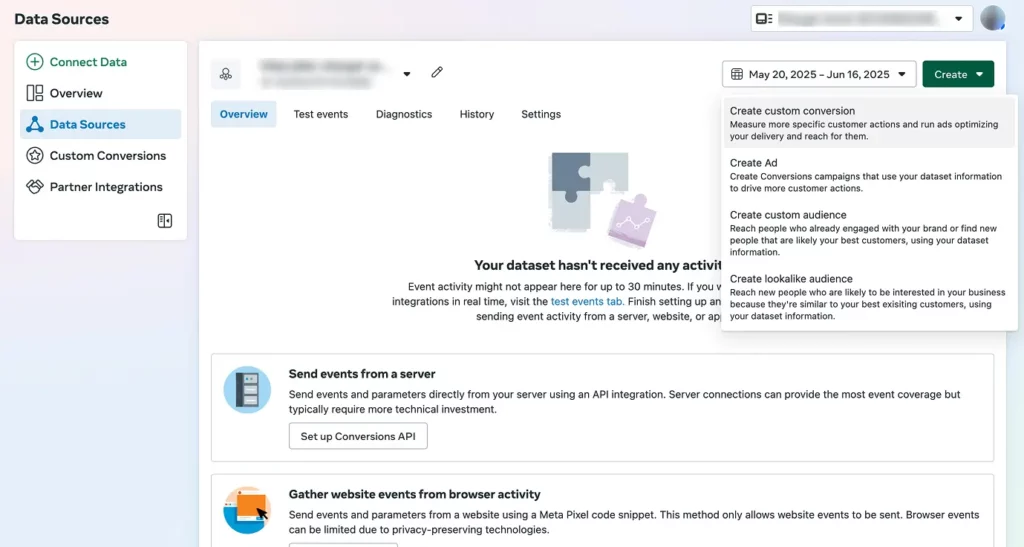
You’ll be prompted to name your conversion. Then choose URL equals and enter the URL of the Thank You page you created in step 1 as the destination. Click Create, and you’re done.
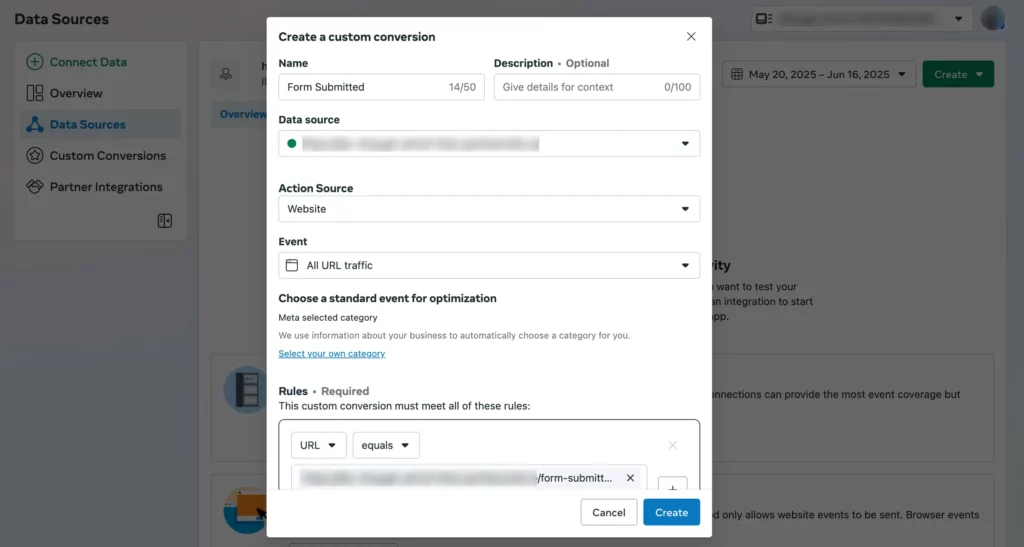
Optionally, if you know what a lead is worth to you, go ahead and assign a value to the conversion.
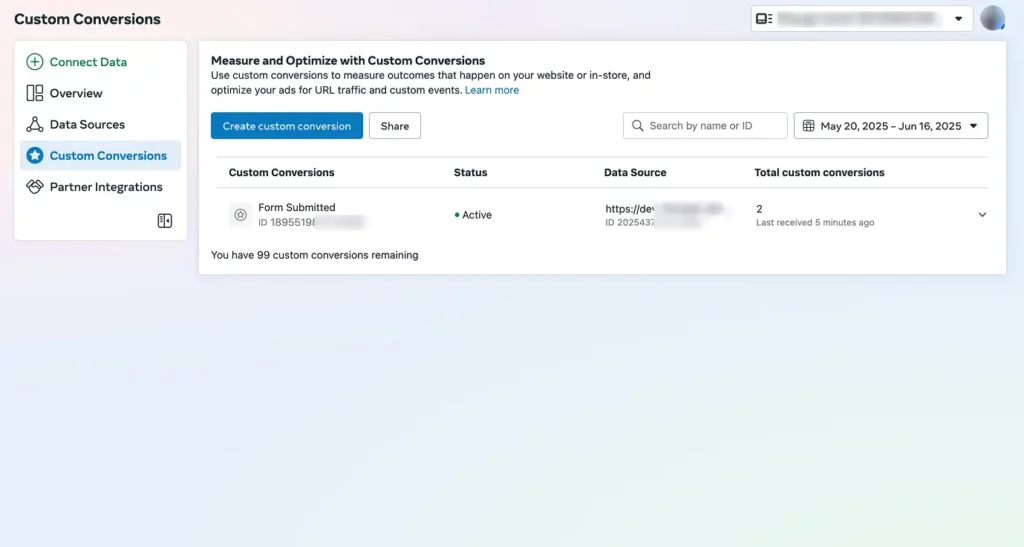
From this point on, the Meta Pixel will log every successful form submission and let you track, analyze, and optimize your campaigns around actual conversions.
What’s next? Boost your form conversions
Great news! Your Pixel is tracking form submissions. Now it’s time to improve what you’re tracking. Here’s where to go from here:
- Not happy with your contact form conversions? Check out 12 proven ways to improve conversion rates.
- Wondering how form layout impacts submissions? Best Form Design Tips for Your Website to Get More Conversions.
- Want to connect form data to Google Analytics via GTM? Here’s your step-by-step guide.
- Interested in seeing exactly where your leads come from? Learn to track UTM and lead source data easily.
- Thinking about funnel optimization? See how building a proper lead-gen funnel can 2x your conversions.
Fix those, and you’ll start seeing real impact from your Meta ads.
Frequently Asked Questions (FAQ)

An Econ major turned into a Digital Marketer by choice. Hello! This is Ashraf and I am here to enlighten you on various WordPress topics and help you make informed decisions.


Leave a Reply