The Ultimate Guide to Using a WordPress PDF Generator for Your Website
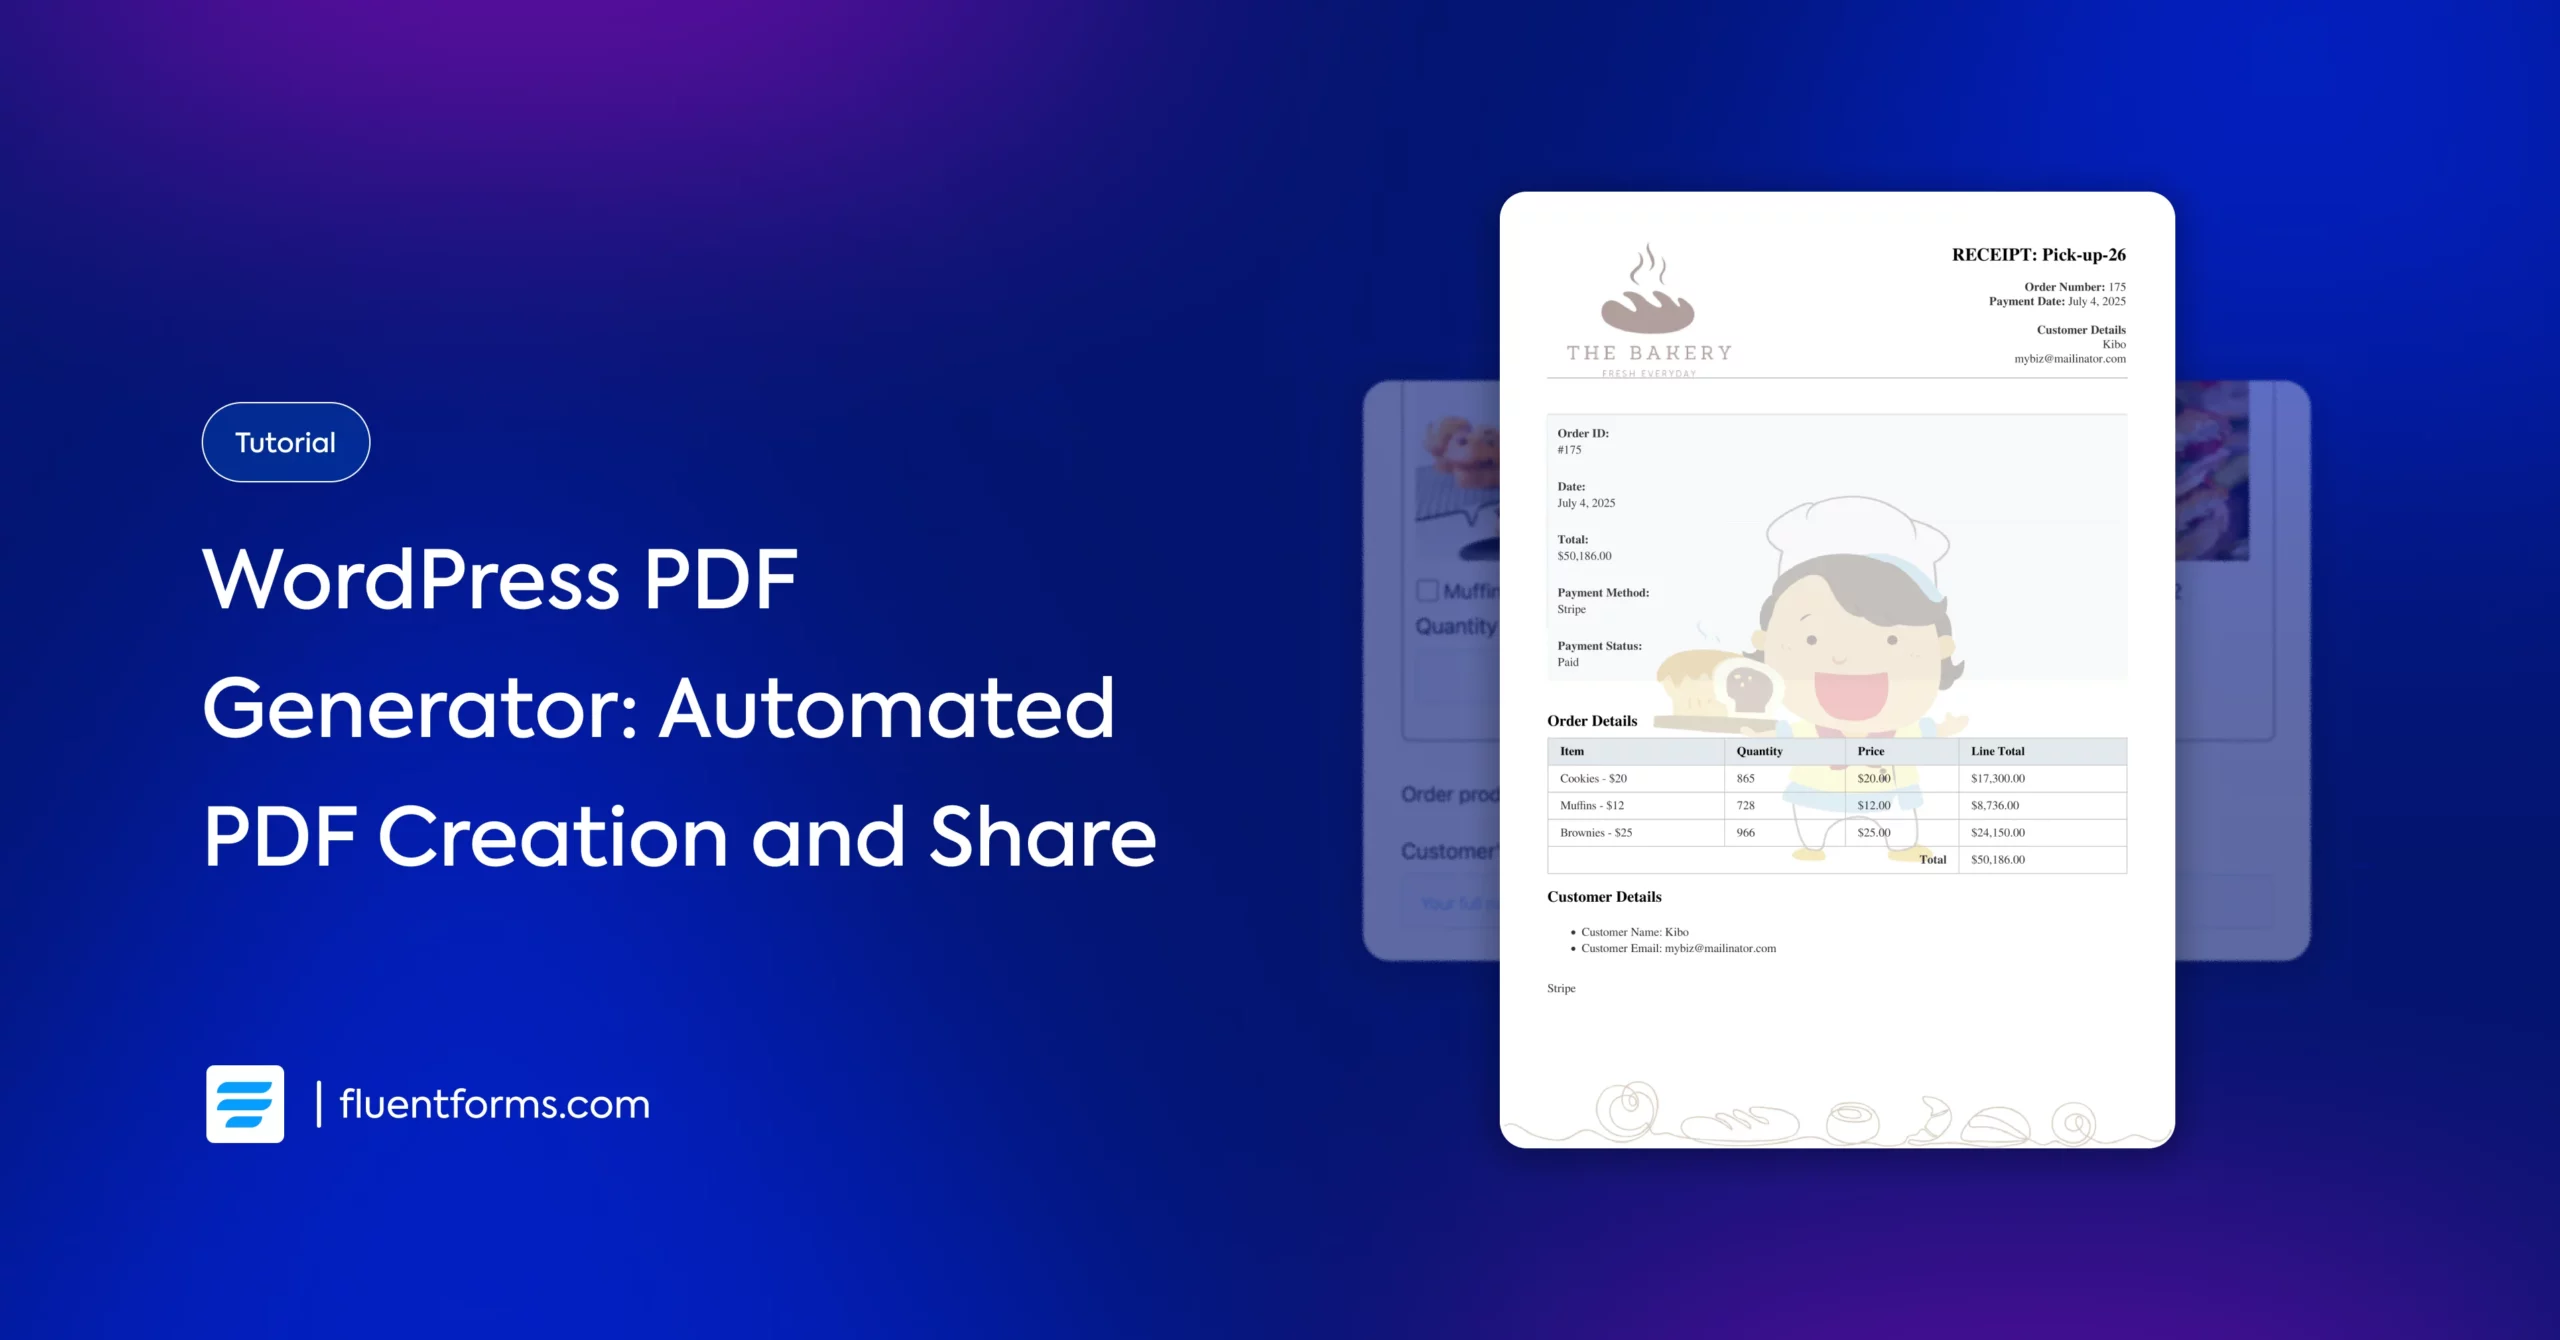
A WordPress PDF generator lets you automatically create professional, downloadable PDFs directly from your website. This ultimately streamlines tasks like invoice creation, ticket generation, ID creation, report generation, summarizing form submissions, etc.
Whether you’re running an e-commerce store, a blog, or a service-based business, a WordPress PDF generator saves time and enhances user experience by automating document creation and sharing. Moreover, you can tailor the PDF documents to match your brand style and other needs.
Let’s explore how a WordPress PDF generator can improve your site’s functionality, boosting efficiency and engagement.
What can you accomplish with a WordPress PDF generator
A WordPress PDF generator primarily helps you organize your form entries by creating a separate PDF feed for each submission. But it’s a lot more than that with all the functionalities it comes with, including:
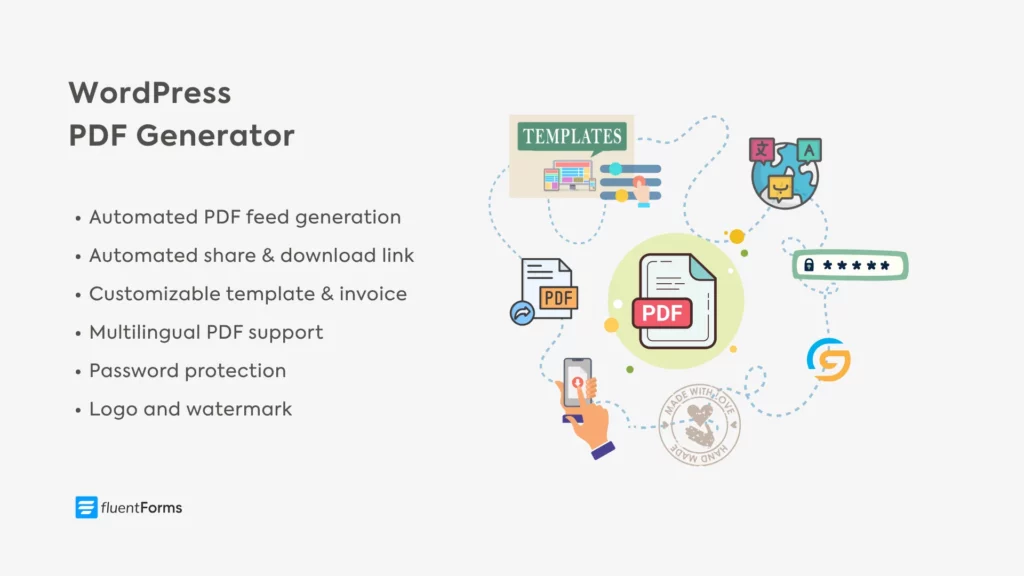
Automated PDF generation: If you create a PDF feed for any form, the PDF generator automatically generates a PDF feed for each submission. You can download all the submissions as PDFs from the form’s entries. This helps you store and manage your submissions locally on your device.
Multilingual support: The WordPress PDF generator supports all languages. This is a great feature if you have a global audience. If your user selects their native language while filling out the form, the feed is also created in that language. What’s more, you can customize the language direction (LTR—left to right or RTL—right to left) to make the PDF feed more intuitive.
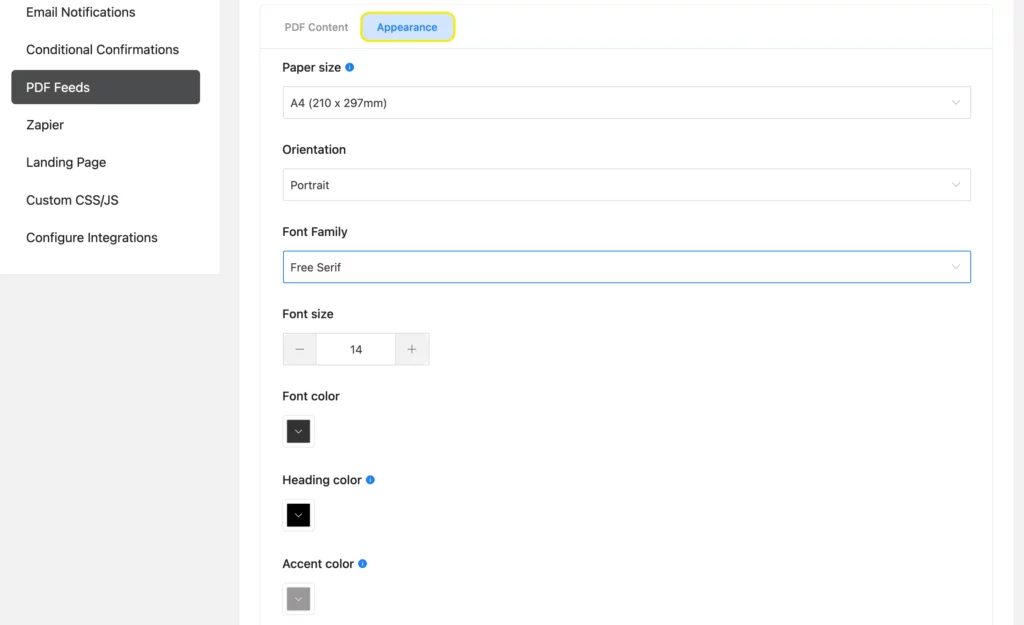
Advanced customization: You can choose a PDF template (general/invoice) and customize it further. You can select the PDF feed’s orientation (portrait/landscape) and choose from the 51 paper sizes (A4, legal, royal, demy, etc.). Moreover, you can customize the feed’s font family, font size, font color, heading color, accent color, etc.
Logo and watermark: You can make the PDF feed more in sync with your brand by adding your logo and watermark. Additionally, you can make the watermark the feed’s background and adjust its opacity to improve readability.
Password protection: You can easily strengthen the security of your PDF feed by protecting it with a password. This way, even if someone gets their hands on the PDF link, they won’t be able to access it without the password you set for the PDF.
Automated summary/invoice sharing: You might have to share the PDF with your stakeholders, team members, or clients. That’s why WordPress PDF generators come with automated share links. You can simply share the shortcode via email or the form’s success message, and the user on the receiving end will automatically receive a download link after submission.
Now that you’ve gotten acquainted with the various purposes a WordPress PDF generator can serve, it’s time you learned how to create and use them effortlessly.
How to set up a WordPress PDF generator
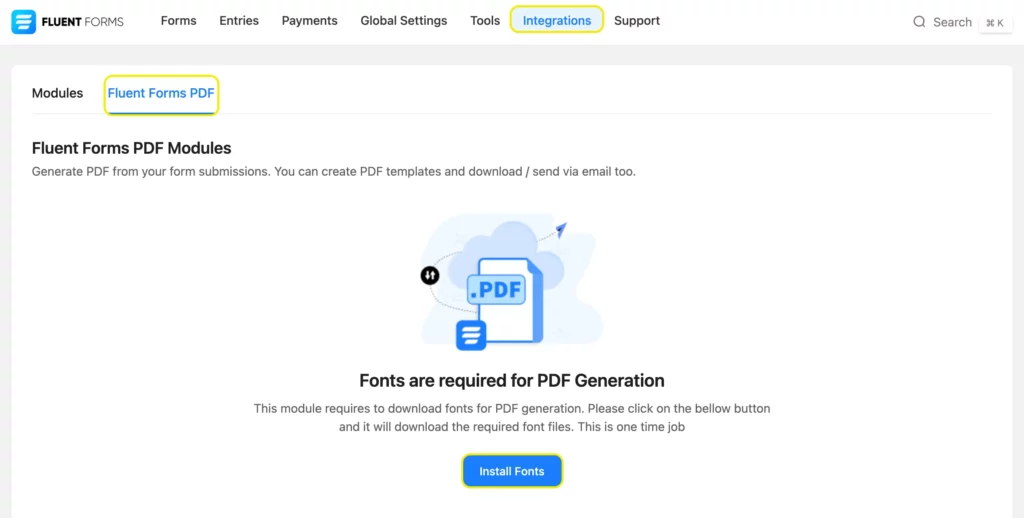
First things first. Download, install, and activate Fluent Forms and Fluent Forms PDF Generator if you haven’t already. Navigate to Fluent Forms PDF from Integrations and click Install Fonts. Don’t interrupt until the process is complete.
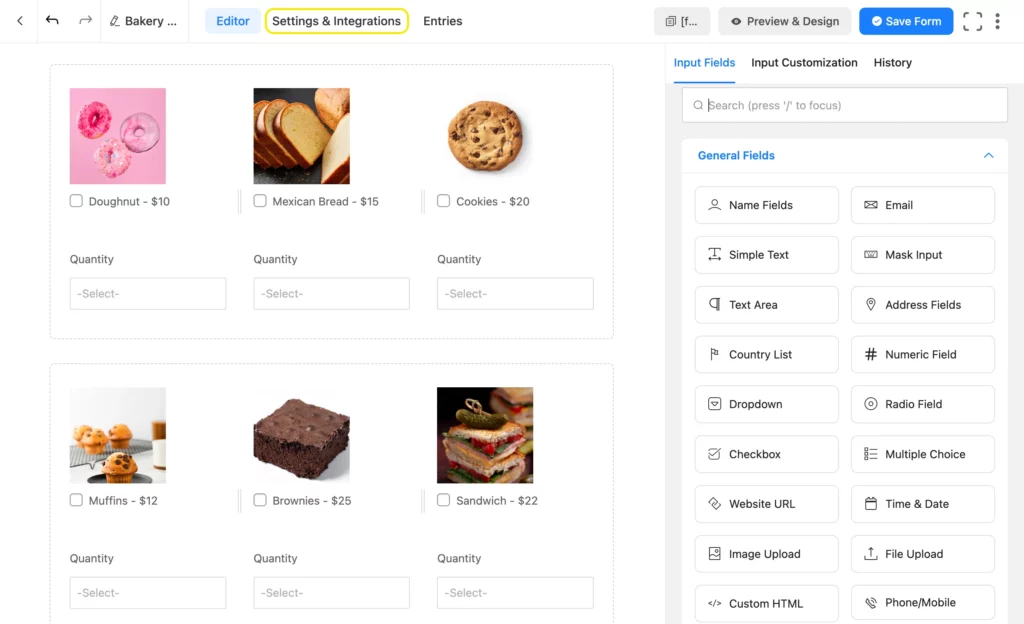
Then create a form with Fluent Forms and save it. If you want to generate a PDF invoice feed, use the payment fields in your form.
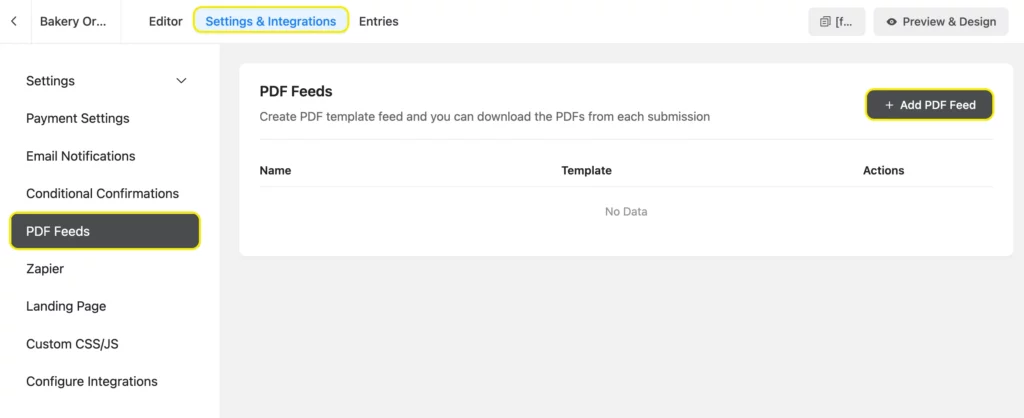
Next, navigate to the settings and integrations of that form you just created.
Navigate to Add PDF Feed from PDF Feeds.
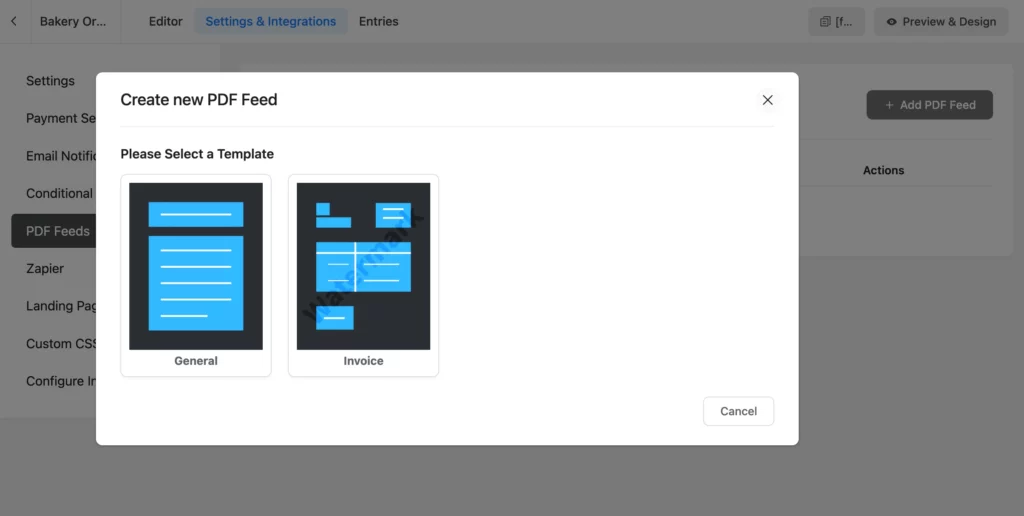
Choose from the templates that pop up on the screen.
Inside, you’ll find different customization options. Set the Feed Title. Upload your logo. Click the dropdown to choose shortcodes for the other fields. Your users’ input for those fields will be shown in the feed. You can select multiple shortcodes for each field.
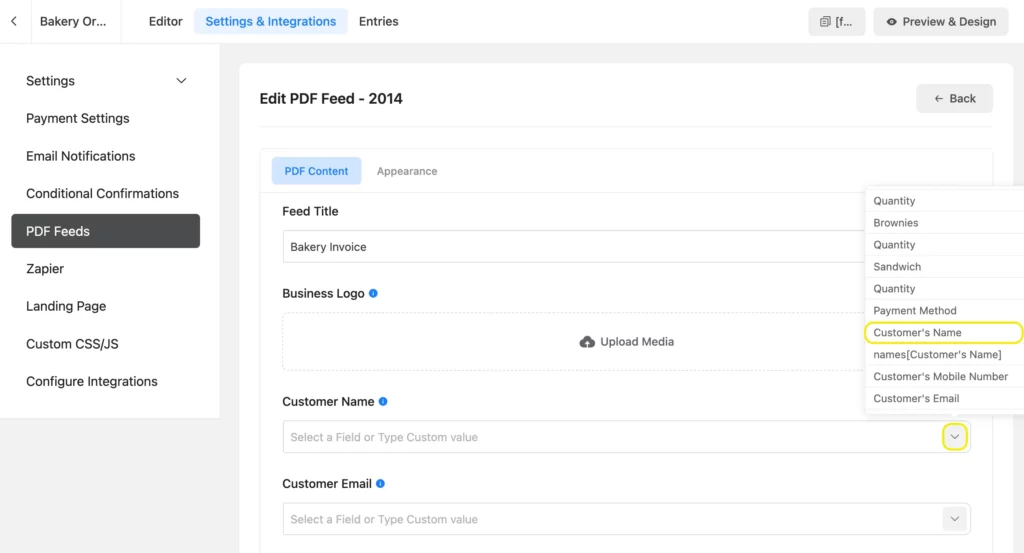
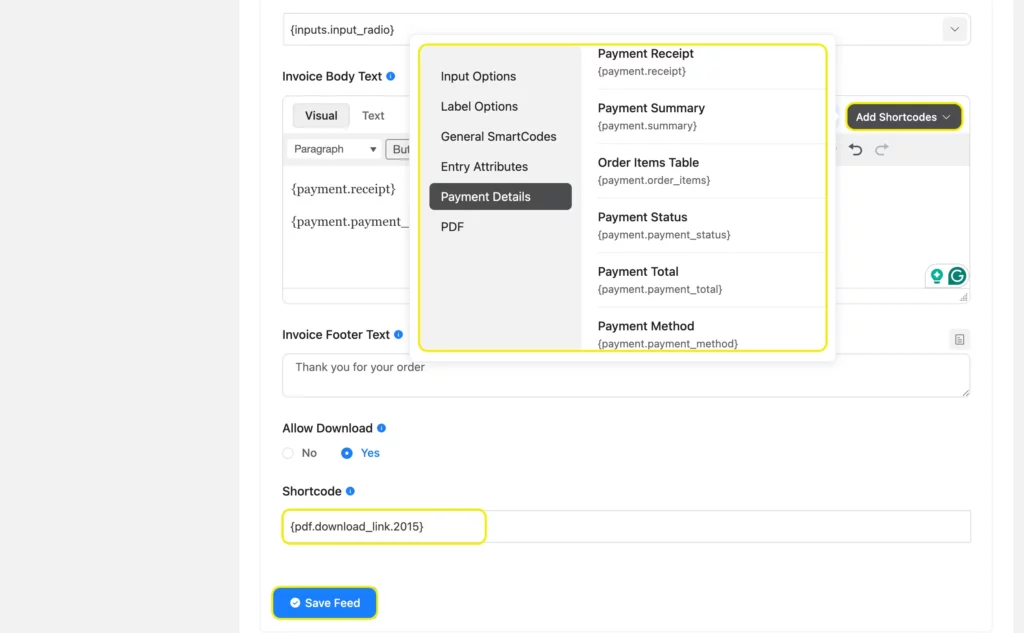
After that, compose the invoice body and footer text. You can choose shortcodes as well. Check out this guide if you want to add conditions to your PDF feed.
Lastly, check “Yes” for Allow Download. Copy the shortcode and save the feed.
In this step, let’s customize the appearance of our invoice. Toggle on the appearance tab and customize paper size, orientation, font family, size, color, etc.
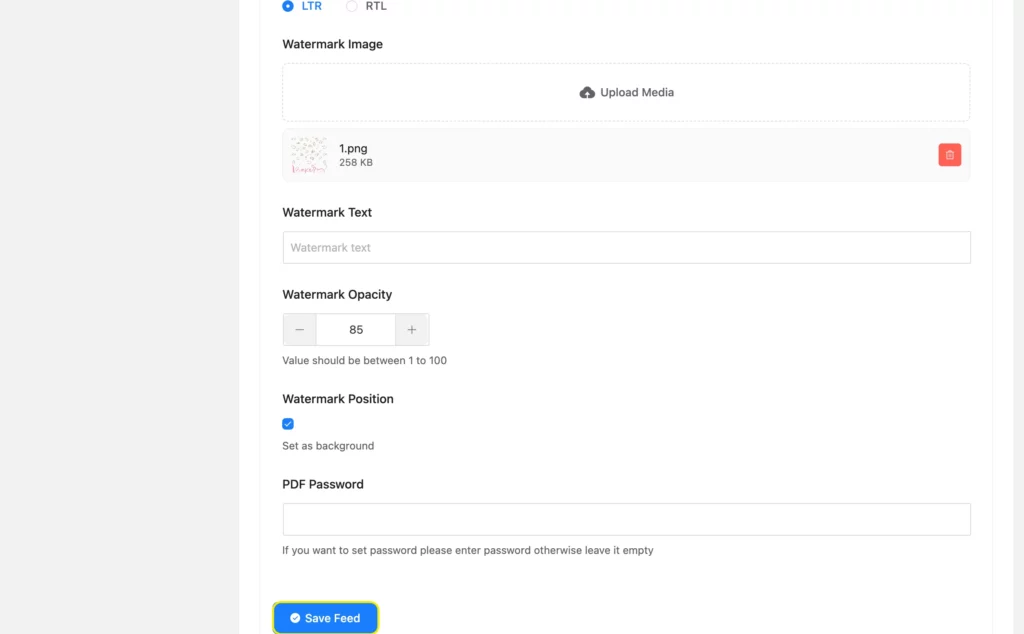
Next, upload the watermark image, add text, and adjust opacity (with 100 being most opaque & 0 being most transparent) and position. Finally, set a PDF password and save the feed.
Our PDF feed is now all set up. Let’s see how easily we can automate the PDF share in the next section.
How to share the PDF feed/invoice
You’ll need to share this invoice with your users. Sometimes, you might receive orders, and you’ll need to share the order summary with your vendors, team members, or stakeholders. Let’s see how we can do that.
Share the PDF feed on the same page as the form
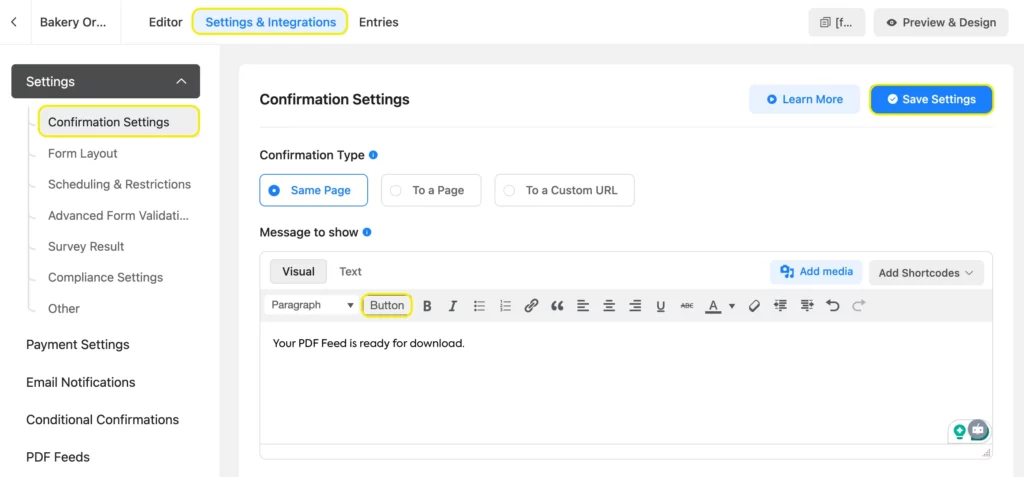
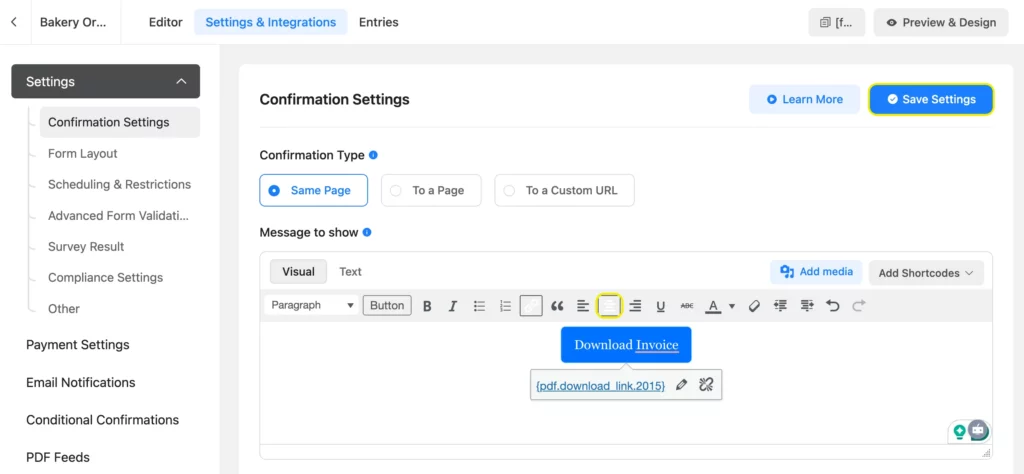
Navigate to your form’s Confirmation Settings from Settings and Integrations. Add any text/media you want, then click Button to create a button.
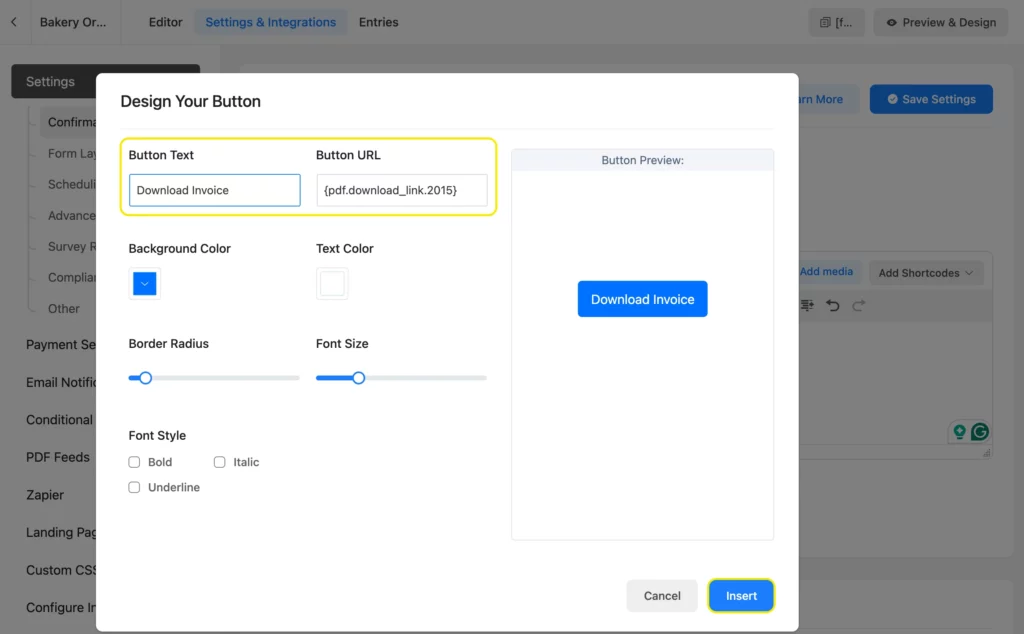
Customize the button text, color, background color, style, etc., and enter the shortcode you copied earlier inside the Button URL. Lastly, click Insert.
Center-align your button and click Save Settings. Now your users will be able to download the invoice.
When a user submits a form, they’ll get a confirmation message like this.
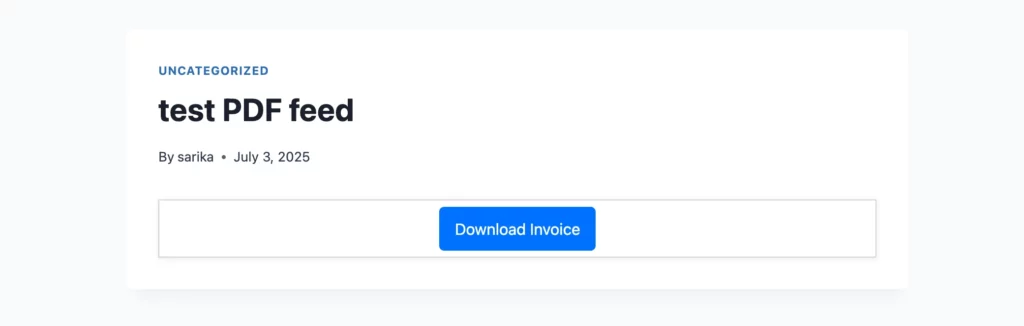
Once they click the button, their invoice/PDF feed will be available for download.
Now let’s see how to send email notifications with PDF attachments to your team or to a customer/user.
Build Smarter Forms for Free

Share PDF feed via email
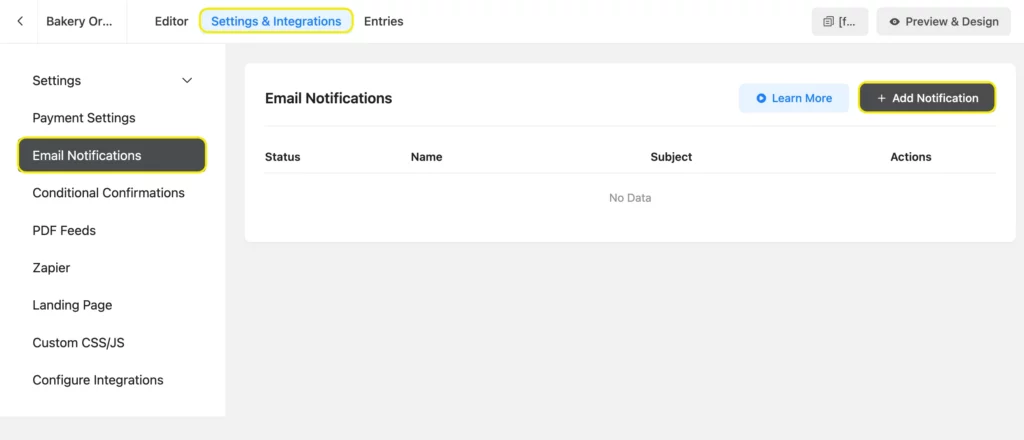
Navigate to Email Notifications from Settings & Integrations and click Add Notification.
Inside the feed, you’ll find a section called Send To. Enter the email addresses of your team members/vendors/stakeholders, etc. Fill out the necessary sections, like email subject and body.
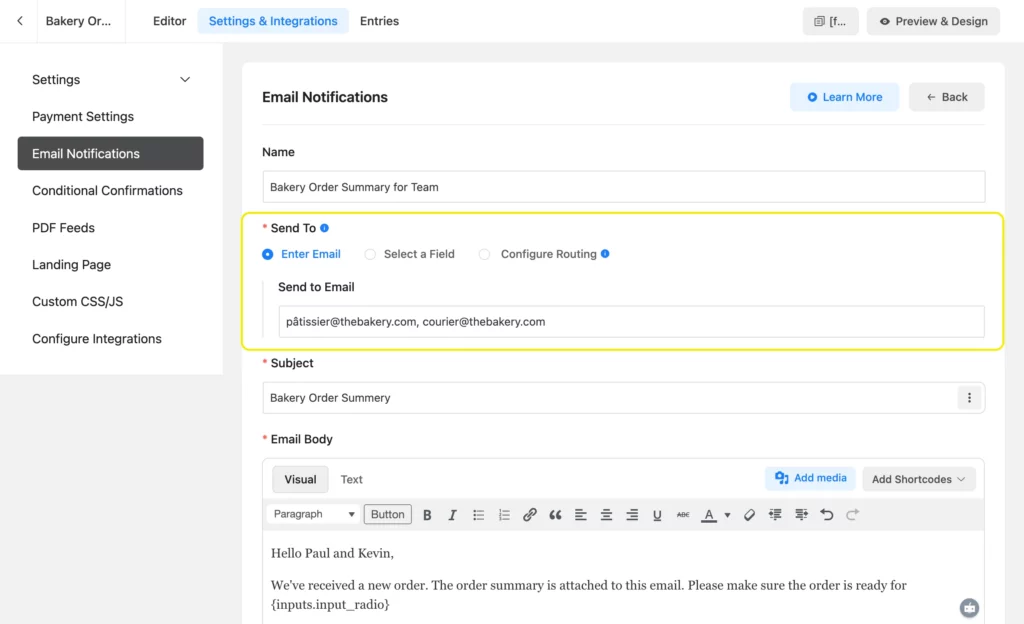
Next, make sure you check the invoice box (or other PDF feeds if you have multiple for the same form). Finally, save the notification. Your selected email accounts will now receive an email with a PDF attachment after each form submission.

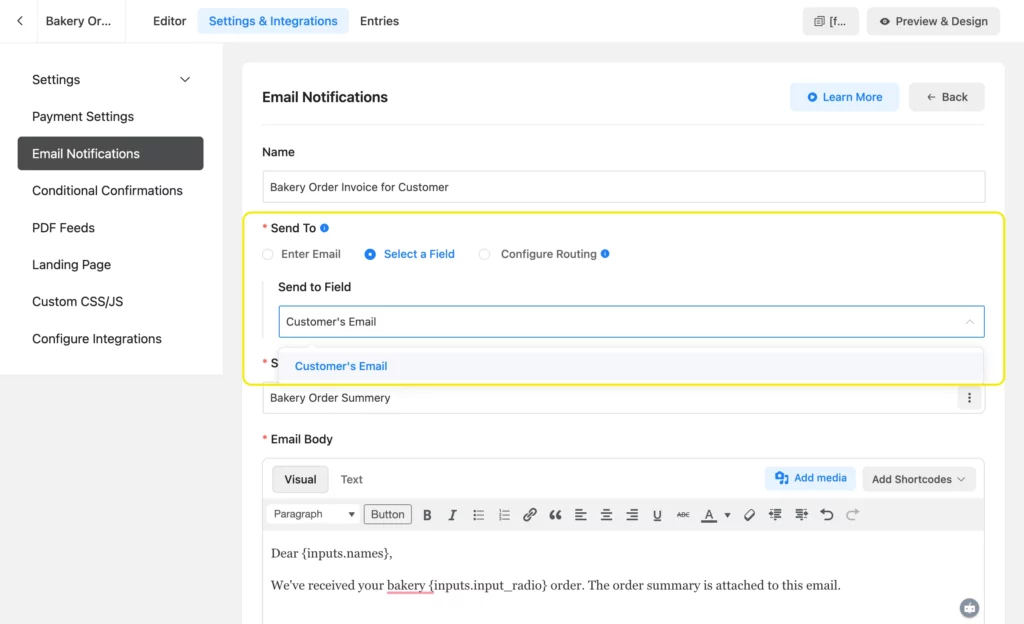
If you want to send the PDF feed/invoice to your customers’ email, create another notification. This time, choose Select a Field under Send To. Select the email field. Repeat the same process with the rest of the notifications and save them.
If you want to make sure your emails don’t end up in users’ spam folders, set up Fluent SMTP. It’s completely free and an amazing tool that ensures email delivery.
If your customer/user enters their email in the form, they’ll receive an email notification with the PDF feed attachment after they submit their form.
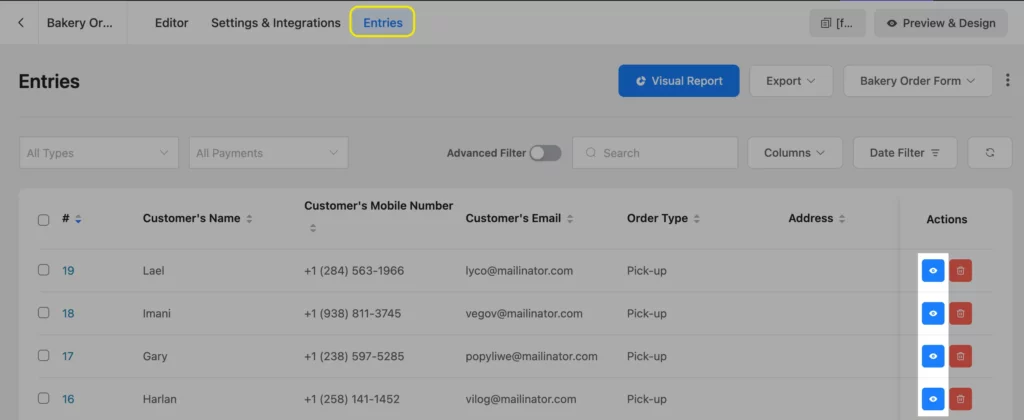
Where will you find the PDF feeds
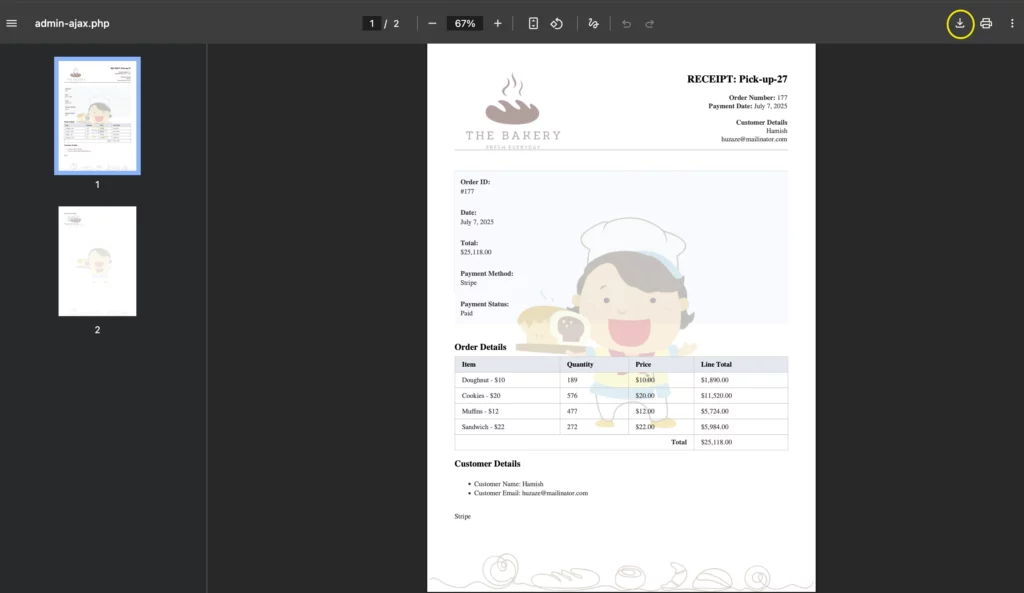
To find the PDF feeds, navigate to your form’s entries. To view the PDF feed of a particular submission, click the eye icon of that row.
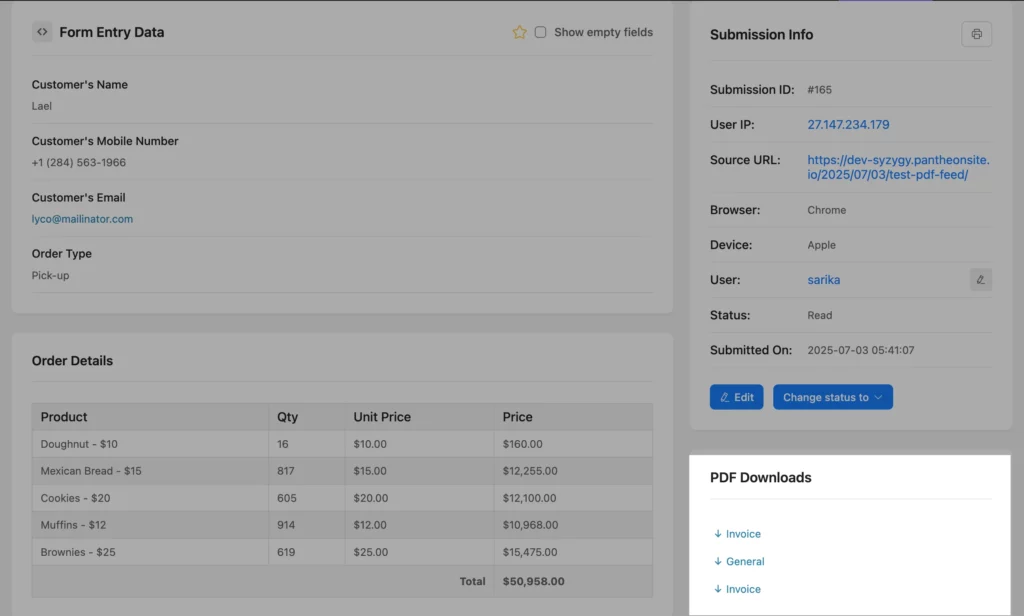
Inside the submission information, you’ll find the PDF feeds in the bottom right corner. Click on a feed to download it.
Now you know everything about creating and using WordPress PDF feeds. Why wait to use this great feature?
Send smart form summaries with PDF feeds
Isn’t a WordPress PDF generator everything you imagined it’d be? With the help of a WordPress PDF generator, you can now generate PDF feeds of any type, customize their style to match your brand, and use multiple languages in them to accommodate your global audience.
What’s more, you don’t even have to lift a finger to send the PDF feeds to their destinations, be they your customer, team member, or vendor. With some simple settings, the feed automatically gets sent to the proper channels immediately after a successful form submission.
Still need help? Don’t hesitate to reach out to us. Oh, and share your experience with others if you use this feature!

Sarika writes for Fluent Forms and loves to offer insights into small businesses. She’s curious and enjoys discussing ideas, interests, and perspectives. In her free time, she’s either marvelling at architectural beauties or trying different cuisines.


Leave a Reply