How to Run WordPress Reporting with Contact Form Entries

Form entries are more than submissions. If analyzed properly, they can help you make better business decisions. All you need to do is scrutinize the data in a cumulative structure.
Whether it’s a simple contact form, lead-generation form, survey, or payment form, each submission contributes to the bigger picture. With the right reporting tool, this scattered data can be collectively used as a summary when interconnected.
In WordPress, form entry management is another name for lead management. All you need is a visually and numerically convertible reporting dashboard based on contact form entries.
In this article, I’ll show you the scope of form entry reporting on WordPress in the simplest and most effective ways.
TL;DR
- Form entries on WordPress can be analyzed to understand submission patterns and form performance
- A reporting dashboard helps in using raw entries in visual summaries
- You can filter the reports by form type or specific date range that shows the completion rate, top countries, timing, etc
- You can get the payment forms’ report by the data of paid, pending, or completed payments
- In WordPress, a form plugin like Fluent Forms provides you with the ultimate form entry reporting, along with different file formats
WordPress reporting based on form entries: how it works
Managing the form entries starts with creating forms on a WordPress site. When you build a form on your WordPress site, users submit their outputs, and it automatically gets stored in a specific space when you use a form plugin such as Fluent Forms.
Every entry stands alone at the backend of your form builder, using which you can access the submission data individually, whether it’s users’ emails or the number of submissions. Especially, when your form plugin possesses a built-in reporting dashboard, you will get the data in a visual format, and even tailored dates are also accessible.
Why do you need WordPress Reporting on your website
The significance of form entry reports depends on the purpose for which you are collecting form submissions. If your forms focus on lead generation, you need tailored reports more. Because a bunch of unorganized data doesn’t make sense in terms of qualified lead generation.
Suppose you have a survey form on your WordPress site and you want to get the submission summary frequently, to know whether you need to make changes based on the performance. That’s why you need a customized form entry report based on a single form or a bulk amount of forms.
Similarly, you require reports for checking the form abandonment rate. In a nutshell, there are a few reasons why you need a reporting dashboard on your WordPress site.
- Checking and improving a form’s performance
- Deleting the unnecessary forms
- Make changes by form customization
- Reducing form abandonment
- Get the payment summary
- Get visual reports for better understanding and presentation
Steps to conduct WordPress reporting using the reporting dashboard
When you use a complete form plugin like Fluent Forms, you get an overall form-building and distributing experience. With Fluent Forms, you will get an overview of submission-based or payment-centric reports on the built-in reporting dashboard.
There are three formats of reports available in Fluent Forms Reports:
- Overview
- Payments
- Submissions
Let’s check the Overview section at a glance.
- You can get the total submissions, spam submissions, or unread submissions report. The overview chart gives you date-based reports while detecting the top-performing forms and countries users are submitting to.
- The visual reporting can be scanned in a minute, no matter how many form entries you already have. Here, you will get a submission timeline pattern that helps you customize the forms accordingly.
- You will get the completion rates based on the partial entry forms and a PDF download to use for various purposes.
So, while talking about WordPress reporting based on the form entries, the Reporting Dashboard of Fluent Forms is a standard as it contains all aspects of form reporting altogether.
You can get the report based on all forms or a specific form.
You can also get the reports of all payments conducted on your site using various payment options included in Fluent Forms.
Let’s check the payment section at a glance.
In the payment section of the reports, you will get the summary of payments based on the dates and/or specific forms. It shows the total paid, pending, refunded, and revenue. You can see both one-time and recurring payments.
Let’s check the submissions section now.
Firstly, you can see the total submissions along with a growth indicator. While displaying the read, unread, spam, and thrashed items, you can also see the overall read rate. The graph and chart give you a visual sense of the forms’ positions, and you can also sort them by form.
WordPress reporting from Fluent Forms reports section
Step 1: install Fluent Forms, create forms, and publish
Here, you will get a step-by-step guide on how you can get your WordPress website visual reporting based on the form entries.
It’s needless to say that, first of all, you have to install a form plugin so that you can publish forms on your website and get submissions from users.
We will lead you to the steps considering Fluent Forms as your primary form builder. Actions may vary if you use other plugins.
Firstly, you need to build forms with Fluent Forms and publish them on your website.
Try Fluent Forms for free
600,000+ businesses and marketers use Fluent Forms to contact their audiences every month.
Step 1: go to the reports on Fluent Forms
Simply click on the ‘Reports’ section of Fluent Forms and you will on to the overview page.
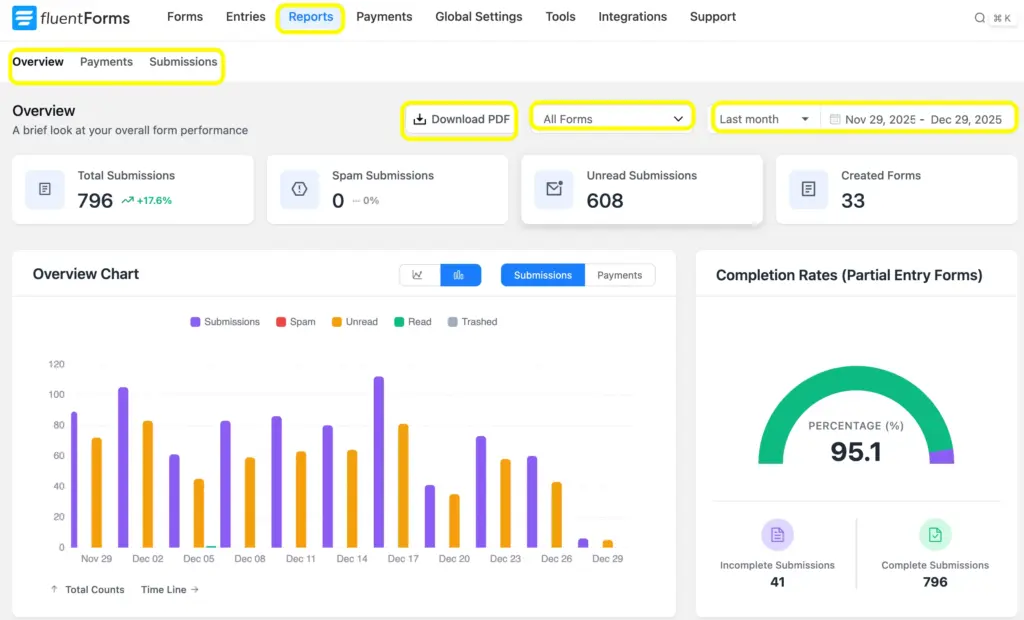
As you see, you can download the PDF, choose a specific form, and get reports based on dates as well. As said earlier, it gives the overview, including the total, spam, and unread submissions. On the right side, you can see the completion rate.
Step 2: tailor the report
You can get the customized reports based on your needs, whether you want the report of a specific form or you need a report of a specific period of time.
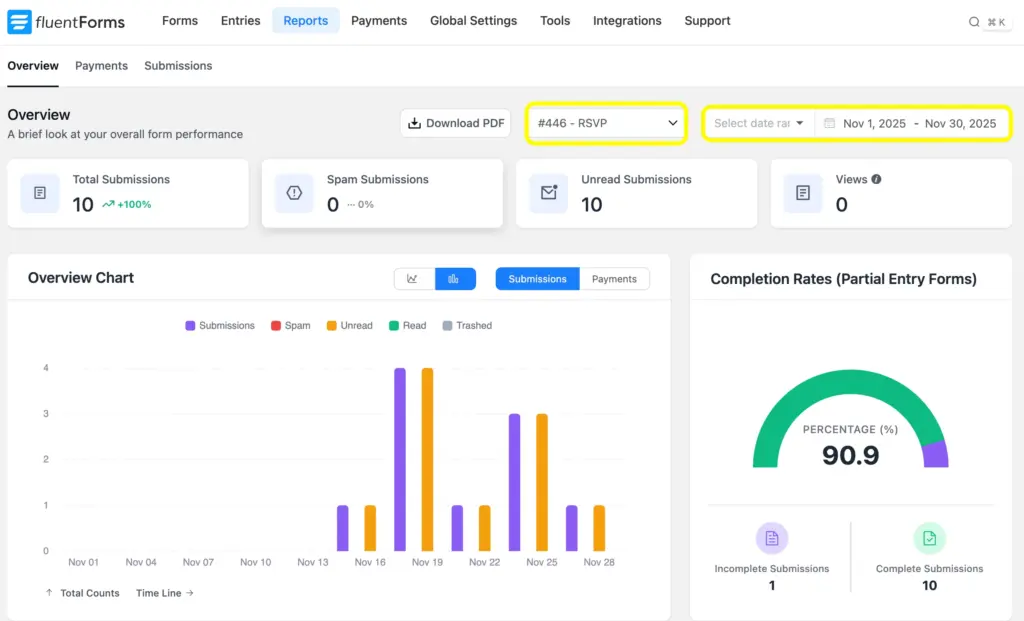
As you see, here I’ve got the report of a specific (RSVP) form and customized the date(yellow marked).
Step 3: checking the payment reports
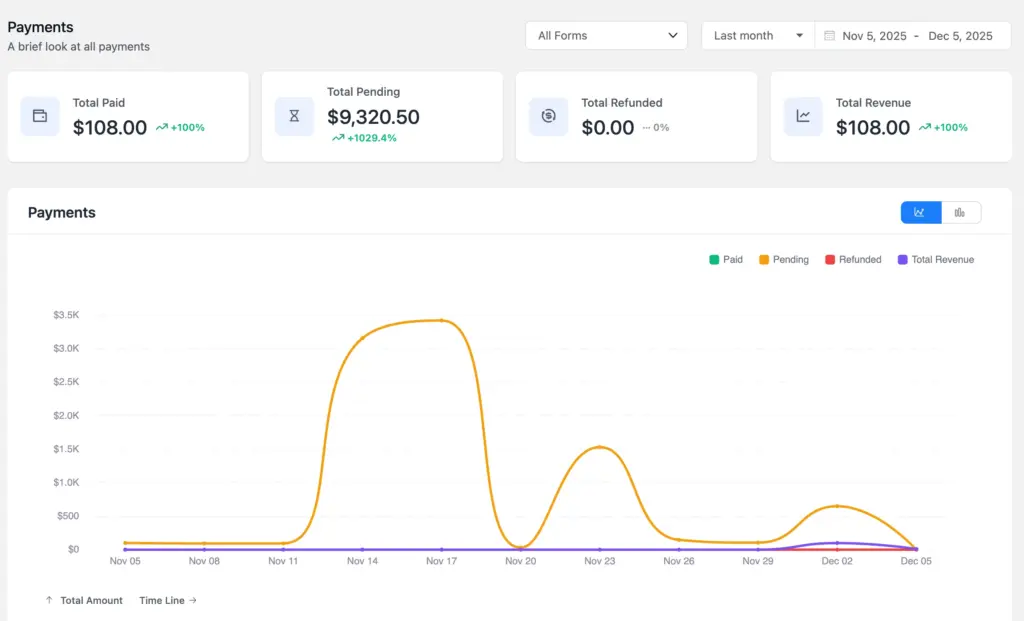
Here, you just need to click on the payment, which will take you to a new page where you will get a visual summary of all payments.
You can also get the calculated summary of both one-time and recurring payments:

You can also get the payment analysis at the bottom:

Step 4: download the PDF
With Fluent Forms, you can download the PDF to get the overview report at a glance in a structured view. Just click on the Download PDF button and get the report in PDF format.

Note: You need to install the Fluent Forms PDF add-on to download a PDF from the reports.
WordPress visual reporting from Fluent Forms entries section
Besides the reporting dashboard, you can access the reports through the Entries button in Fluent Forms. Here you can get the visual reporting asd well.
Step 1: go to the entries and choose your format
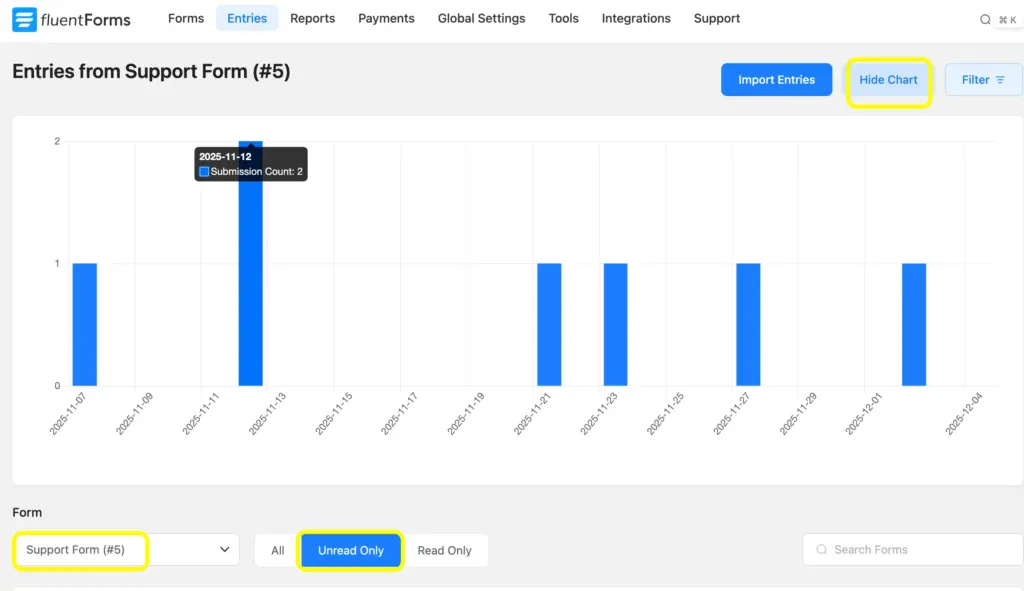
You can check the entries by clicking on the Entries button on Fluent Forms. Here, you can select the form from the top left corner, and choose whether you want to get reports of the read or the unread forms.
You can also search forms from the top right corner.
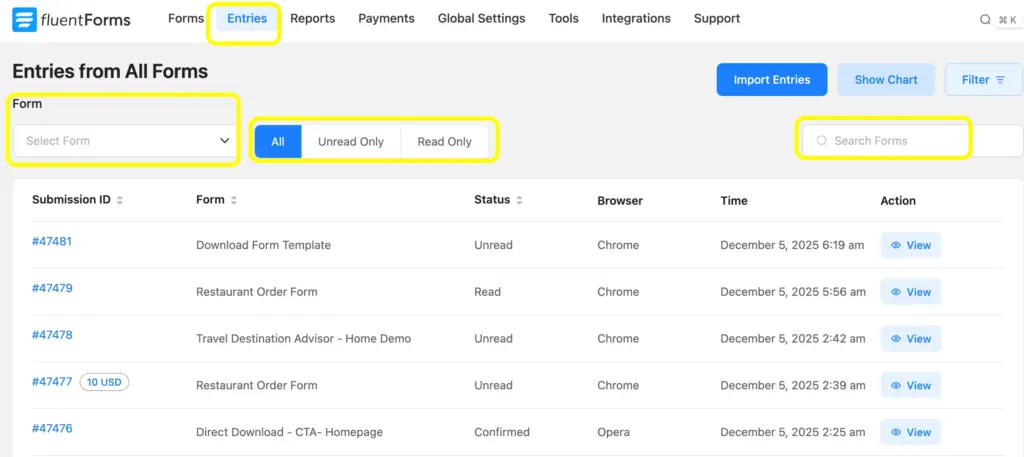
Step 2: show chart, get form-based reports
You can find the form entries report as a chart, where you can also select a specific form and choose whether you want to check the read or unread ones.
Step 3: import entries
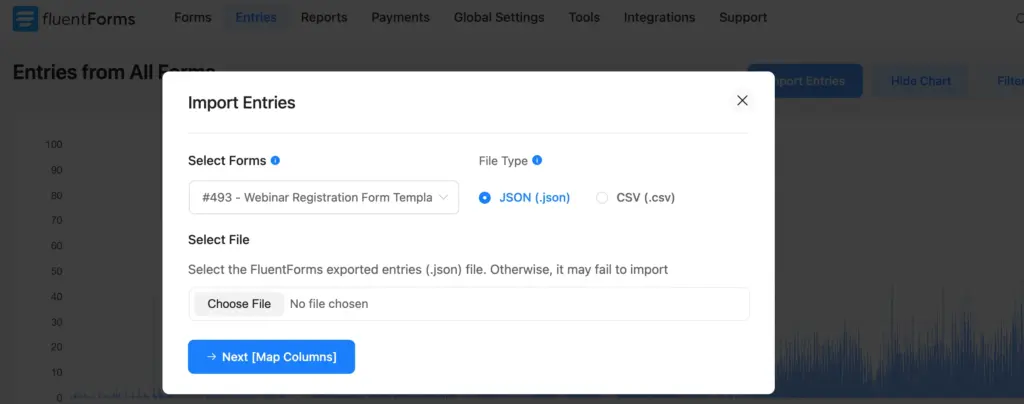
At the top of the page, you will see a button labeled ‘import Entries’ that you can use to get the entries in JSON or CSV format.
So, these are the simplest and most effective ways how you can get your WordPress reporting with contact form entries, in a numeric as well as visual format.
Related features
Email Summaries
Get email summaries for all submissions of your website’s forms made using Fluent Forms and decide which submissions to check out in detail. It provides you with a customized end-to-end communicative approach with the users.
Role Manager
Create and manage forms with your team by using the Role Manager feature of Fluent Forms. Provide access to your teammates as Editor, Author, and Contributor. To implement this, simply go to the Global Settings and hit the Managers option.





Leave a Reply