How to Create an RSVP Form for Your Big Event

Think you are going to host a big event and tackle a huge crowd. It’s not only the number of guests, but also about space management, parking slot arrangement, budget, and overall organizing hassles that majorly come from the confirmation provided by the guests.
In that case, a well-explained RSVP form allows you to eliminate the guesswork and gain an overview of the number of guests and other relevant details, such as a confirmation code.
If the RSVP form is properly distributed to the expected guests, you will first receive the numbers, and secondly, every preference you intend to implement. And a fact that, an RSVP form gives the clearance from your side in some aspects, such as where you are going to park, arranging food according to preference, or allowing guests of guests, etc.
In this blog, I’ll show you how to create an RSVP form using a WordPress contact form plugin and which top fields you should use. Follow this RSVP form tutorial to build an efficient form that eliminates friction and increases attendance.
TL;DR
- An RSVP form is built to get the response from the invitees to know whether they will attend the event or not, and to get a proper headcount of the total number of guests
- In an RSVP form, the host can also get an idea about whether the guests need space for parking, will take other guests with them, or have any food preference
- RSVP helps a lot in big events like weddings, concerts, and sports events
- In WordPress, you will need a form builder, such as Fluent Forms, to build an RSVP form
- Name, email, checkbox, radio field, etc., are the most commonly used form fields for an RSVP
What is an RSVP form and when does it help
RSVP is an abbreviation of the French phrase ‘répondez s’il vous plaît’, which means ‘please respond’. Essentially, it’s a form to gather a response from the invitees, confirming their attendance.
An RSVP form helps the host get the headcount and arrange an event with a perfect estimation, whereas invitees get the option to inform the host whether they are attending or not. Mostly, it has a deadline to complete, so the host gets the ideation before the beginning of the final arrangement of an event.
Hosts look for responses given in an RSVP form in many big events, such as:
- Weddings, birthdays, and anniversaries
- Reunion and concert
- Sports and cultural events
- Corporate conferences, workshops, and seminars
Top fields to build an Event RSVP form
An RSVP form is typically set with a limited number of form fields, depending on the extent of queries. The form typically gets elaborated when you want to get detailed or conditional responses from the audience.
Several fields are consistently visible in all types of RSVPs.
Name, email, and phone number
Name and email are very basic for an RSVP, whereas a phone number has a further impact when you want to talk to the invitee in case there are any changes to the schedule, or something similar. Hosts often use this to convince or reconfirm with invitees who responded ‘maybe’.
Checkbox, dropdown, and radio field
These fields submit faster, while providing users with selected options to choose from, thereby avoiding confusion.
Multi-column container
This field type helps you accumulate similar questions in one field rather than having different fields. It makes shows relevance and saves time.
Form step and section break
Form step helps keep up the engagement when the form is long. A section break allows you to divide the parts and give a title and description clarifying facts or conditions.
Simple text or rich text
When you want to hear a few words from the invitees, a small space for a simple text is enough. And, if you want some complex answers, such as ‘tell us about the presentation of your project’, you will need a rich text input field.
Save and resume
It’s very important for an RSVP form, especially when someone is not sure about their attendance at the party and doesn’t want to provide a yes/no answer immediately. Here, you can provide a ‘not sure’ option, and get the partial response through a save and resume option. As you have the contact info from the saved but not submitted form, you can contact them before finalizing the headcount.
Payment Fields
List the payment fileds, if some one want to collect successful payment in their RSVP forms how Fluent Forms can help, list all payment integrations and link to the pages. Also mention Fluent Forms Stripe Payment in free (like booking Form blog)
Bonus Fields
You can use space-saving fields, such as accordions/tabs, to make each section get packed in a single button and appear when users click on it. Only the relevant section’s fields with appear and the other section’s title will be displayed as well. Fluent Forms’ accordion and tab features help you make your long WordPress forms concise, with a better UI.
Steps to create an RSVP form on WordPress
First of all, you need a WordPress form plugin to build an RSVP form, preferably a drag-and-drop one like Fluent Forms. If not installed, you can install Fluent Forms from the WordPress repository.
Fluent Forms allows you to create any kind of form in multiple ways. You can simply choose a template, create using AI, or create a new blank form, while also accessing a conversational form format.
Step 1: create a new form
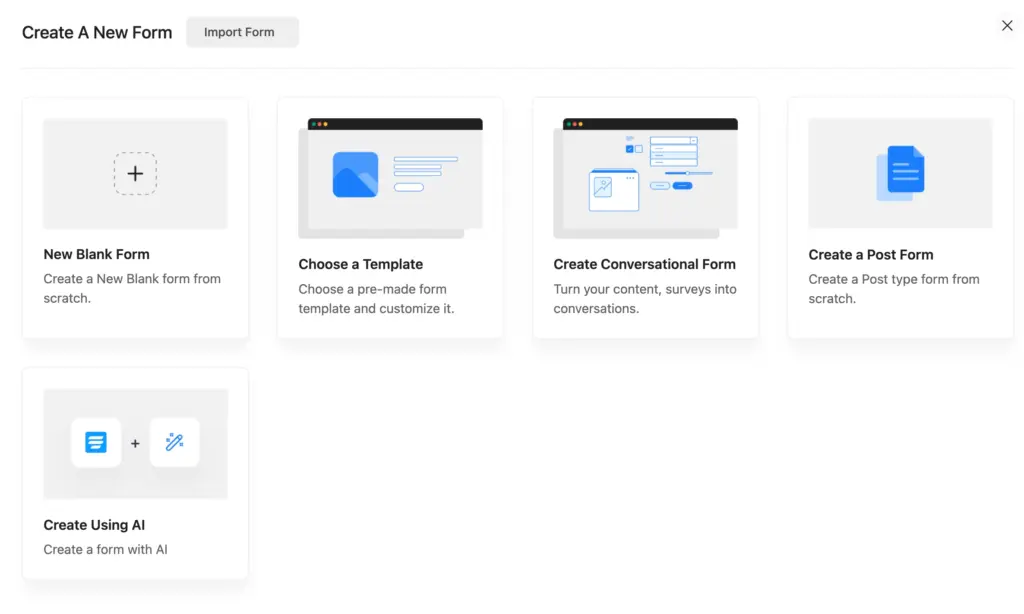
We will go for a New Blank Form here, so that it gives us an overall impression about the form building in WordPress, from scratch.

Here, you can see that the editor page opens with an overview of form building in Fluent Forms. You can find a few buttons in the top row. You can undo/redo any of your actions, which is placed in the top left corner. You can easily save the form using the highlighted-blue ‘Save Form’ button. You can also check the preview and design with a single click, appearing in a new tab.
On the right side of the editor page, you can access all the input fields, which you can select by clicking. You can drag any field and drop it to the form position you want to attach. Additionally, you can search for the fields and choose the preferred ones. Another option is to click on the + symbol and get your right field.
Step 2: add necessary fields
There are 60+ input fields in Fluent Forms, accessible depending on the free vs pro version you are using. Let’s add only those fields that are more relevant for an RSVP form.
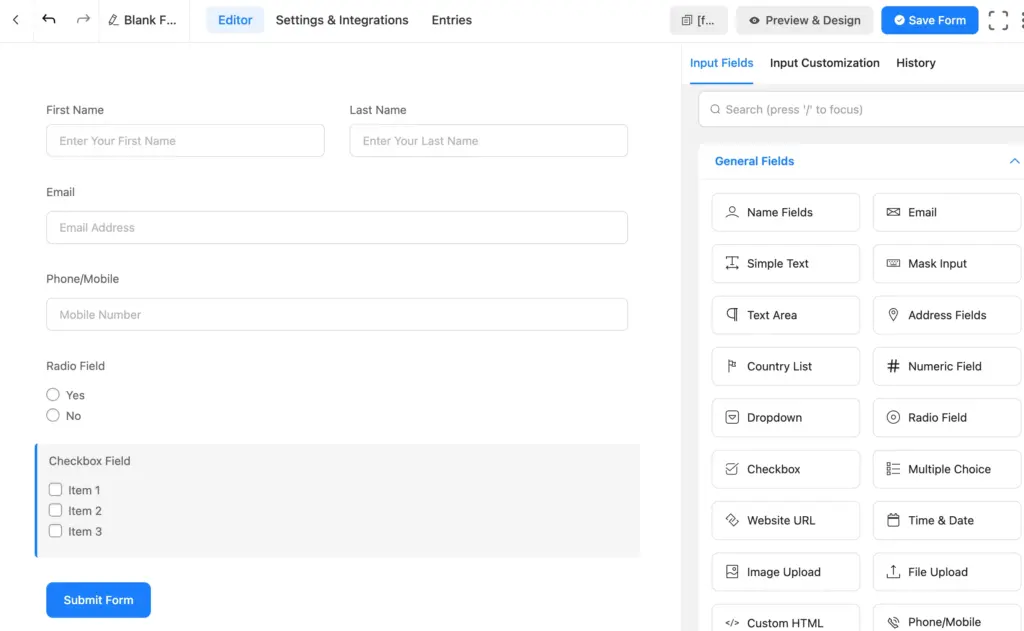
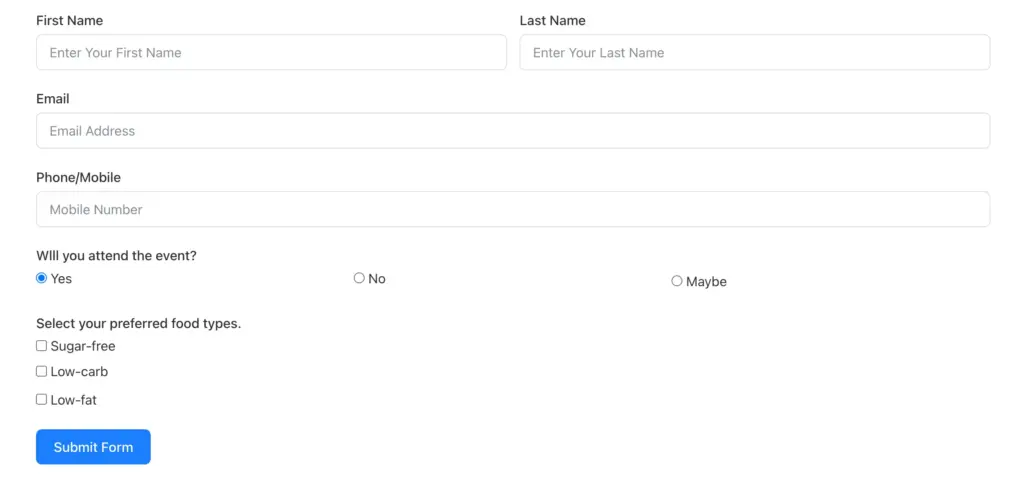
Here, I’ve added a name field, email field, phone/mobile field, radio field, and checkbox field.
Step 3: customize the fields
In terms of the RSVP form, I would say customizing the fields means customizing the placeholder/element label/options(if applicable), and adding conditional logic if necessary.
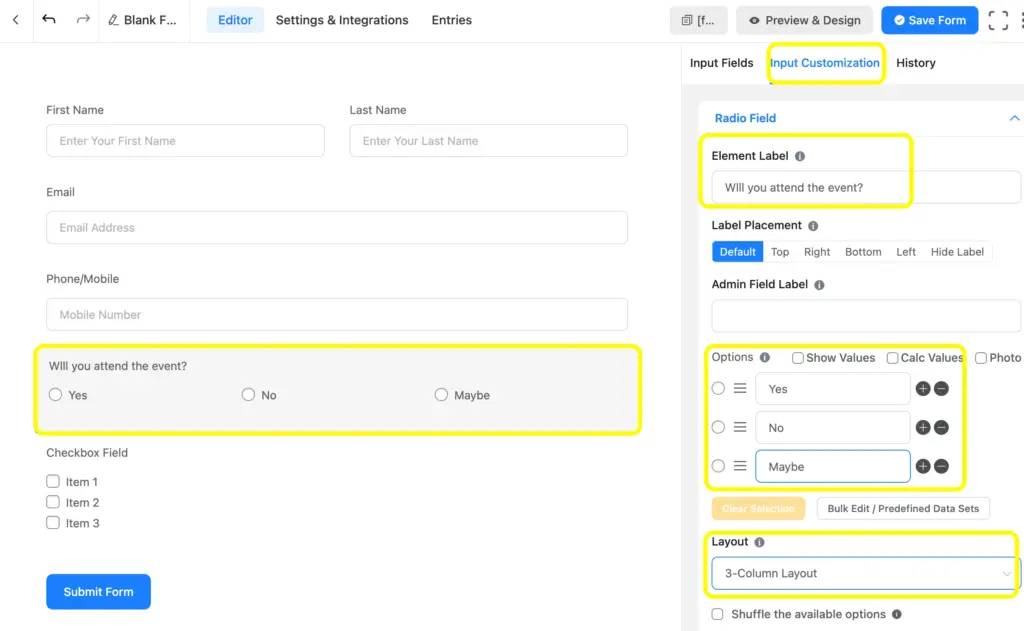
Here, you can see I have customized the Radio Field button, where I’ve changed the Element Label, added Options, and changed the Layout. You can change it simply by clicking on the field you want to make changes to.
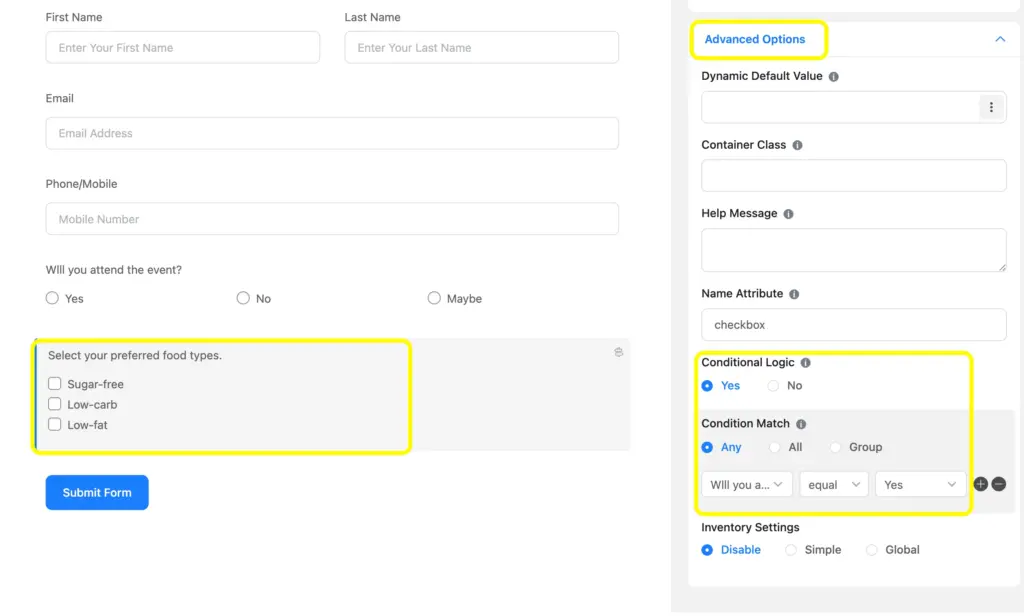
I’ve also added conditional logic in the Checkbox field that asks about the food preference. The condition is set in a way that the checkbox will appear when the user selects Yes in the radio field question.
You will get the conditional logic option in the Advanced Options in the Input Customization.
Step 4: save, rename, check preview, and publish the form
Once you are done with customizing, you can now save, check the preview, and copy the shortcode to publish the form in your WordPress site.
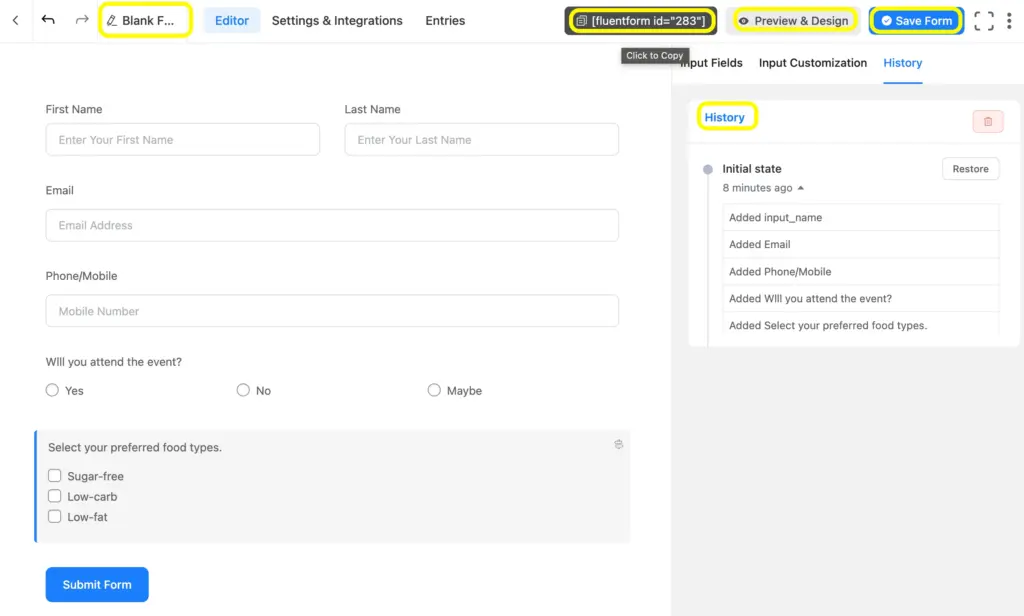
To rename the form, you will see the rename option in the top left. In the top right side, you will find the shortcode, preview button, and the Save Form button. Also, next to the Input Customization button, you will get the History option, where you can check the version history.
Let’s check the preview:
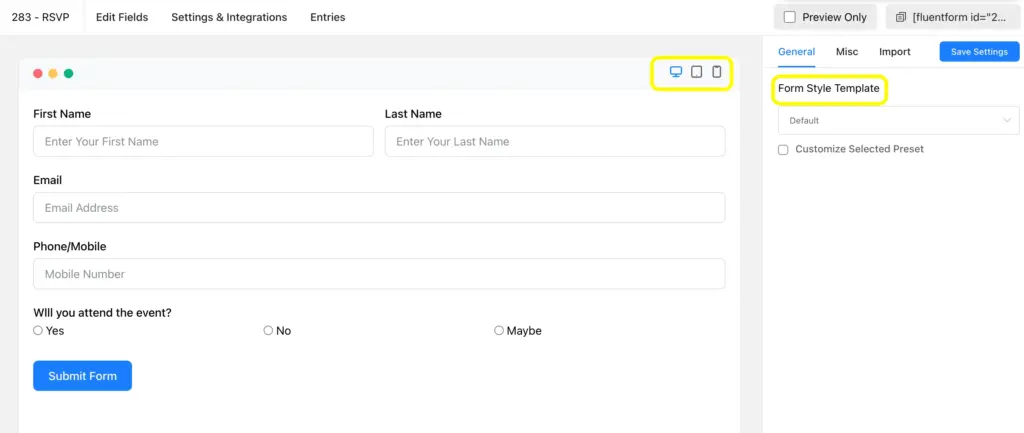
You can check the device responsiveness on the top-right side of the form preview. And you can also change the Form Style Template by selecting one from the options, which you will find in the upper right part of the preview page.
You can also check the device-friendliness and form style template on the preview page. You can edit the shadow, border, margin, and padding, etc with Fluent Forms Advanced Form Styler.
Additionally, use the Gutenberg Form Styler available in Fluent Forms free.
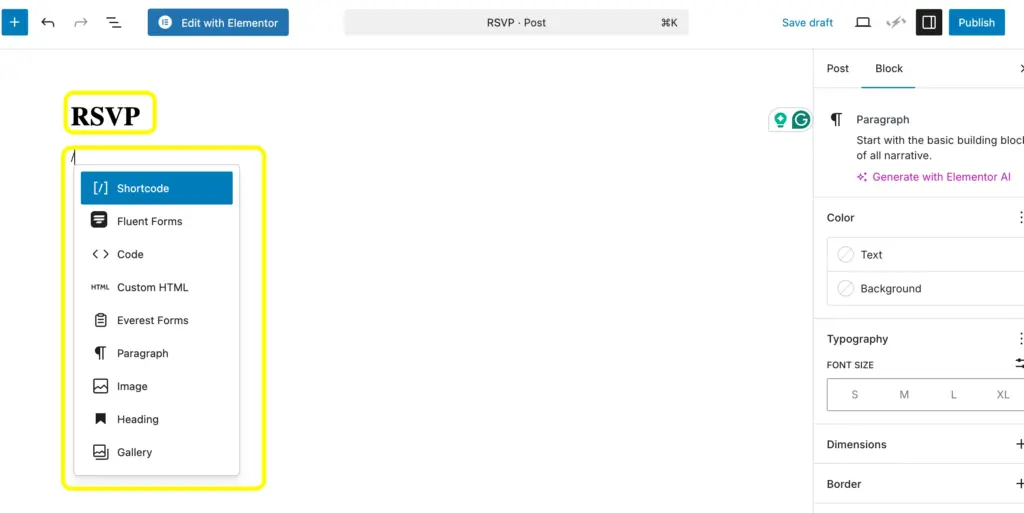
To publish the form, copy the shortcode from the top corner so that you can paste it to the page you want to publish the form on.

Once you have copied the shortcode, you can now paste it into the relevant page. Here, I have chosen a new page and selected a block to paste the shortcode, which will take me to the next part.
In this page, you need to paste the shortcode in a block. Here, you will see the Save Draft button at the top right side of the page. After saving, you can instantly publish the form on the selected page, using the Publish button at the top right corner of the page.
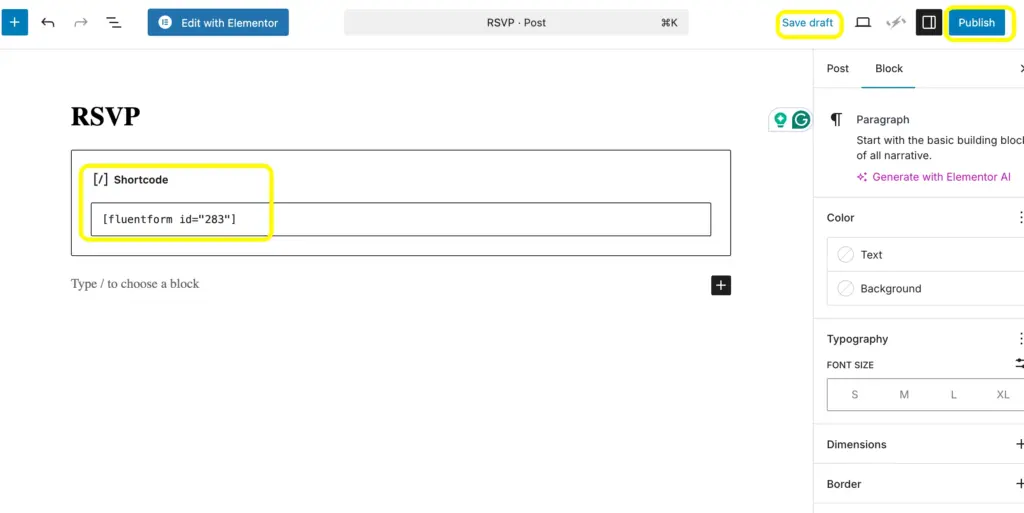
Let’s see how the live form appears on the site:
Step 5: set up email notification
Once you are done building the form on the editor page, set the email notification to get an instant alert that your guests have responded.
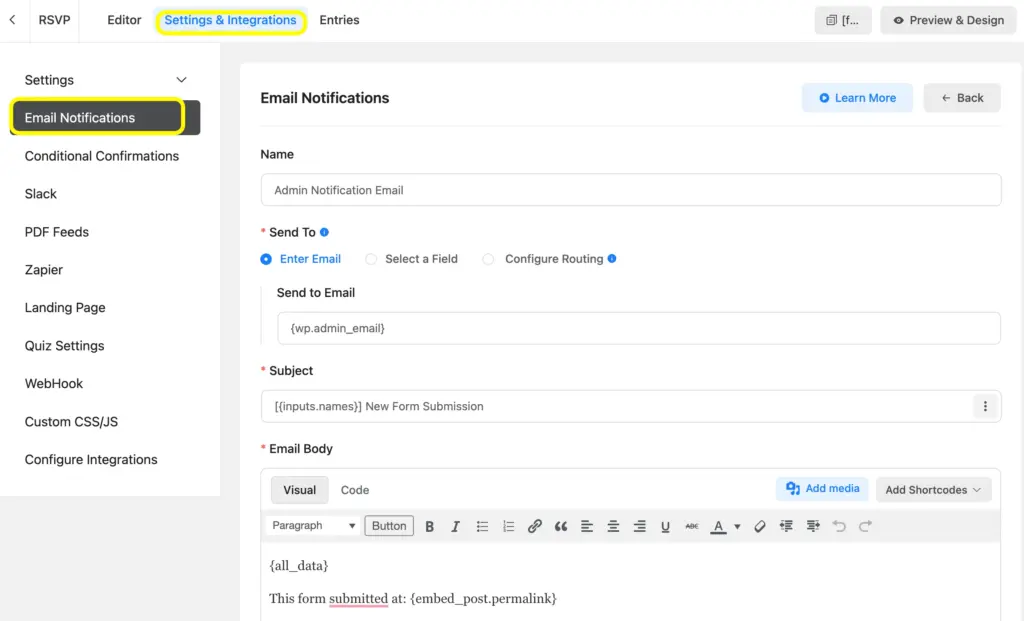
To set up the email notification, go to Settings and Integrations, and select the Email Notifications button. Here you can set up the Admin Email Notification once you have enabled the settings.
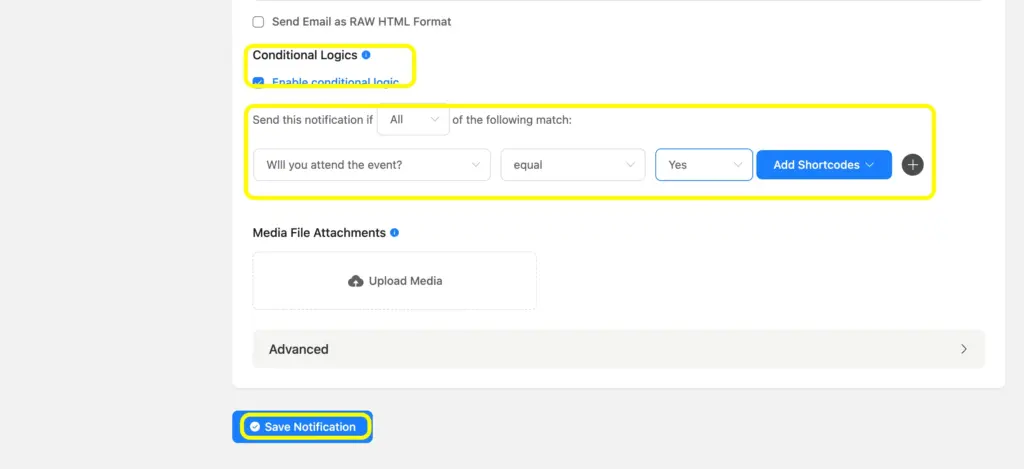
You can also set up conditional logic in the email notification. Suppose you only need a notification when someone responded they will attend the event. You can set the condition accordingly.
Don’t forget to hit the Save Notification button before you leave the settings page.
To enable SMS notification, you can use any of the two powerful integrations of Fluent Forms: Clicksend and Twilio. You can also send form notifications to Slack, Discord & Telegram, too, with Fluent Forms integration.
Step 5: set up SMS notification to stay in touch
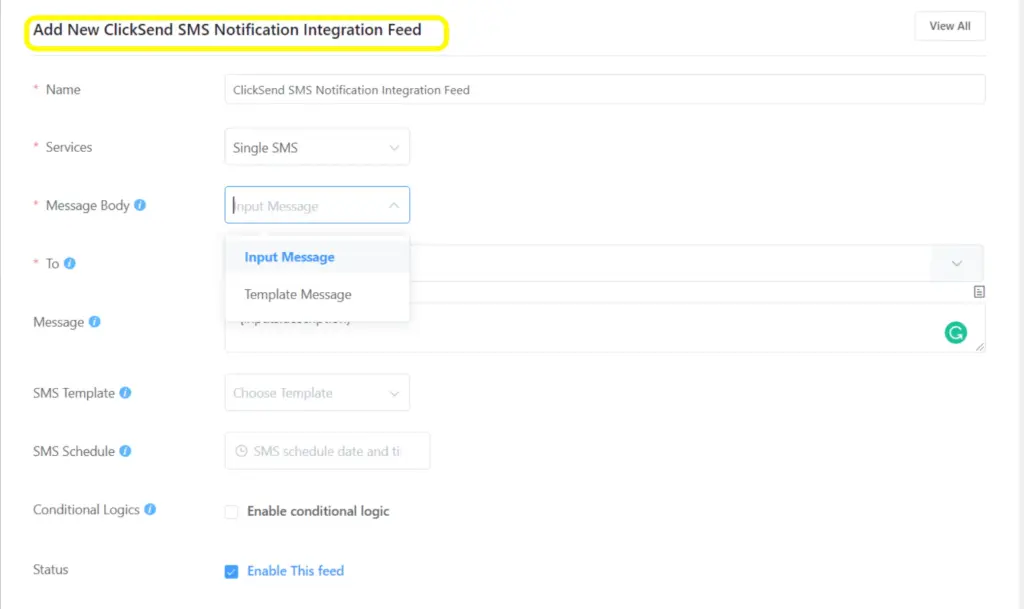
Once you integrate ClickSend with Fluent Forms, you can send notifications via SMS to your invitees. This makes your workflow automated and helps communicate with the users immediately
Look at how you can set up the messages after connecting ClickSend to Fluent Forms:
This is the simplest way you can build an RSVP form on WordPress, using the fields and features of Fluent Forms. With the customization and styling, your form-making can be more creative and consistent to your brand identity.
Related features
User registration
When an event raises a privacy concern, user registration helps to make it more organized. You can easily create a user registration form using Fluent Forms. You can enable auto-login for the registered users.
Save and resume
Using the Save and Resume feature of Fluent Forms, you can allow users to save progress and submit a form later. It helps the user fill out some fields instantly and save the form, and then resume from where they left off. It’s especially effective for those who are unsure of joining an event.
Multi-step form
Turn long-form boring forms into a few segments so that users can see the progress while filling out a form. The multi-step form develops engagement and reduces form abandonment.
Address Autocomplete
Allow users to easily add their address with the address autocomplete feature of Fluent Forms to automatically populate the address field. The integrated Google Maps helps to detect the current location of the users, while users will get address suggestions depending on the letters typed in the input field.
Conversational forms
Why not make your guests feel like chatting with you through a conversational form? With this nice feature, the submitters will feel like filling out the form in no time. When providing one question at a time, it comes with a welcome screen, which you can design as per your needs.

Hi, this is Aparup. I am a Literature postgraduate, mixing my creative thoughts with my experience in the tech industry to surpass AI. Professionally, I am a content marketer seeking solutions to users’ problems regarding WordPress.


Leave a Reply