
How to Create a Product Recommendation Quiz for Your Online Store
Here’s the thing about online menus and product catalogs: too many choices confuse people. A visitor lands on your page, scrolls through 20 options, and quietly closes the tab without ordering anything.
A product recommendation quiz fixes that. It asks a few quick questions, figures out what the user actually wants, and tells them exactly what to get.
In this guide, I’ll show you how to create a product recommendation quiz from scratch using Fluent Forms. We’ll use a perfume recommendation quiz as an example. Its purpose is to recommend fragrance profiles based on a customer’s personality, lifestyle, and preferences. Once you see how it works, you’ll know exactly how to adapt it for your own store.
TL;DR
- A product recommendation quiz guides shoppers to the right product without them having to browse your entire catalog. Users can make confident purchase decisions.
- Fluent Forms uses the Personality Quiz feature for this quiz. Users’ response to each question maps to a product category. The category with the most points becomes the recommendation.
- Plan your product categories and option-to-product mapping before you start building to simplify your workflow.
- Build the quiz as a conversational form. One question at a time feels natural for a product recommendation quiz and performs better.
- Use radio fields to add questions and options. Match options to product categories using “Show Values.” Add the Quiz Score Field, define the same product categories as Personality Types, and repeat them in the adjacent “Show Values” box.
- Write a dedicated confirmation message for each product category using conditional confirmation. Users will only see the message that’s relevant to them.
How Product Recommendation Quizzes Increase Conversions
When someone already knows what they want, a catalog works fine. But most of the time, people don’t know. They know how they feel and what mood they’re in, but they can’t map that to a product name.
A quiz meets them where they are. It asks about the feeling, not the product. And when it gives them a result that matches their mood perfectly, two things happen: they feel understood, and they buy with confidence.
For product businesses, the format converts; it turns passive browsing into an active decision. A “what should I get?” quiz turns browsing into an experience. It’s engaging, it’s fun, and it nudges people toward a decision they already wanted to make.
Beyond the immediate sale, every quiz submission also gives you insight into which moods your customers are in, which categories they lean toward, and what language they use to describe what they want. You can use that data directly in your marketing strategy and product descriptions.
What You’ll Need
Before you start building, here’s what you need in place:
- A WordPress website
- Fluent Forms Pro (the Quiz Module is a Pro feature)
- A clear sense of your product categories, as these become the quiz results
If you’re building this for your own store, spend a few minutes mapping out your categories before you touch Fluent Forms. The quiz will be much easier to set up once the logic is ready.
How the Quiz Logic Works
Fluent Forms uses its Personality Quiz feature to run product recommendation quizzes.
Here’s the idea: each answer option the user picks is mapped to one of your product categories. As they move through the questions, their answers quietly accumulate points for different categories. At the end, whichever category has the most points wins, and that product gets recommended.
In our perfume quiz, every A answer points toward Fresh & Clean, every B answer toward Sweet & Playful, every C answer toward Warm & Sophisticated, and every D answer toward Bold & Intense. A customer who picks mostly A answers across seven questions gets recommended crisp, citrus-forward fragrances. A customer who picks mostly D answers gets dark, intense, statement-making scents.
The mapping is very simple, and users receive a clear output.
Plan Your Quiz Before You Build
Before you start building, map your quiz on paper or in a spreadsheet.
Define your product categories. For each category, research & note what makes it distinct and which products belong to it. Then write your questions; aim for 5 to 7, enough to be accurate without feeling like a survey.
For each answer option, decide which category it points toward. You can have 3 to 5 options per question to keep the quiz simple for users. I’m going with 4 options for this example.
Here’s an example question for our perfume quiz:
Question 2: When would you mostly wear this perfume?
A. Everyday / Work / Casual outings
B. Dates / Romantic evenings
C. Parties / Social events
D. Special occasions / Luxury events
And this is how you map the options to your products:
- Answer A to Clean and Refreshing
- Answer B to Fun and Playful
- Answer C to Warm and Sophisticated
- Answer D to Bold & Intense
For convenience, always place the option that points towards product A in position A. For example, none of my option C responses will point towards “Clean & Refreshing,” but all of my option A responses will. This will keep the form building simple.
Don’t worry about users finding patterns in your options, as a particular product’s options are always in the same position. Fluent Forms has a quiz feature called Randomize Options that will automatically shuffle the options’ positions each time the form reloads. You can randomize the questions as well.
Step-by-step: How to Create a Product Recommendation Quiz
Once you have all the option mapping planned out, building the quiz in Fluent Forms is straightforward. Simply follow these steps in your WordPress dashboard to create an accurate product recommendation quiz for your users.
Step 1: Enable the quiz module
Log in to your WordPress dashboard. Go to Fluent Forms Pro > Integrations from the top navigation bar. Search for the Quiz Module in the search bar. When it appears, click the toggle to turn it on.
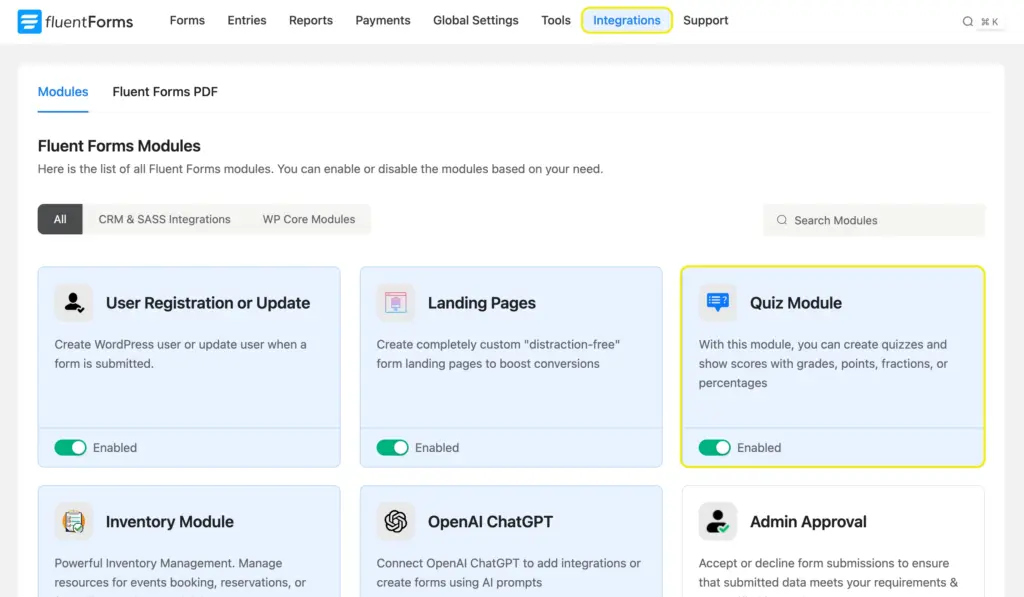
The quiz module is now active. You’ll have access to the quiz score field and all personality quiz settings across all your forms.
Step 2: Create a new conversational form
Go to Fluent Forms > New Form. A pop-up will appear with a few options. Select Create Conversational Form.
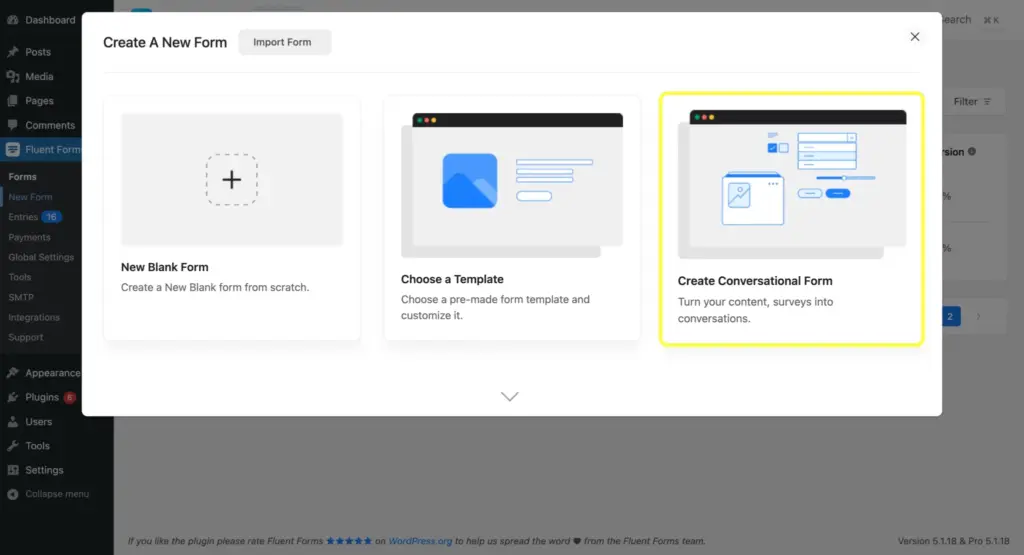
Instead of showing all questions on one page (like a traditional form), the conversational format presents one question at a time. The user answers, clicks next, and moves to the following question. It feels far more engaging than a traditional form, especially for a product recommendation quiz.
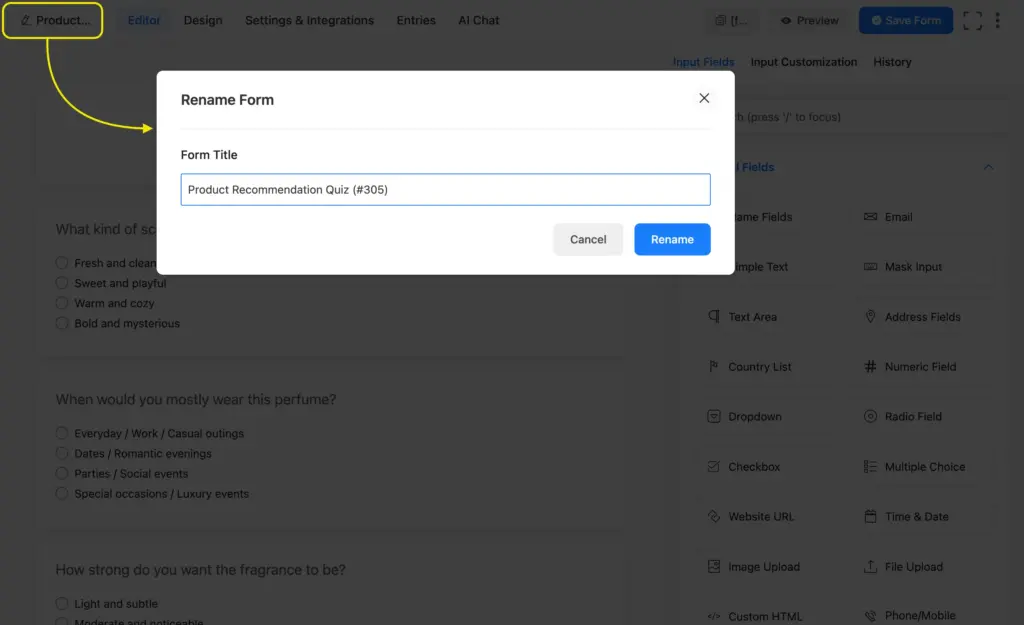
You’ll land in the conversational form editor. This is where you’ll design the quiz questions and options and map them to your products. Start by assigning a name to your form.
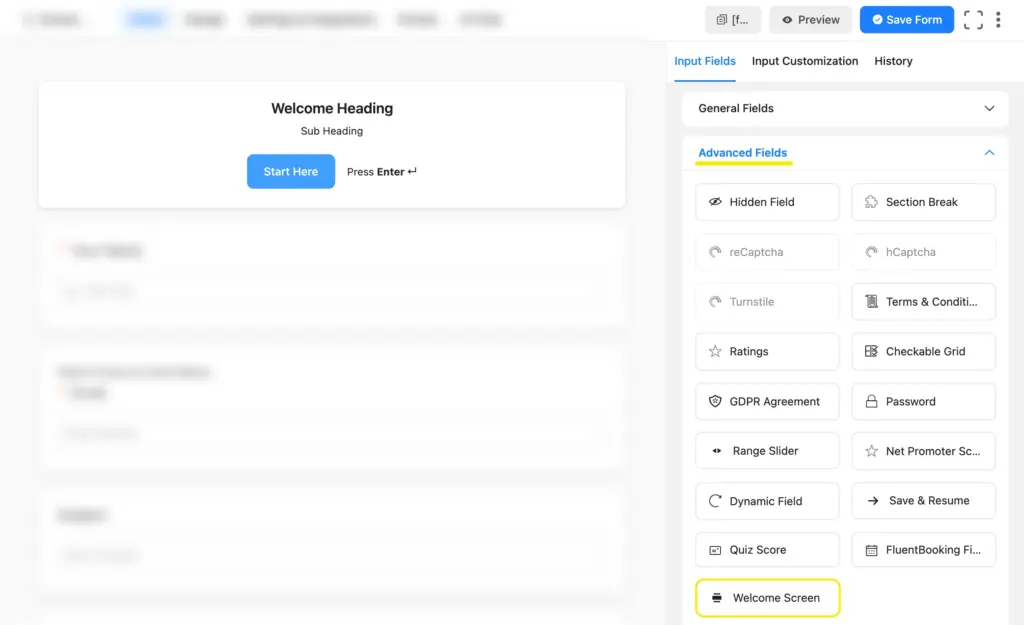
Step 3: Add a welcome screen
The first thing users see when they land on the quiz is the welcome screen. This is optional, but worth adding. It sets the tone, tells users what to expect, and gets them excited before the first question.
From the Advanced Fields panel, drag a Welcome Screen field onto the editor at the very top.
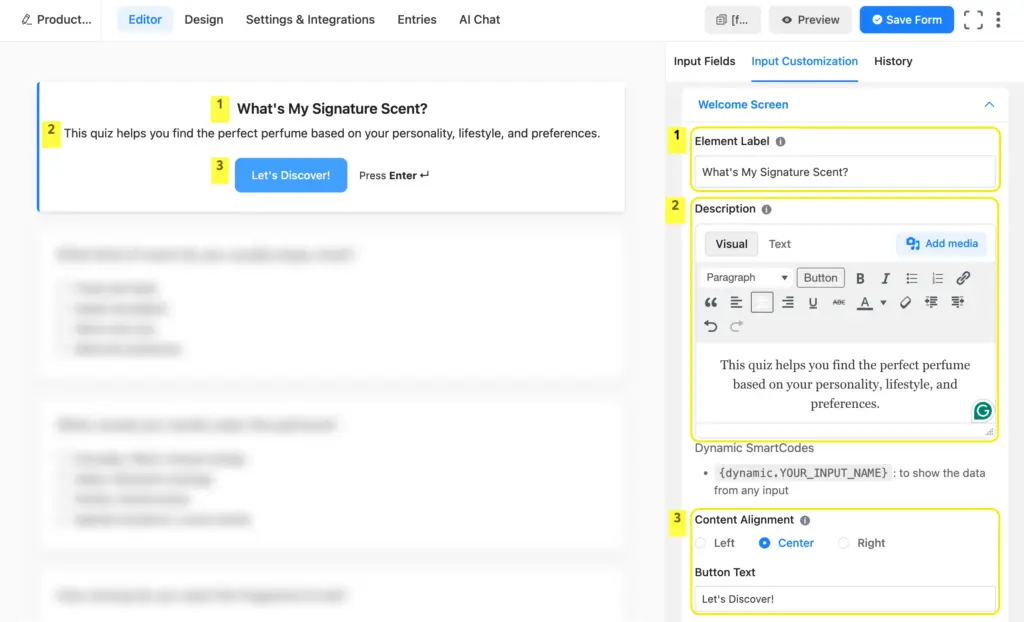
In the field settings, add a heading and a copy. Keep it short and inviting, like:
- Heading: Not sure which perfume is right for you?
- Subheading: Answer 7 quick questions and we’ll find your perfect scent.
- Button text: Let’s find my scent
Step 4: Add your questions using radio fields
Each question in the quiz uses a Radio Field. This is the field type that Fluent Forms uses to track and calculate personality type scores.
In the conversational form editor, drag a Radio Field for your first question. In the Element Label, type the question. Then add your choices in the Options section.
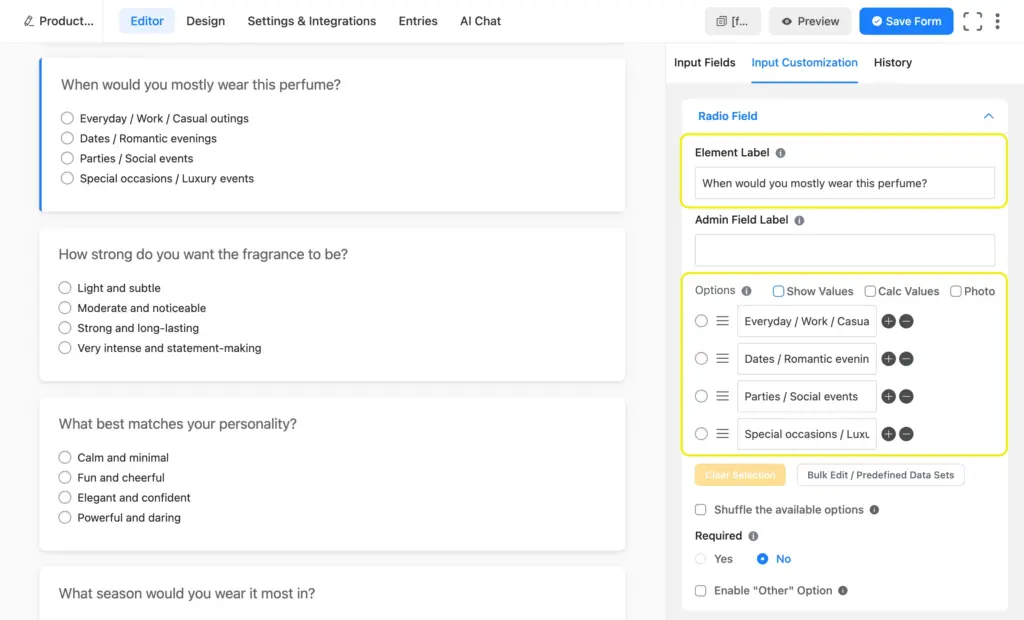
Repeat this for all seven questions.
In conversational forms, each radio field gets its own screen. There’s no visual clutter from the other questions. Users concentrate on one question at a time and answer accurately.
Step 5: Assign product categories to answer options
Now, assign a product/category to each answer option of the radio fields. Do this using the Show Values option. Once you click “Show Values,” it’ll open up a box beside each option. Enter the assigned product/category for each option in the box.
It’s best if you keep copy-pasting the show values; that way, you can easily avoid punctuation or spelling errors.
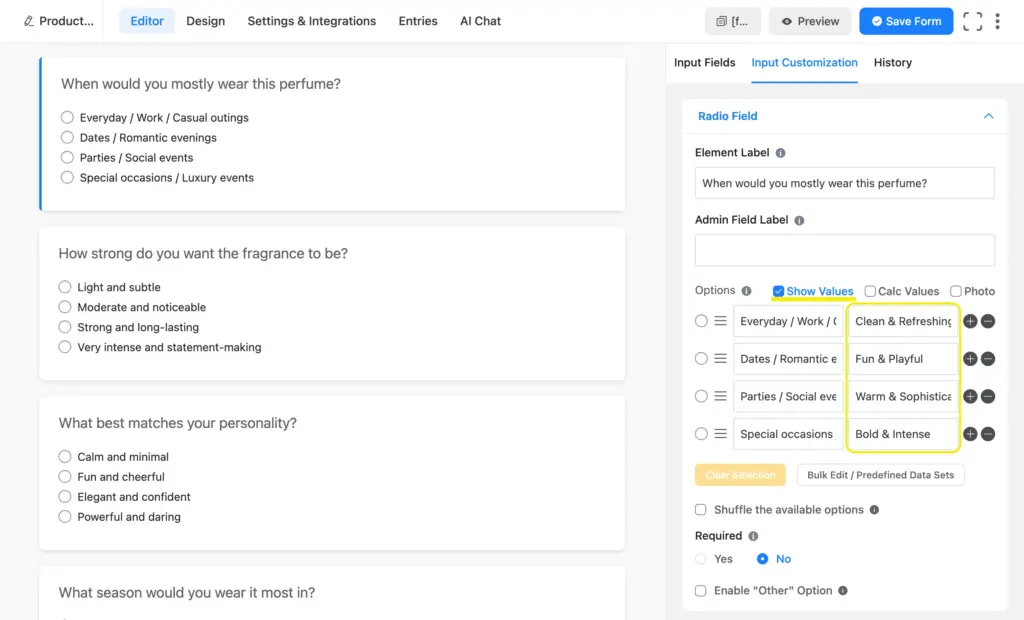
In my quiz, the first option maps to Clean & Refreshing. Second option maps to Fun & Playful. Every C answer maps to Warm & Sophisticated. Every D answer maps to Bold & Intense.
Complete this process for all your questions. Here’s an example mapping reference:
| Question (Label) | Answer (Options) | Maps to (Show Values) |
|---|---|---|
| Q2: Occasion | A. Everyday / Work / Casual | Clean & Refreshing |
| Q2: Occasion | B. Dates / Romantic evenings | Fun & Playful |
| Q2: Occasion | C. Parties / Social events | Warm & Sophisticated |
| Q2: Occasion | D. Special occasions / Luxury | Bold & Intense |
| Q3: Strength | A. Light and subtle | Clean & Refreshing |
| Q3: Strength | B. Moderate and noticeable | Fun & Playful |
| Q3: Strength | C. Strong and long-lasting | Warm & Sophisticated |
| Q3: Strength | D. Very intense / statement-making | Bold & Intense |
Step 6: Add & configure the quiz score field
Once all the radio fields are configured, go to the Advanced Fields panel. Find the Quiz Score field and drag it into the form editor below your last question.
This field stays hidden from the user. It runs the personality score calculation silently in the background.
Click on the Quiz Score field to open its Input Customization settings. Scroll to the SelectScore Type dropdown and set it to Personality Quiz.

The Personality Quiz Instructions panel will now appear below.
Add your product/category names (the ones we mapped the options to) in the first box and repeat the same product/category name in the corresponding Show Values box. The total number of rows here should be the same as the number of options each question has.
The show values here will match with the values assigned to the options to count users’ responses. The products (personality types) and the corresponding show values must be an exact match for the quiz to work.
Once every answer is mapped, click Save Form in the top right corner.
Step 7: Configure the quiz setting
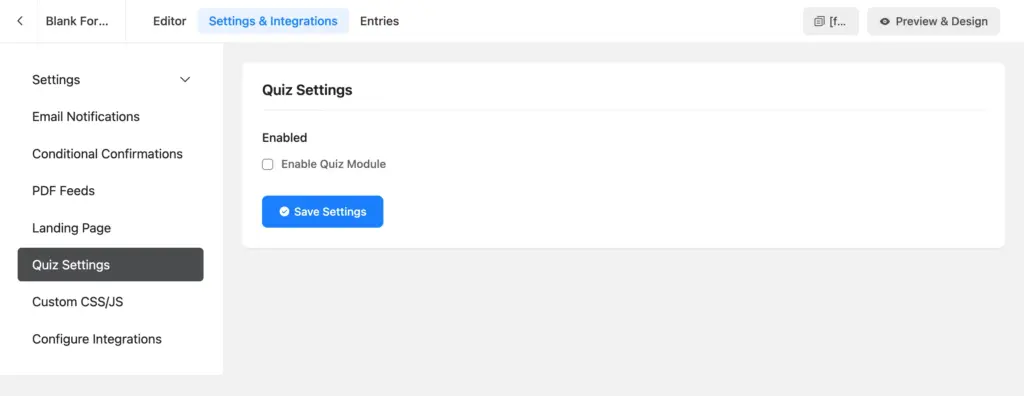
From your form editor, navigate to Settings & Integrations > Quiz Settings.
Check the Enable Quiz Module checkbox. Click Save Settings.
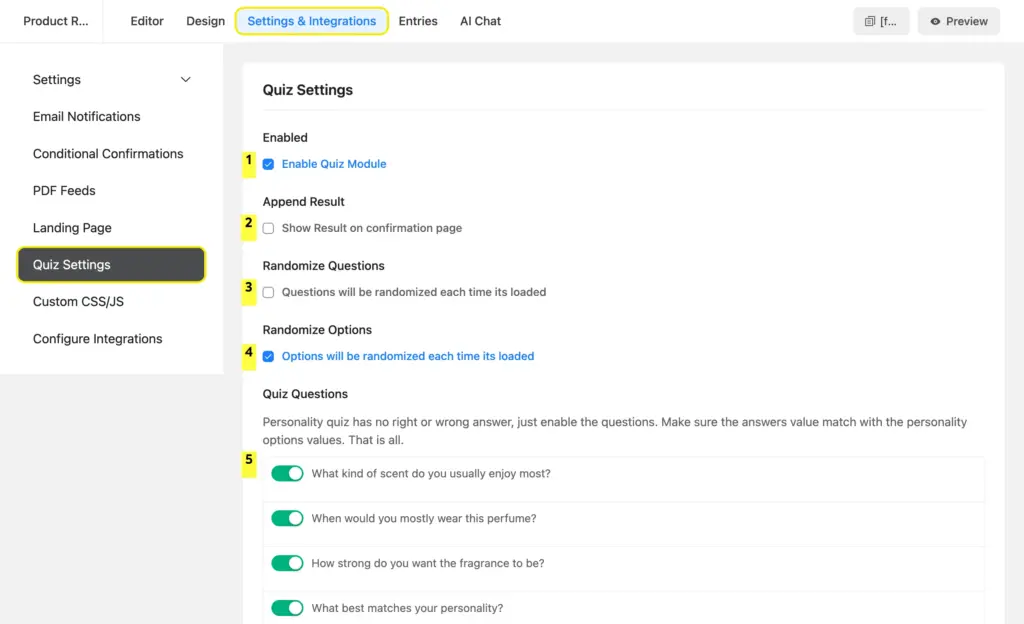
Configure these quiz settings:
- Append Result: Shows the results in a table on the confirmation page. However, I didn’t turn it on because I want to show custom messages based on a user’s result.
- Randomize Questions: Randomizing questions keeps the quiz fresh by changing the order of the questions on each reload. This way, users won’t notice patterns within your options.
- Randomize Options: Randomizing answer options keeps the quiz test honest by shuffling the response options every time the form reloads.
- Quiz Questions: Here, you get to select which questions are included in the quiz test. Toggle on all the questions if there are no other fields (email/name) other than the quiz questions.
Click Save Settings once the quiz settings are configured.
Step 8: Write the confirmation messages
This is the most important step for your conversions. The confirmation message is the first thing users see right after submitting. Focus on product recommendation. Make your copy convincing to motivate users to make a purchase or visit your products.
I’ll create 4 different confirmation messages for four different results. You can create as many confirmation messages as your options/resulting products for this quiz. Then we’ll show the message conditionally, so a user only sees the result that’s relevant to them.
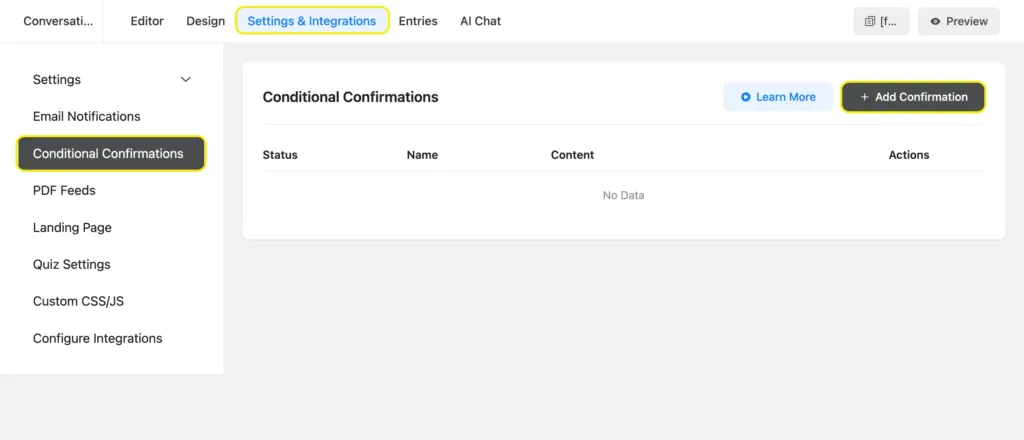
Go to Settings & Integrations > Confirmation Confirmations. Click Add Confirmation.
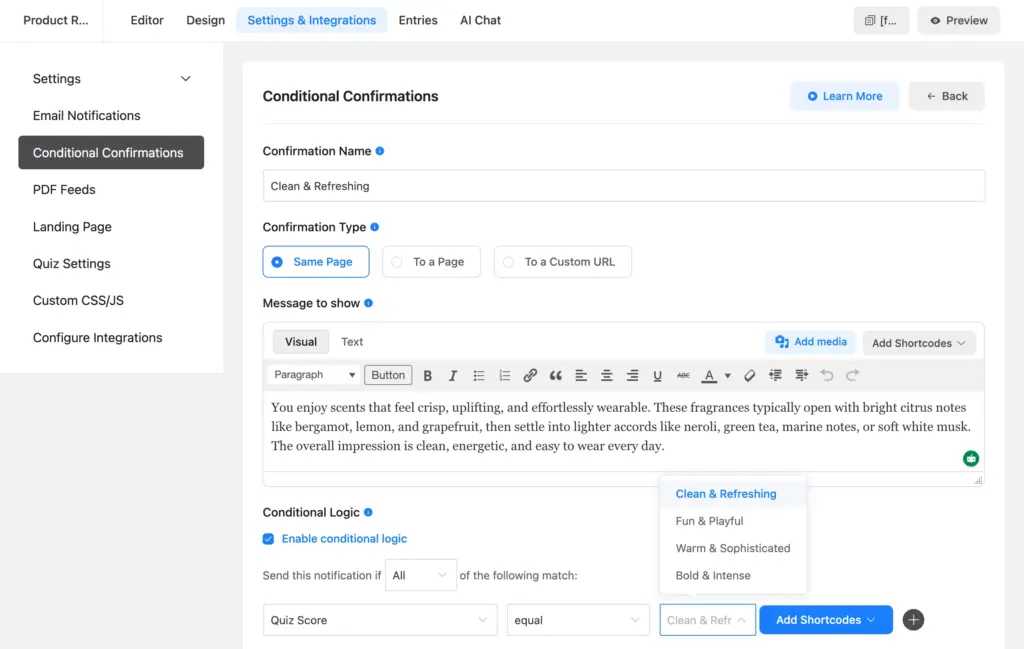
Configure the following inside the notification feed:
- Add a confirmation name.
- Select confirmation type: whether to show it on the same page or take users to a custom landing/product page made for that product.
- Write the confirmation message (you can skip it if your confirmation directs to a product/landing page). You can format the message text (use bold/italic, add bullet points, change text color, add CTA buttons, and more).
- Enable conditional logic. This is crucial because otherwise, a prospect for product A might receive messages about product B and get confused. Inside the condition logic, you’ll find 3 boxes. Select Quiz Score in the first box and equal in the second box. In the third box, select the quiz result to which this particular message belongs.
Once the Settings are configured, click Save Notification. Similarly, add more confirmations to cover all the quiz results.
Here’s a preview of our confirmation message for mostly C (Warm & Sophisticated) results.
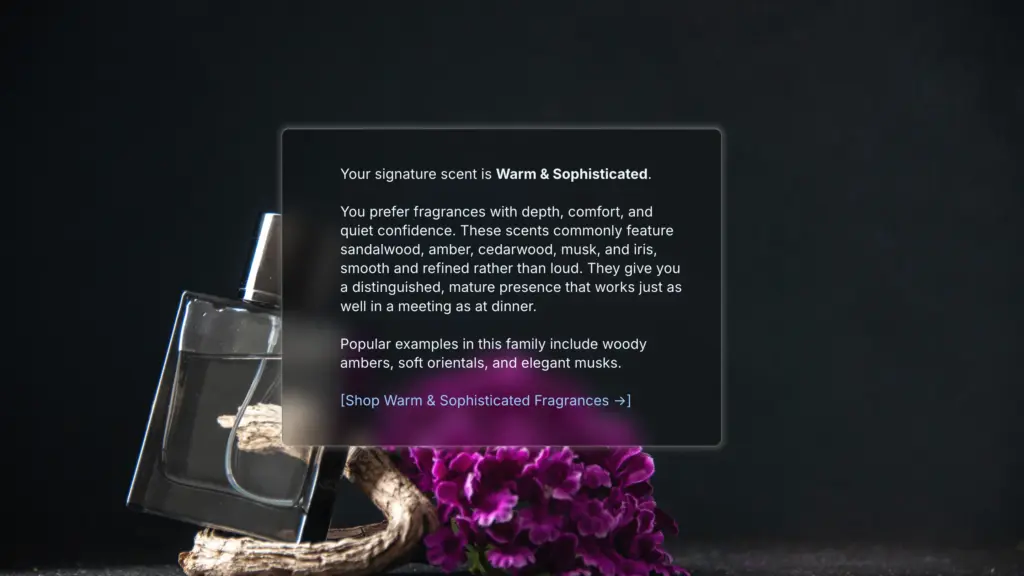
Step 9: Customize the conversational quiz design
Are you wondering how my confirmation message got a custom background image? Let me show you.
Navigate to the Design tab from the top panel. Here you can customize:
- Font: match it to your site’s typography
- Question color: the color of the question text
- Answer color: the color of the answer option text and selection state
- Button color: Buttons’ background and text colors
- Background: Add an image or a solid/gradient color
- Background image opacity: Adjust image opacity to increase readability
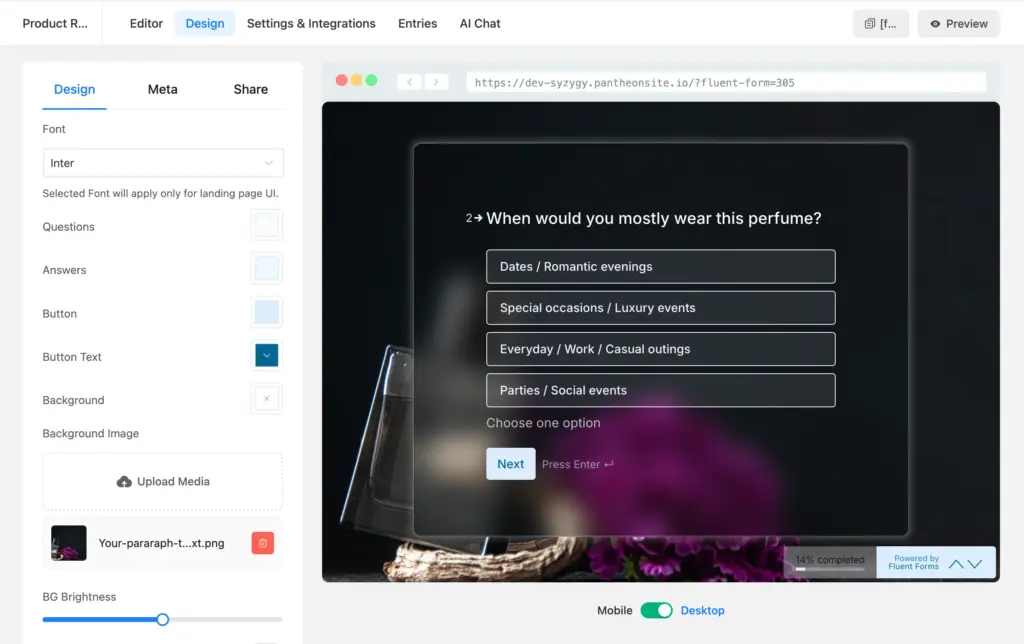
The conversational form also shows a progress bar in the bottom-right corner by default. It tells users how far along they are, which keeps completion rates up. There are some more settings on mobile friendliness, scrolling, and removing the brand.
Step 10: Publish your quiz
You can publish the quiz in one of three ways:
- Direct URL: Conversational forms can work as landing pages as well. You simply have to share the URL on social media or email. You can use this as a CTA button’s URL as well. Clicking the URL opens a full-screen quiz.
- Shortcode for classic form: Breaks the conversational layout and displays the quiz as a traditional form.
- Embed via HTML code: Use this code to embed this form on a page. You can control the form height and width.
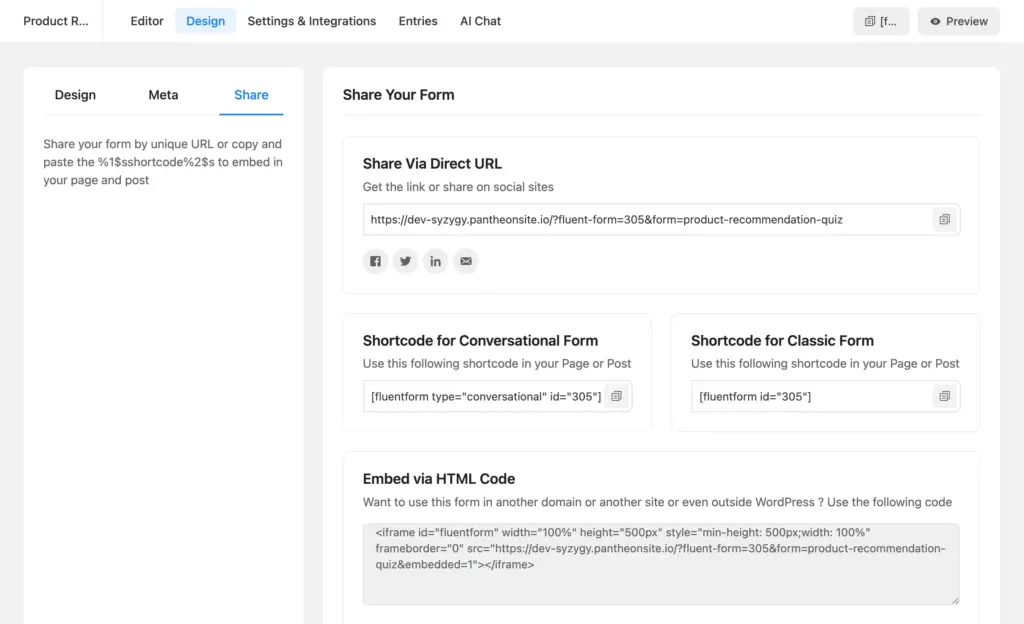
Go to the page where you want to publish this quiz. Use the direct share URL in your CTA button or embed the form in a prominent position on the page. Save the page, check everything in the preview, and publish.
Learn how to use this template on your site.
Tips for Achieving More From Your Product Recommendation Quiz
Here are some tips to convert more with your product recommendation quiz.
- Capture an email before the result: Add an email field just before the submit button with a label like “Where should we send your personalized recommendation?” This turns every quiz completion into a lead. Follow up with the recommended fragrance family, bestsellers in that category, or a first-purchase discount.
- Place it where shoppers hesitate: Put the quiz on your homepage, your main product category page, and any product page where users might feel overwhelmed by options. Use a compelling copy, “Not sure which scent is right for you?” followed by a quiz link (in a button).
- Promote it as content: “What’s your signature scent?” is naturally shareable. Post it on Instagram Stories with a link, pin the quiz page, and add it to your email welcome sequence. Personality quizzes have high organic reach because people love sharing their results.
- Test every path before publishing. Complete the quiz selecting all A answers, then all B, then all C, then all D. Confirm each result displays the correct product type and the right confirmation message. Then complete it with a mixed set of answers to see how the majority-wins logic handles a real user’s choices.
- Keep it short: Five to seven questions is a good length for this type of quiz; accurate enough to feel insightful, short enough that completion rates stay high. If you ever need to ask more, break the quiz into steps using Fluent Forms’ multi-step form feature, with a progress bar between sections.
Build Smarter Forms for Free

Can You Build This as a Traditional Form Instead
Yes. Everything in this tutorial works in Fluent Forms’ standard form format as well. The radio fields, quiz score field, personality type mapping, quiz settings, and confirmation messages all work the same way. The only difference is the format the user experiences.
In a standard form, all seven questions appear on one page. Users scroll down, pick their answers, and submit. It is a more familiar format for some users, and saves some time because every question can be seen at once.
To build a standard version, go to Fluent Forms > New Form and select New Blank Form instead of Create Conversational Form. Follow the rest of the steps from there. There is no separate design tab for traditional forms; you can visually style it from the Preview & Design tab.
If you’ve already built the conversational quiz and want a standard version, you don’t need to start from scratch. Go to your forms list, find the quiz, click the three-dot menu, and select Convert to Regular Form. All your fields and settings carry over.
That said, for a personality-style recommendation quiz, especially one aimed at mobile users, the conversational format usually performs better. It’s more engaging, the one-question-at-a-time pace matches the mood of a quiz, and the built-in progress bar keeps completion rates up. It’s worth giving it a go and tracking performance.
Convert More with Insightful Product Recommendation Quizzes
A product recommendation quiz is one of the highest-impact forms you can add to your store.
It takes a visitor who is casually browsing and gives them exactly what they came for: a confident answer. It removes the friction between “I’m not sure” and “I’ll take this one,” without any manual effort on your end.
Users take the quiz because everyone is curious about themselves. And the result is exactly what they were looking for. They explore the recommended products and make their decision.
Fluent Forms Quiz and Survey feature lets you build any product recommendation quiz directly from your WordPress dashboard, no code, no workarounds. You can do everything from your WordPress dashboard without writing a single line of code.
Pick your product categories, map your questions & options, and follow the simple steps above. Once the quiz is built, embed it anywhere, and it works for every visitor after that.

Sarika writes for Fluent Forms and loves to offer insights into small businesses. She’s curious and enjoys discussing ideas, interests, and perspectives. In her free time, she’s either marvelling at architectural beauties or trying different cuisines.


Leave a Reply