

How to Create a Client Onboarding Form on WordPress

Every freelancer, agency, or consultant eventually hits the same wall: onboarding a new client takes longer than it should. You send a welcome email, wait for a reply, chase down a signed agreement, ask for missing files, and repeat half of it because something got lost in a Google Doc or a Slack thread.
A client onboarding form fixes this. Instead of juggling emails, PDFs, and spreadsheets, you collect everything you need, project details, files, agreements, and even payment, in one guided flow. And if you’re already running WordPress, you don’t need a separate tool to do it. With Fluent Forms, your WordPress site can handle the entire onboarding process, from first contact to project details, without a single extra plugin subscription.
This tutorial walks you through building a complete, automated client onboarding form in WordPress using Fluent Forms.
TL;DR
- A client onboarding form collects everything you need from a new client (contact details, project scope, files, agreements, payment) in one structured form instead of scattered emails.
- WordPress is a practical home for onboarding because your site, forms, and client data all live in one place that you control.
- A good onboarding form uses the most required fields and the customizations
- Fluent Forms lets you build the form, trigger confirmation and notification emails, connect to your CRM, and optionally collect a deposit, all from one plugin.
- This guide covers the full build: planning the form, adding fields, configuring notifications, etc.
What Is a Client Onboarding Form
A client onboarding form is the first structured touchpoint between you and a new client after they’ve decided to work with you. It replaces the back-and-forth of intake emails with a single questionnaire that captures:
- Contact and company details
- Project goals, scope, and timeline expectations
- Brand assets, briefs, or reference files
- Billing information or an upfront deposit
Think of it as the bridge between “you’re hired” and “let’s get to work.” Done well, it sets expectations early, reduces the number of clarifying emails you send, and makes your business look organized from day one.
Why Use WordPress for Client Onboarding
Most service providers already have a WordPress website for their portfolio, service pages, or blog. That means the onboarding infrastructure is already sitting there, unused.
Here’s why building the onboarding process directly into WordPress makes sense:
You already have the audience
Clients land on your website before they ever sign a contract. Keeping onboarding on the same domain feels more professional than redirecting them to a third-party form tool.
You own the data
Client submissions, files, and payment records stay in your WordPress database rather than on someone else’s server with its own pricing tiers and export limits.
It’s fully brandable
A form embedded on your site can match your fonts, colors, and layout exactly, so the onboarding experience feels like a natural extension of your brand rather than a generic form link.
It connects to tools you already use
Because WordPress runs a huge ecosystem of plugins, your onboarding form can talk directly to your CRM, email marketing tool, or project management app without middleware.
It scales with you
Whether you’re a solo consultant or a ten-person agency, the same form builder can support one onboarding flow or a dozen, each tailored to a different service line.
What Should a Good Client Onboarding Form Include
Before opening the form builder, it helps to know what a strong onboarding form actually contains. A strong onboarding form typically includes::
- Basic contact information: name, email, phone, company name
- Project or service details: what the client is hiring you for, timeline, budget range
- Conditional questions: different follow-up questions depending on the service selected
- File uploads: logos, brand guidelines, contracts, reference documents
- Terms and agreement acceptance: a checkbox or signature confirming the client agrees to your terms
- Payment or deposit collection: optional, but useful for locking in commitment
- A confirmation step: a clear “what happens next” message once the form is submitted
You don’t need every element for every business. A copywriter’s onboarding form looks different from a web developer’s or an accountant’s. The goal is to only ask for what you genuinely need to start the work, nothing more.
Fluent Forms Features You Can Use to Automate Client Onboarding Workflow
Fluent Forms isn’t just a form builder; it helps you to establish an automated onboarding workflow. Here’s what makes that possible:
Multi-step forms break a long questionnaire into digestible sections (Contact Info, Project Details, Files, Agreement, Payment), so clients don’t abandon the form halfway through.
Conditional logic shows or hides fields based on earlier answers. A client onboarding for a “Website Design” package can trigger different questions than one for “SEO Services,” all inside the same form.
File and image upload fields let clients attach logos, briefs, or signed documents directly; no separate email attachment is needed. You can also access the Cloud Storage Manager add-on to store the uploaded files easily.
Email notifications send an internal alert to your team the moment a new client submits the form, and a branded confirmation email to the client themselves.
Payment fields allow you to collect an onboarding fee or project deposit right at submission, using gateways like Stripe, PayPal, Square, Mollie, Razorpay, Paddle, Paystack, or Authorize.net.
Third-party integrations push submitted data straight into your CRM, email marketing platform, or project management tool, so you don’t have to manually copy client details anywhere.
You can explore the full range of available fields on the input fields page and see the complete feature set on the Fluent Forms features page.
Steps to Create a Client Onboarding Form in WordPress
Here’s the full walkthrough, from adding a new form to embedding a finished, automated onboarding form.
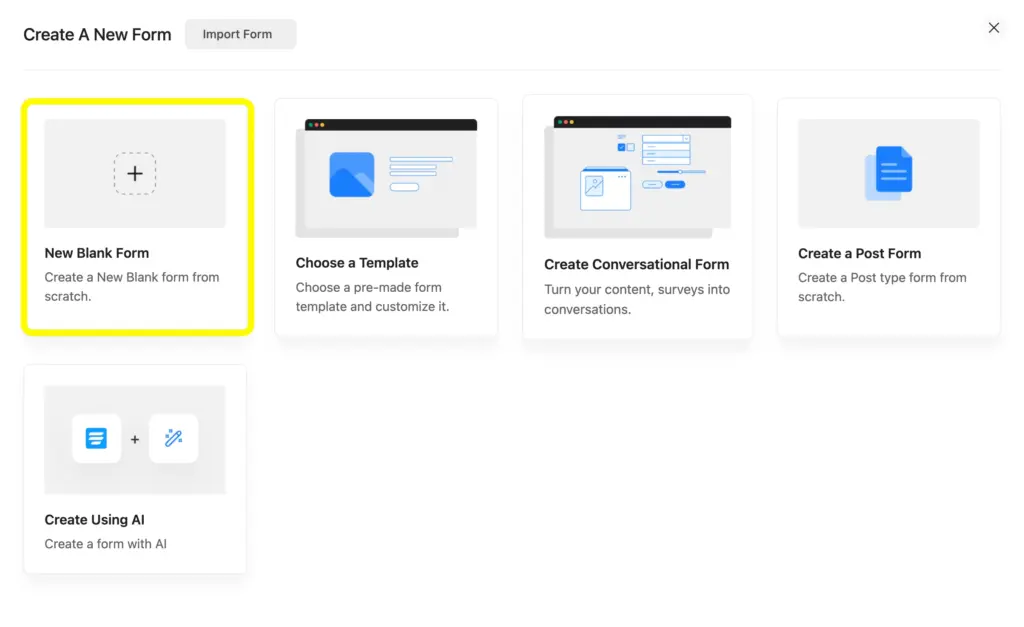
Step 1: Start from a template or a blank form
First of all, go to Fluent Forms Dashboard and select Add New Form
You can start from scratch or browse the form templates library for a layout close to what you need, then customize it. Starting from a template is usually faster since the field structure and labels are already in place.
Step 2: Add and customize the required fields
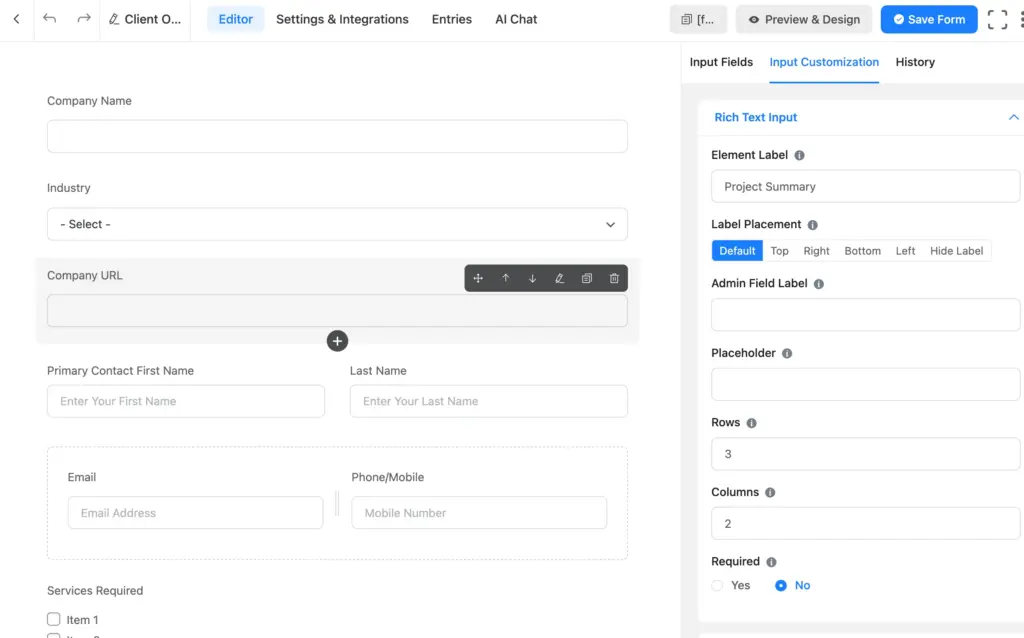
On the editor page of Fluent Forms, you will easily find the Input Fields on the right side, which you can add by clicking, or you can simply drag and drop the required fields.
Step 3: Configure confirmation and notification emails
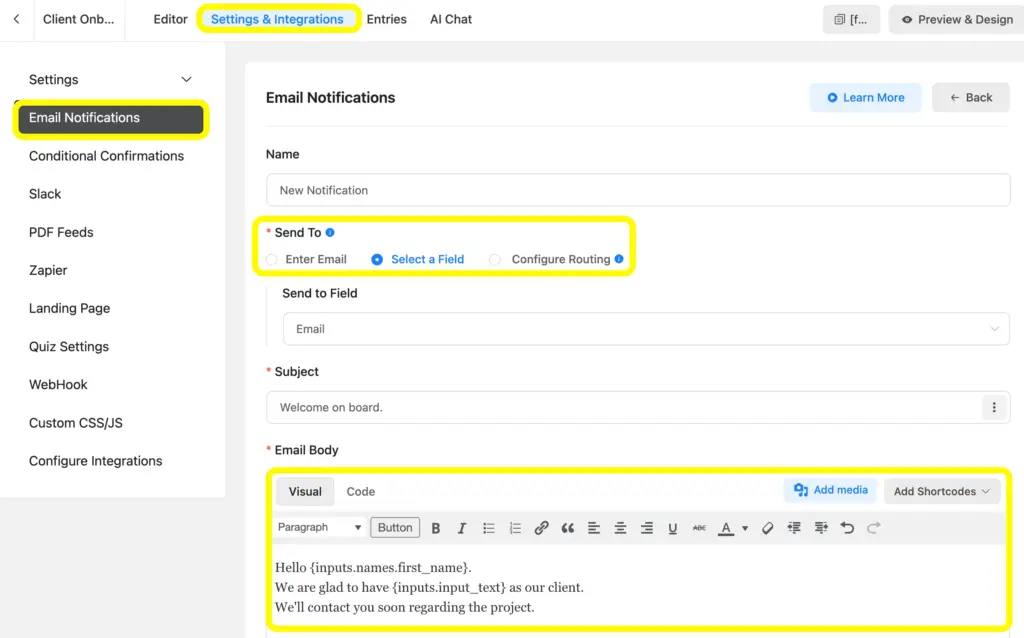
Once you have added and customized the fields, it’s time to put the confirmations and notifications on. Go to the form’s Settings & Integrations > Form Notifications tab. Set up:
- A client-facing confirmation email that thanks them for submitting, restates next steps, and sets expectations for response time
- An internal notification email to you or your team the moment a new submission comes in, so nobody misses a new client
You can personalize both emails using smart tags that automatically pull in the client’s submitted answers.
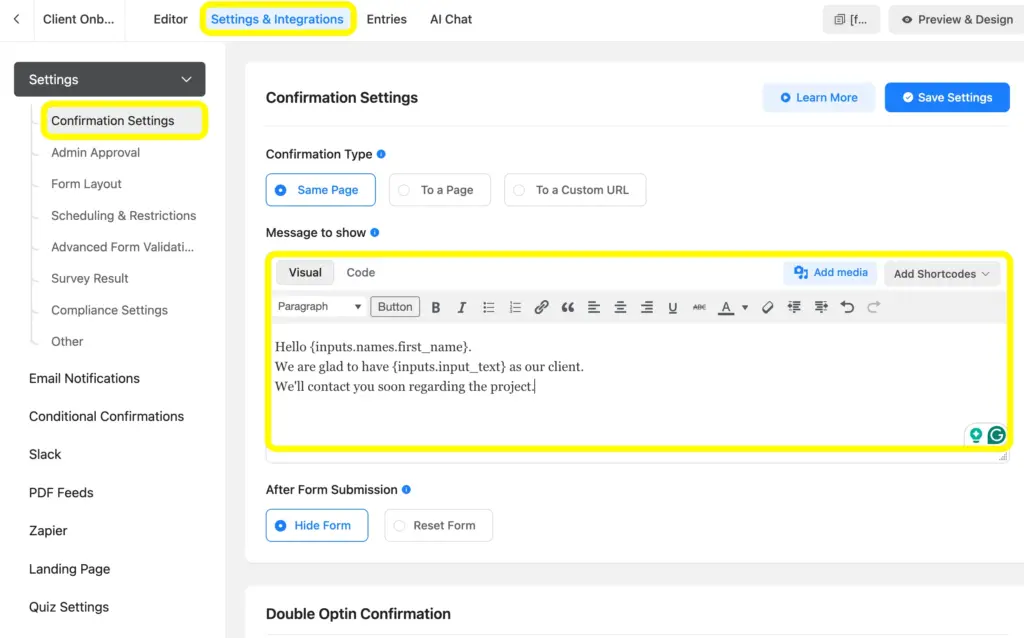
Fluent Forms email notification system helps you add notifications instantly and precisely while applying the shortcodes as well as conditional logic.
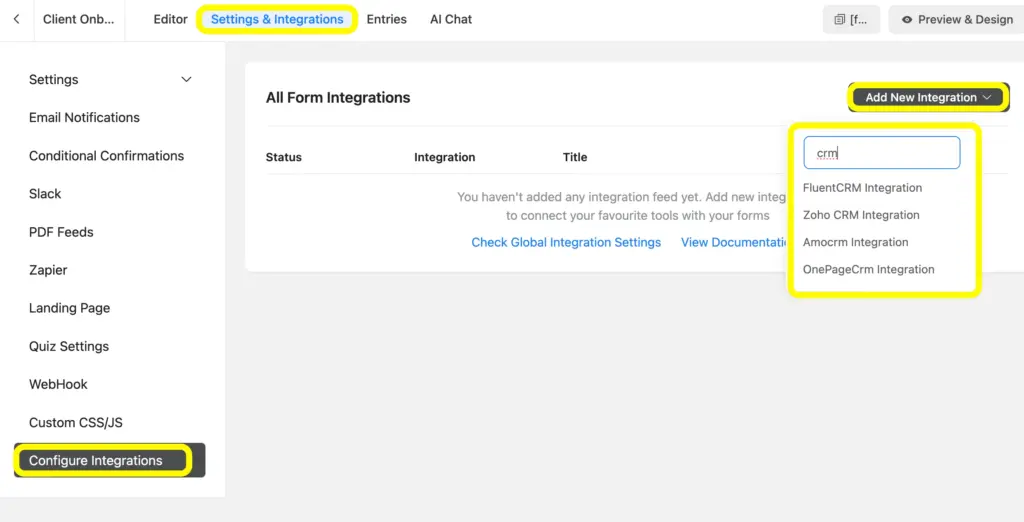
Step 4: Connect your CRM or productivity tools
Still inside Settings & Integrations, connect the form to the tools you already use, whether that’s a CRM, an email marketing platform, or a project management app. Each new submission can automatically create a contact, tag them by service type, or kick off a task list, removing the need to manually transfer client details anywhere.
Step 5: Add a payment field (optional)
If you collect an onboarding fee or project deposit, add a Payment Method field along with a Custom Payment Amount or Payment Item field. Fluent Forms supports Stripe, PayPal, Square, Mollie, Razorpay, Paddle, Paystack, and Authorize.net, so you can pick whichever gateway you already use. Learn more on the payment feature page.
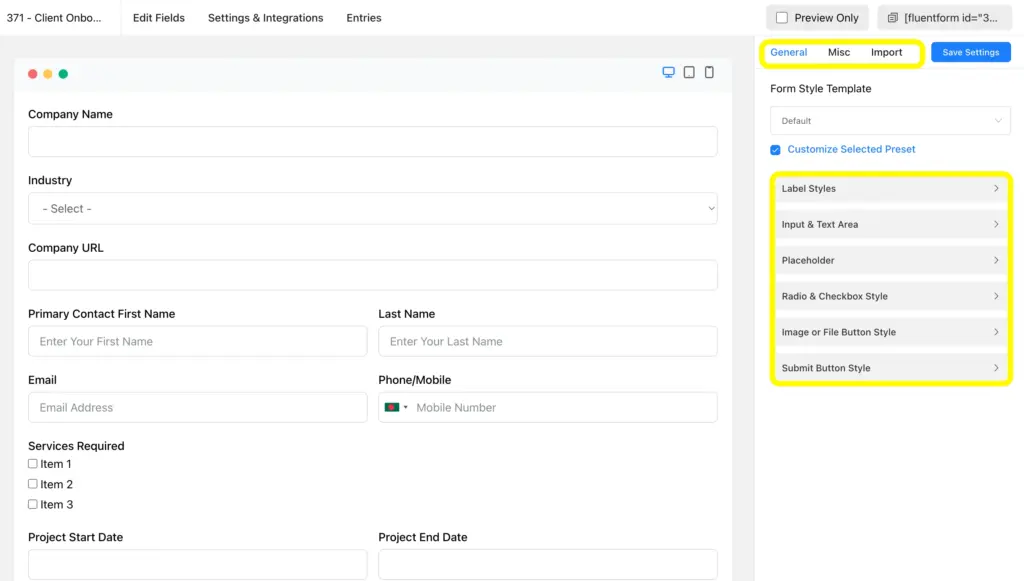
Step 6: Style the form to match your brand
Use the Advanced Form Styler to adjust colors, fonts, spacing, and button styles so the form looks like a natural part of your website rather than a bolted-on plugin. A branded onboarding form signals professionalism before the client relationship even begins.
Step 7: Embed the form on your website
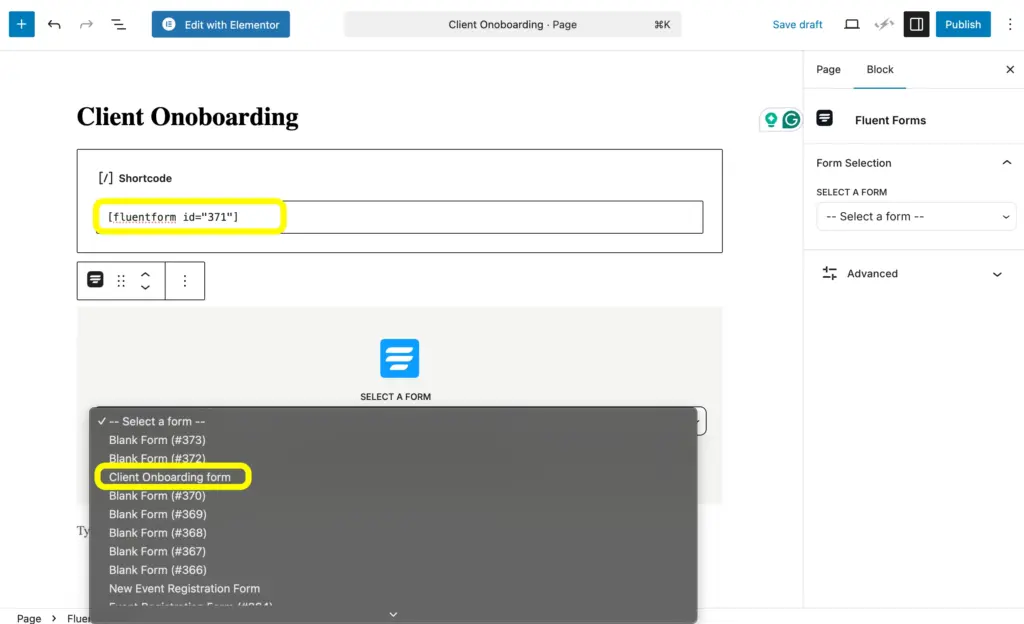
Copy the form’s shortcode or use the Fluent Forms block to place it on a dedicated “Client Onboarding” page, or send clients a direct link right after they sign your proposal.
Best Practice to Automate Your Client Onboarding Workflow
A few habits make the difference between a form that just collects data and a workflow that actually saves you hours every week:
- Keep each step short. Five to seven fields per step are easier to complete than one long scroll.
- Only ask what you need for this stage. Save deeper discovery questions for a follow-up call, not the intake form.
- Automate the handoff. Use integrations so a new submission automatically creates a CRM contact or a project task, instead of you copying details manually.
- Test the client’s view. Submit a test entry yourself every so often to make sure conditional logic, notifications, and payment fields all behave as expected.
- Review and refine quarterly. As your services evolve, revisit the form fields so you’re not still asking questions that no longer apply.
Give Every New Client a Smooth Start
A disorganized onboarding process quietly costs you time, and sometimes clients, before the real work even starts. Building your onboarding form in WordPress with Fluent Forms turns that scattered process into a single, branded, automated flow: contact details, project scope, files, agreements, and payment, all captured in one place, with confirmations and CRM updates happening in the background.
Set it up once, and every new client gets the same smooth, professional start, without you lifting a finger after they hit submit.
Ready to build your onboarding workflow? Get Fluent Forms Pro and turn your client intake into an automated system today.

Hi, this is Aparup. I am a Literature postgraduate, mixing my creative thoughts with my experience in the tech industry to surpass AI. Professionally, I am a content marketer seeking solutions to users’ problems regarding WordPress.



Leave a Reply