
How to Accept Donations in WordPress Websites
For its unmatched flexibility and versatile plugins, nonprofit organizations prefer WordPress websites as their primary web platform.
Accepting donations in WordPress is super easy once you have activated the right form/donation/payment plugin and integrated the payment methods with proper security.
Accepting one-time donations or implementing recurring donations enhances a nonprofit organization’s fundraising scalability.
So, we’ve come up with a painless donation solution for WordPress that can help both nonprofits and donors.
What’s that?
It’s a way to accept donations in WordPress without using many plugins or writing a single line of code.
In this blog, I’ll show you how to enable fundraising on your WordPress site using a form plugin that integrates multiple payment methods.
TL;DR
- You can accept donations on your WordPress site using a form plugin and payment methods
- Recurring payment is a plus for donations, which you can apply using the Subscription field of Fluent Forms
- You need to integrate the payment tools to start accepting donations
- In Fluent Forms, you can use the predefined donation form template or start from scratch
- Fluent Forms allows you to easily customize fields without coding. You can customize the subscription field for recurring donations
- In Fluent Forms, you can use the advanced form styler to bring uniqueness to your donation forms, also available in the block editor via the Gutenberg form styler
- Add a landing page that can be set from the Form’s settings
- Email notifications, spam protection, and a reporting dashboard are some of the features of Fluent Forms that are relevant for donations
Why accept donations in your WordPress site
WordPress is the most popular CMS among billions of businesses worldwide, and it’s not keeping nonprofit organizations behind.
If you are a WordPress user, you can multiply the possibilities of your business using the themes and plugins while practicing the smartest and simplest possible development.
WordPress gives you freedom as well. You need not tolerate the old-age codes through which you build many designs. You have plenty of plugin options to change at any time.
That is where a dynamic industry like nonprofits can make the best use of WordPress.
Let’s see why accepting donations in WordPress is always a better choice:
- Easy to build donation forms and pages
- Simplified donation form customization
- Plenty of integrations with plugins to use multiple payment options
- High-end security measures are a plus
- Industry-standard themes available
What you need to ensure before accepting donations on your site
There is no debate that your WordPress site can deliver all the features you expect, which are more likely to be found on a custom-themed site or one powered by SaaS.
Again, there are a few notes that can amplify your nonprofit organization’s donation acceptance.
You will find later why we recommend installing and activating a form plugin in your donation site.
Some donors prefer to make a one-time contribution, while others expect recurring payment options. Additionally, not all donors use the same payment method, so integrations with multiple payment options expand the donation acceptance rate as well.
Flawless calculation
A donation requires seamless calculation under a variety of conditions. Some prefer one-time donations, some prefer recurring ones, and a few may need a custom calculation. So, the calculation should be flawless before they hit the Pay Now button.
Recurring payments
Most of the donors of platforms like health or education prefer to donate the same amount on a monthly/quarterly/annual basis. It helps them a lot if your site ensures recurring payments and makes them automated.
Relevant integrations
A form plugin can provide a proper way to accept donations. Still, integrations such as CRM, payment solutions, etc., can elevate the whole user experience. You need a complete ecosystem of tools for your site.
Form customization with proper branding
While engaging users and maintaining brand consistency, as branding can build trust, you need customization. It might be simple, like a landing page or logo adapted in the videos, but it makes a huge difference because a donor can be a lifetime gem for your site.
Scheduling, restriction, spam protection, etc
Your donation form may require a scheduling policy that specifies when you want to start and end your project.. You can restrict users based on their geolocation, IP, or similar criteria. You can also use spam protection features to prevent unauthorized users.
Steps to accept donations in WordPress
The beauty of WordPress is that you can run businesses using plugins that require no coding skills to operate. And, a form plugin like Fluent Forms can be your ultimate partner to accept donations on your nonprofit organization’s WordPress site.
Additionally, it helps if you want to start accepting donations for a single special campaign, as you need to run the donation program easily and effectively. The whole process will be faster and smoother.
Let’s go through the steps to accept donations in WordPress.
1. Have a proper form plugin
Here we expect you to get e a proper plugin, which doesn’t mean you necessarily need a donation plugin. That can be a form plugin that swiftly does the donation chores.
But how?
- Accepting payment
- Letting users fill out the form
- Collecting users
- Reconnecting to the users through CRM
- Customizing the form page
Each of the tasks mentioned here can be handled using a form plugin like Fluent Forms.
2. Add payment methods
First, you need to add payment methods to your WordPress site. You can easily configure payment methods with Fluent Forms.
Once the payment methods are set up, your site is ready for users to pay. Now, you can concentrate on the donation form customization.
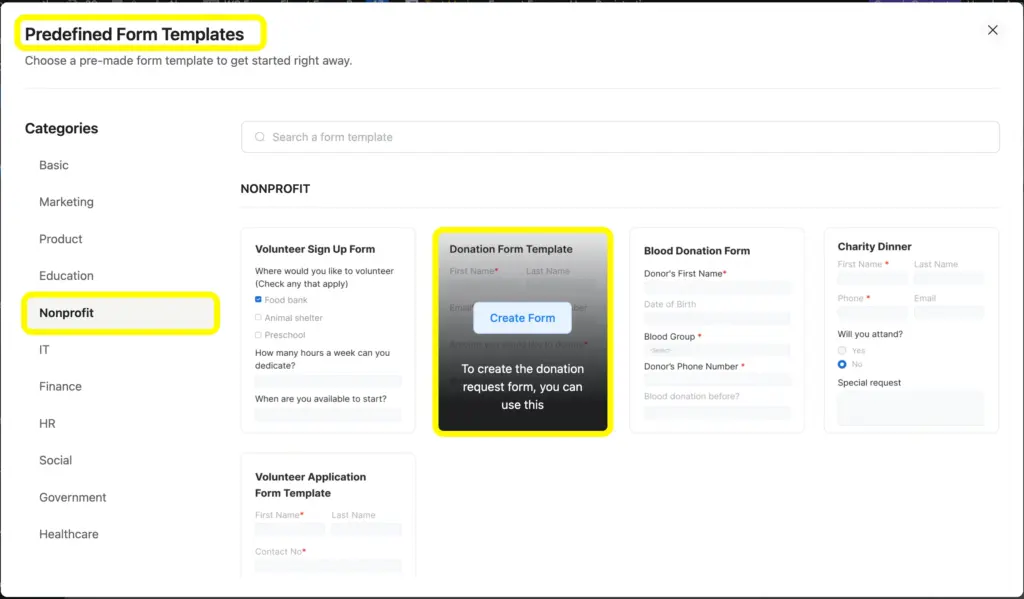
3. Choose a template or start from scratch
Using Fluent Forms, you can simply choose the donation form template and start customizing instantly. Fluent Forms provides you with plenty of form templates that are completely tailored for industry-specific needs, and also superbly customizable.
Go to Fluent Forms Dashboard and select Choose a Template. You will find the predefined form templates.
You can also start from scratch by opening the blank editor page. After clicking the Add New Form button, click on the New Blank Form.
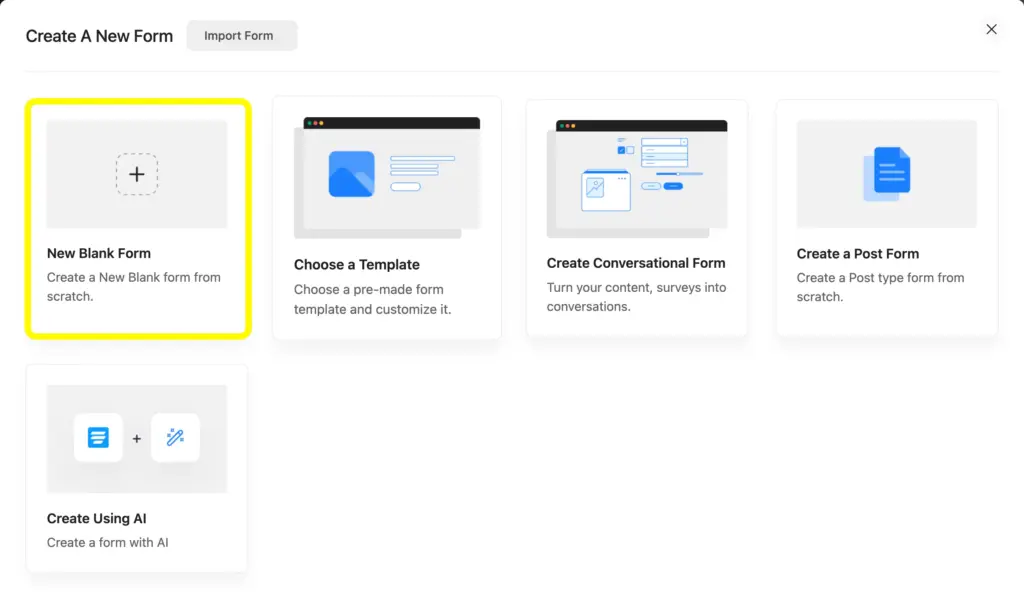
Now, you will go to a new editor page where you can build the form applying your own idea.
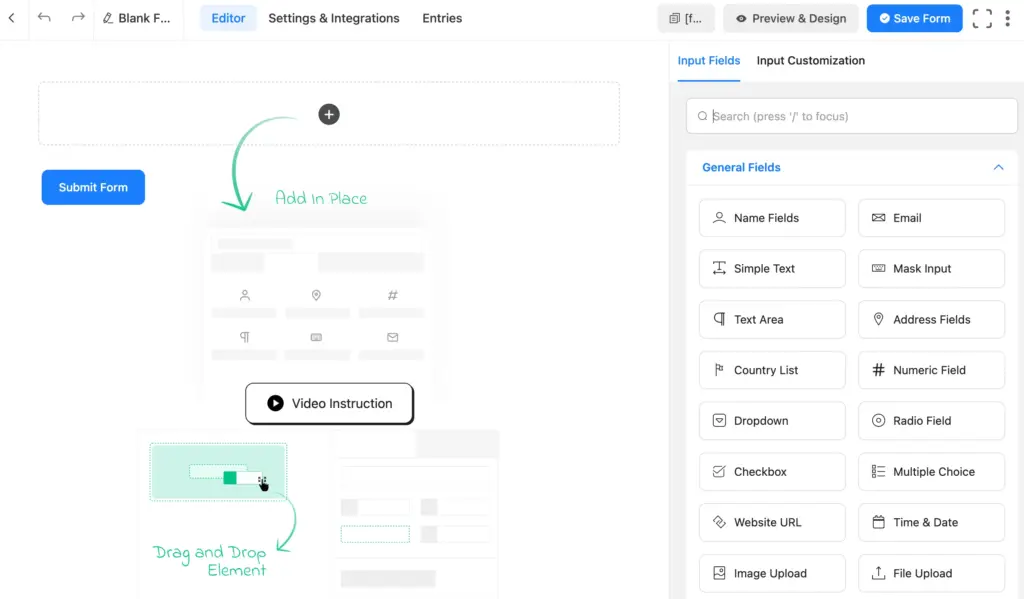
4. Add required fields
Once you have entered the editor page, you can now add fields from the 60+ input fields in Fluent Forms. You will find the fields on the right side of the editor page form, where you can simply click and serially add fields, or drag any fieldsto the preferred positions.
Here I have added a few fields to a donation form, which I’ll customize later as needed.
- Name fields
- Tow-column field
- Email field
- Country
- Radio field
- Subscription field
What I’ll try to collect from the user is their identity, country name, preferred donation scope, etc.
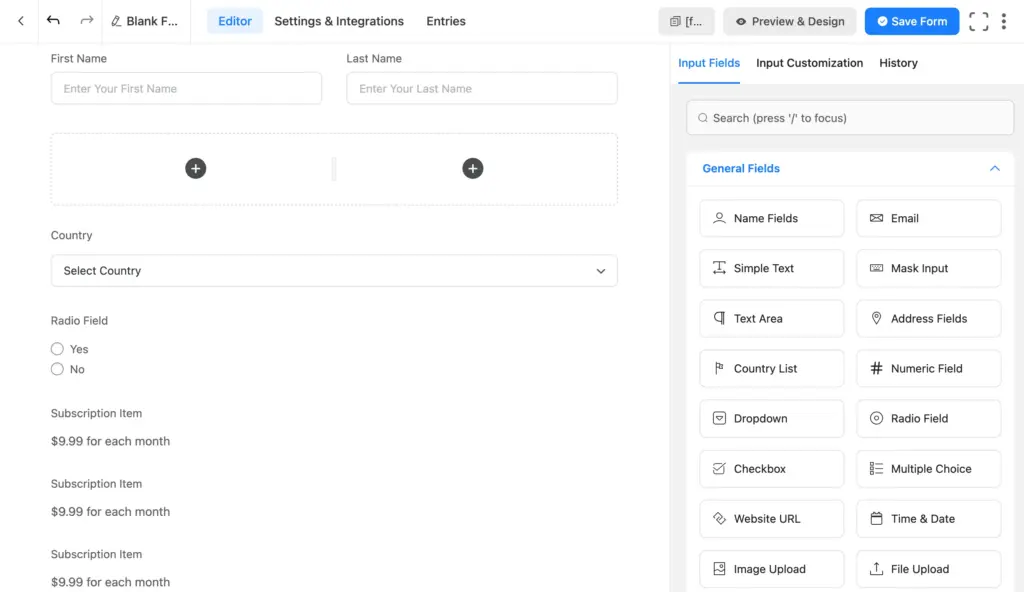
5. Customize the fields
Once you have added the required fields, you can customize them to meet the requirements of a standard donation form.
Fluent Forms gives you the ultimate no-code customization for each form, including the placeholder, admin field label, element label, options, layout, etc.
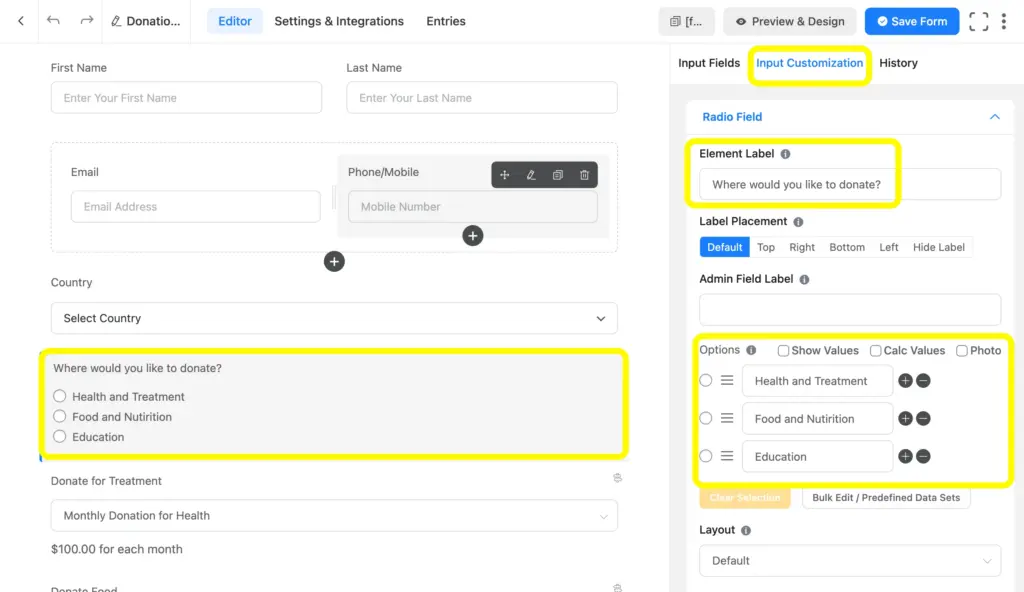
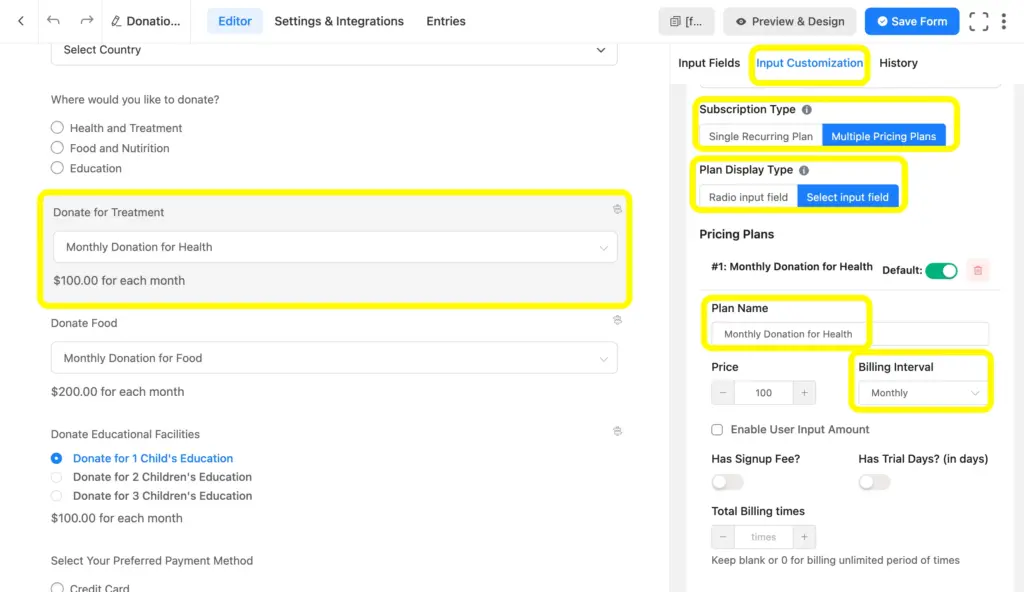
As you can see here, I have also customized the subscription field for recurring payments/donations. It is amply customizable, and the amount can be set by the donor as well.
What you can set up in the subscription fields, which includes, but is not limited to:
Subscription Type: either a single recurring plan or multiple pricing plans
Plan Display Type: either radio input field or select input field
Plan Name
Pricing: a custom amount can be set
Billing Interval: daily, weekly, monthly, and yearly
Enable User Input Amount
Options for Sign Up Fee and Trial Day
As you can see here, the Subscription field isvery useful for implementing recurring donations. You can also add a payment item button and enable custom payment.
I’ve also applied conditional logic to the subscription field. Users will also see this when they choose their preference to donate.
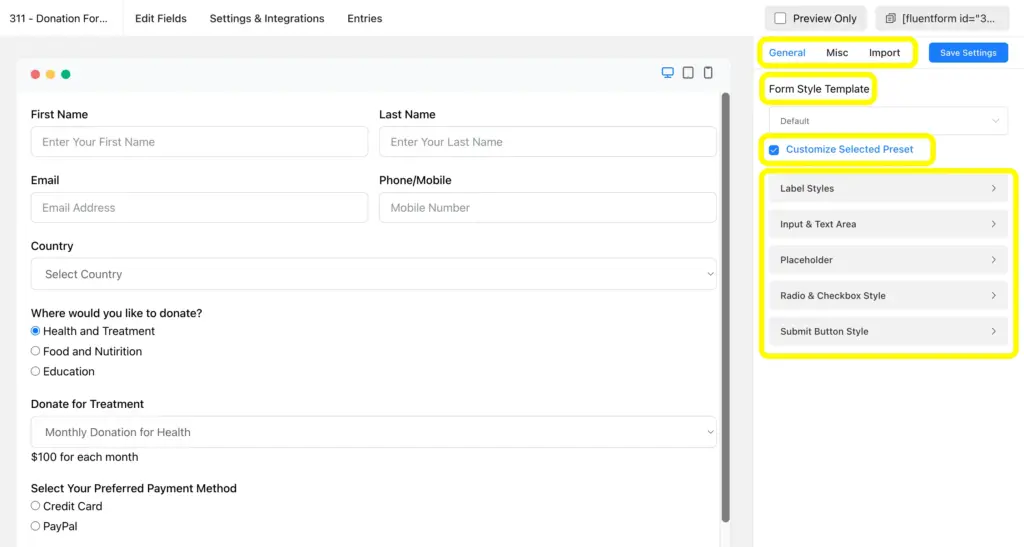
6. Implement Advanced Form Styler
Fluent Forms allows advanced form customization through its built-in advanced form styler. You will find the styler in the preview page, where you can apply styling that fits your brand’s identity. You can make changes in the padding, margin, colors, etc.
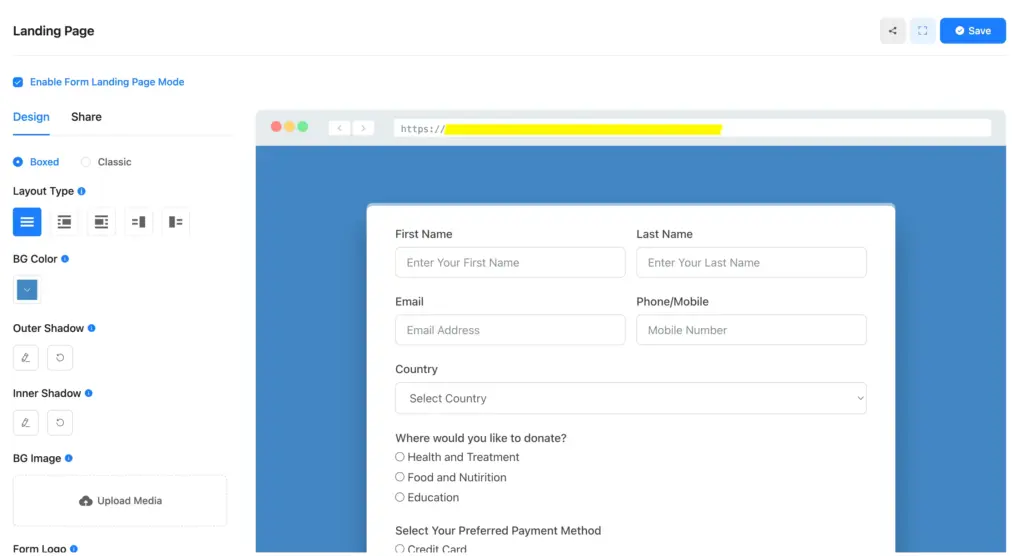
7. Develop a landing page (no-code)
To make the donation form particularly effective, you can enable a landing page within the form. Simply go to the form’s Settings and Integrations, where you will find the Landing Page option,
You can customize the page with your brand style, and you can also apply the Gutenberg block styler in Fluent Forms to make it even better.
This is the simplest way to accept donations on your WordPress site using Fluent Forms for nonprofit organizations.
Related features
Email notification
Fluent Forms allows you to send an email notification to the users once a form is submitted. As you can set it with conditional logic, you can send tailored messages to the users.
Spam protection
Fluent Forms includes multiple spam-protection measures along with reCAPTCHA, hCaptcha, Turnstile, etc. You can also apply login requirements, block empty submissions, enable the limit of maximum entries, and take other security measures.
Reporting dashboard
Fluent Forms’ reporting dashboard lets you view your form performance report in a visual format. You can get the summary along with the analysis by form and regions.

Hi, this is Aparup. I am a Literature postgraduate, mixing my creative thoughts with my experience in the tech industry to surpass AI. Professionally, I am a content marketer seeking solutions to users’ problems regarding WordPress.


Leave a Reply