
How to Build a Course Enrollment Form in WordPress Without LearnDash

You’ve been running courses on the LearnDash WordPress plugin for years. Then Stellar WP and LiquidWeb got involved, prices went up, and support slowed down.
If you’re re-evaluating your setup, here’s how to build a course enrollment form in WordPress with Fluent Forms, and why FluentCommunity is worth a close look as your next LMS.
TL;DR
- LearnDash still works, but the acquisition changed pricing, support, and trust for many course creators.
- FluentCommunity is a strong alternative for creators who want an LMS and a student community in one WordPress plugin.
- It fits independent course creators well, large enterprise operations with complex requirements should evaluate feature fit first.
- Fluent Forms (free) builds the enrollment form and connects to FluentCommunity natively.
- One form submission creates the student account, processes Stripe payment, and triggers course access.
- Stripe is included in the free version of Fluent Forms.
- Students self-enroll on public courses, admins enroll students manually from the course editor.
Why LearnDash Users Are Reconsidering Their Setup
What changed after the LiquidWeb acquisition
The LearnDash plugin was acquired by Stellar WP, part of the LiquidWeb brand family. For a while, most users didn’t feel much difference.
LearnDash pricing restructured after the acquisition. Support slowed down. The product direction started feeling more enterprise-focused than creator-focused. Browse any LearnDash forum and you find the same thread: “I love what I built, but I’m not sure I trust where this is going.”
That feeling is worth paying attention to. Your course platform is the foundation of your business. Staying on one you don’t trust carries its own risk.
What you actually need from a WordPress LMS
Most course creators need the same four things:
- A way to organize lessons and modules
- An enrollment form to register students and give access
- Control over who sees what content
- A space where students connect, ask questions, and stay engaged
LearnDash delivers the first three. The fourth requires LearnDash integrations like BuddyPress or BuddyBoss bolted on separately; which adds cost, plugin conflicts, and another thing to maintain.
FluentCommunity is built with all four as one product. Courses, access control, quiz modules, progress tracking, and a community space live in the same WordPress install. The enrollment form connects to it natively through Fluent Forms.
What This Setup Uses
Two plugins. That’s the entire stack.
Fluent Forms (free) builds the course enrollment form. It collects student details, handles payment via Stripe, and triggers enrollment in FluentCommunity on submission.
FluentCommunity is the WordPress LMS and community platform. It manages lessons and modules, runs quizzes, tracks student progress, controls access by course privacy setting, and gives enrolled students a community space alongside the course content.
No separate forum plugin. No third-party checkout tool. No BuddyBoss subscription on top. Both plugins run on your WordPress server and connect natively. LearnDash with BuddyBoss costs $400-600 per year for a single site. FluentCommunity Pro is $159 per year and covers both the LMS and the community.
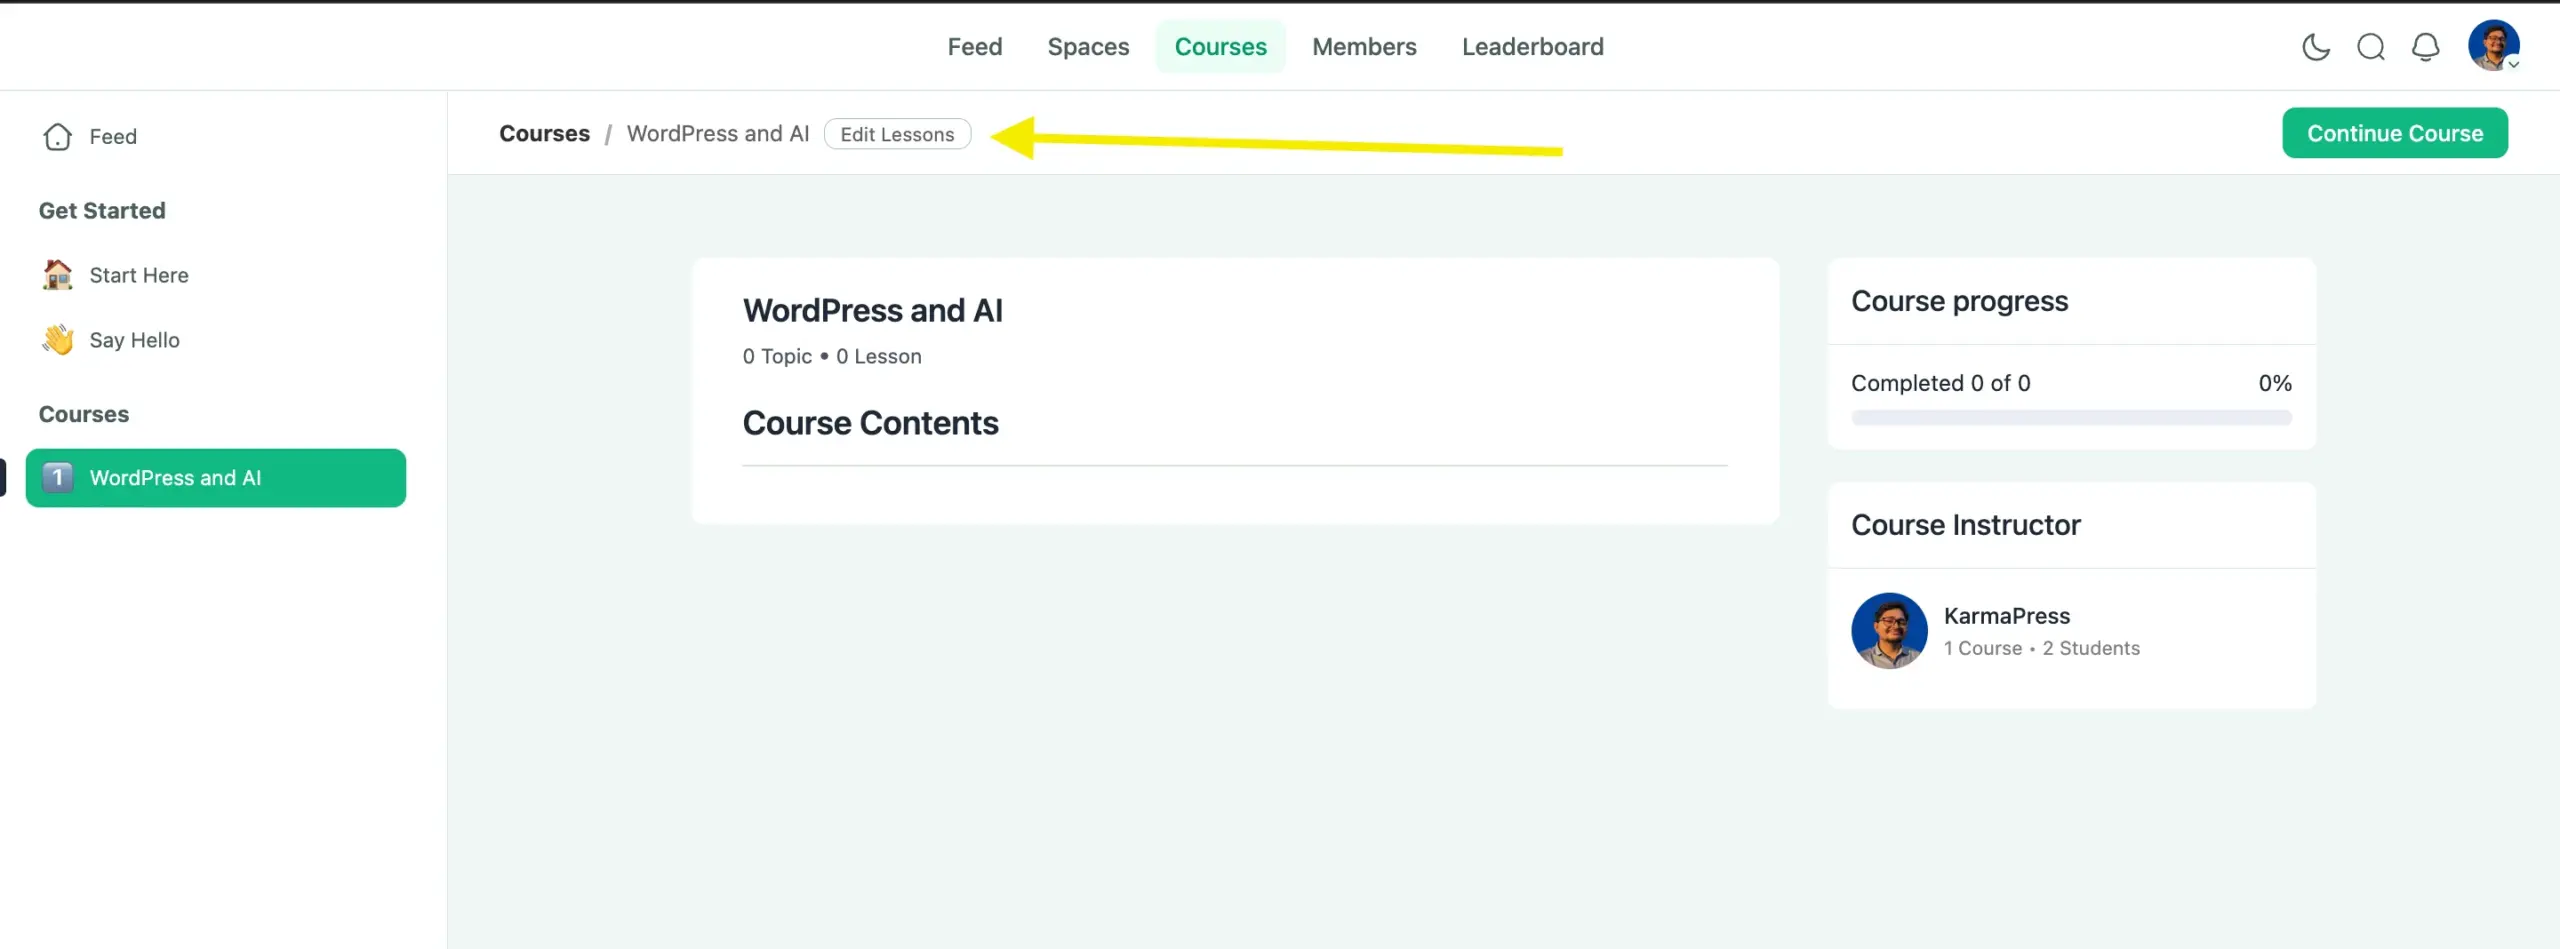
Step 1: Set Up Your Course in FluentCommunity
Enable the Course Module
The Course Module is off by default. Turn it on before anything else.
Go to FluentCommunity > Settings > Features and Addons. Find the Course Module and click Settings. Check the Enable Course Module checkbox and save.
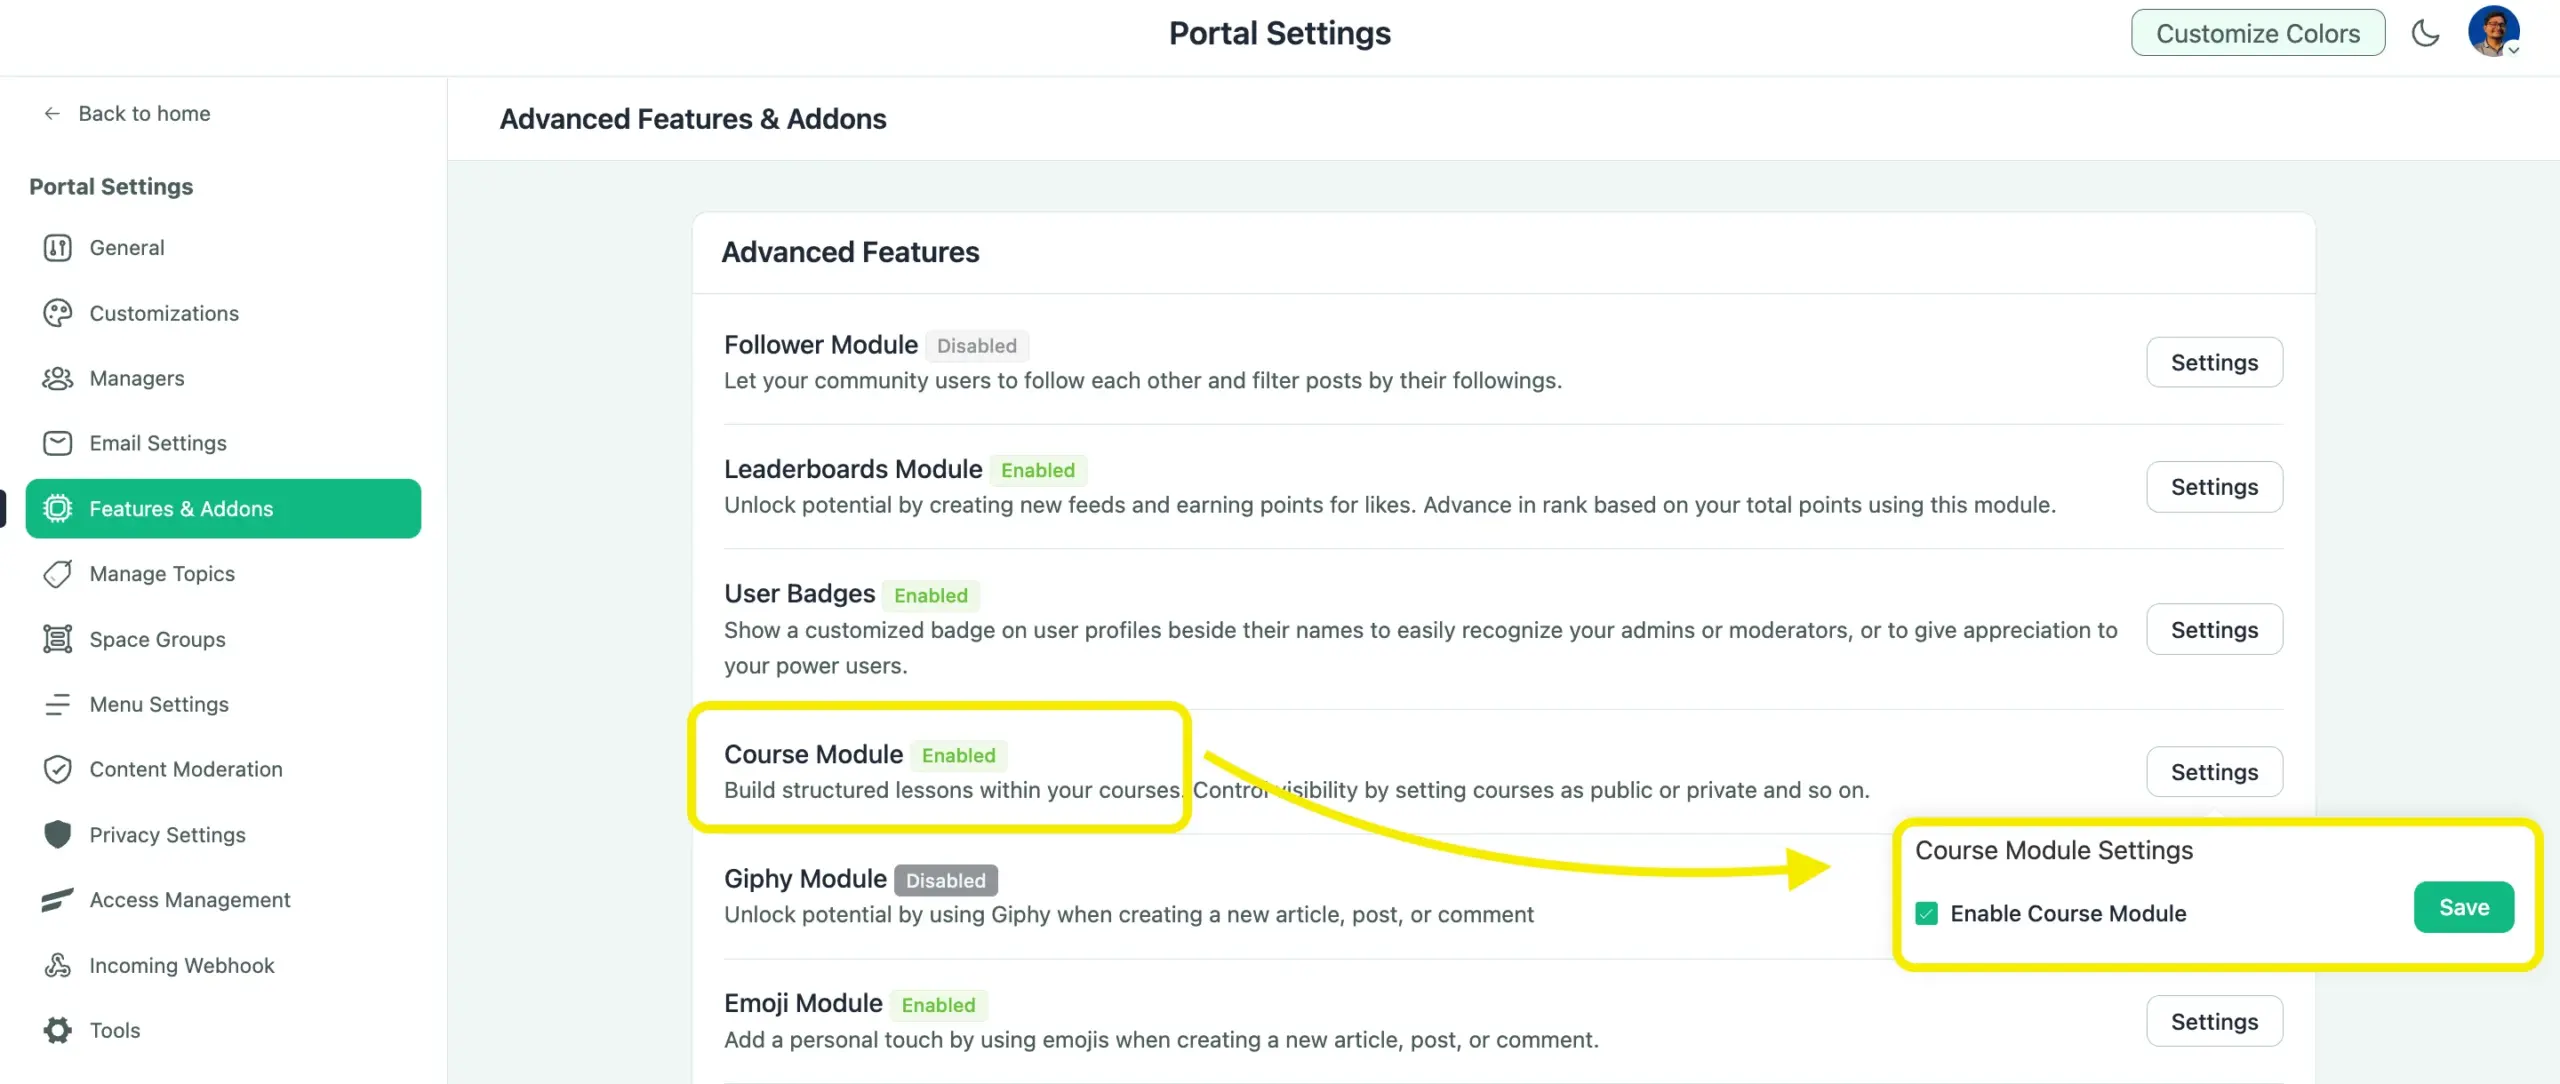
The Courses section now appears in your FluentCommunity navbar.
Create your course and configure enrollment type
Click Add Course in the ‘Manage Courses’ section in the Portal Settings.
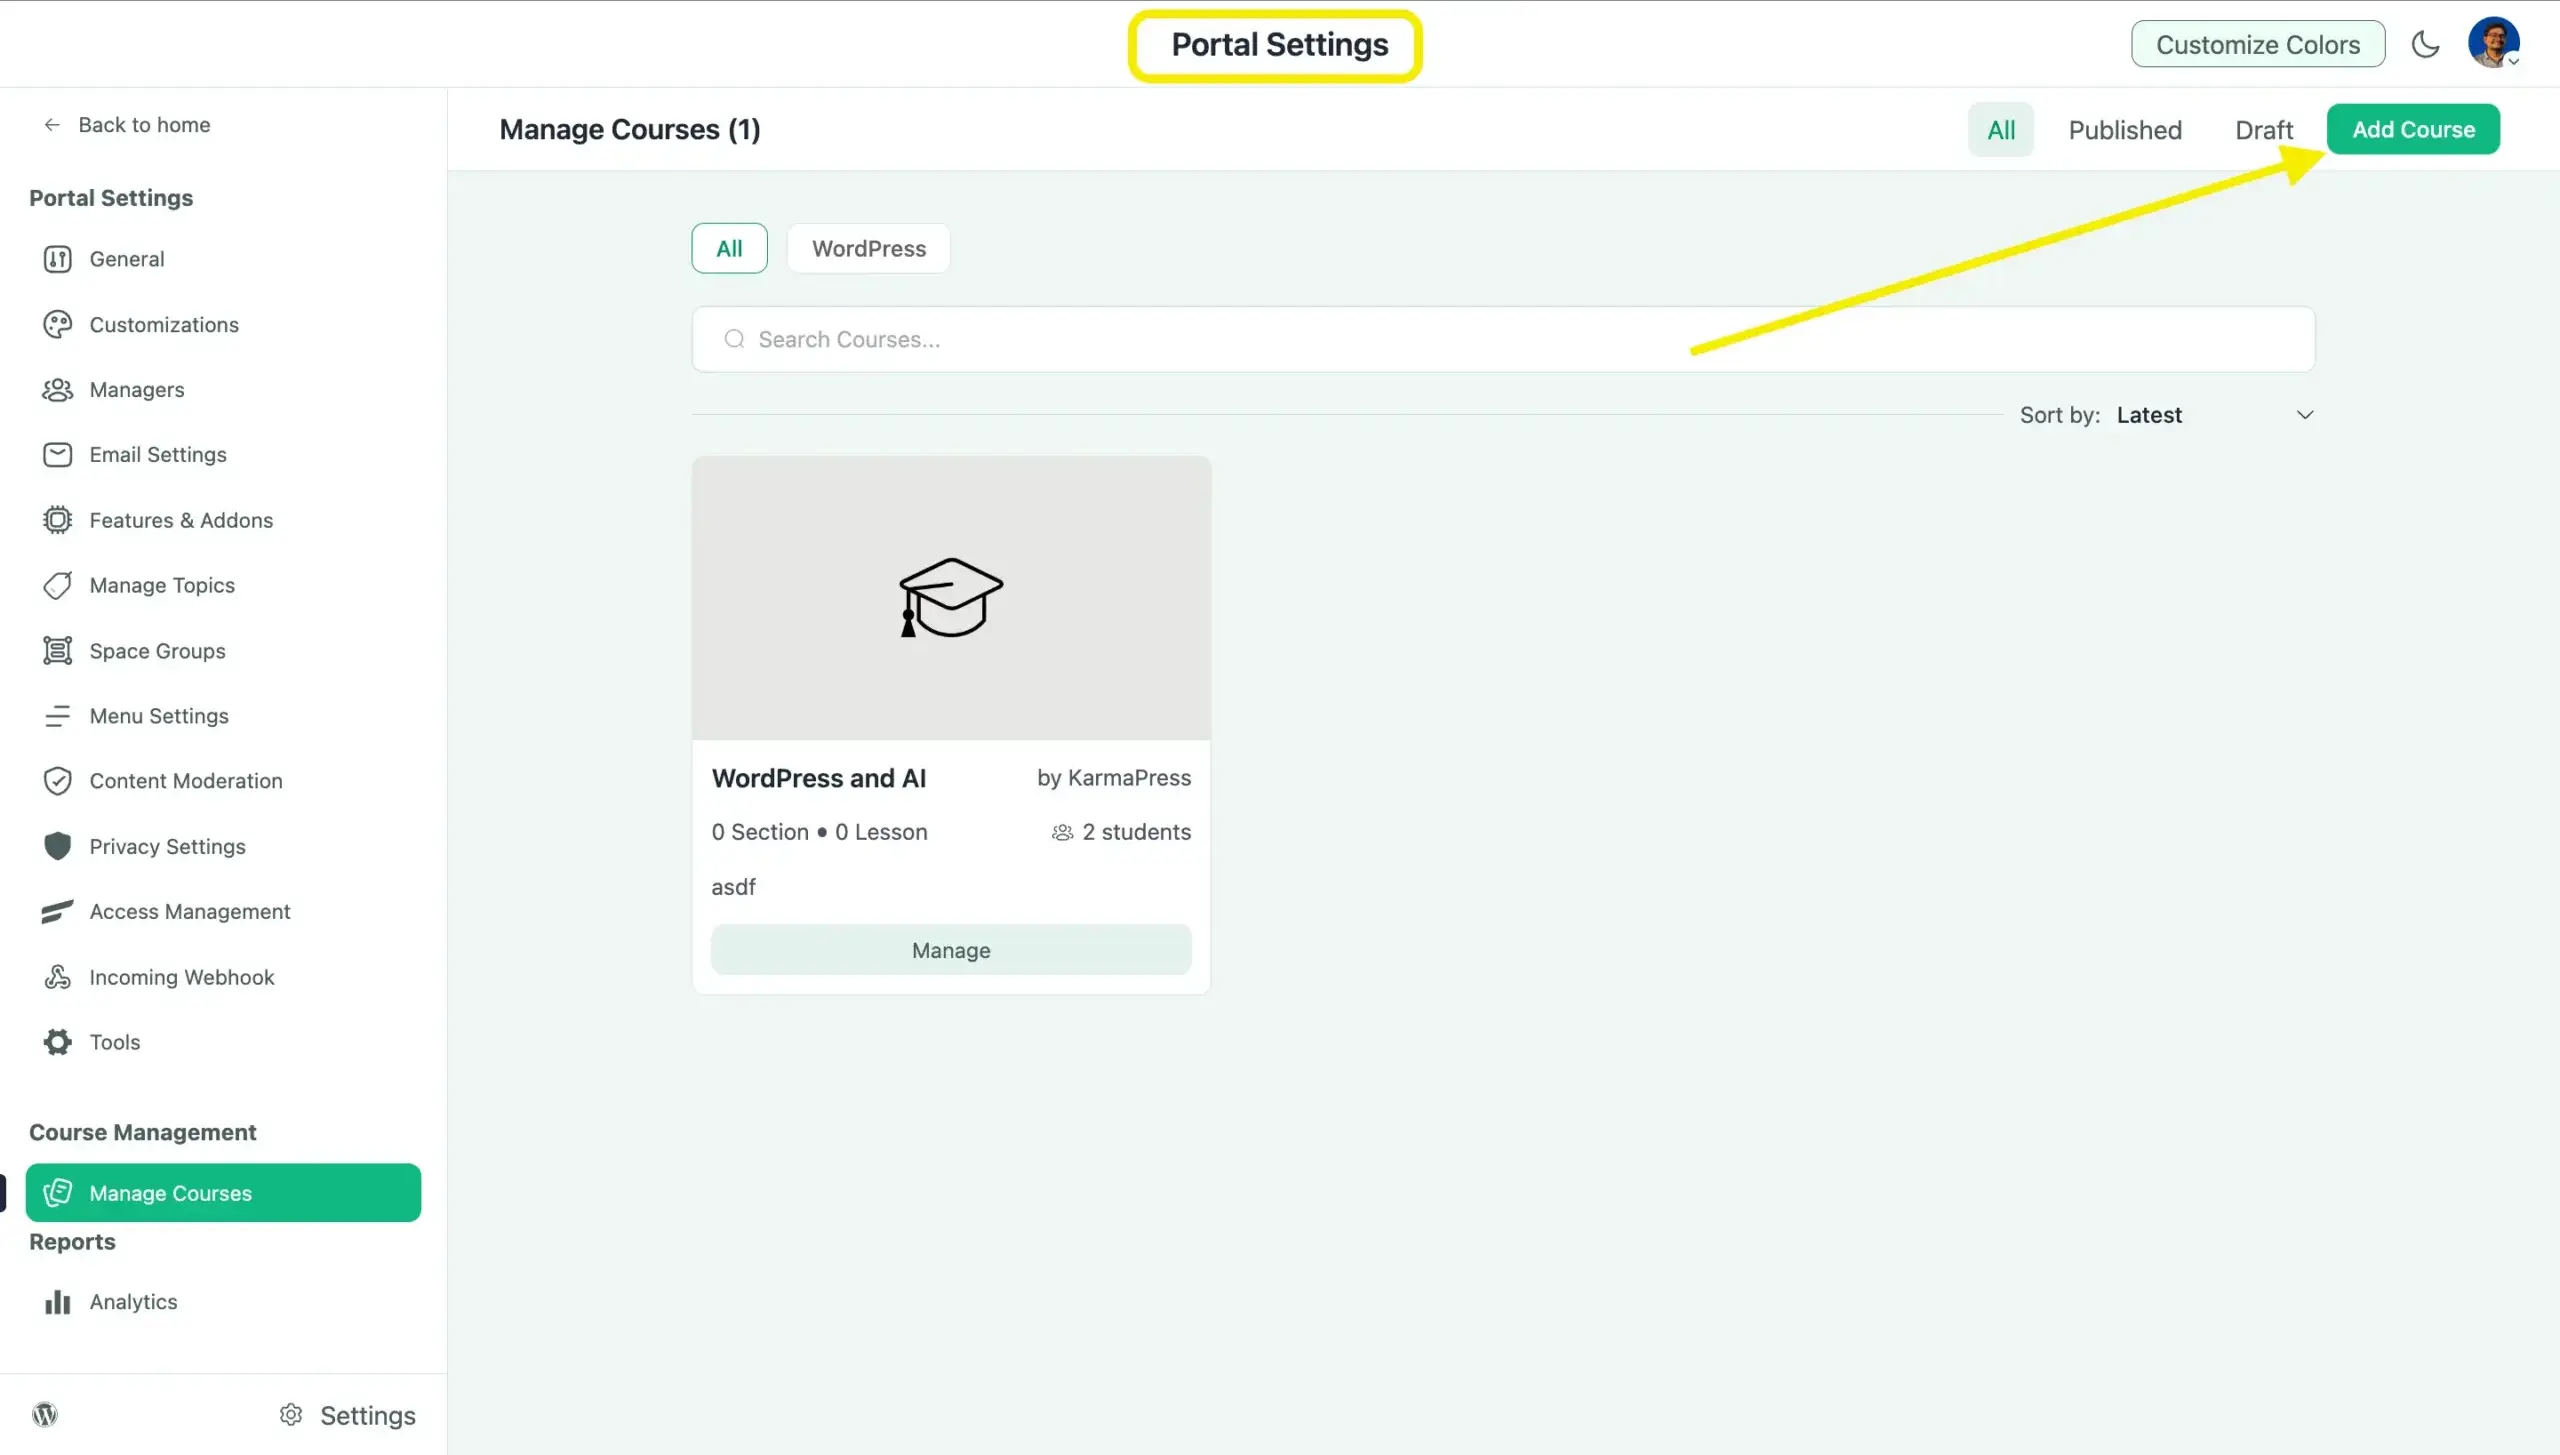
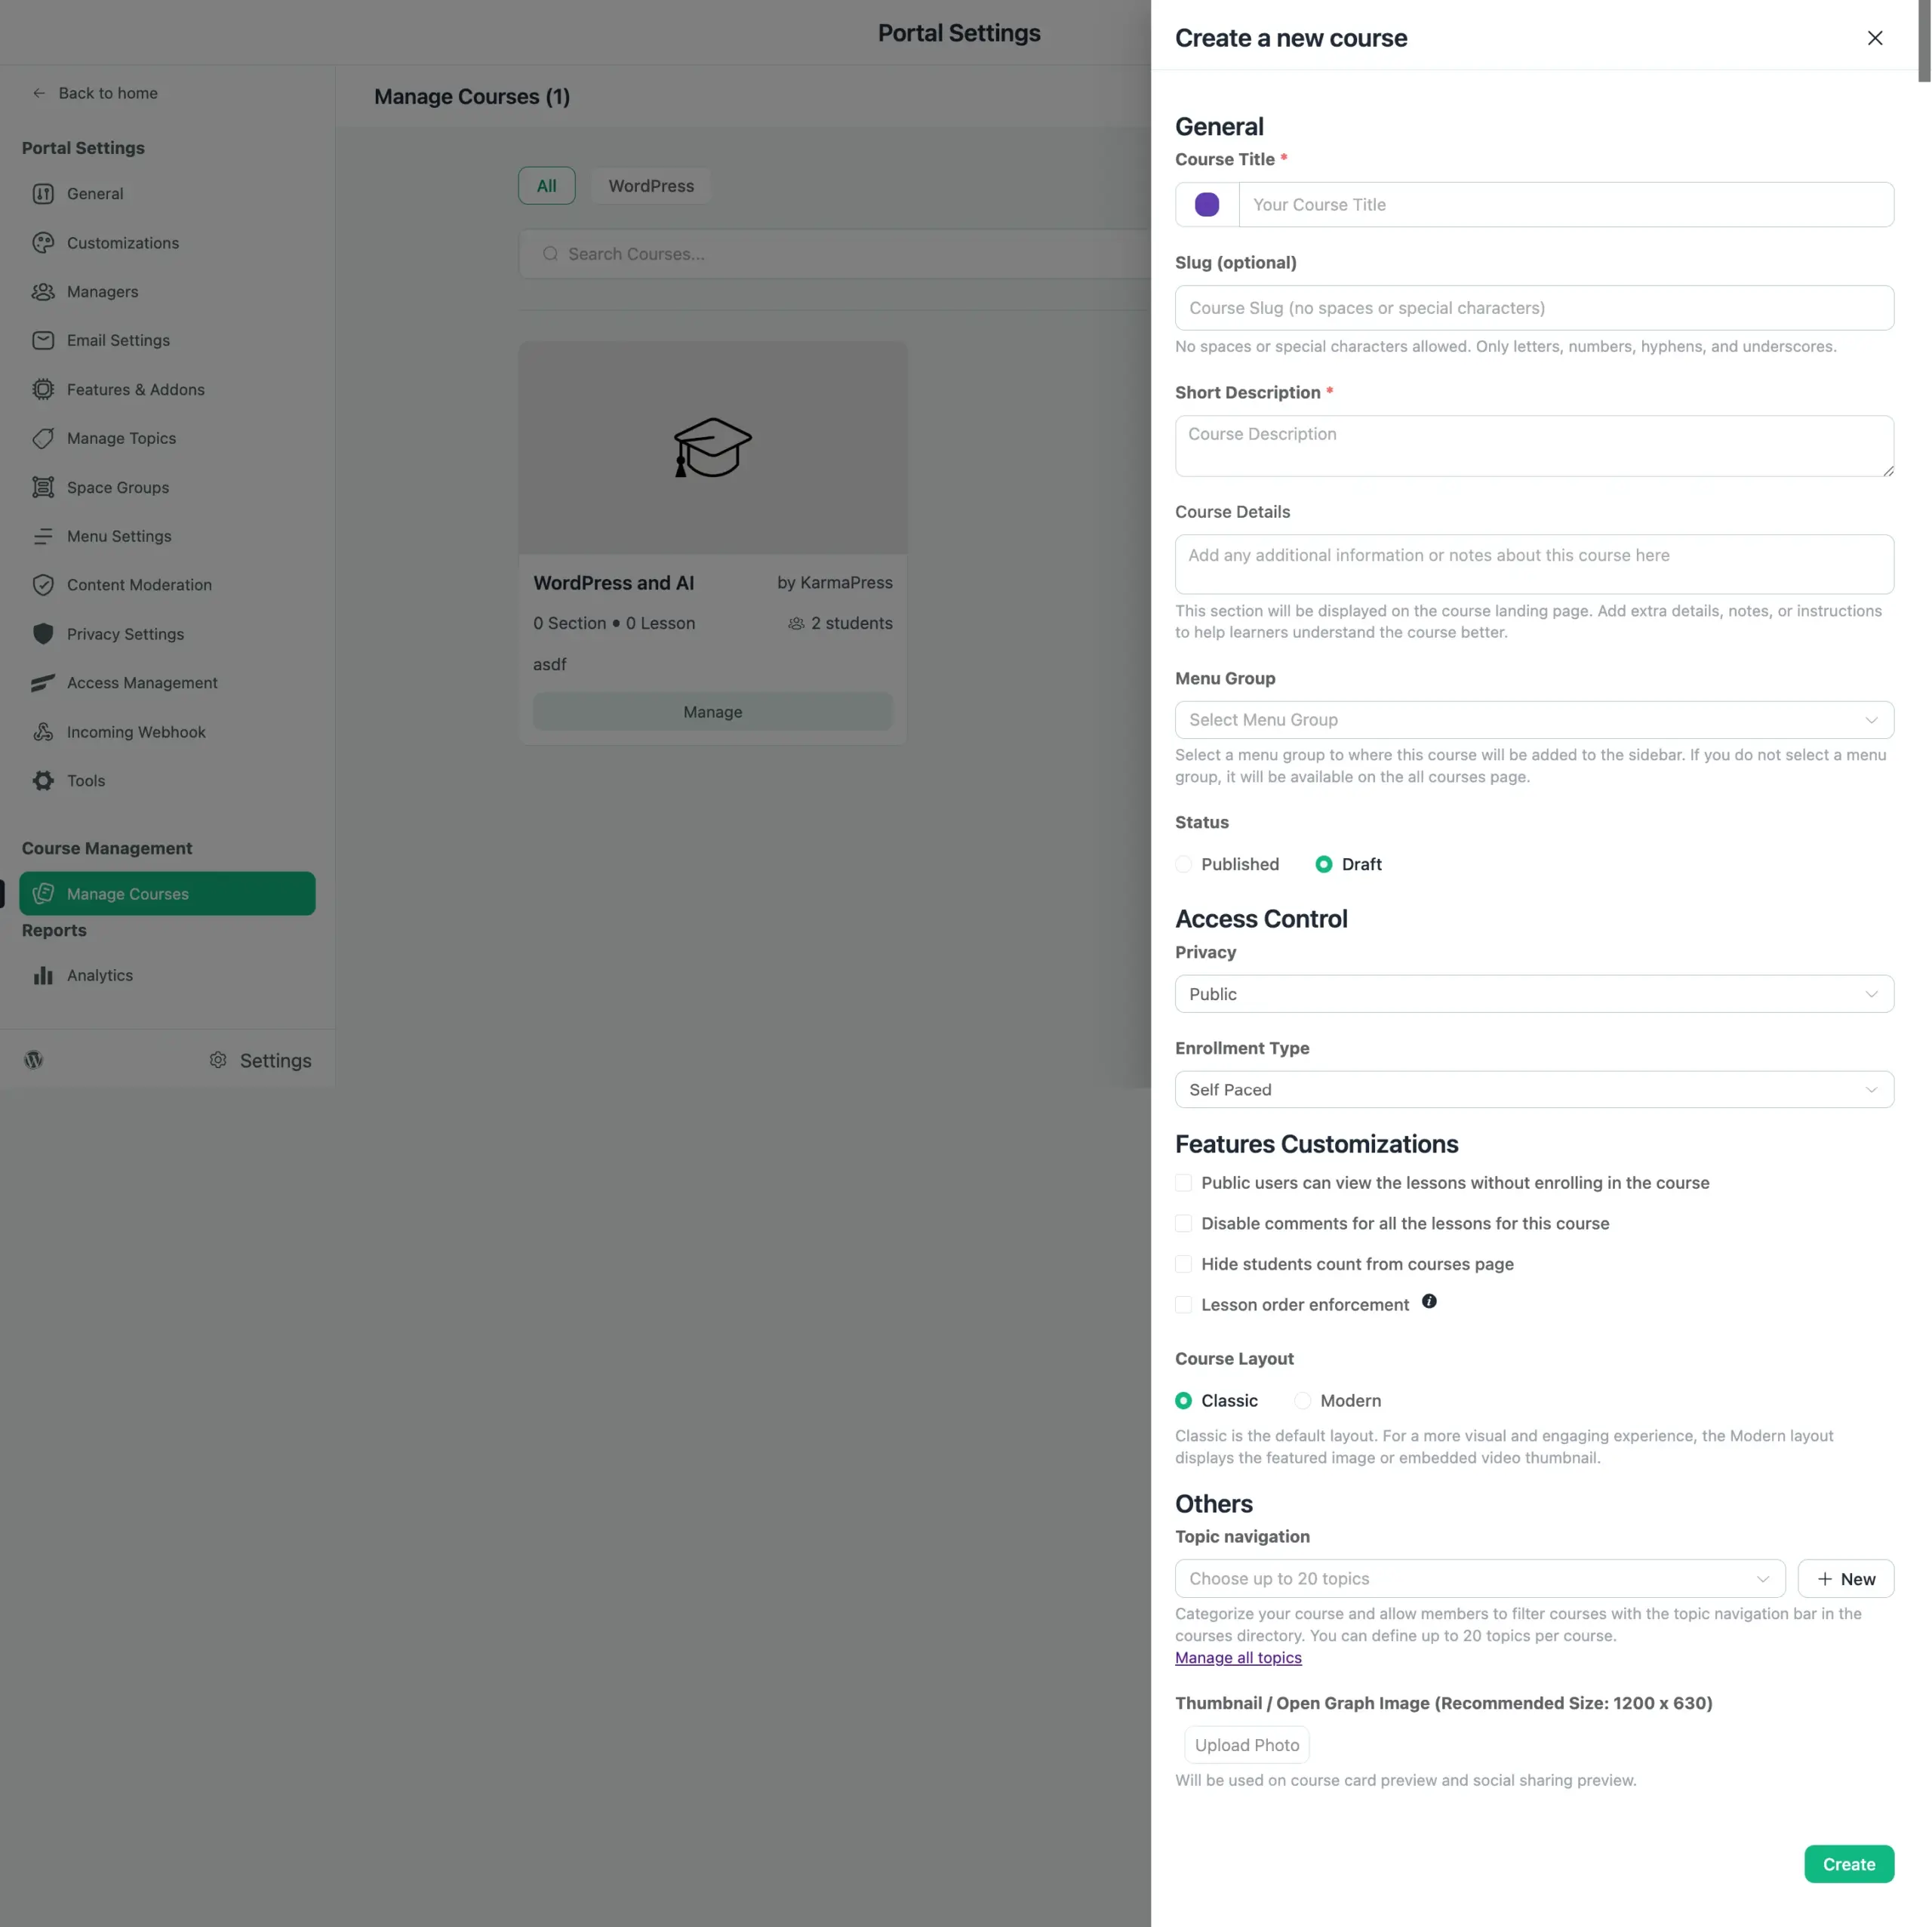
Fill in the title, slug, and short description.
You can also do it from the ‘Courses’ tab of the ‘Home’ dashboard.

Before publishing, set your enrollment type. This decision affects what students experience the moment they enroll:
- Self-Paced: students get access to all lessons immediately
- Structured: content drips based on the date each student enrolled
- Scheduled: lessons release on a fixed calendar date, regardless of when someone joins
Choose based on how you deliver the course. Changing enrollment type mid-cohort affects existing students, so get this right upfront.
Also set your course privacy here:
- Public: open to any visitor
- Private: shows a lock screen with a login/signup prompt when a non-enrolled student tries to view the course
- Secret: doesn’t appear in the course directory at all. Access is by direct link or admin enrollment only.
Your privacy choice affects how the enrollment form behaves. This matters in Step 2.
Step 2: Build the Course Enrollment Form in WordPress with Fluent Forms
Activate the FluentCommunity module in Fluent Forms
This step is easy to miss. Fluent Forms doesn’t connect to FluentCommunity until you activate the module.
Go to Fluent Forms > Integrations. Find the FluentCommunity module and toggle it on.
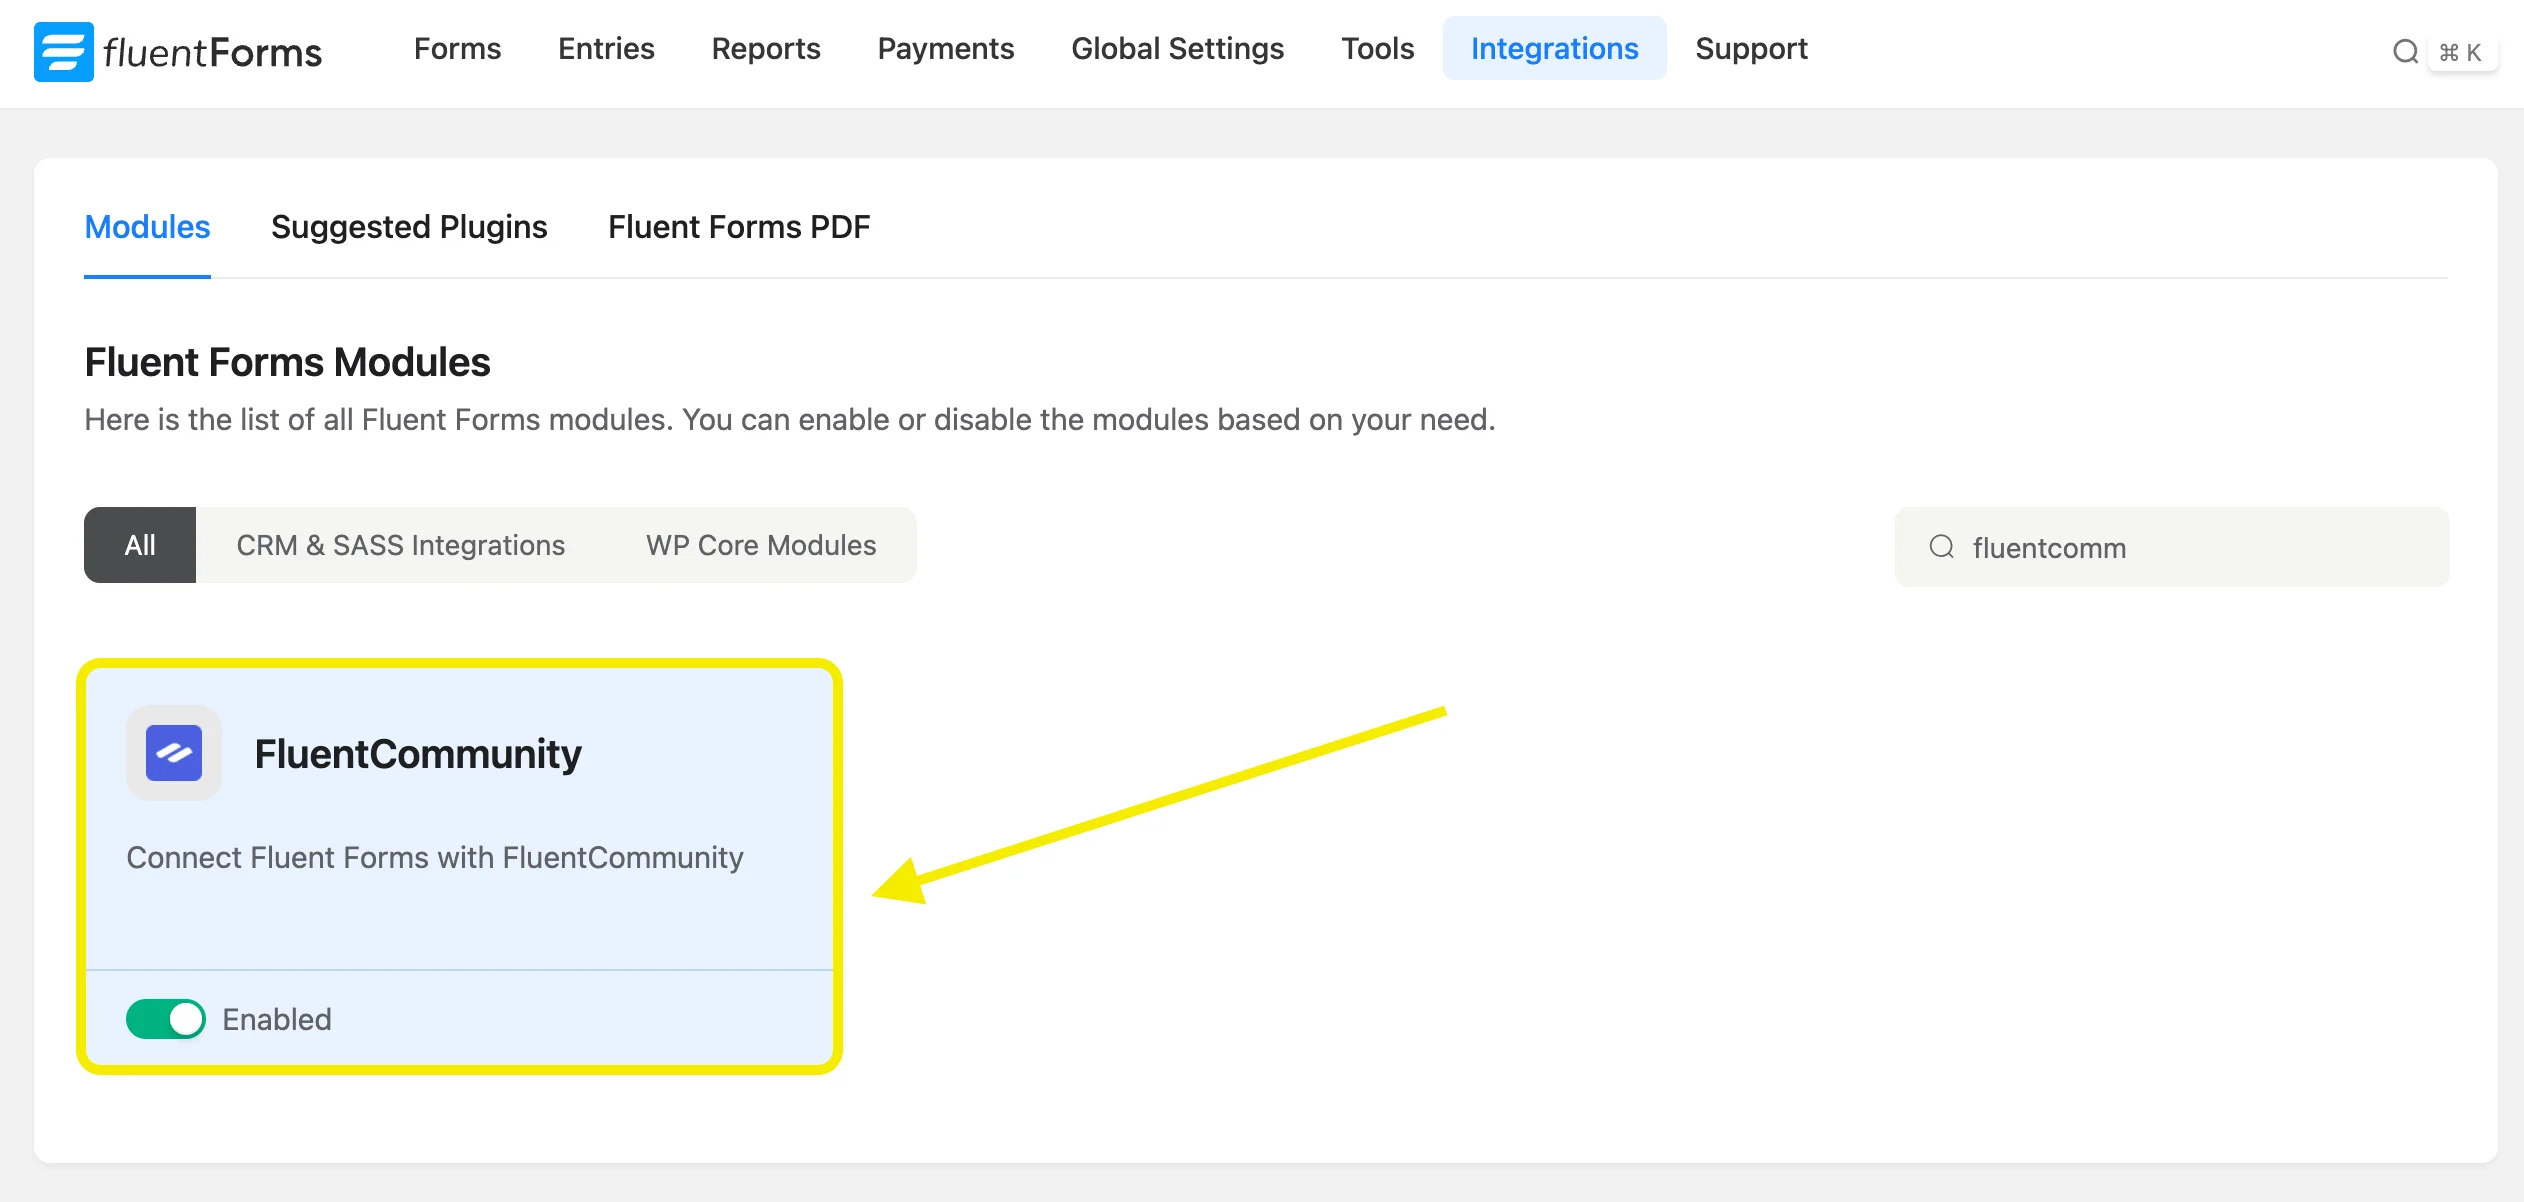
Without this step, the FluentCommunity integration feed won’t appear when you’re building the form. Everything else in this section depends on this being on.
Create the form and choose your fields
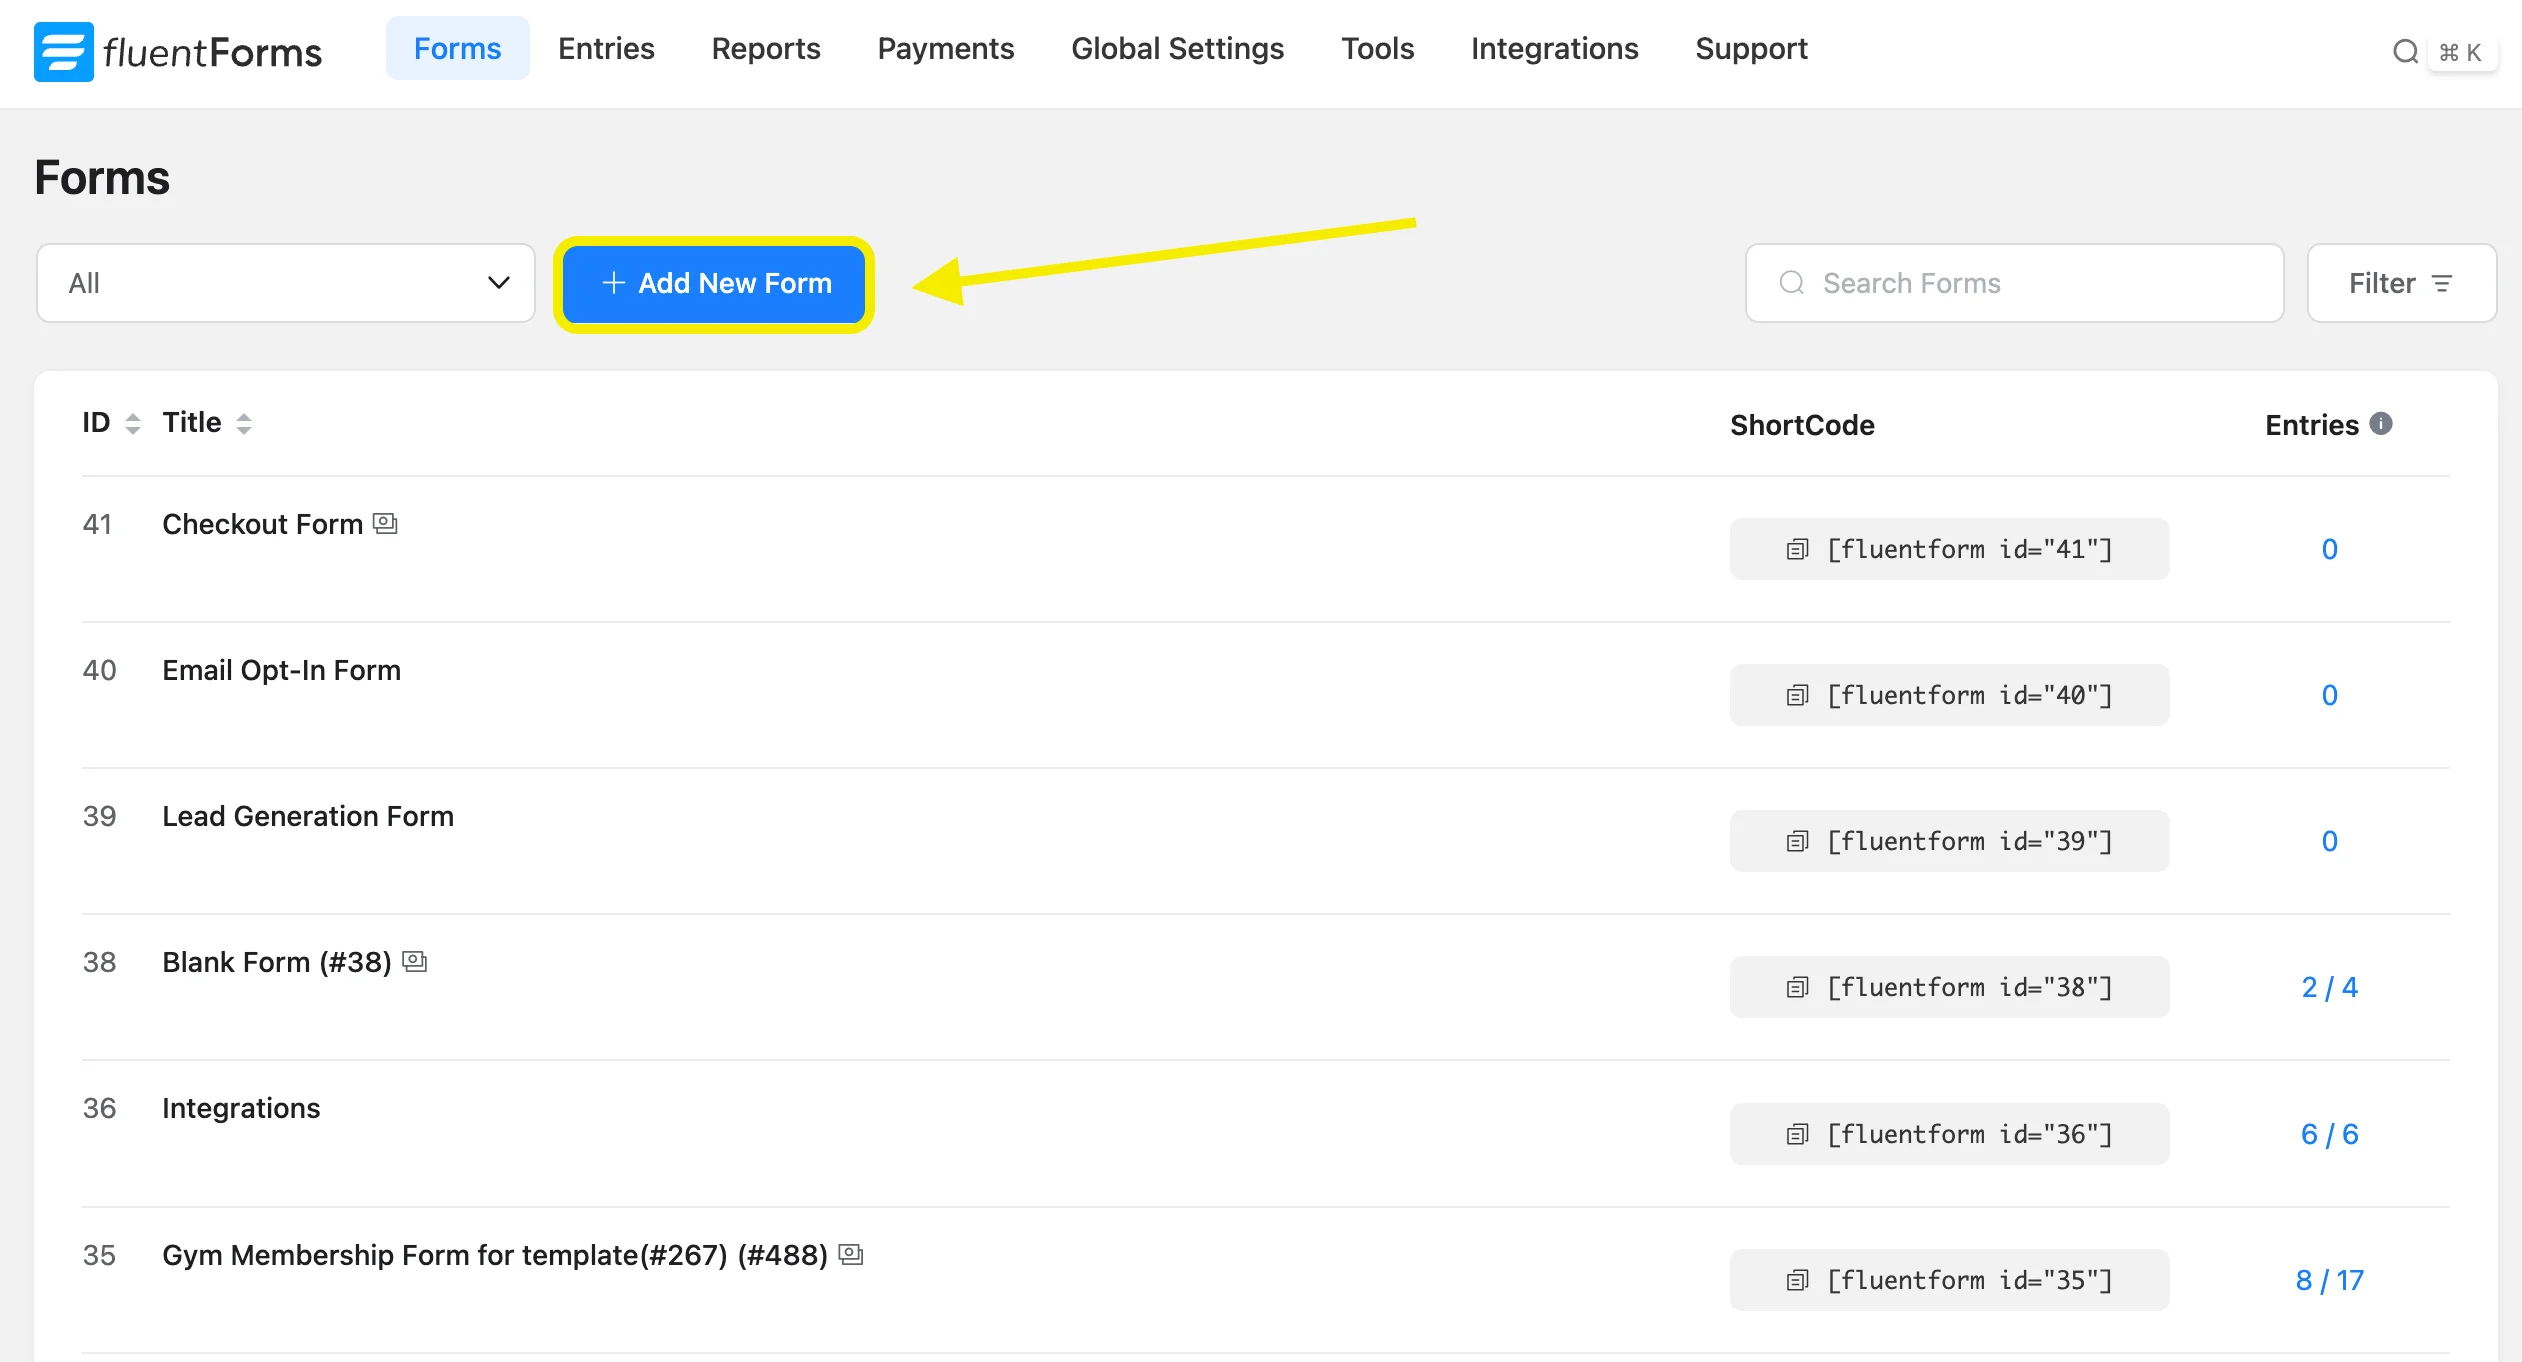
Click Add New Form and start from a blank form or a template.
The form shown below is a complete course enrollment form. Here’s what each section does and why it’s there.
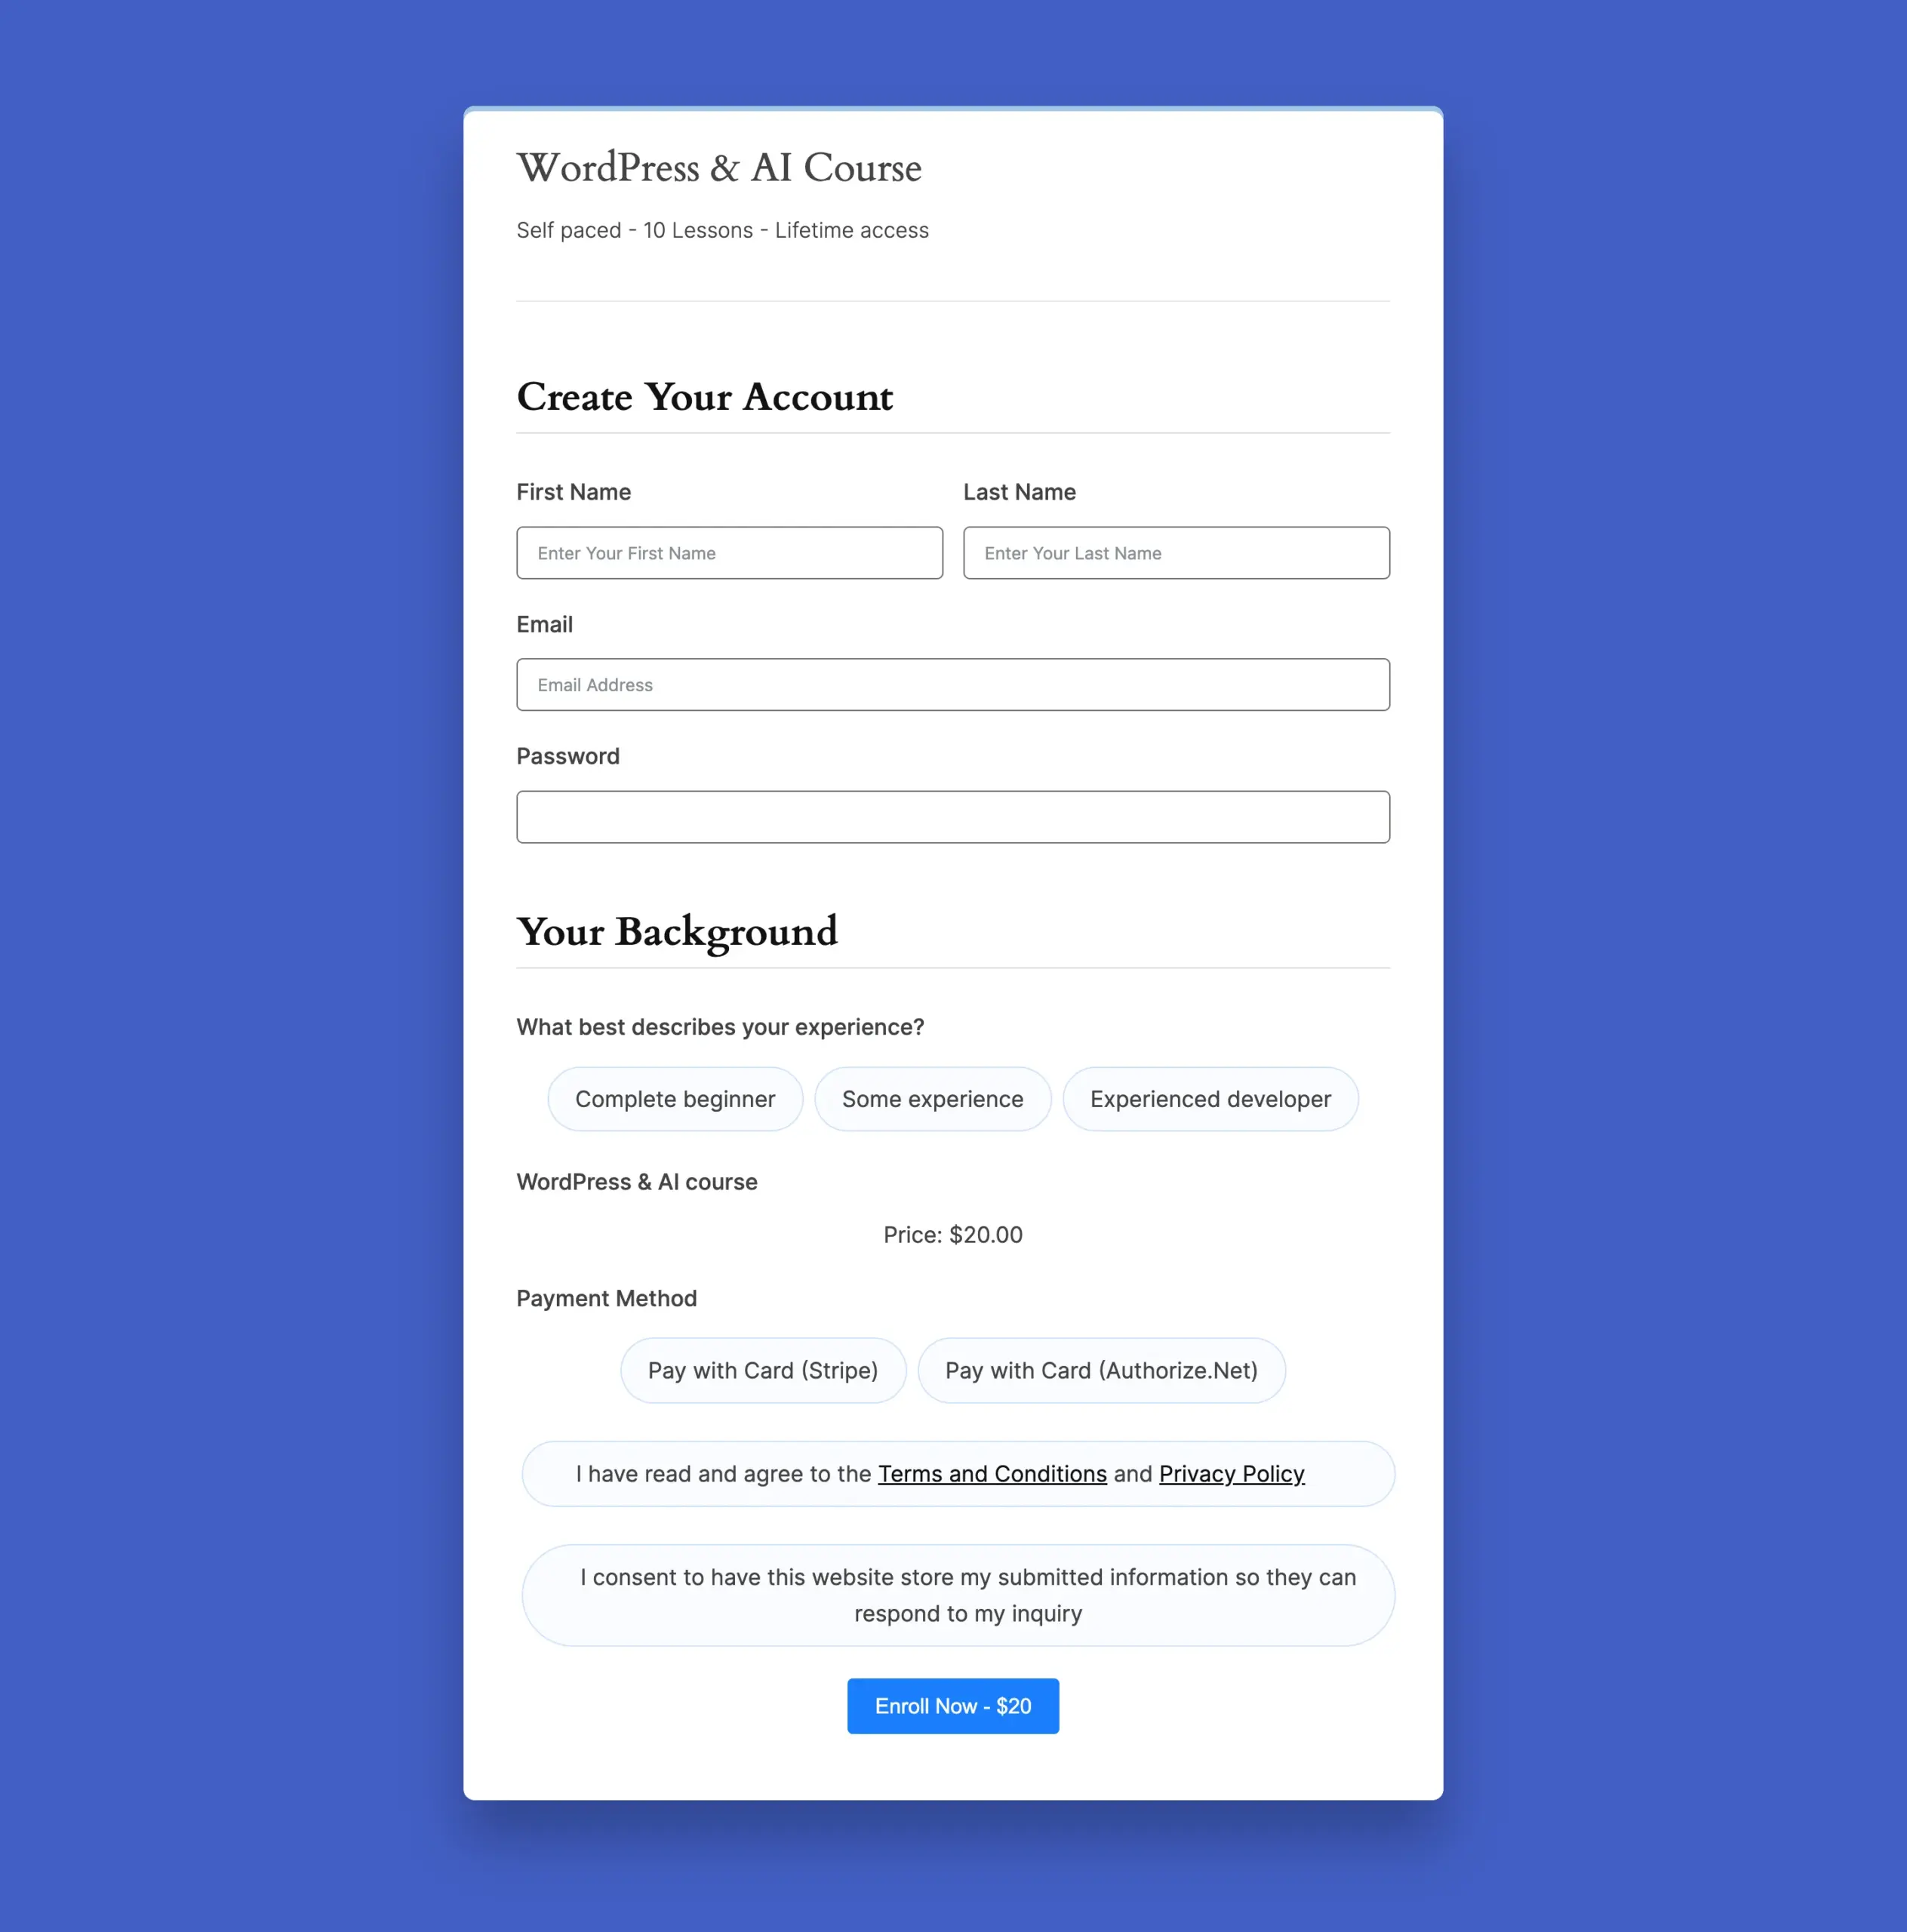
Section 1: Create your account
Three fields. All required for new users.
- Name: maps to the WordPress display name shown in the community
- Email Address: becomes the WordPress login identifier
- Password: sets login credentials for FluentCommunity on the spot
These three fields create the WordPress user account on submission. Skip any one of them and enrollment fails, or students get locked out of their account immediately after registering.
Note: For new users, there’s also the option to leave the password field blank for auto-generating the password upon form submission.
Section 2: Your background
One radio button question with three options: Complete beginner, Some experience, Experienced developer.
This uses conditional logic, which is free. The student’s answer doesn’t gate access to anything. It routes them to a different confirmation message or onboarding email based on what they select.
Keep this to one question. The goal is useful intake data, not a questionnaire.
Section 3: Payment
An order summary sits above the card fields so the student sees the total before entering card details. Below, a Stripe field collects card number, expiry, and CVC.
Fluent Forms free includes Stripe with standard transaction charges. No redirect to a checkout page. The student pays and gets enrolled in one submission.
LearnDash WooCommerce integration is the traditional payment route there, which means an extra plugin, extra configuration, and extra points of failure. Here, payment and enrollment happen in one form.
For additional payment gateways beyond Stripe, you need Fluent Forms Pro.
Note that Fluent Forms free version offers Stripe support, with an additional 1.9% fee. Fluent Forms Pro unlocks additional payment gateways and removes the extra fee on Stripe payments.
Section 4: Consent checkboxes
Two fields at the bottom.
- Terms and Conditions (required before submission)
- GDPR agreement
Spam protection (Honeypot or hCaptcha) runs in the background. No visible field needed.
Every feature in this form is available in the free version of Fluent Forms: text fields, radio buttons, conditional logic, Stripe payment, terms & conditions, GDPR, and spam protection.
Build Smarter Forms for Free

Map fields in the integration feed
Go to Settings & Integrations inside the form editor. Click Configure Integration, then Add New Integration, then select FluentCommunity Integration Feed.
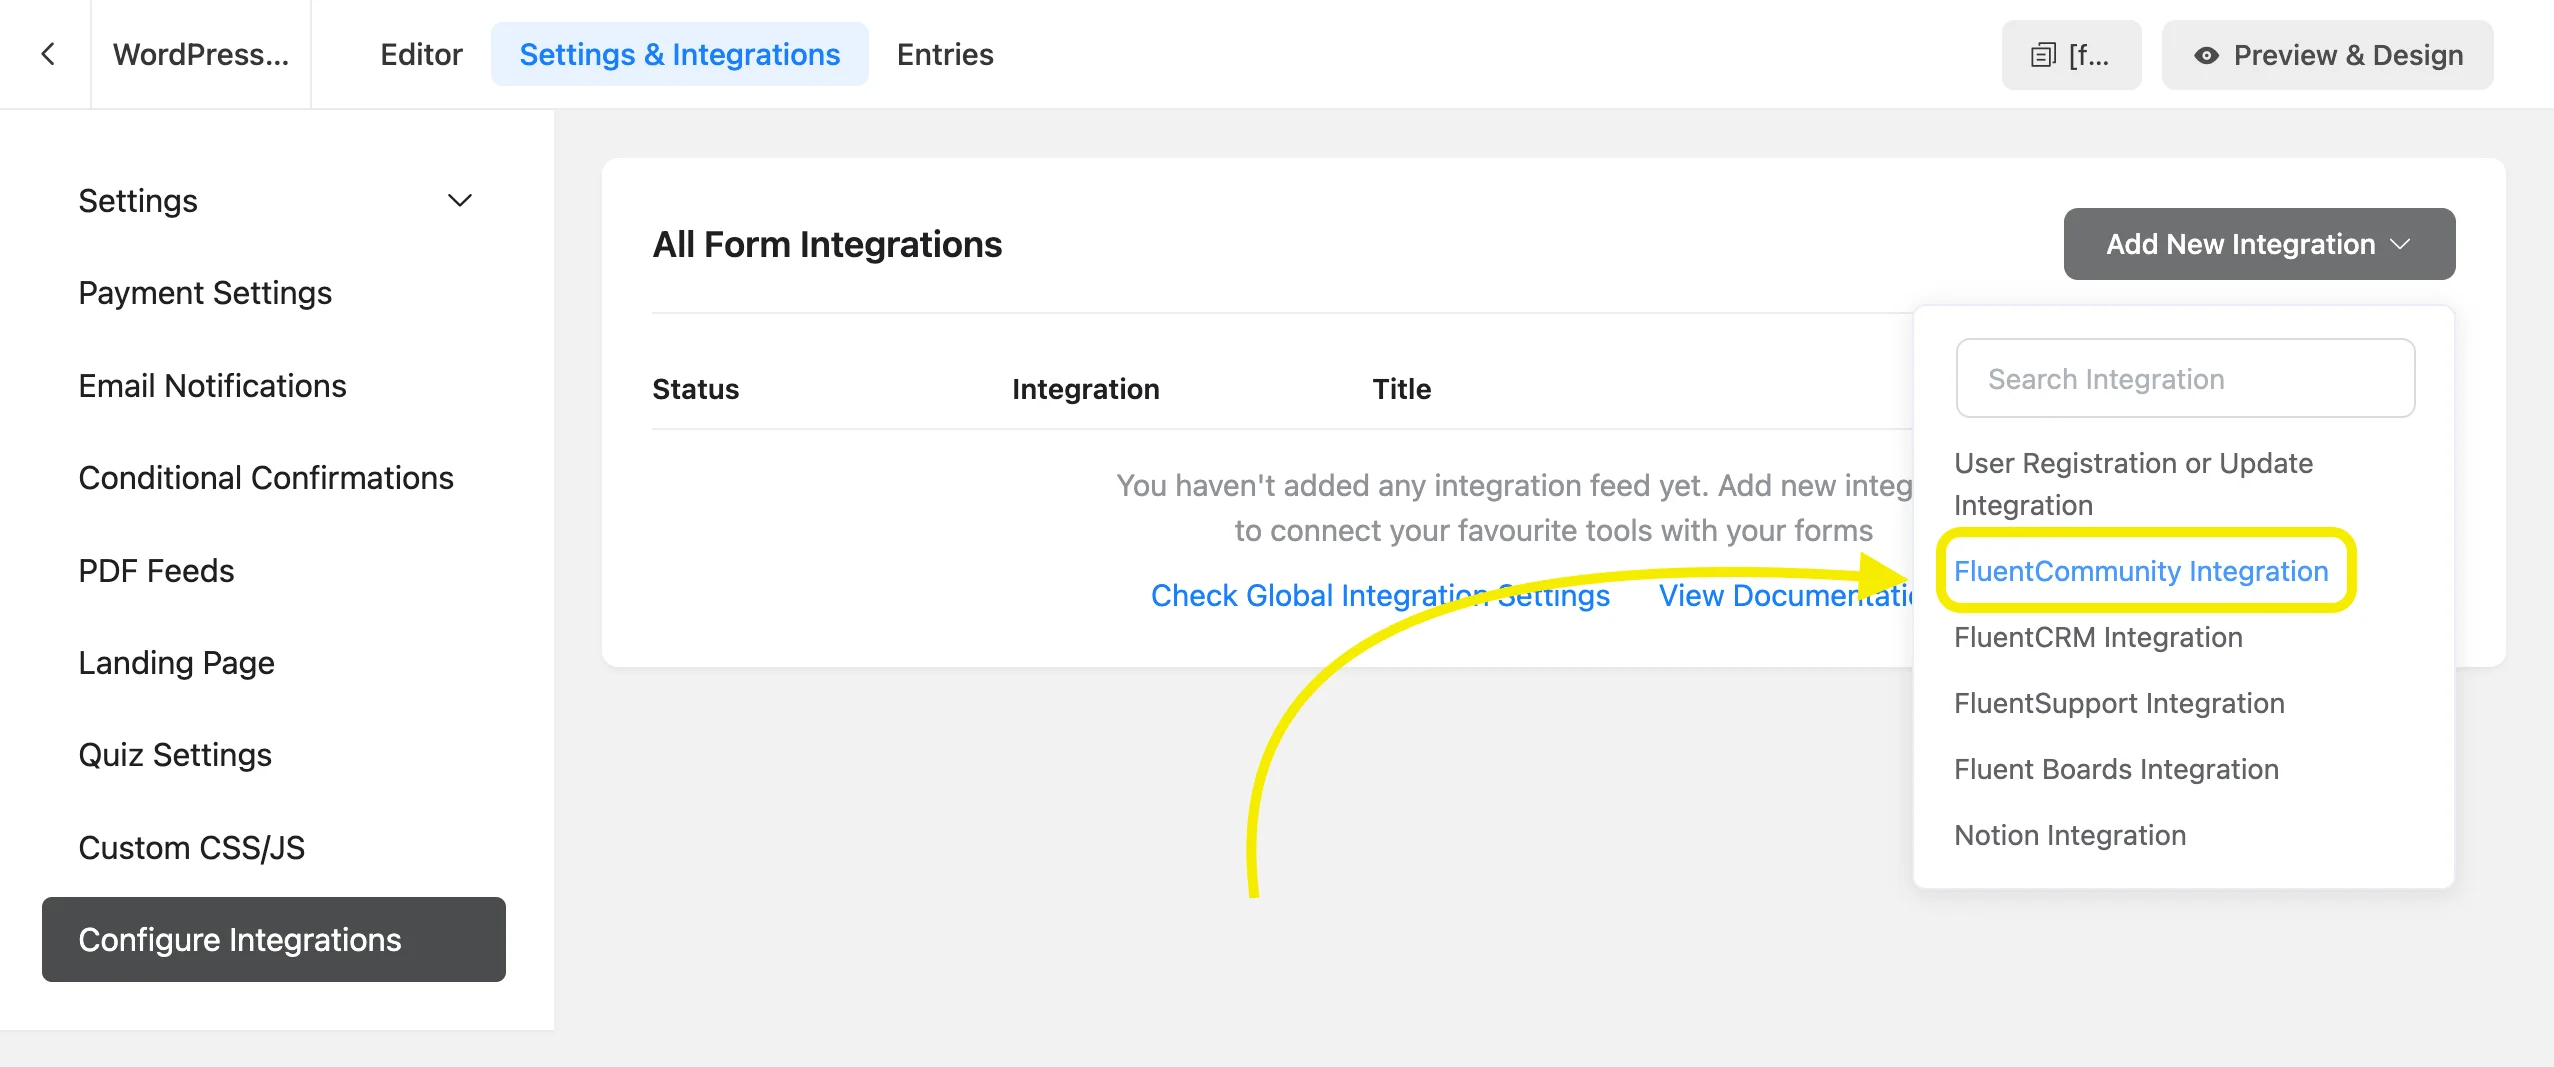
In the feed, configure four things:
- Name the feed for easy identification later
- Select the course to enroll students into from the dropdown
- Map the Email Address field from your form
- Map Full Name and Password for new user creation
The dropdown lists Secret Courses alongside public and private ones. If you’re running a private cohort, the form enrolls students into it directly. They access it via the form link. The course won’t appear in the directory.
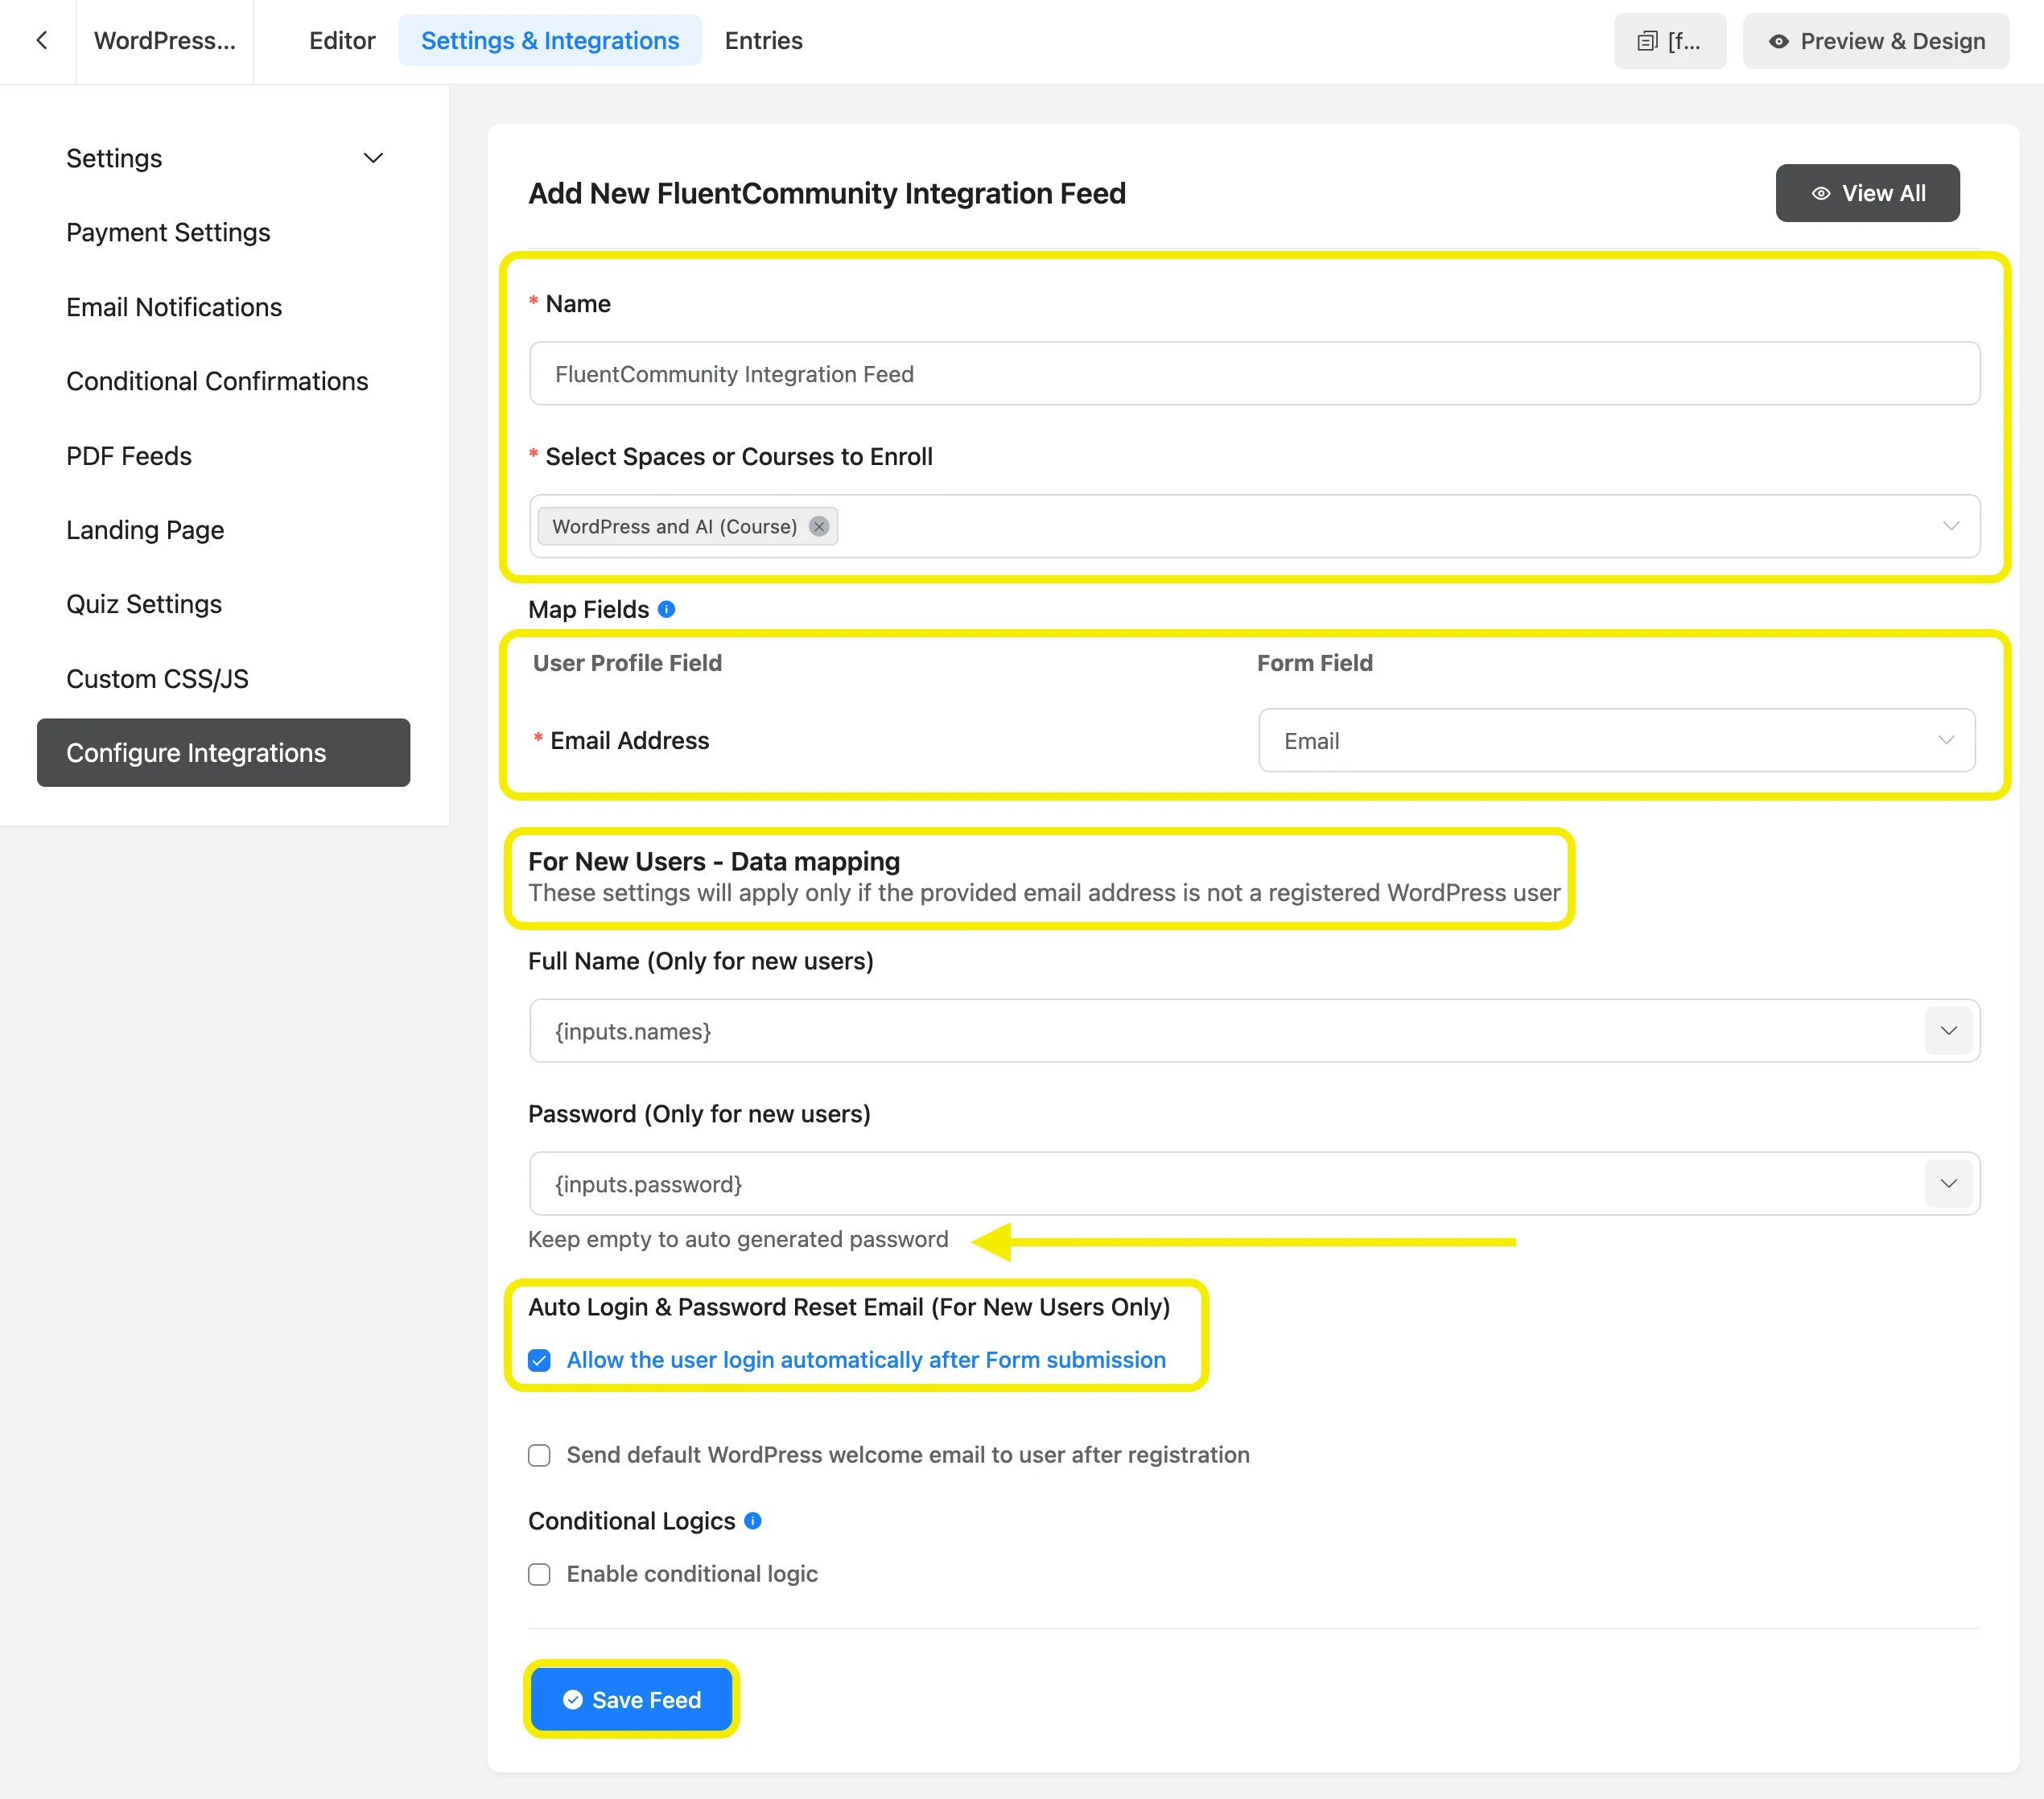
Double-check field mappings before saving. A misconfigured email mapping creates user accounts under the wrong address. Students won’t find their account, and support requests follow.
Set post-submission behavior
Two options to decide on before going live:
- Auto-login after submission: the student submits the form and lands directly in the course. No separate login step. Turn this on for a cleaner experience.
- Send Welcome Email: sends the default WordPress registration email to new users. Useful so students have their login credentials in their inbox.
Neither is required. But leaving them as unconsidered defaults is a missed setup decision.
Step 3: Test Enrollment (Admin and Student Flow)
Enrolling a student from the admin side
Admins enroll any WordPress user manually, without the form.
Go to the course in FluentCommunity, click Edit Lesson.
Then click the Students button in the top right.
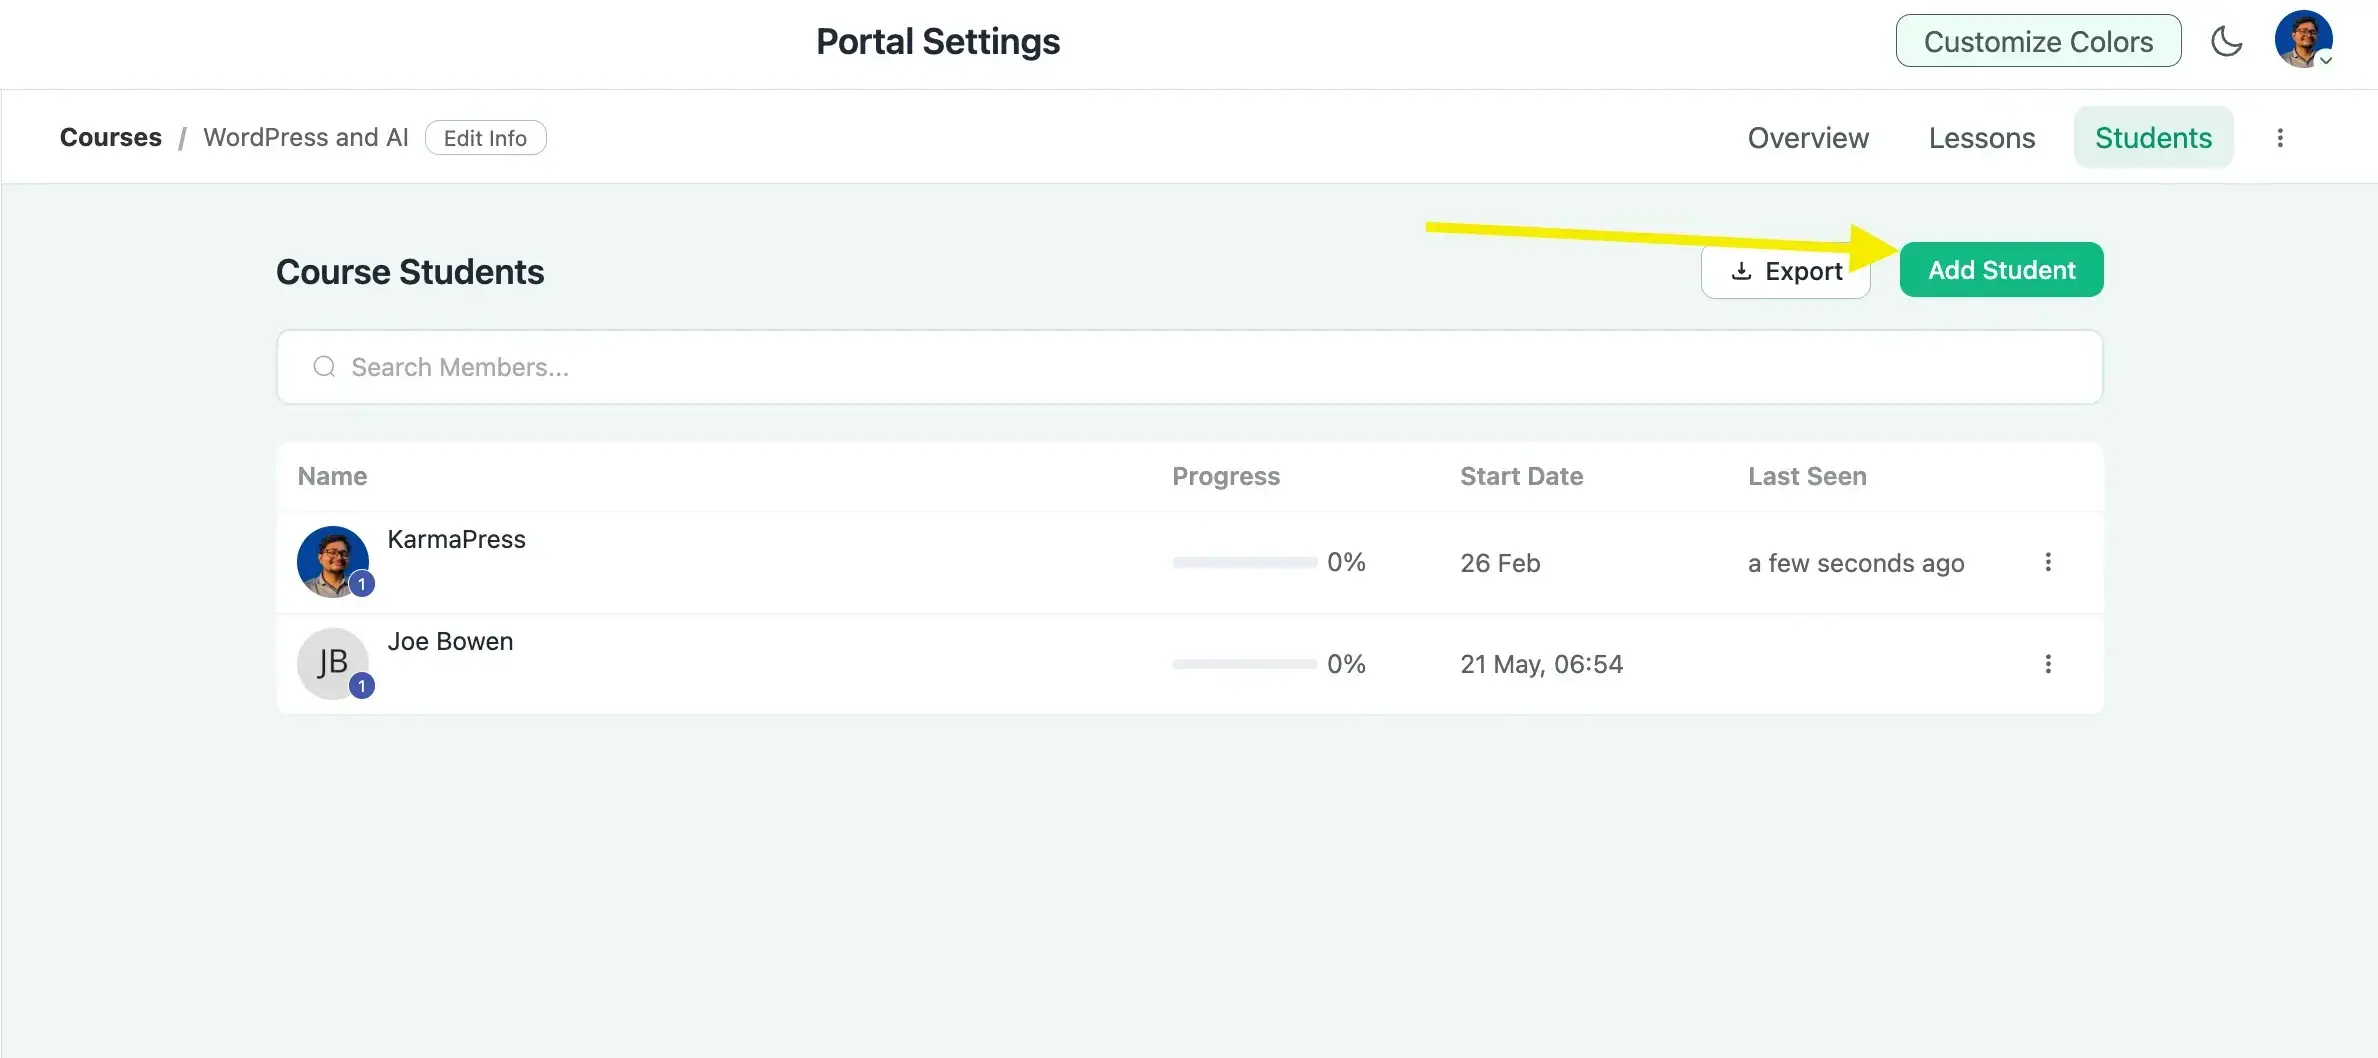
Click Add Student, select the user from the dropdown, and confirm.
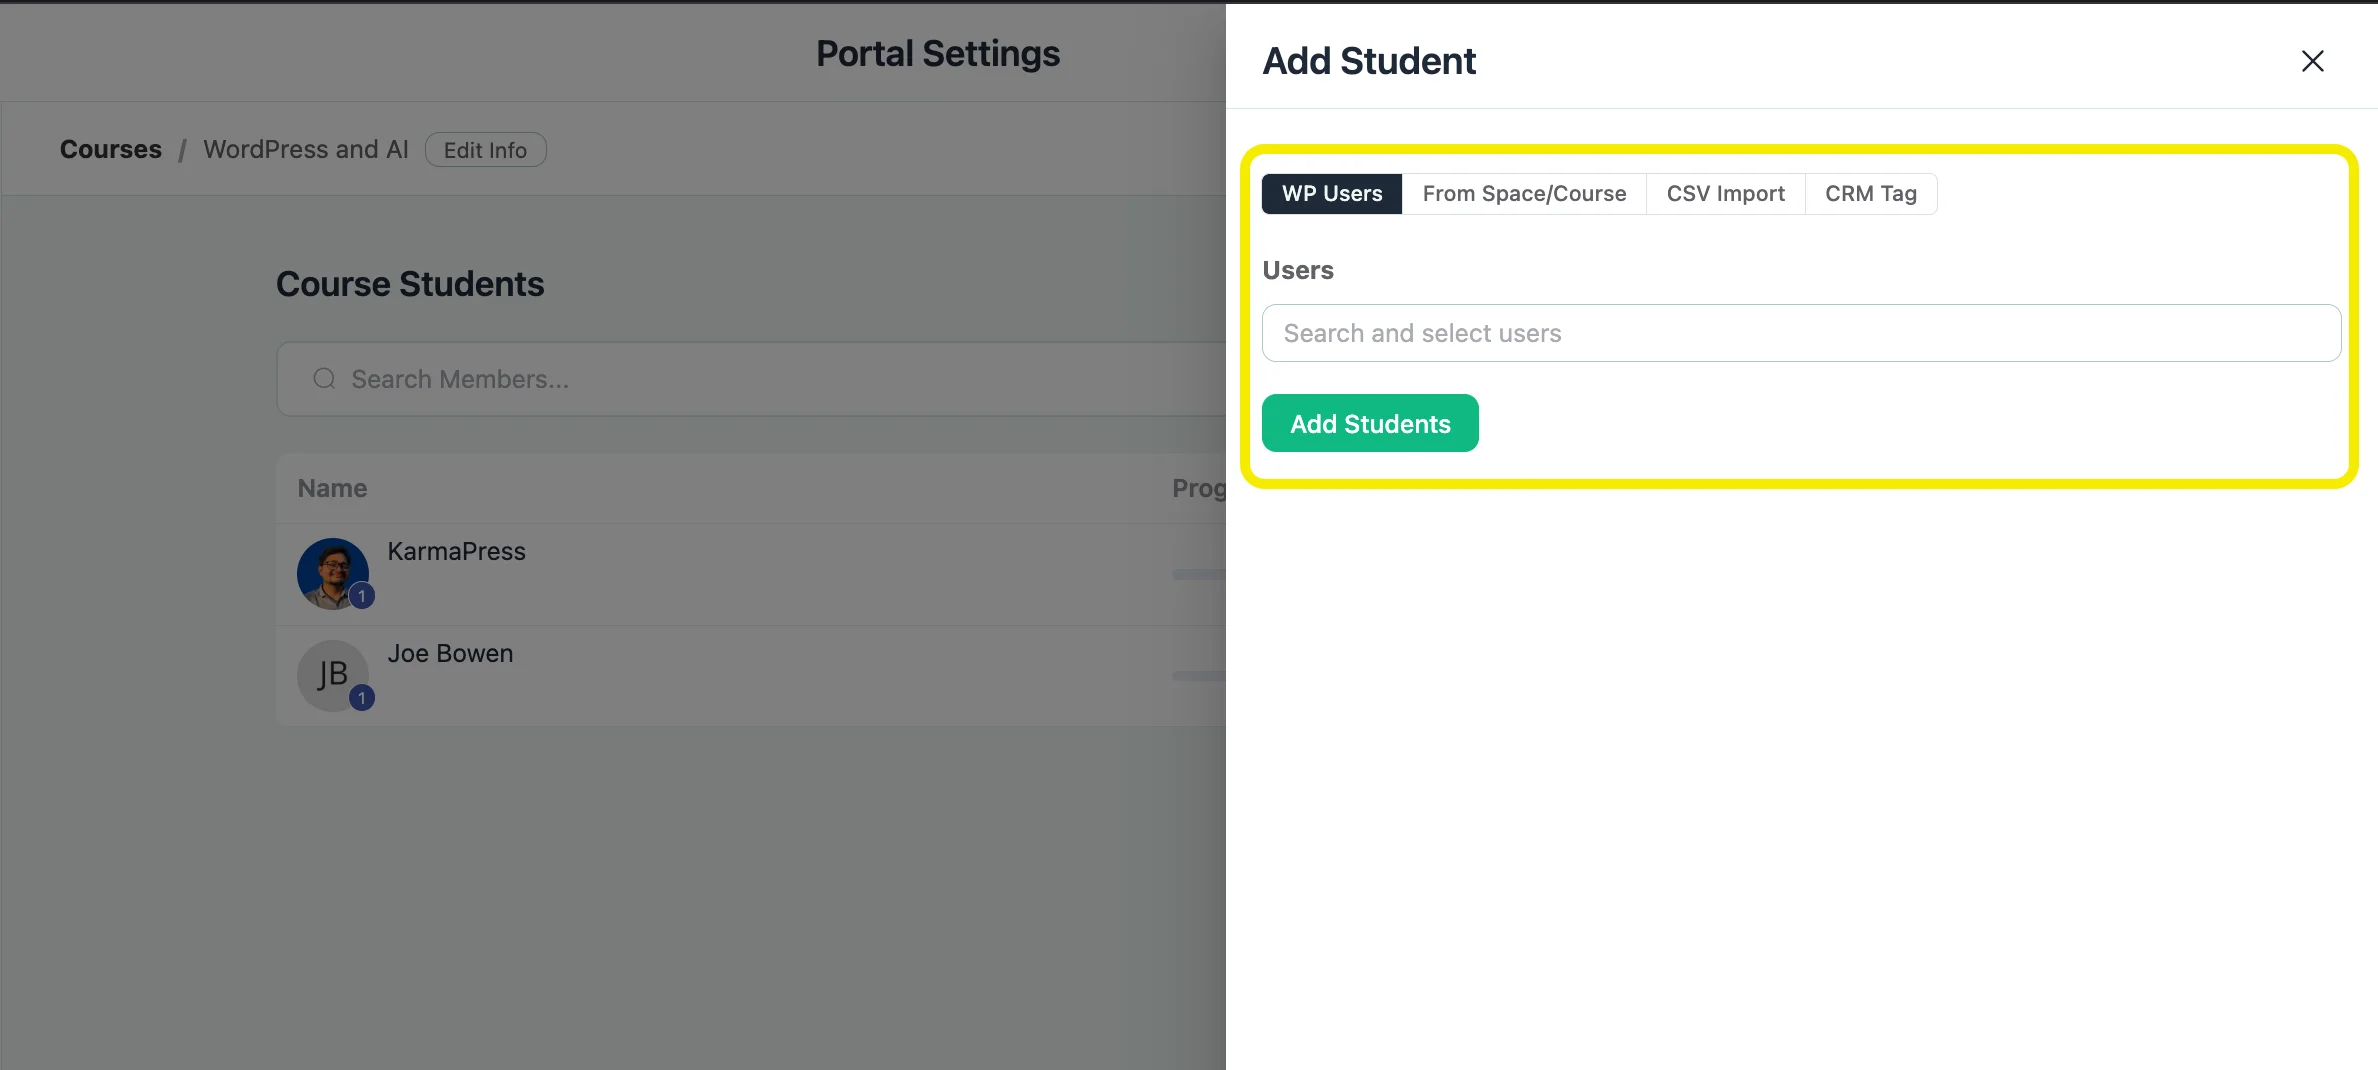
This handles edge cases: a student with a payment issue, a beta tester, someone you’re giving complimentary access. One requirement: the user must already be a WordPress user and a space member in FluentCommunity before you add them this way.
How students enroll themselves
The student experience differs by course privacy:
- Public course: Students see an “Enroll this course” button and click it. No form required.
- Private course: Students see a lock screen with a login or signup prompt when they click View Course.
- Secret course: The course doesn’t appear publicly. Students access it via a direct link or admin enrollment only.
If you’re using the enrollment form for a private course, the form handles both account creation and enrollment in one step. The lock screen is the fallback for students who arrive at the course URL directly without going through the form.
Is FluentCommunity the Right LearnDash Alternative for You
FluentCommunity is a strong fit for independent course creators who want an LMS and a student community without managing two separate plugin stacks.
If you’re running a single site, delivering courses to an engaged audience, and frustrated by the cost of LearnDash plus a community plugin, the switch makes clear sense. FluentCommunity has courses, quizzes, progress tracking, enrollment management, and community spaces built in. At $159 per year for a single site, it costs less than LearnDash alone.
Three things it gives you beyond what LearnDash offers natively:
LMS and community in one
Students finish a lesson and discuss it in the same space. No separate forum, no Facebook group redirect, no second login.
One enrollment submission does everything
The form creates the WordPress user, processes payment, enrolls them in the course, logs them in, and sends the welcome email. No extra plugins required.
Your server, your data
FluentCommunity runs on your WordPress install. No per-student fees, no external service changing pricing after a corporate acquisition.
Running a custom LMS on your own WordPress install means no platform dependency, ever.
One honest note: if you’re running a large enterprise course operation with complex certification workflows, SCORM requirements, or deeply custom reporting, take time to map the LearnDash features you rely on against what FluentCommunity currently offers. The plugin is actively developed, but every operation has unique requirements.
What to Do Next
Install Fluent Forms free first. Enable the FluentCommunity module in the Integrations tab. Build the form with the four sections shown above. Connect the integration feed to your course.
The form in this post takes about 20 minutes to build the first time. The second one takes five.
If you’re evaluating FluentCommunity as your next LMS, start with one course on your existing WordPress site. Test it with a small group of students before migrating everything. That low-risk approach gives you real experience with the platform before committing.
Try FluentCommunity and see what your course setup looks like when the LMS and the community are the same product.

This is Sumit. He’s a physics major who’s trying to understand both the physical as well as the WordPress worlds. Whenever he’s not busy, plays fifa or spends time with his family.


Leave a Reply