You’re running a charity gala next month. You need people to reserve a seat, pay for their ticket, and, if they’re feeling generous, add a donation on top. But you don’t want to collect the payments manually. A fundraising event registration form does exactly that: sign-up, entry fee, and donation in one submission.
I’ll create a charity gala registration form for this tutorial, covering the whole setup: planning your ticket tiers, building the form, letting people register as an individual or a team, adding one-time or recurring donations, connecting a payment gateway, and sending confirmation emails.
TL;DR
A fundraising event registration form combines attendee signup, ticket or entry payment, and an optional donation in a single form.
One combined form beats an RSVP plus a separate payment link: you get one dashboard, cleaner records, and, on Pro, no per-donation platform fee.
Plan your ticket options, your donation ask, and the attendee details you need before you open the builder.
Most of the form is free, including the payment fields and Stripe. Some fields (Phone, Repeat), settings, and extra gateways need Pro.
Use a Payment Item field to list each ticket tier with its price, then add an optional donation with preset amounts and a custom entry.
Let people register as an individual or a team, collect each attendee’s dietary needs, and offer a one-time or recurring donation.
Collect card payments with Stripe on the free version (PayPal and other gateways are Pro), and offer offline payment for cash or check at the door of a physical event.
Set a confirmation message, send an attendee receipt and an admin alert, and store every entry in your dashboard for CSV or PDF export.
A fundraising event registration form is a single form that signs someone up for your event and takes their money at the same time. It captures who is coming, how many seats they need, what they owe for a ticket, and how much extra they want to donate, all in one submission.
The attendee fills out one form, pays the entry fee, adds a donation if they want to, and submits once. You get a single entry with the name, the ticket, and the total attached.
Registrations and payments are stored as entries that you can search, filter, and export.
Fluent Forms is self-hosted, so donations go straight to your payment gateway. The free version (Stripe) adds a 1.9% platform fee on top of the gateway’s own rate; Fluent Forms Pro removes that platform fee (and adds more payment gateways), so more of each donation reaches your cause.
The ticket price and the donation are collected together, so you can see what each person paid without cross-checking a separate payment list.
It sits on your own domain, so you can easily style it to match your site.
Plan Your Form Before You Build
Plan your form first to keep it clean and shorten the process. Decide three things: what people are paying for, what you’ll ask them to donate, and what details you need from them.
Decide your ticket and entry options
List what someone can register for and what each option costs. Keep it to a handful of clear choices. For a typical fundraiser, that might be:
General admission at a set price
A supporter or VIP tier at a higher price
A free option for volunteers or press
A group or table rate, if you sell seats in blocks
Write down the exact price for each. These become the priced options in your registration field later.
Set your donation ask
The donation is the point of a fundraiser, so make it easy and keep it optional. Offer a few preset amounts and a custom field so people can give what they choose. Presets like $25, $50, and $100 give donors a fast decision without forcing a number on them.
Keep the donation separate from the ticket price. People should be able to register without donating; an optional field ensures that.
List the attendee details you need
Ask only for what you’ll use. Every extra field lowers the chance someone finishes. For most events, you need:
Name and email, so you can send a receipt and event details
Phone number, if you need day-of contact
Number of guests, if one person registers a group
Dietary or accessibility needs, if you serve food or plan seating
What You’ll Need (Free vs Pro)
Before you build, make sure you have:
A WordPress website
Fluent Forms installed and activated (the free version is enough to start & collect payments via Stripe)
A payment gateway account if you’re collecting money online
Here’s a list of free vs pro fields and features you’ll require in this tutorial:
How to Build a Fundraising Event Registration Form in Fluent Forms
With your plan ready, the build is quick. Follow these steps in your WordPress dashboard.
Step 1: Create the form
Go to Fluent Forms → New Form. You have two ways to start:
From a template: start with the Event Registration Form template. It already has attendee fields, event type, and attendance options, so you tweak instead of building from scratch. Download and import it to your site, then make necessary tweaks.
Start from scratch: choose Create a Blank Form if you’d rather add each field yourself. That’s the approach we’re taking here.
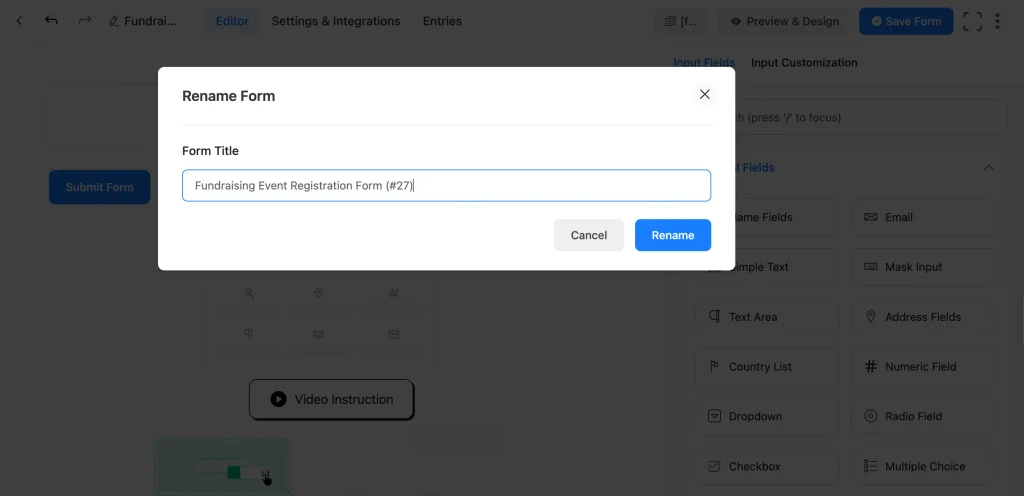
Give your form a name, like “Fundraising Event Registration,” in the editor.
Step 2: Add attendee information fields
From the input fields on the right, drag a Name field and an Email field onto the form. Click each one and mark it required under Input Customization. You need a valid email to send a receipt and event details. Add a Phone field if you want day-of contact. Keep the list short, since fewer fields mean a higher completion rate.
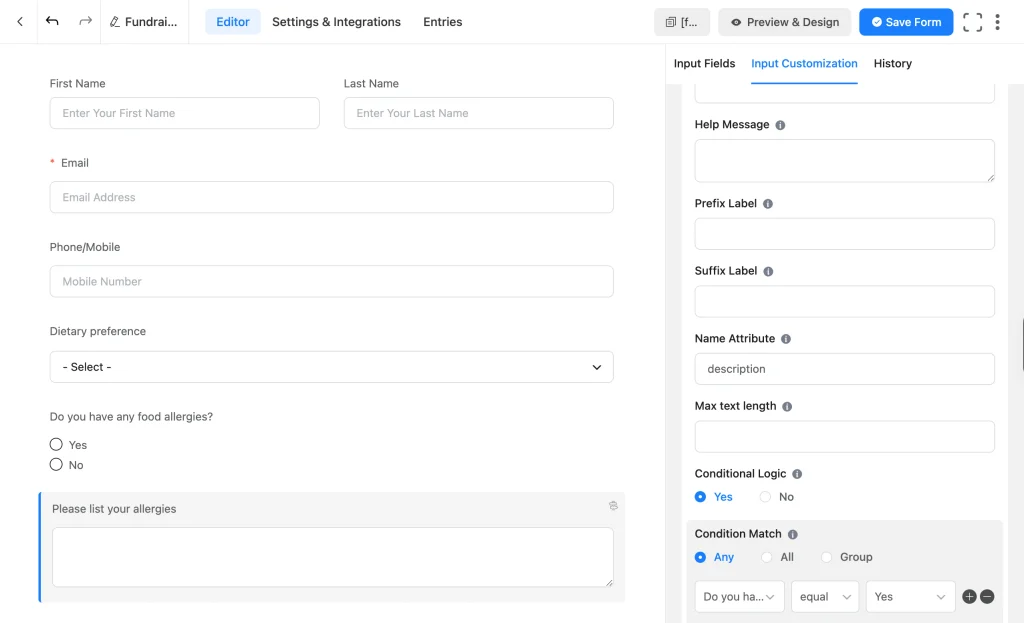
Since this is a gala with a meal, collect the registrant’s dietary needs here too. Add a Dropdown field labeled “Dietary preference” with options like “No preference,” “Gluten-free,” “Vegan,” “Kosher,” “Halal,” and “Dairy-free.”
Then add a Radio field labeled “Do you have any food allergies?” with “Yes” and “No,” plus a Text Area labeled “Please list your allergies” set to show only when the “Do you have any food allergies?” question equals Yes.
Step 3: Add ticket and registration options
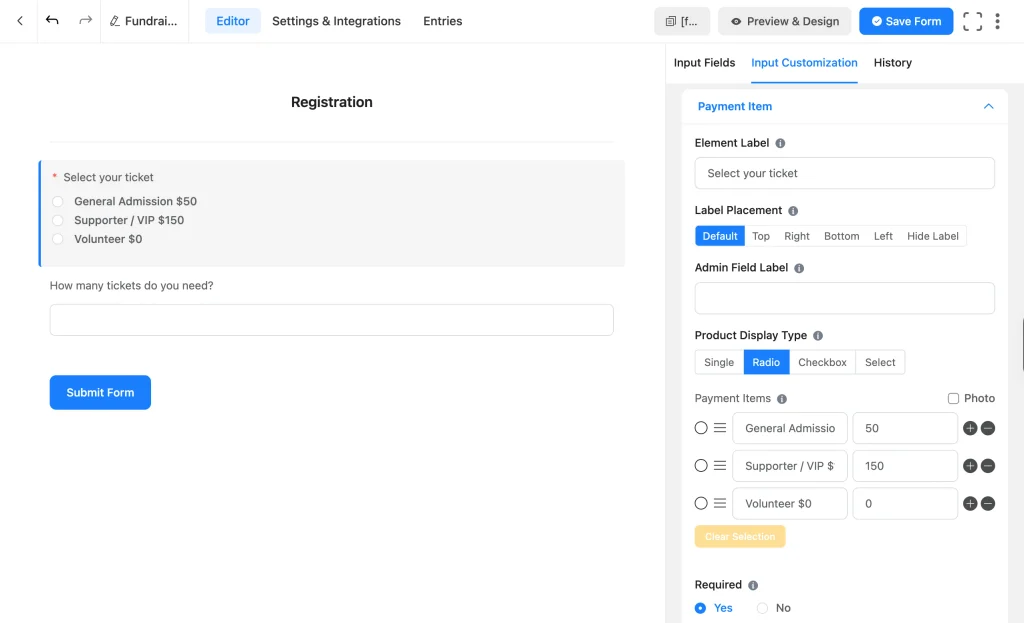
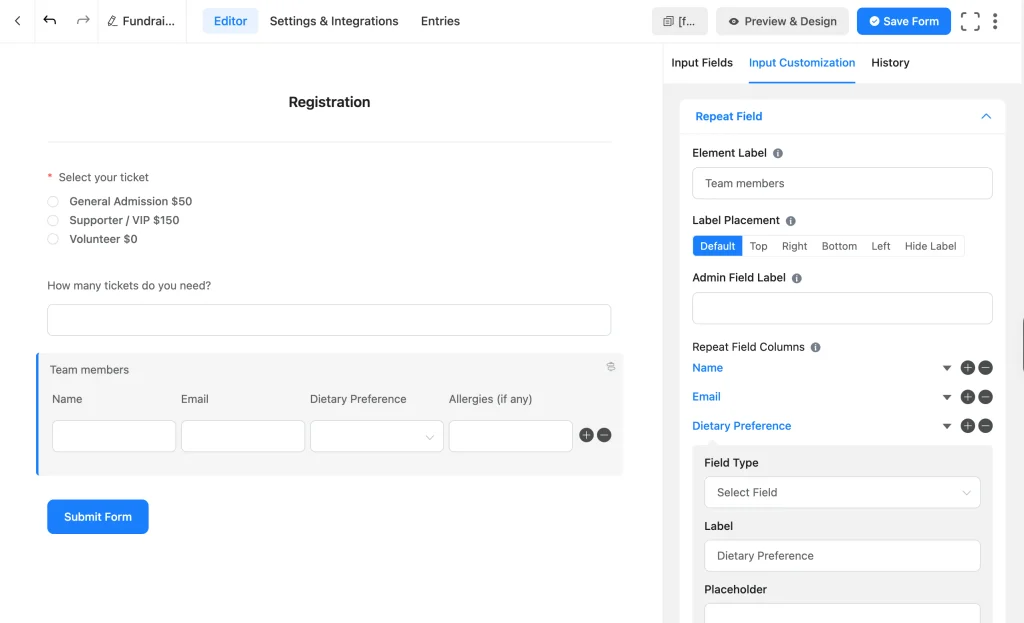
Drag a Payment Item field onto the form below the attendee fields. In Element Label, type “Select your ticket.” Set the Product Display Type to Radio (or Select for a dropdown), so people pick one tier.
In the Payment Items section, add your ticket tiers from your plan, each with its price (the price amount goes in the second box):
General Admission: $50
Supporter / VIP: $150
Volunteer: $0
Mark the field as Required so every attendee picks a ticket.
To let one person buy several tickets at once, add an Item Quantity field and map it to your Payment Item. The total then follows ticket price times quantity, so a supporter registering four people at $50 is charged $200. The Item Quantity field is free.
Step 4: Let people register as a team
Many fundraisers, especially charity walks and runs, let supporters sign up as a group rather than one at a time. If your users purchase multiple tickets, here’s how you can allow them to list their guests/team.
Add a Repeat Field (a Pro field) labeled “Team members.” It lets one person add as many teammates as they need from a single submission, each on their own row. Add columns for each member’s name, email, dietary preference (the same options you used above), and allergies. Each teammate then carries their own dietary details on their row.
Now show that field only when it’s needed, using conditional logic: a rule that shows or hides a field based on the value of another one. Click the Repeat Field, open Advanced Options, turn on Conditional Logic, and create the rule: show this field when Item Quantity is greater than 1. Someone buying a single ticket never sees it.
Cap the guest list at the ticket count (Pro)
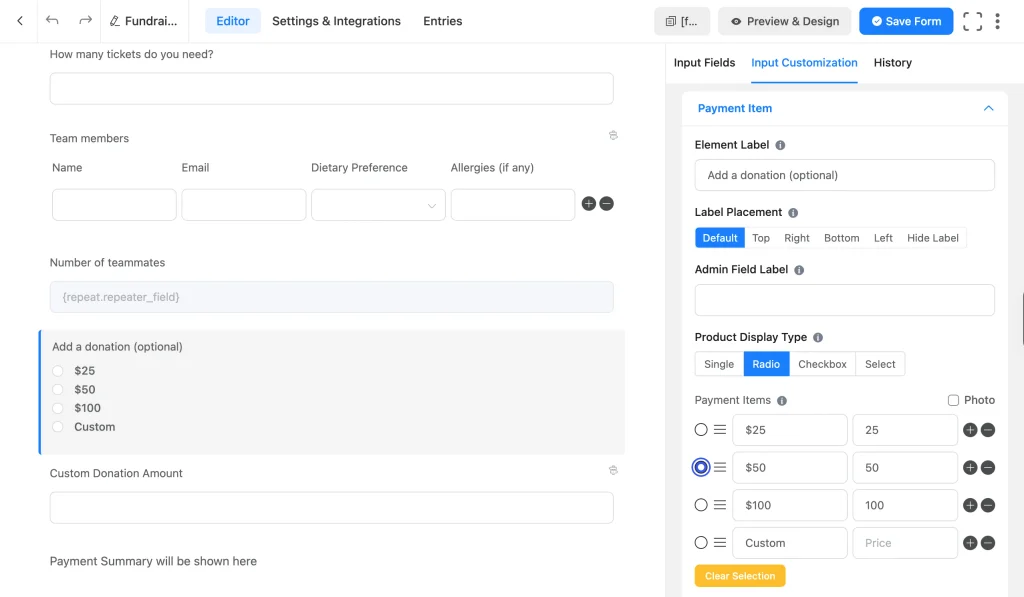
How to ensure team members (attendees) don’t exceed the number of tickets purchased? Well, you can set a validation rule. First, add a Numeric field and turn on calculation with the expression {repeat.repeater_field}, which counts the rows in your team members field. Hide this field by typing ff-hidden in its Container Class under Advanced Options, so it works in the background. Click Save Form.
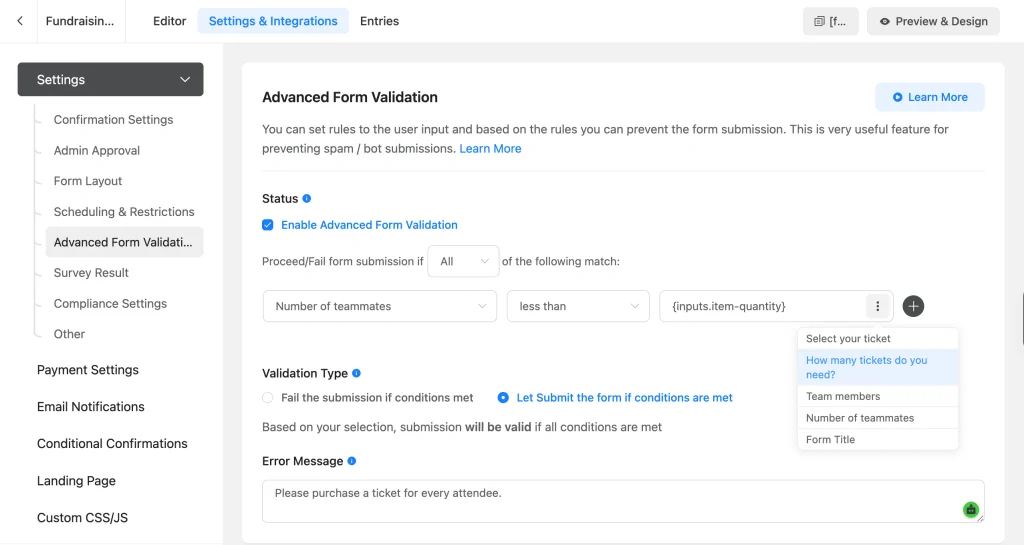
Go to Settings & Integrations → Advanced Form Validation and add a rule that the row-count field must be less than the ticket quantity. If it isn’t, the submission fails.
Why “less than” and not “equal”? The person filling out the form already entered their own name at the top, so the repeat field holds their teammates only, usually one fewer than the tickets bought. A count below that is fine too, since the extra seats might be sponsored or gifted. The rule only blocks the real mistake: listing more teammates than tickets paid for.
Step 5: Add the optional donation field
This is what turns a registration form into a fundraising form. Drag a second Payment Item field and label it “Add a donation (optional).”
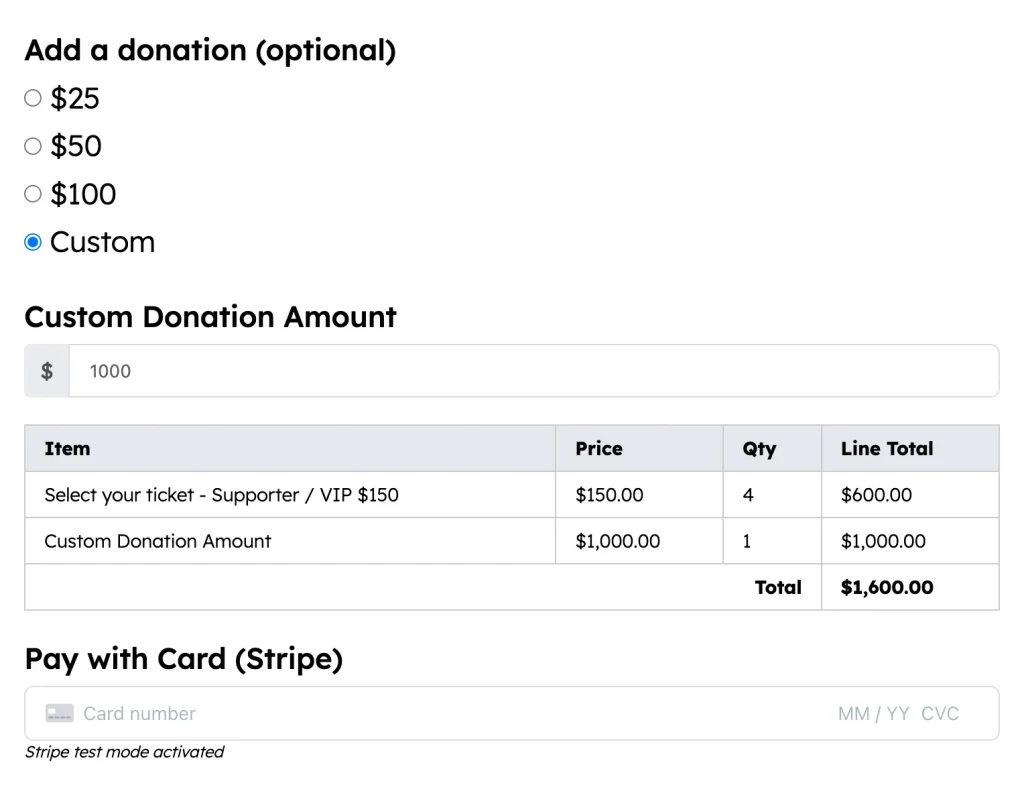
Set the display to Radio and add your preset amounts as priced items, such as $25, $50, and $100, plus a “Custom amount” option. To let donors enter their own figure, add a Custom Payment Amount field, then set its conditional logic to show only when Add a donation equals Custom amount.
Leave the donation field optional. A donor who only wants to register should be able to skip it and still submit.
The presets above collect a one-time donation. If your cause runs on ongoing support, you can also include a recurring gift option. Add a Subscription field with monthly amounts, and use conditional logic to show it only when someone picks “Give monthly.” That lets one form capture both a one-time donation and a recurring pledge without cluttering the page.
Step 6: Add the payment method and a summary
Your tickets and donation are already configured. Two additional fields finish the checkout:
Add a Payment Summary field, which shows a total of the selected ticket plus any donation, so the attendee sees exactly what they’ll pay before they submit.
Add a Payment Method field so the attendee can choose how to pay.
Once the form is built, automate the follow-up: confirm the registration on screen, email the attendee and your team, and store every entry.
Confirmation message
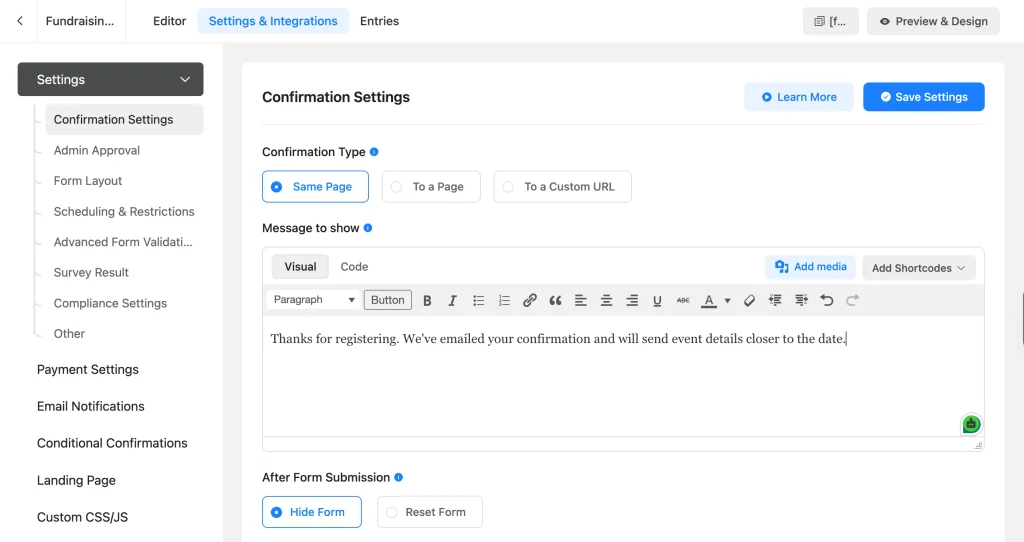
Go to Settings & Integrations → Confirmation Settings. Write a message that tells the attendee their spot is booked and what comes next, like “Thanks for registering. We’ve emailed your confirmation and will send event details closer to the date.”
You can show a message on the same page, redirect to a thank-you page, or send them to another URL. On Pro, Conditional Confirmations let you show a different message per ticket tier, so a VIP sees different next steps than a general attendee.
Email notifications
Go to Settings & Integrations → Email Notifications. Set up two notifications:
An attendee receipt: add a notification with Send To set to the email shortcode from your form’s email field. Include their ticket, their donation, and the total using the field shortcodes.
An admin alert: the default notification is sent to {wp.admin_email}. Keep it so your team sees every new registration as it comes in.
Connect FluentSMTP so these emails land in the inbox instead of the spam folder.
Store and export entries
Every registration is saved under your form’s Entries tab, timestamped and searchable. You can download entries as a CSV for your records or generate a PDF of each one. This is your source of who registered, what they paid, and how much they donated, all in one place.
Publish and Promote Your Form
Your form is ready to go live. You have a few options:
Gutenberg block: edit any page or post, add the Fluent Forms block, and pick your form.
Shortcode: copy the form’s shortcode from the editor and paste it into any page, post, or widget.
A dedicated event page is the strongest choice. It gives supporters one clear place to register and keeps the event separate from the rest of your site. Once it’s live, link to that page from your email list, your social posts, and any printed materials, so every channel points to the same form.
Tips for Higher Registrations and Donations
Keep the form short: ask only for what you’ll use on the day. Use conditional logic to reveal extra fields instead of showing them to everyone.
Suggest a default donation: preselecting a middle amount like $50 nudges donors without pressure, and they can still change or clear it.
Show the impact of each amount: a short line under the donation field, like “$50 feeds a family for a week,” helps people choose a number.
Test every path: register once per ticket tier, add a donation, and confirm the total, the receipt email, and the entry all come through correctly.
Offer both online and offline payment: some supporters prefer to pay at the door. Capture their registration with the offline payment option.
Enjoying this article?
We regularly publish actionable content on our blog. Subscribe to get them delivered straight to your inbox.
We won’t spam you. You can unsubscribe whenever you want.
Frequently Asked Questions
Can I collect donations for free with Fluent Forms?
Yes. The payment fields and the Stripe gateway work on the free version, so you can take ticket payments and donations without buying Pro. The free version adds a 1.9% platform fee on top of your gateway’s rate. Fluent Forms Pro removes that fee and adds more gateways, so on Pro, your only cost is the gateway’s standard rate.
No, and you shouldn’t. Keep the donation field optional so someone who only wants to register can skip it and still submit. The ticket is the required part; the donation is extra.
Can one person register a whole group?
Yes. Add an Item Quantity field so a buyer can pay for several tickets at once, and a Team Members repeat field to collect each attendee’s name, email, and dietary details. The repeat field appears only when someone buys more than one ticket. The repeat field and the row-count validation are Pro features.
How do I make sure people don’t list more guests than tickets?
Use a hidden numeric field that counts the repeat-field rows, then add an Advanced Form Validation rule (Pro) that the row count must be less than the ticket quantity. Since the buyer’s own name is entered at the top of the form, the teammate rows are normally one fewer than the tickets bought, and the rule blocks anyone from listing more people than they paid for.
Where does the registration data go?
Every submission is stored under your form’s Entries tab in WordPress, timestamped and searchable. You can export entries as CSV or generate a PDF, and the ticket amount and donation are recorded together so your totals match without manual calculation.
Build Your Fundraising Registration Form Today
Creating a fundraising event registration form in WordPress includes a few clear steps: add your attendee fields, price your ticket tiers, add an optional donation, connect a payment gateway, and set up the confirmation and receipt emails.
You can set it up with Fluent Forms, most of it on free fields. The form registers your attendees, collects donations, and stores the entries together. Upgrade to Pro when you want more gateways, with no platform fee on top of your gateway’s rate.
Sarika writes for Fluent Forms and loves to offer insights into small businesses. She’s curious and enjoys discussing ideas, interests, and perspectives. In her free time, she’s either marvelling at architectural beauties or trying different cuisines.






Leave a Reply