How to Accept Credit Card Payments in WordPress
You don’t always need a full eCommerce store to accept payments online. If your goal is to collect credit card payments for services, registrations, bookings, donations, or a few digital/physical items, a payment form is often the smarter route.
With Fluent Forms, it’s faster to set up, easier to manage, and cleaner for users. You can build payment-ready forms inside WordPress, connect major gateways, automate follow-up actions, and launch quickly without the complexity of a large store setup.
In this guide, I’ll show you how to accept credit cards in WordPress using Fluent Forms, what you need before launching, which gateways are supported, and which advanced features can improve conversion and user experience.
TL;DR
- Allows you to accept payments for products, services, bookings, and donations directly on WordPress without needing complex tools.
- Connects with major gateways like Stripe and PayPal, as well as regional options like Authorize.net, Mollie, Razorpay, Paystack, Square & Paddle.
- Supports subscription payments and custom donation amounts.
- Requires enabling the payment module, connecting your gateway via API, & adding payment-specific fields to your forms.
- The free version supports Stripe with a 1.9% platform fee, while the Pro version removes this fee and unlocks other gateways.
- Includes built-in tools for coupons, inventory management to prevent overselling, and dynamic pricing calculations.
- Supports automatic confirmation emails, PDF receipts, and CRM integrations immediately after a successful transaction.
- Offers a dedicated “Test Mode” to validate the payment flow and email triggers before accepting real customer money.
Why use Fluent Forms to accept payments
Fluent Forms makes it easy to turn any WordPress form into a streamlined payment collection tool. Instead of installing a full eCommerce system, you can accept payments directly within your forms while keeping the experience simple and conversion-focused. Here’s why it stands out:
- All-in-one payment collection: Collect user information and payments in a single step. This eliminates the need for separate checkout pages and reduces friction, helping more users complete the process.
- Multiple payment gateway support: Fluent Forms integrates with popular gateways like Stripe and PayPal, allowing you to offer flexible payment options. This makes it suitable for global audiences and different payment preferences.
- Dynamic pricing and calculations: You can automatically calculate totals based on user selections, quantities, or custom inputs. This is especially useful for order forms, service pricing, registrations, or donation forms with variable amounts.
- Recurring and subscription payments: Easily set up recurring billing for memberships, SaaS subscriptions, or ongoing donations. This helps you create predictable revenue streams directly from your WordPress site.
- Customizable order forms: Build product-style forms for selling items, collecting event fees, or taking service bookings. You can add images, pricing options, and conditional logic to tailor the experience.
- Smart donation and contribution options: Accept fixed or custom donation amounts, add suggested tiers, and even show impact-based options to encourage higher contributions.
- Automated payment workflows: Trigger confirmation emails, receipts, automations, or onboarding sequences automatically after successful payments. This reduces manual work and speeds up follow-ups.
- Lightweight alternative to eCommerce plugins: If you don’t need a full online store, Fluent Forms provides a faster and simpler way to accept payments without the overhead of complex setups.
Overall, Fluent Forms offers flexibility, automation, and ease of use, making it a practical solution for collecting payments directly through your WordPress forms.
Supported payment gateways in Fluent Forms
Fluent Forms supports multiple payment gateways so you can choose based on customer preference and region.
Primary gateways
Stripe: Supports major credit/debit cards and wallet-based checkout options depending on your Stripe account setup.
PayPal: Supports PayPal account-based payments and card-enabled checkout experiences.
These two are enough for many businesses, especially if your audience is global and already familiar with them.
Regional and specialized options
Fluent Forms also supports:
Note that Fluent Forms free version offers Stripe support, with an additional 1.9% fee. Fluent Forms Pro unlocks additional payment gateways and removes the extra fee on Stripe payments.
Payment behavior is regional. A gateway that converts well in one market may underperform in another. Having options lets you easily match checkout behavior to audience expectations.
Start with one gateway you already trust, test conversion quality, then add a second option if users ask for it.
Step-by-step: accept credit cards in WordPress with Fluent Forms
Follow these steps to accept credit card payments easily in WordPress.
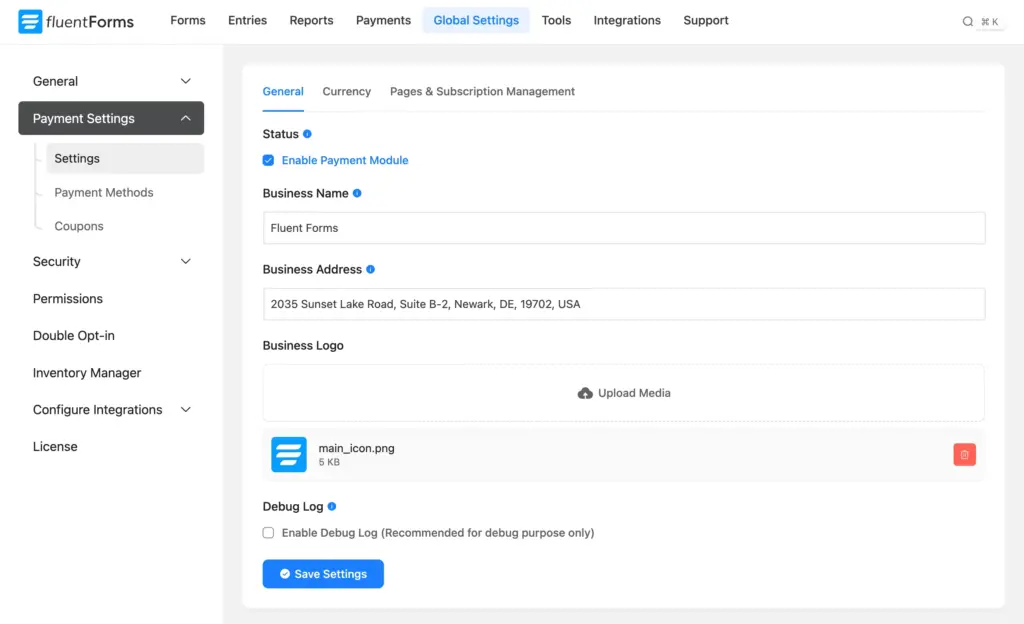
1. Enable the payment module
From your WordPress dashboard, go to Fluent Forms → Global Settings → Payment. Turn the payment module on. This activates payment functionality across your forms. If this setting is off, payment fields and gateway options don’t appear on your forms.
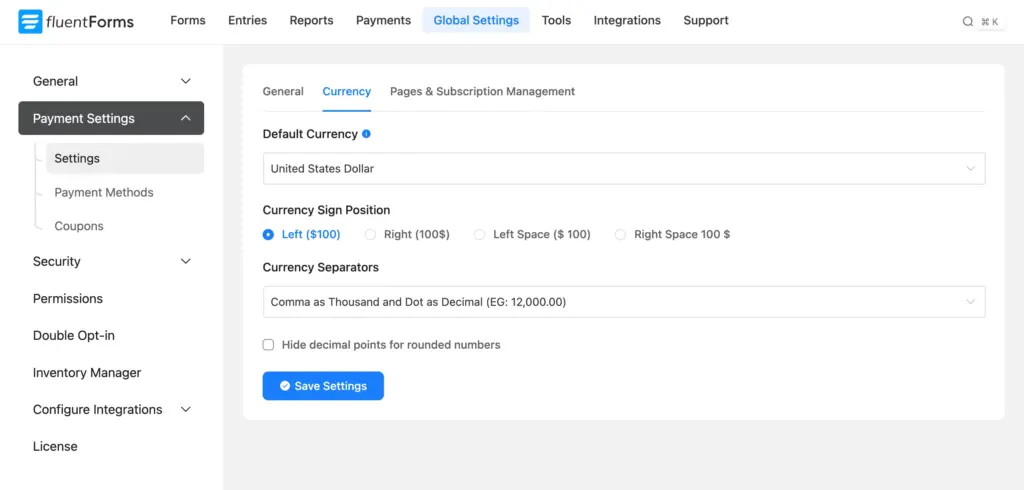
2. Configure currency and amount format
Before building the form, set your default currency and formatting style. This avoids common issues like mismatched totals, decimal confusion, or reporting inconsistencies later. It also keeps customer-facing totals clear and predictable at checkout.
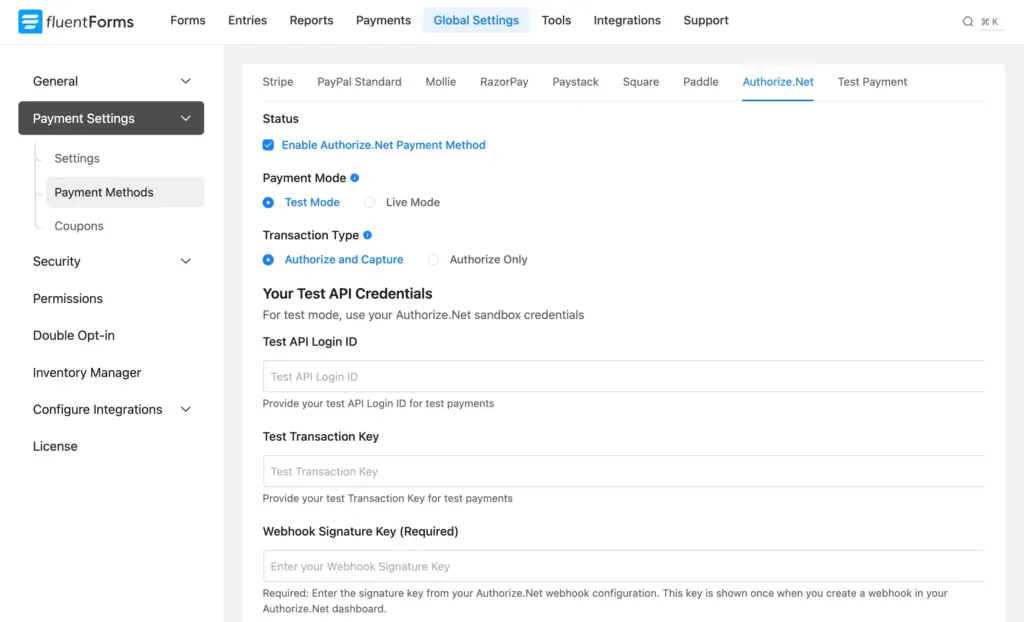
3. Connect your preferred gateway
Open payment settings and connect your gateway account. For Stripe, Fluent Forms offers a one-click “connect” flow.
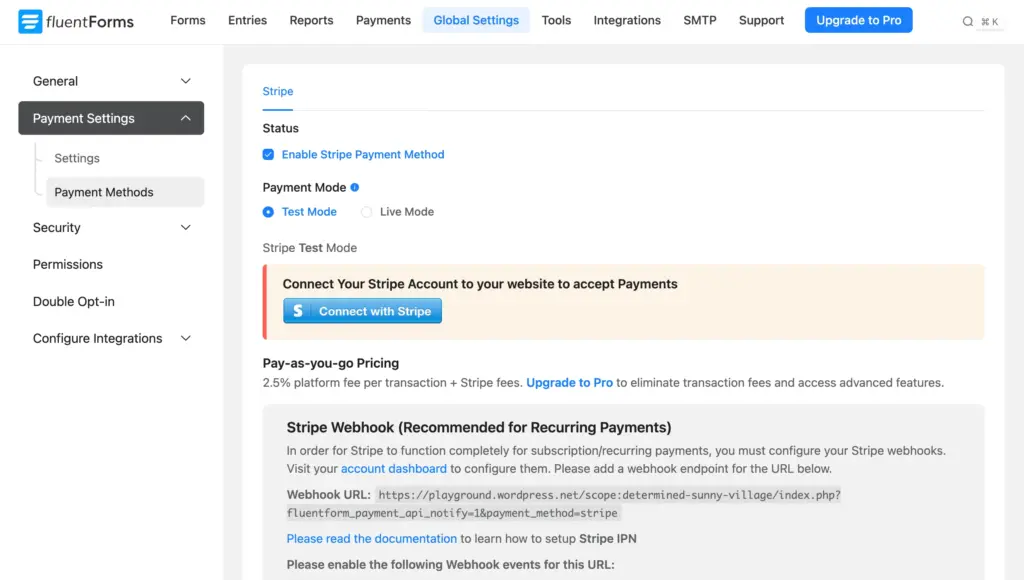
For other gateways, you’ll usually enter API credentials and environment details. Start in test mode first so you can validate the full payment flow safely.
If your business serves multiple markets, decide early whether one gateway is enough or whether you need a backup method for better completion rates.
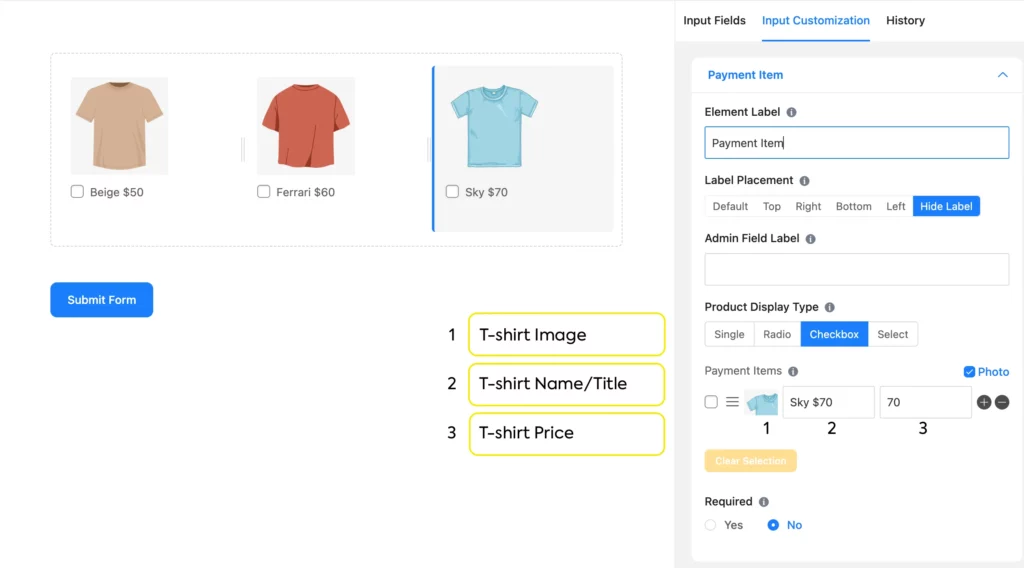
4. Build your payment form structure
Now, create a payment form and add required fields. A clean starter setup includes:
- Name
- Payment item field
- Quantity field (if needed)
- Total/payment summary field
- Payment method selector
If you’re collecting custom amounts (donations, variable invoices, quote-based pricing), use a custom payment amount field. Keep the structure lean.
5. Test everything in test mode before going live
Do a full end-to-end test before accepting real money. Validate:
- successful payment flow
- failed payment behavior
- cancellation flow behavior
- email delivery
- confirmation message accuracy
- amount calculation and currency display
- automation triggers after payment
Only switch to live mode after these checks pass. Once live, your forms are equipped with all the right tools to accept payment. All you have to do is publish your order form and keep accepting payments.
However, a good payment flow doesn’t end at transactions. It continues through communication, delivery, and follow-up. Define what should happen after a successful payment. You can send PDF receipts or confirmation emails, notify your internal team about further tasks, or trigger other automation workflows.
Build Smarter Forms for Free

Advanced payment features worth using
Once your core payment flow works, these advanced features help improve conversions, automate pricing, and reduce manual management.
Subscription and recurring billing
For memberships, retainers, SaaS products, or recurring donations, subscription payments are essential.

Fluent Forms lets you create recurring billing directly in your forms, so users can choose monthly or yearly payment plans. This is especially useful for ongoing services and donation campaigns where predictable revenue matters.
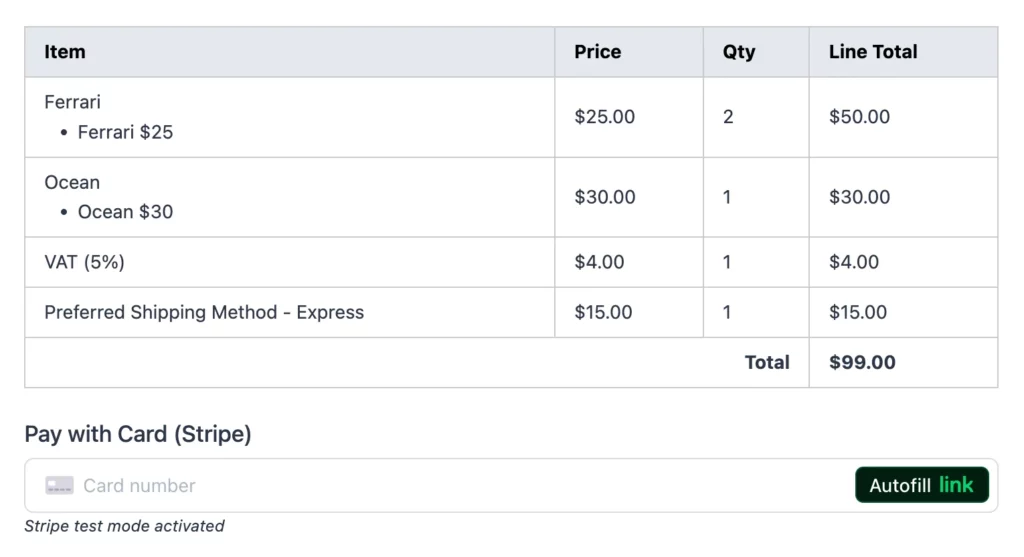
Payment summary blocks for clarity
A dynamic payment summary displays selected items, quantities, and totals before submission. When users can clearly review what they’re paying for, it builds trust and reduces payment errors.
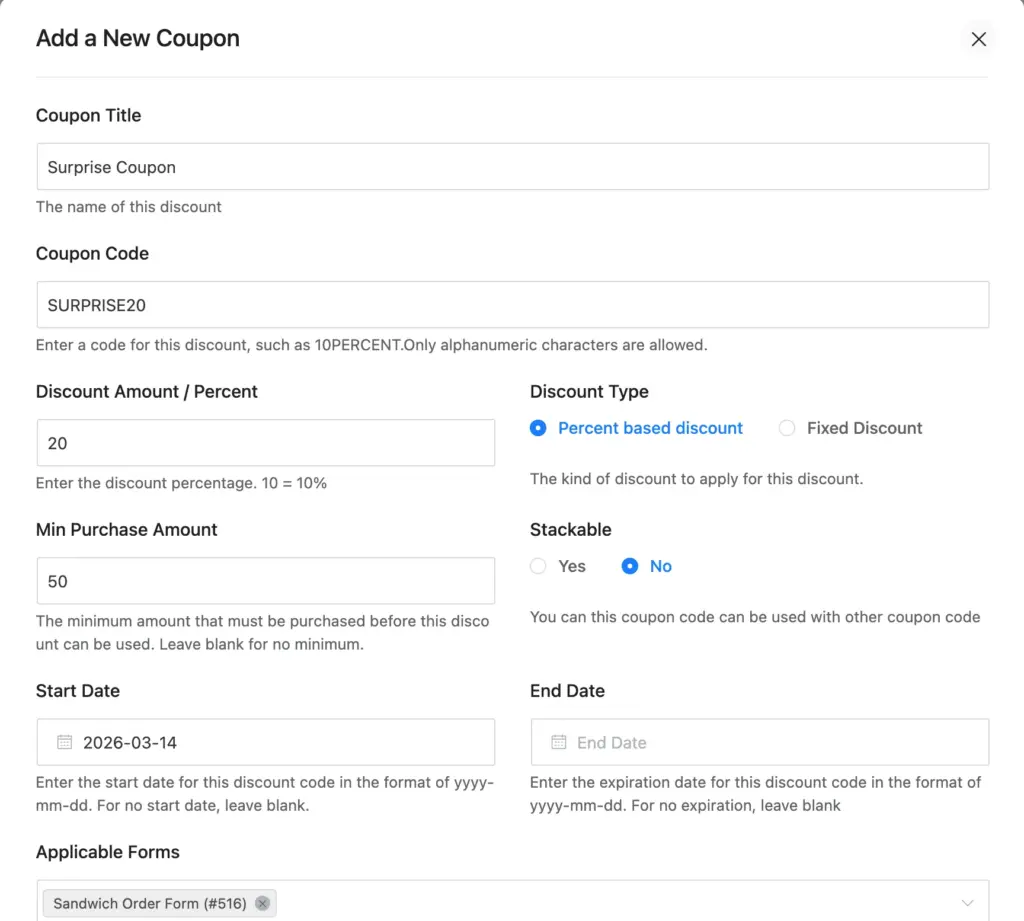
Coupons and discount logic
Built-in coupon support lets you run promotional campaigns without extra tools. You can offer percentage or fixed discounts, set usage limits, and apply conditional coupons. This is helpful for seasonal promotions, early-bird pricing, or targeted offers.
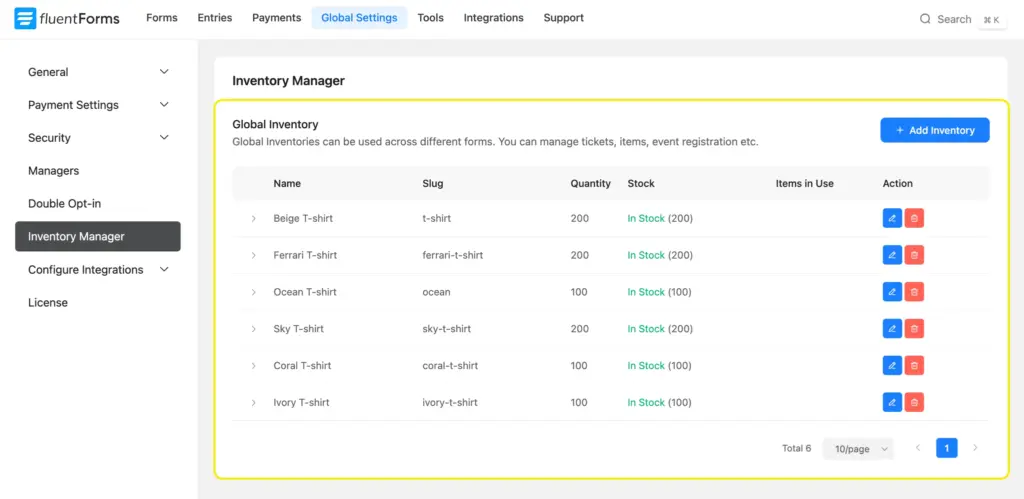
Inventory and quantity controls
Fluent Forms lets you pair product fields with quantity inputs so users can select items and quantities in a structured order form.
You can also enable the built-in inventory module to assign stock limits, show remaining availability, and configure stock-out behavior (like hiding or disabling unavailable items). This helps you manage merchandise, event slots, or limited products directly from the form while preventing overselling.
Together, these features make your payment forms smarter and conversion-friendly without adding complexity to your WordPress setup.
Enjoying this article?
We regularly publish actionable content on our blog. Subscribe to get them delivered straight to your inbox.
We won’t spam you. You can unsubscribe whenever you want.
Start collecting credit card payments the smarter way
A form-first payment setup is usually the fastest and most practical option. Fluent Forms lets you accept credit cards securely in WordPress, connect trusted gateways, automate what happens after payment, and keep your checkout flow simple for users.
Most importantly, accepting credit card payments doesn’t require complicated configuration. Once you connect a gateway like Stripe, users can pay directly within the form.
Start with a focused payment form, test it properly, and expand with advanced features like subscriptions, coupons, and inventory controls as your needs grow. This approach gives you a payment system that works now and still scales with you later.

Sarika writes for Fluent Forms and loves to offer insights into small businesses. She’s curious and enjoys discussing ideas, interests, and perspectives. In her free time, she’s either marvelling at architectural beauties or trying different cuisines.


Leave a Reply