FluentCRM is a popular self-hosted CRM plugin for WordPress, designed to help small businesses manage their subscribers effectively. By integrating FluentCRM with Fluent Forms, you can seamlessly grow your subscriber list through form submissions.
This guide will walk you through integrating FluentCRM with Fluent Forms on your WordPress site.
Ensure both Fluent Forms and FluentCRM plugins are installed and activated. No additional settings are needed to integrate them.
Enable the FluentCRM Integration #
To learn how to enable FluentCRM integration, follow the steps with the screenshots below –
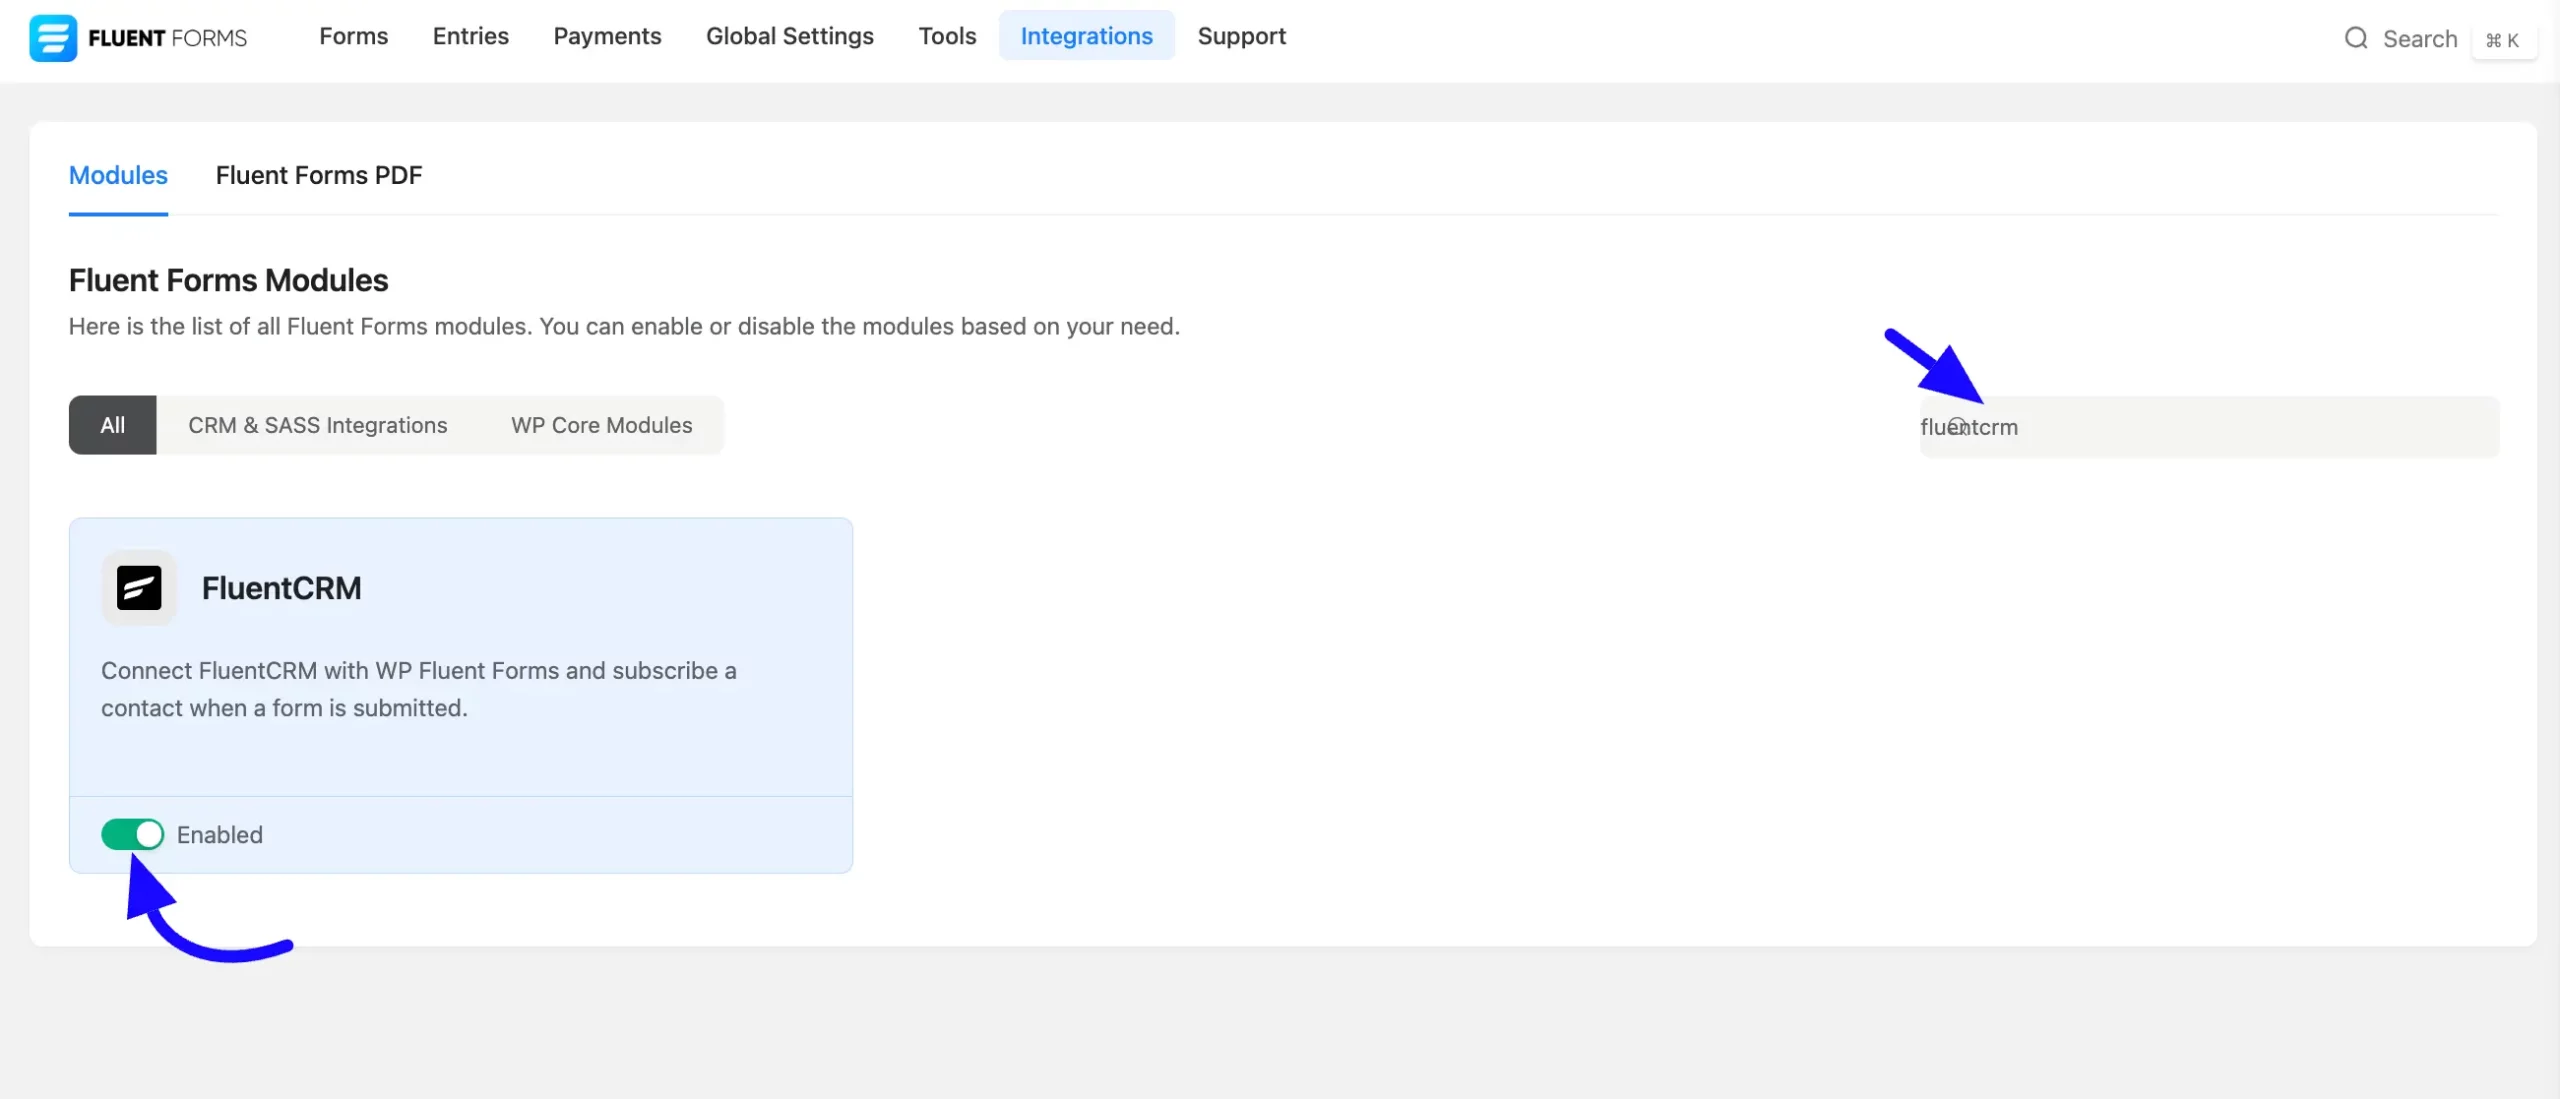
First, go to Integrations from the Fluent Forms Navbar, search for FluentCRM through the search bar, and get the FluentCRM Module.
Now, turn on the Toggle to enable the FluentCRM module, and click the Settings Icon on the right side.
Integrate FluentCRM with FluentForms #
To learn how to integrate FluentCRM into any specific Form in Fluent Forms, follow the steps with the screenshots below –
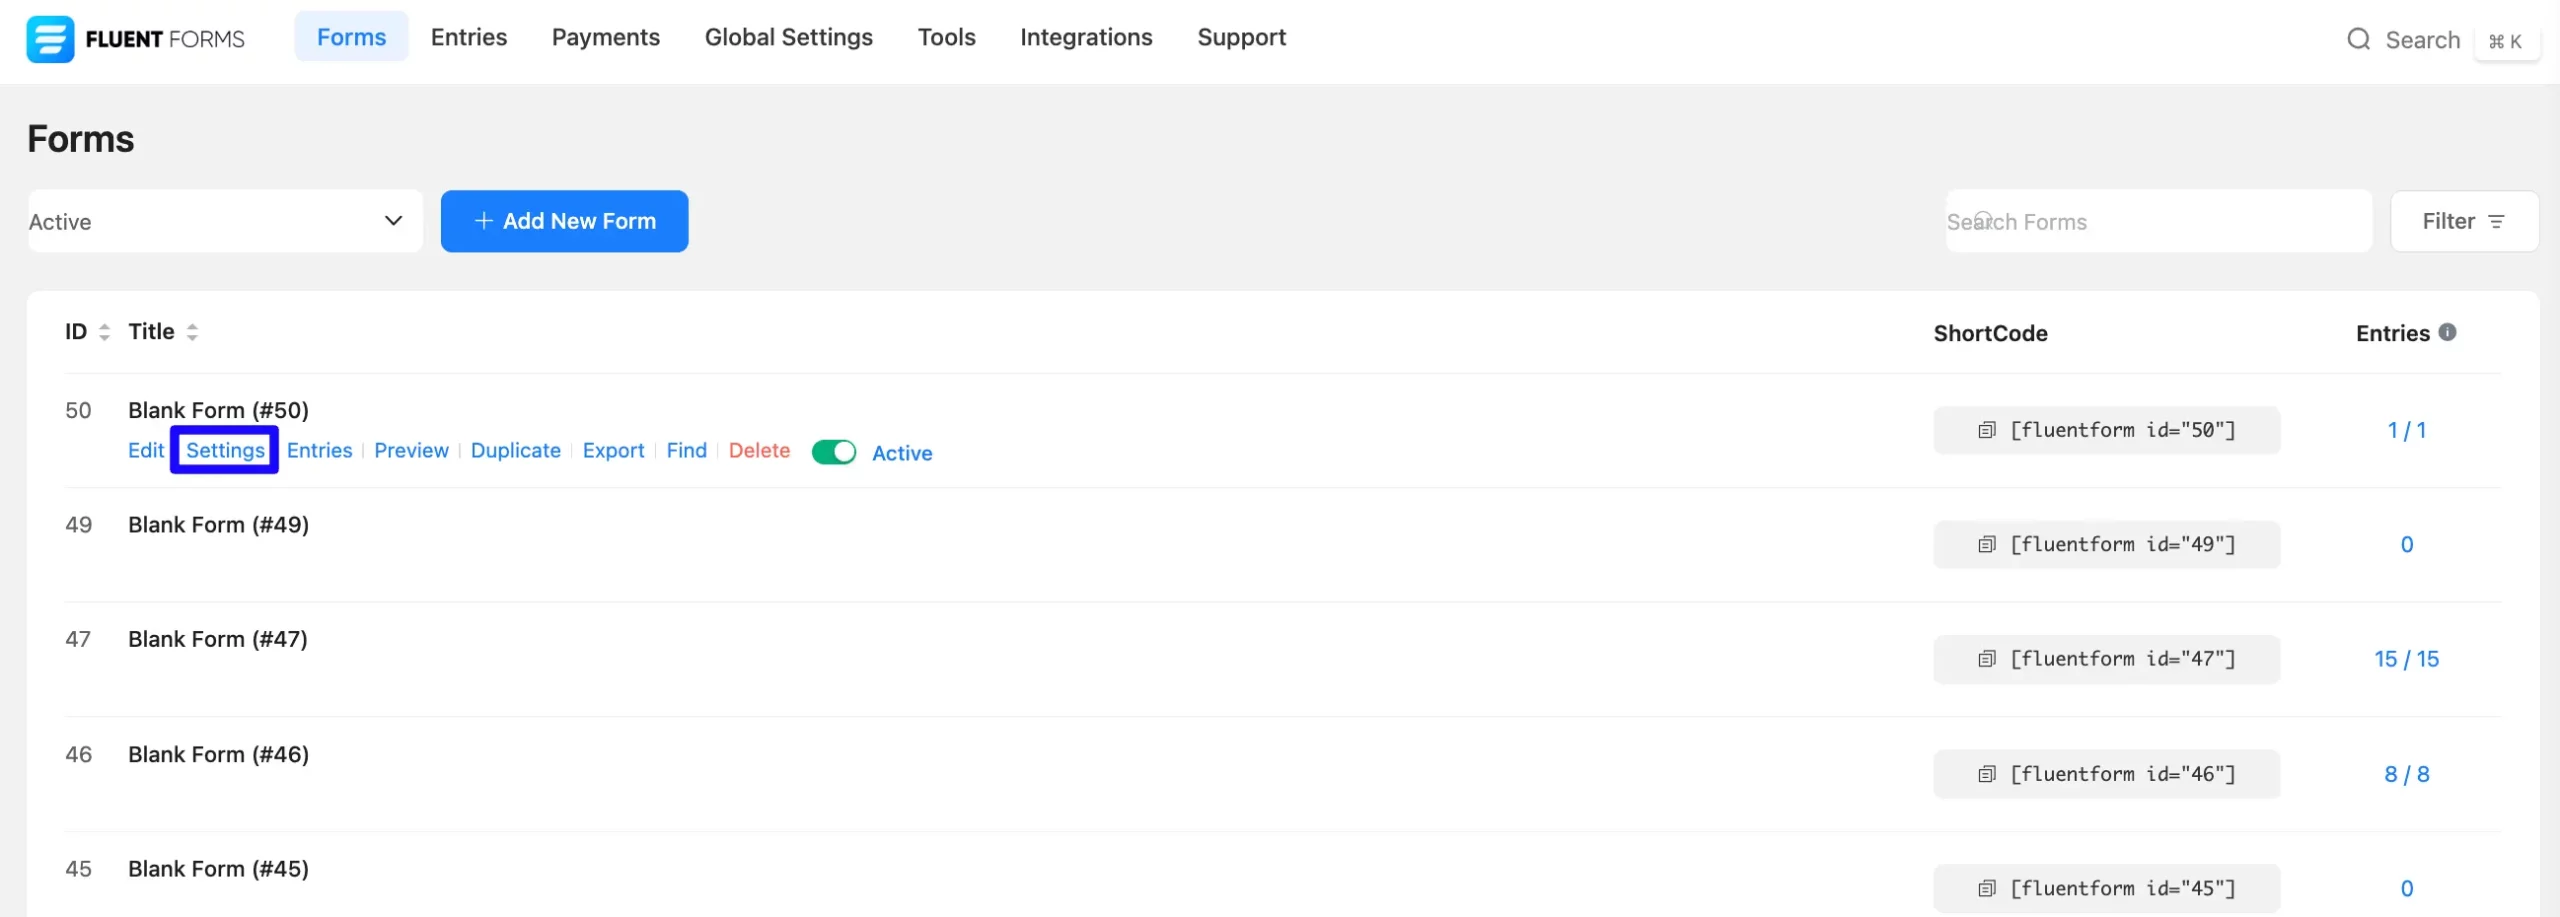
First, go to Forms from the Fluent Forms Navbar, select the Desired Form where you want to integrate your FluentCRM and click the Settings button.
If you do not have any existing forms, read Create a Form from Scratch or Create a Form using Templates documentation to create a new one.
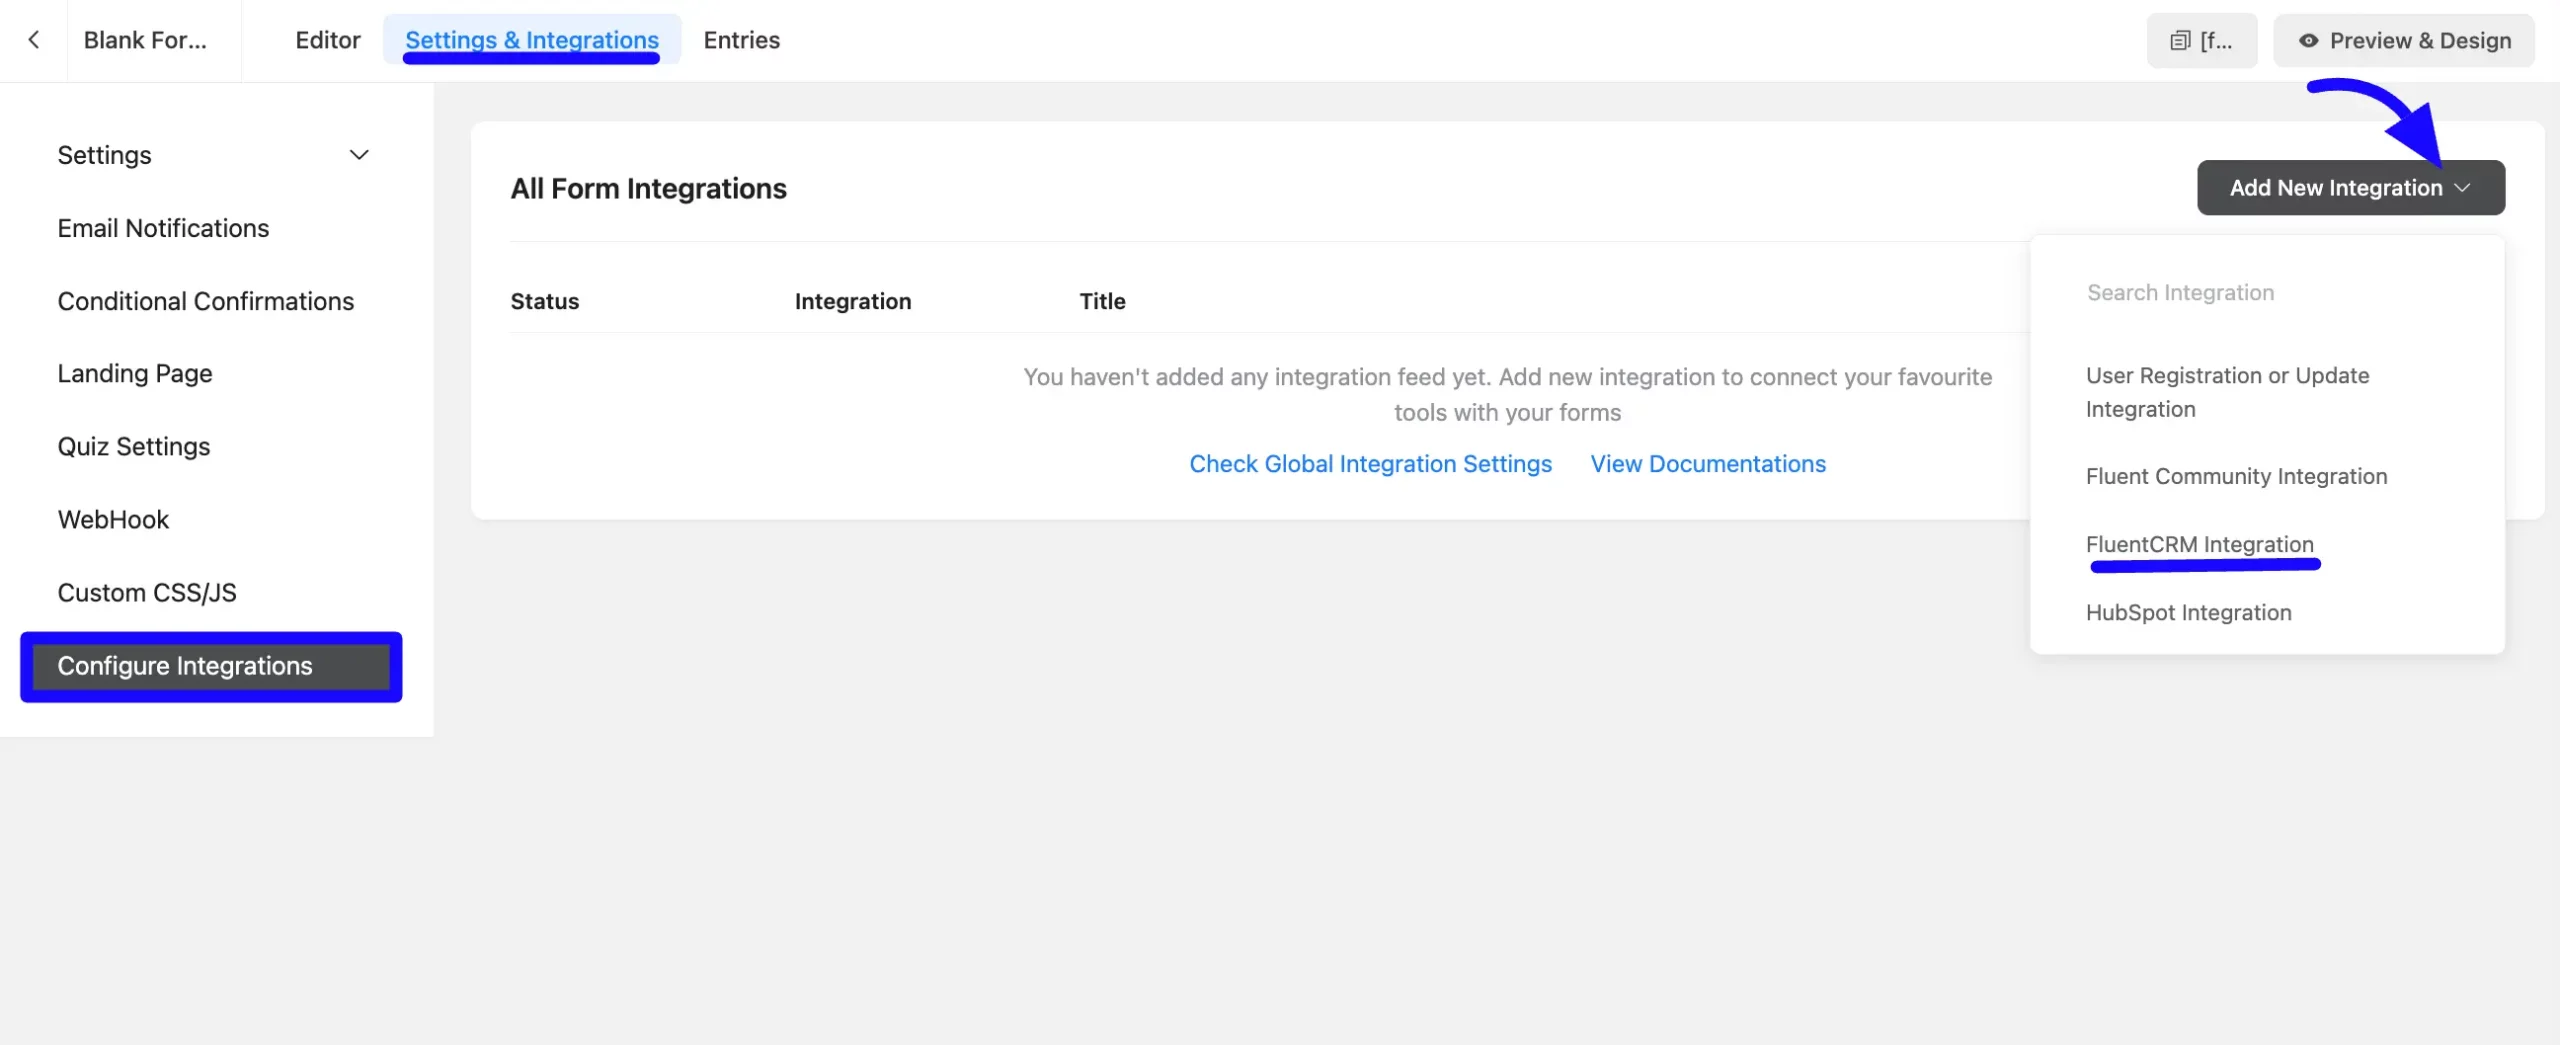
Once you are on the Settings & Integrations, go to the Configuration Integrations tab, click the Add New Integration button, and select FluentCRM Integration feed from the dropdown list.
Configure FluentCRM Integration Feed #
Once you select FluentCRM integration, you will need to configure the following-
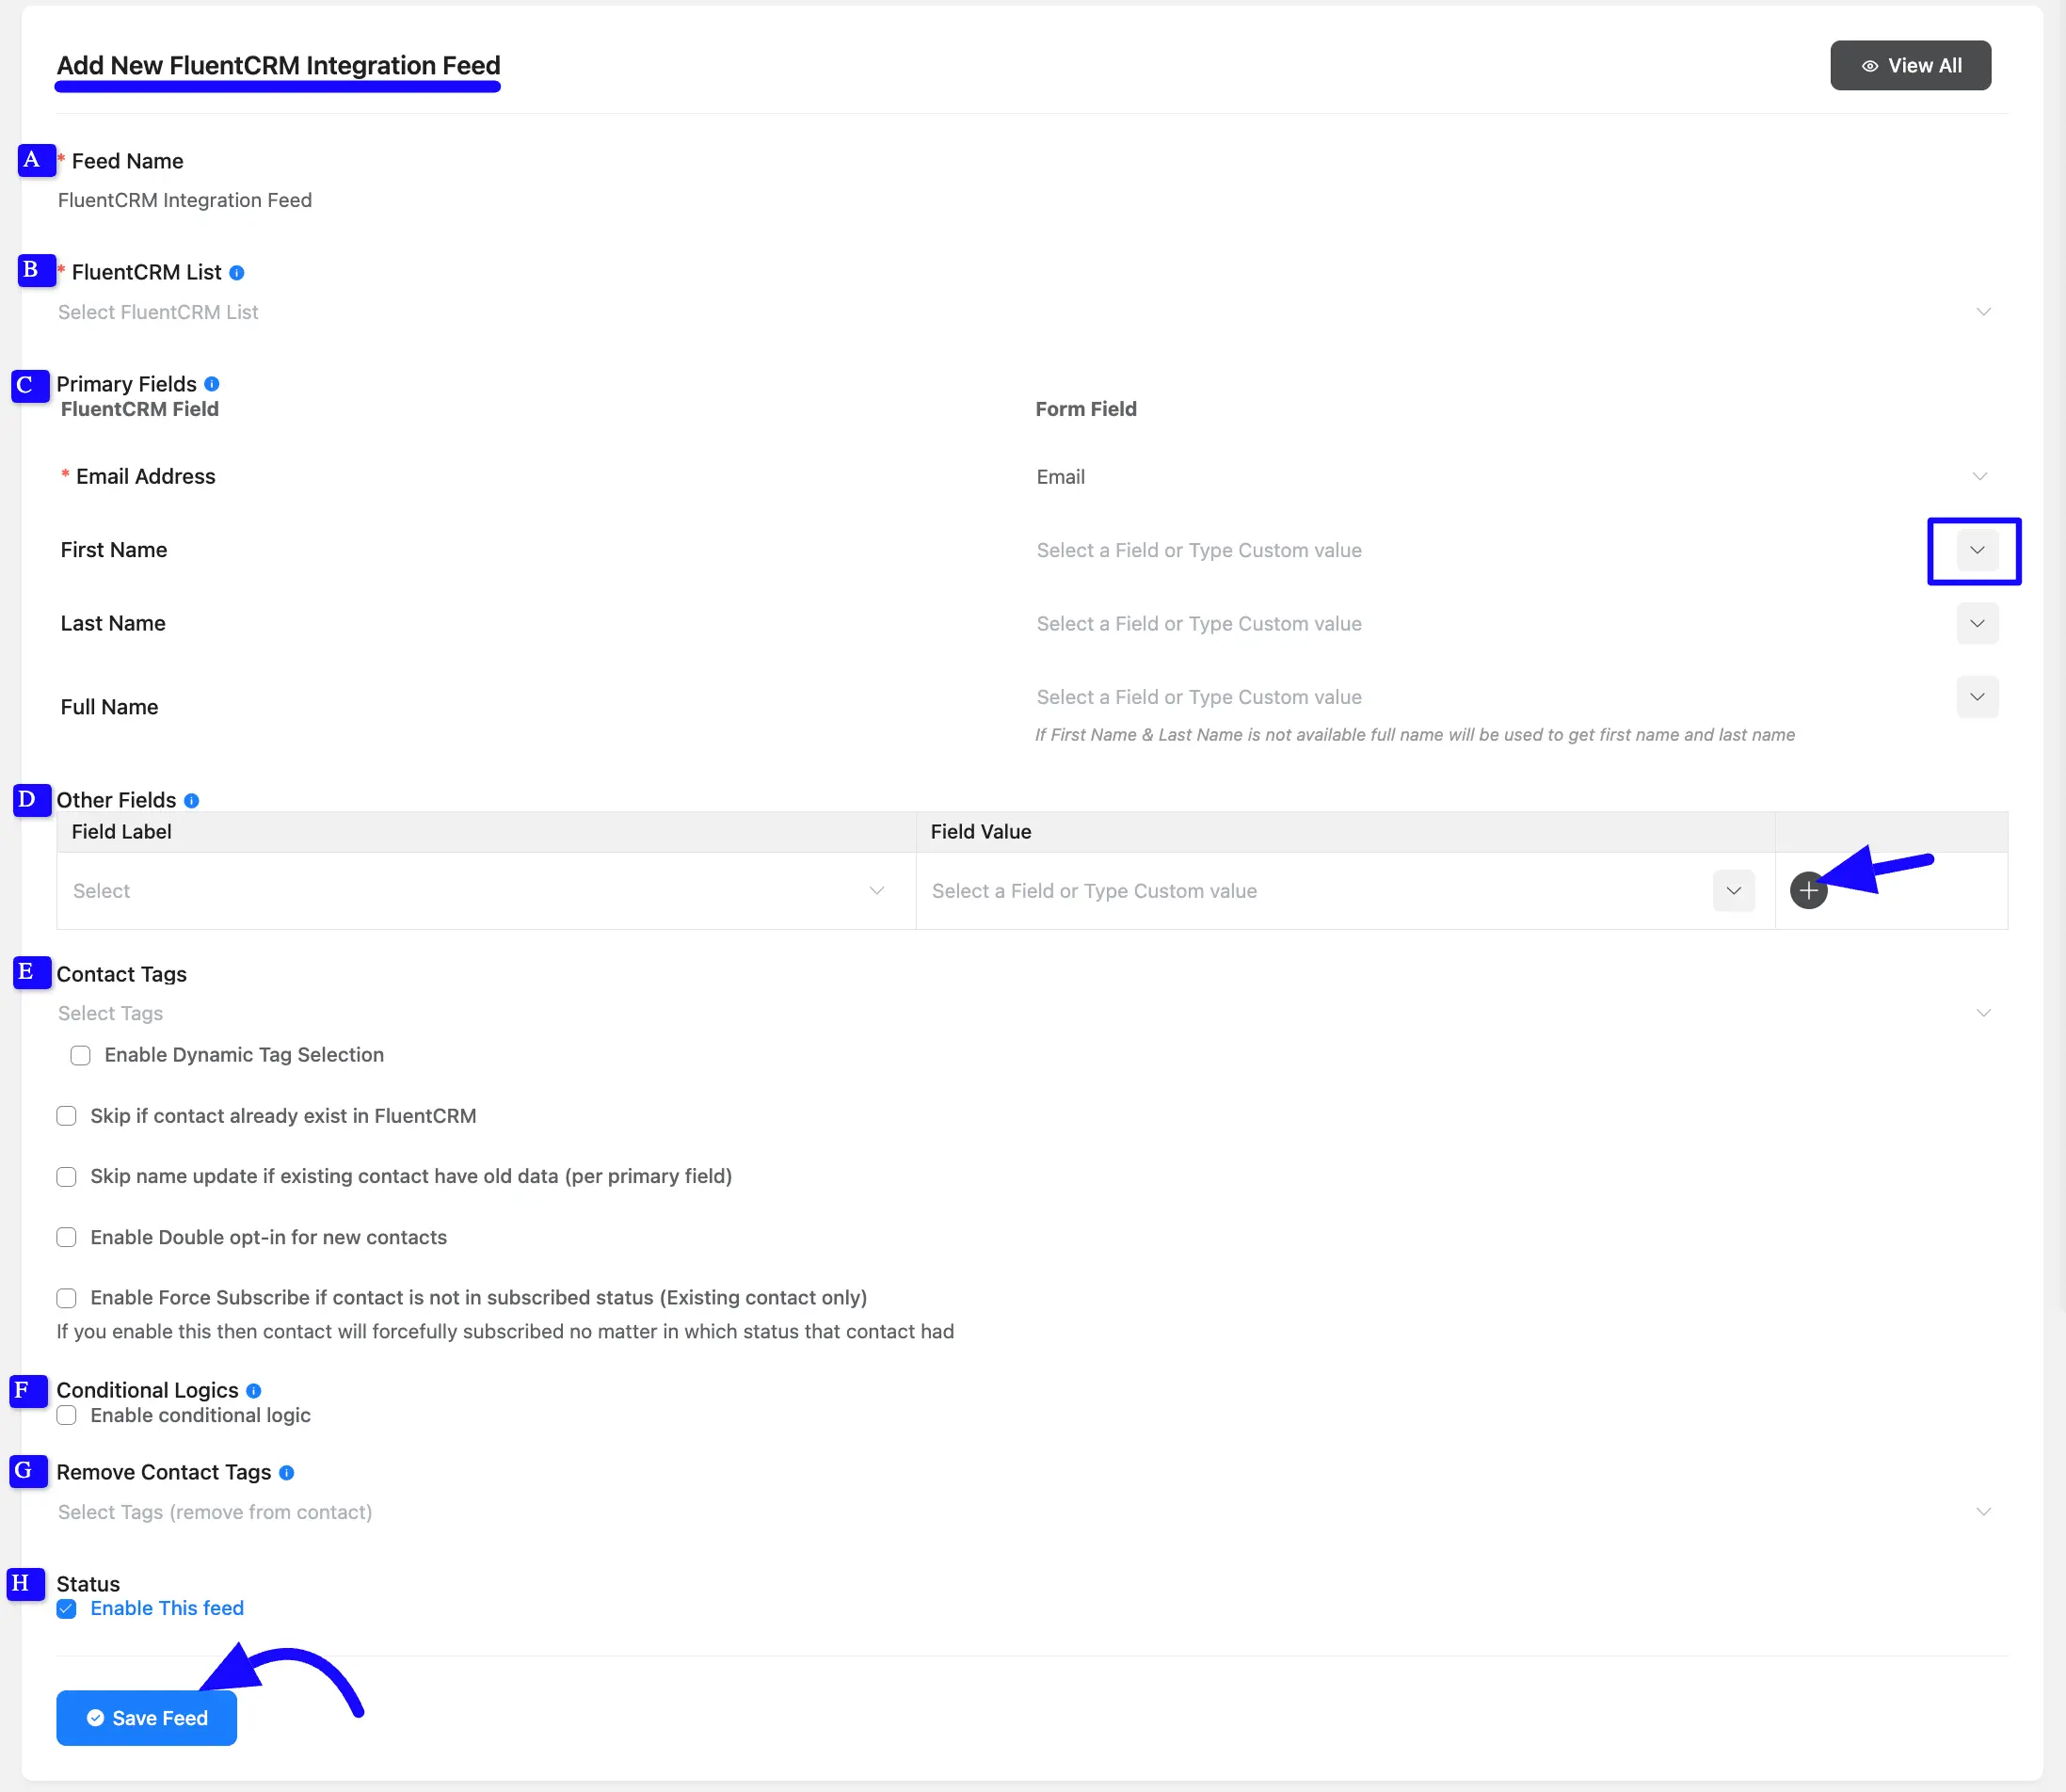
A. Feed Name: Enter a name for your FluentCRM integration feed.
B. FluentCRM List: Select the FluentCRM contact list you wish to integrate with. You can also change this anytime if needed.
C. Primary Fields: Use all the fields under this option to properly link your FluentCRM Fields with the Form Fields. You can easily select the value for the form fields based on the FluentCRM fields using the Shortcode Arrow.
D. Other fields: Here you can map additional Fluent Form fields to FluentCRM fields. To add multiple fields click the Plus (+) Icon.
E. Contact Tag: Select one or multiple FluentCRM tags for the contact from your FluentCRM Contact tags.
- Enable Dynamic Tag Selection: If you wish to add dynamic tags based on conditions, check the Enable Dynamic Tag Selection options and also apply conditions from the dropdown list.
- Skip contact already exists in FluentCRM: If you want to prevent duplicate contact in FluentCRM then check the checkboxes of skip contact already exist in FluentCRM.
- Skip name update if existing contact has old data: If you want to retain existing contact names even if new data is submitted then check the checkboxes of skip name update if existing contact have old data (per primary) options.
- Enable Double Opt-In for a new Contact: Enable this option to send a double opt-in email for new contacts.
- Enable Force subscribe if contact is not in subscribed status: Check the checkboxes to enable this to subscribe existing contacts that are not already subscribed.
F. Conditional logic: If you want to allow FluentCRM integration conditionally based on your submission values then Enable Conditional Logic options. To know more about this conditional logic read the article.
G. Remove Contact Tags: If you want to remove a contact’s tags in FluentCRM, select the desired tags from the dropdown list.
H. Status: Enable this feed option to activate the integration.
After configuring the integration, Click the Save Feed button to finalize your FluentCRM integration.
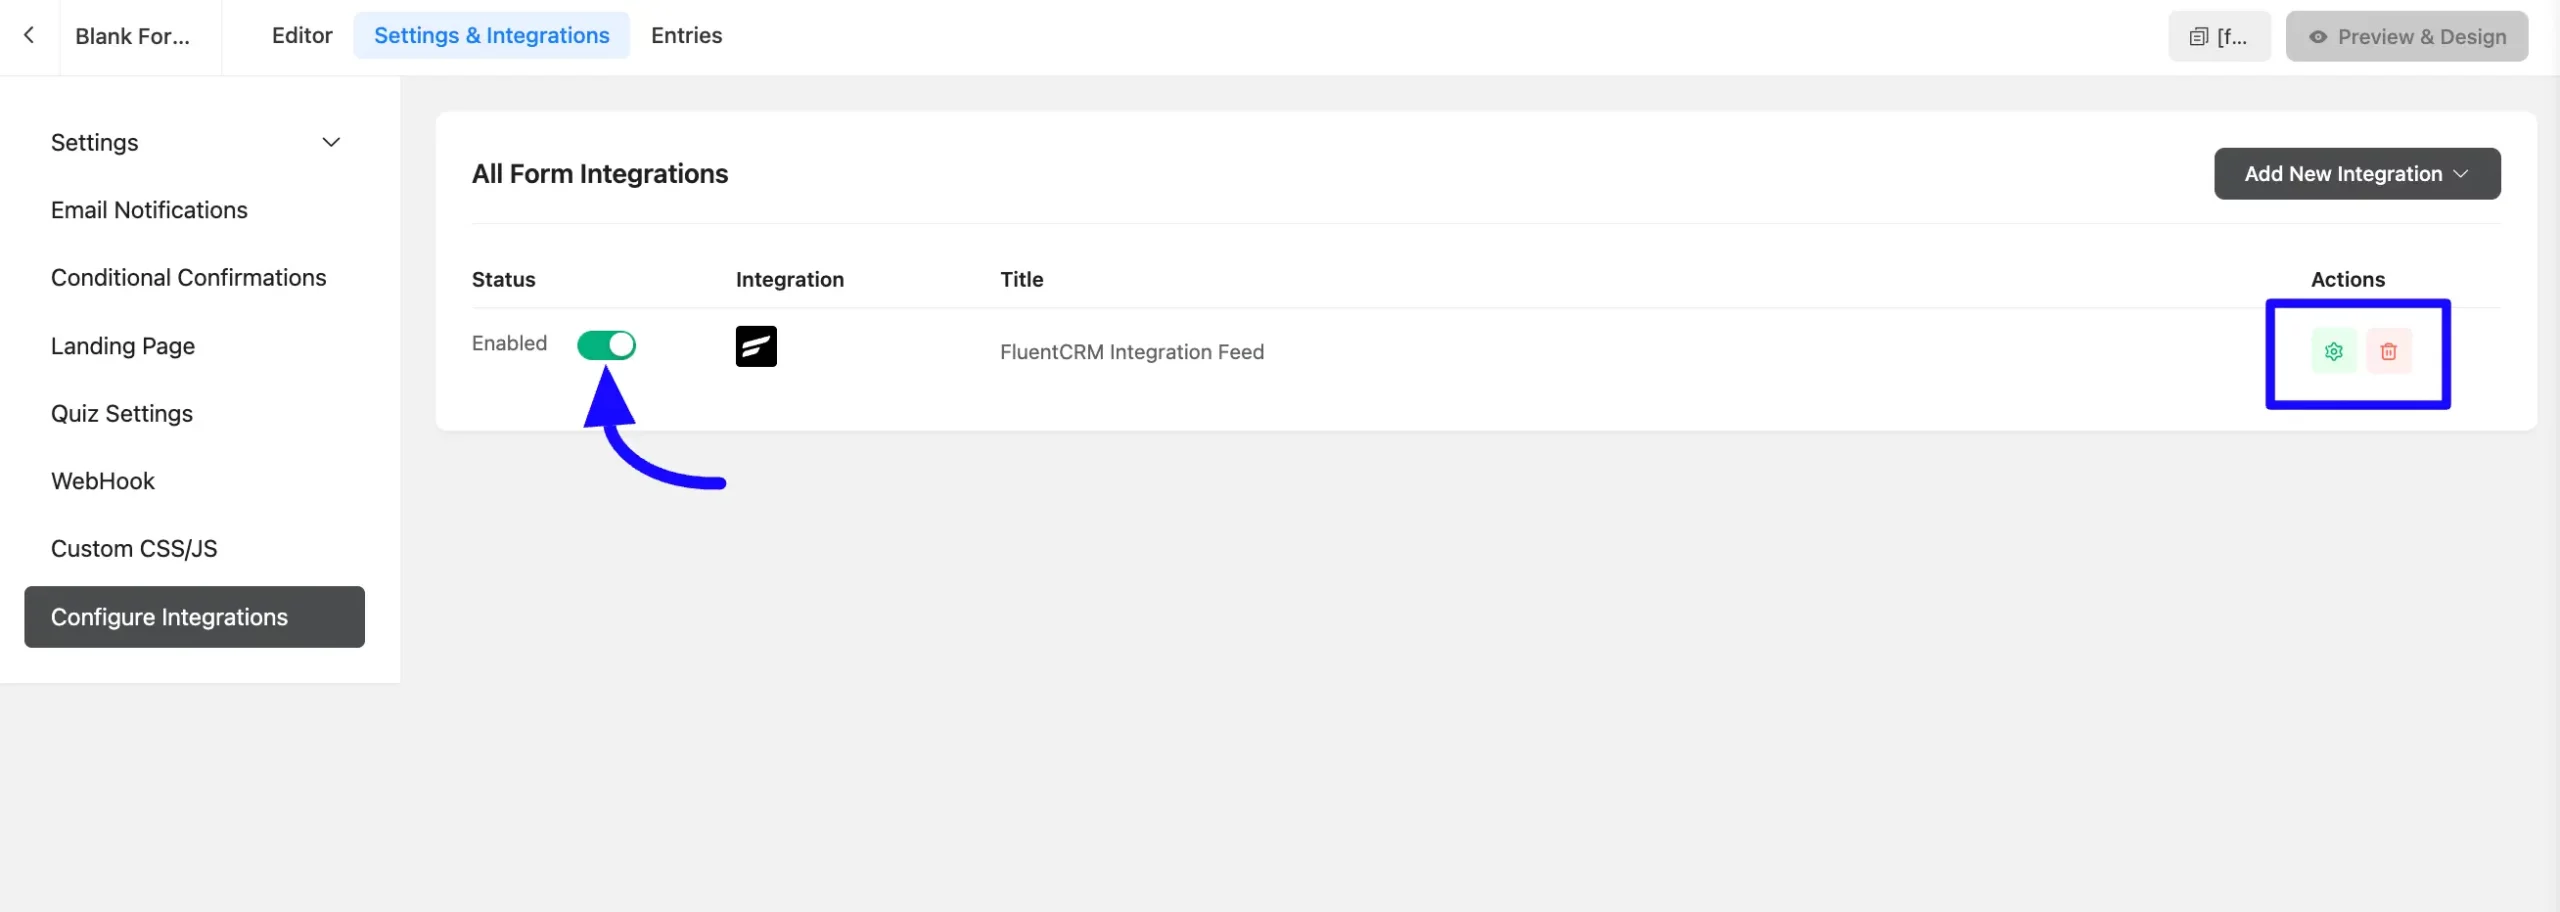
After successful Integration, you will see your FluentCRM Integration Feed has been added here.
You can modify your feed anytime by clicking the Settings Icon and Delete it by clicking the Trash Icon.
Also, you can disable or enable this feed anytime by turning off the Toggle if needed.
Automation Trigger with Fluent Form #
FluentCRM allows you to set up automation funnels triggered by Fluent Forms. These triggers can automate tasks based on user behavior, such as form submissions, subscription cancellations, or payment receipts.
To learn how you can use all the Fluent Form Triggers of your FluentCRM, follow the steps with screenshots below –
First, go to the Automation section from the Fluent CRM Navbar, and click + New Automation. For detailed steps on creating a new automation funnel, refer to the FluentCRM automation documentation.
Now, all the Fluent Form Triggers for creating an automation funnel are organized under Fluent Form plugin categories in the left sidebar. These are:
- Subscription Cancelled (Fluent Form)
- Subscription Payment Received
- New Form Submission
Once you select your desired Trigger, click the Continue button, and put a Title under the Internal Label field for this automation funnel so you can easily find it later.

Subscription Cancelled (Fluent Form) Automation #
This trigger starts the automation when a subscription is canceled. Once you select this trigger, a tab will appear on the right-hand side with options to set your trigger.
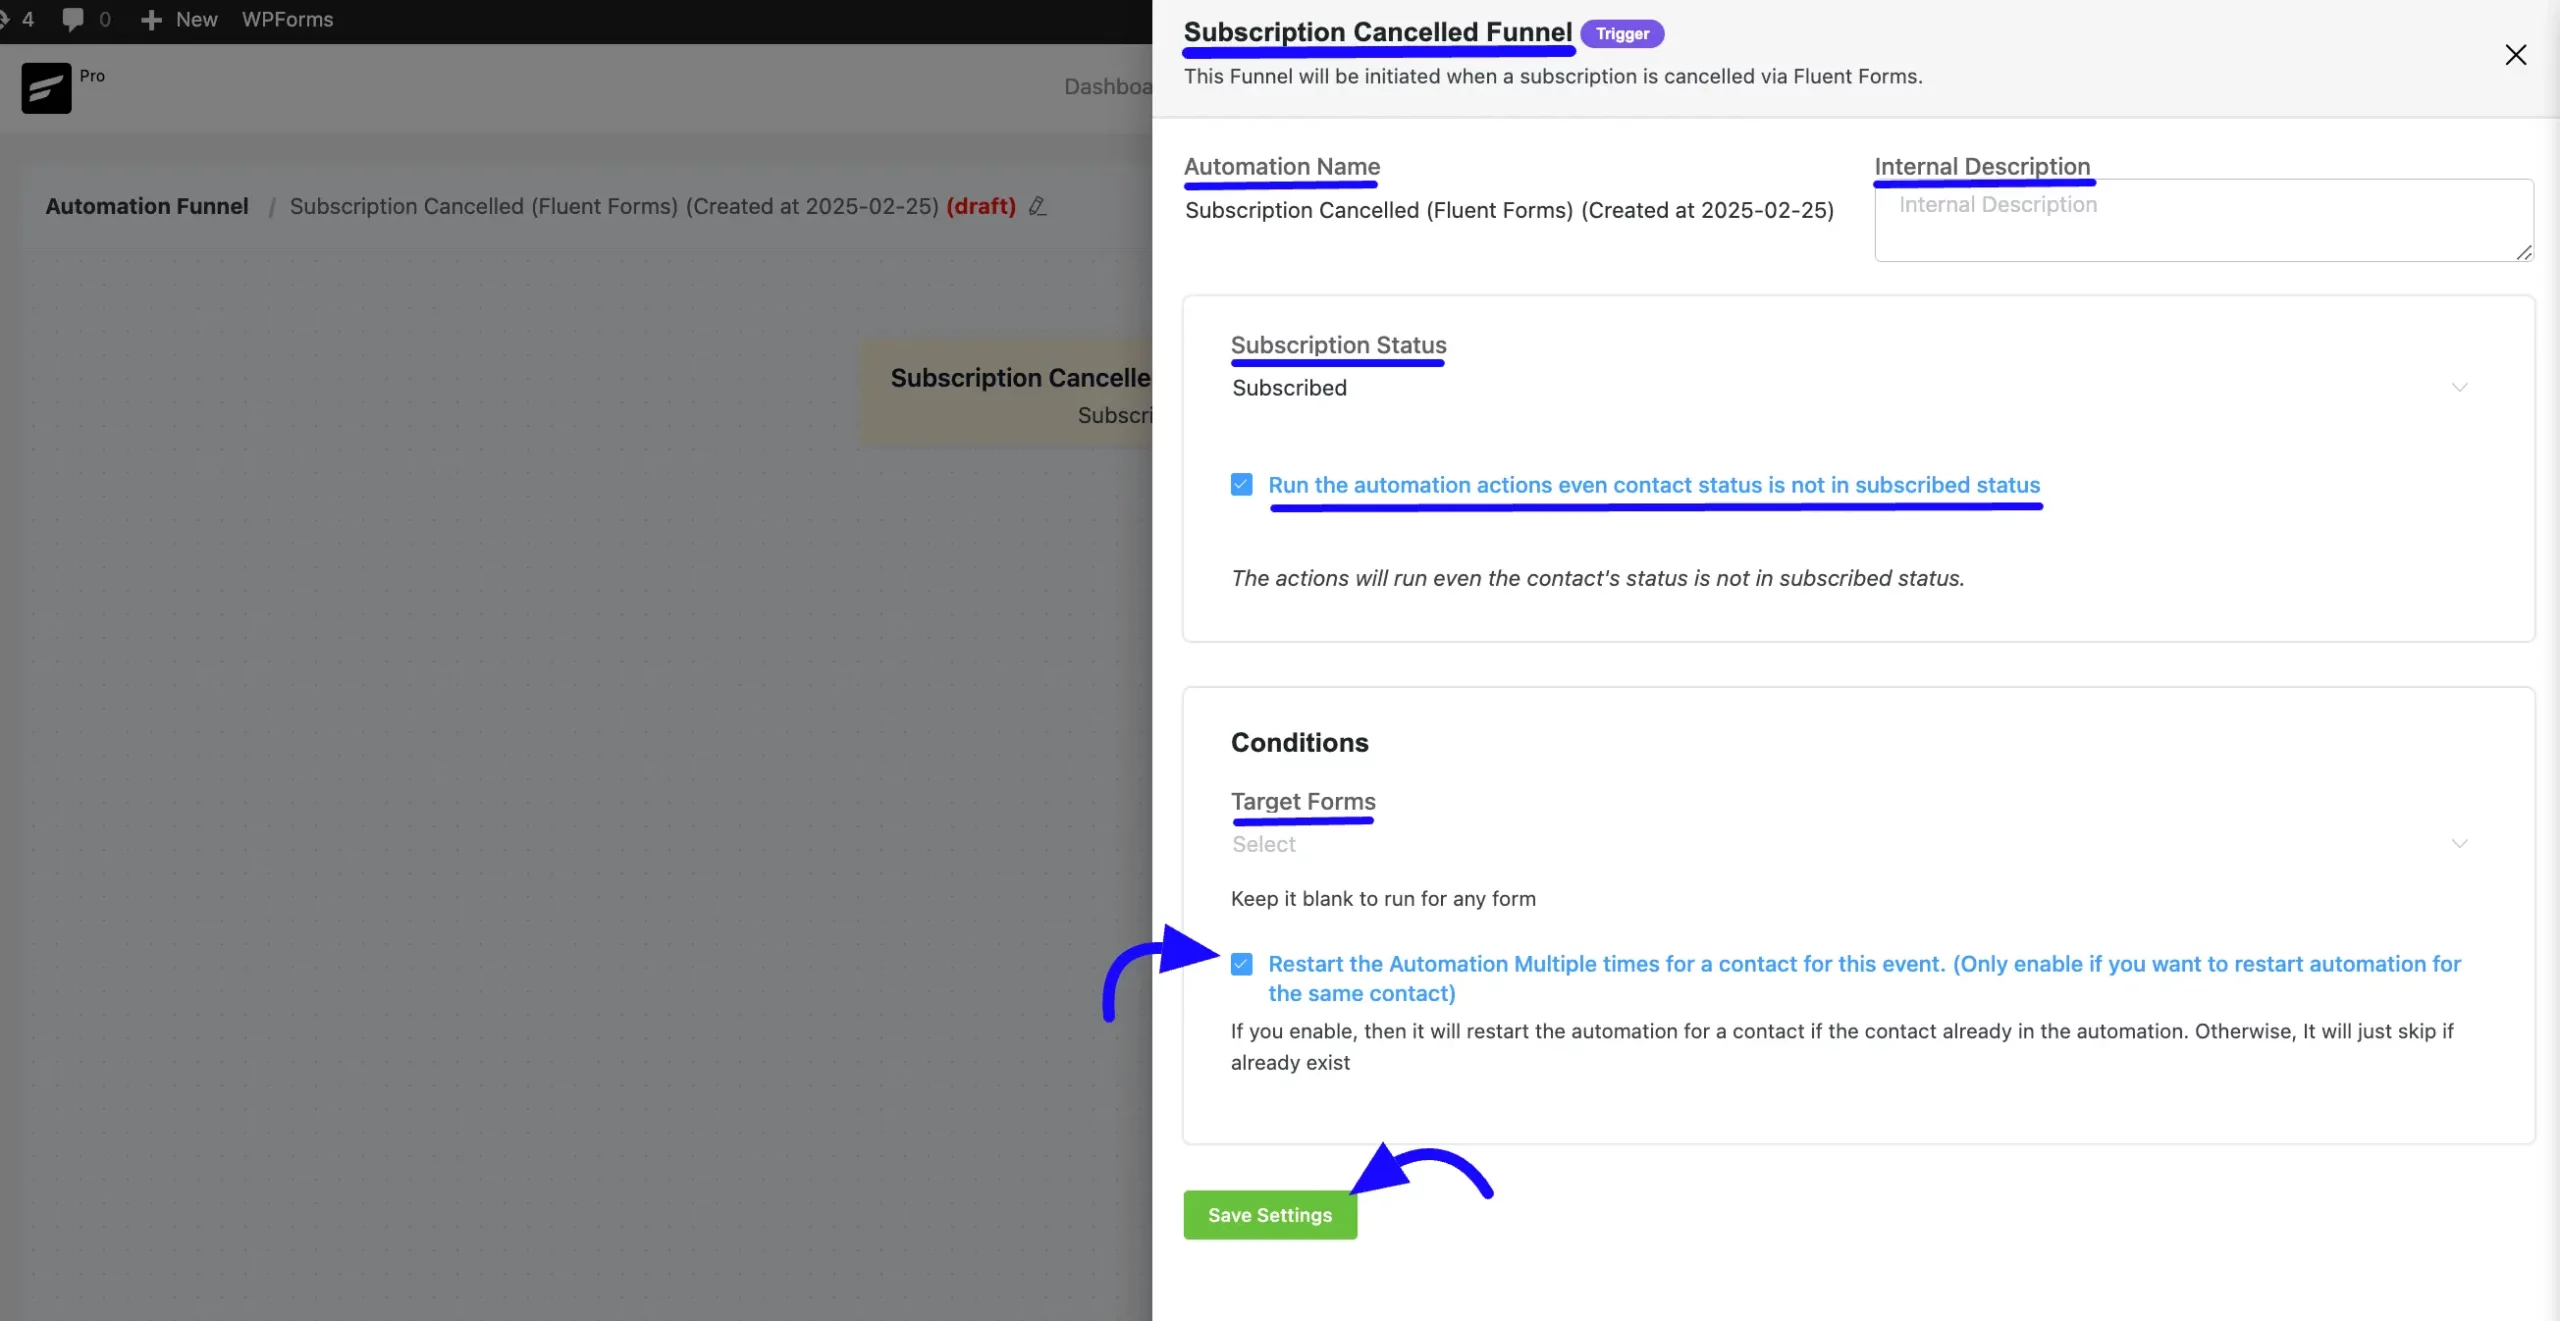
Settings of Subscription Cancelled Funnel #
- Automation Name: Provide a Name for the Automation so you can find it later easily.
- Internal Description: Write a description that will be used as a Subtitle in the Block Diagram in the Automation Editor.
- Subscription Status: Change the subscription status using the dropdown list for the contact that submits the form according to FluentCRM Contacts Status.
- Run the automation actions even contact status is not in subscribed status: Check this option if you want to run the automation even when the contact’s status is not in subscribed status.
- Target Forms: Select which Form will trigger this automation Funnel. Leave blank to run for all forms available on your website.
- Restart: Check this option if you Restart the automation multiple times for the same contact that triggers the automation.
Once you are done, click the Save Settings button to save all your changes.
Subscription Payment Received (Fluent Form) #
This trigger activates when a subscription payment is received. Once you select this trigger, a tab will appear on the right-hand side with options to set your trigger.
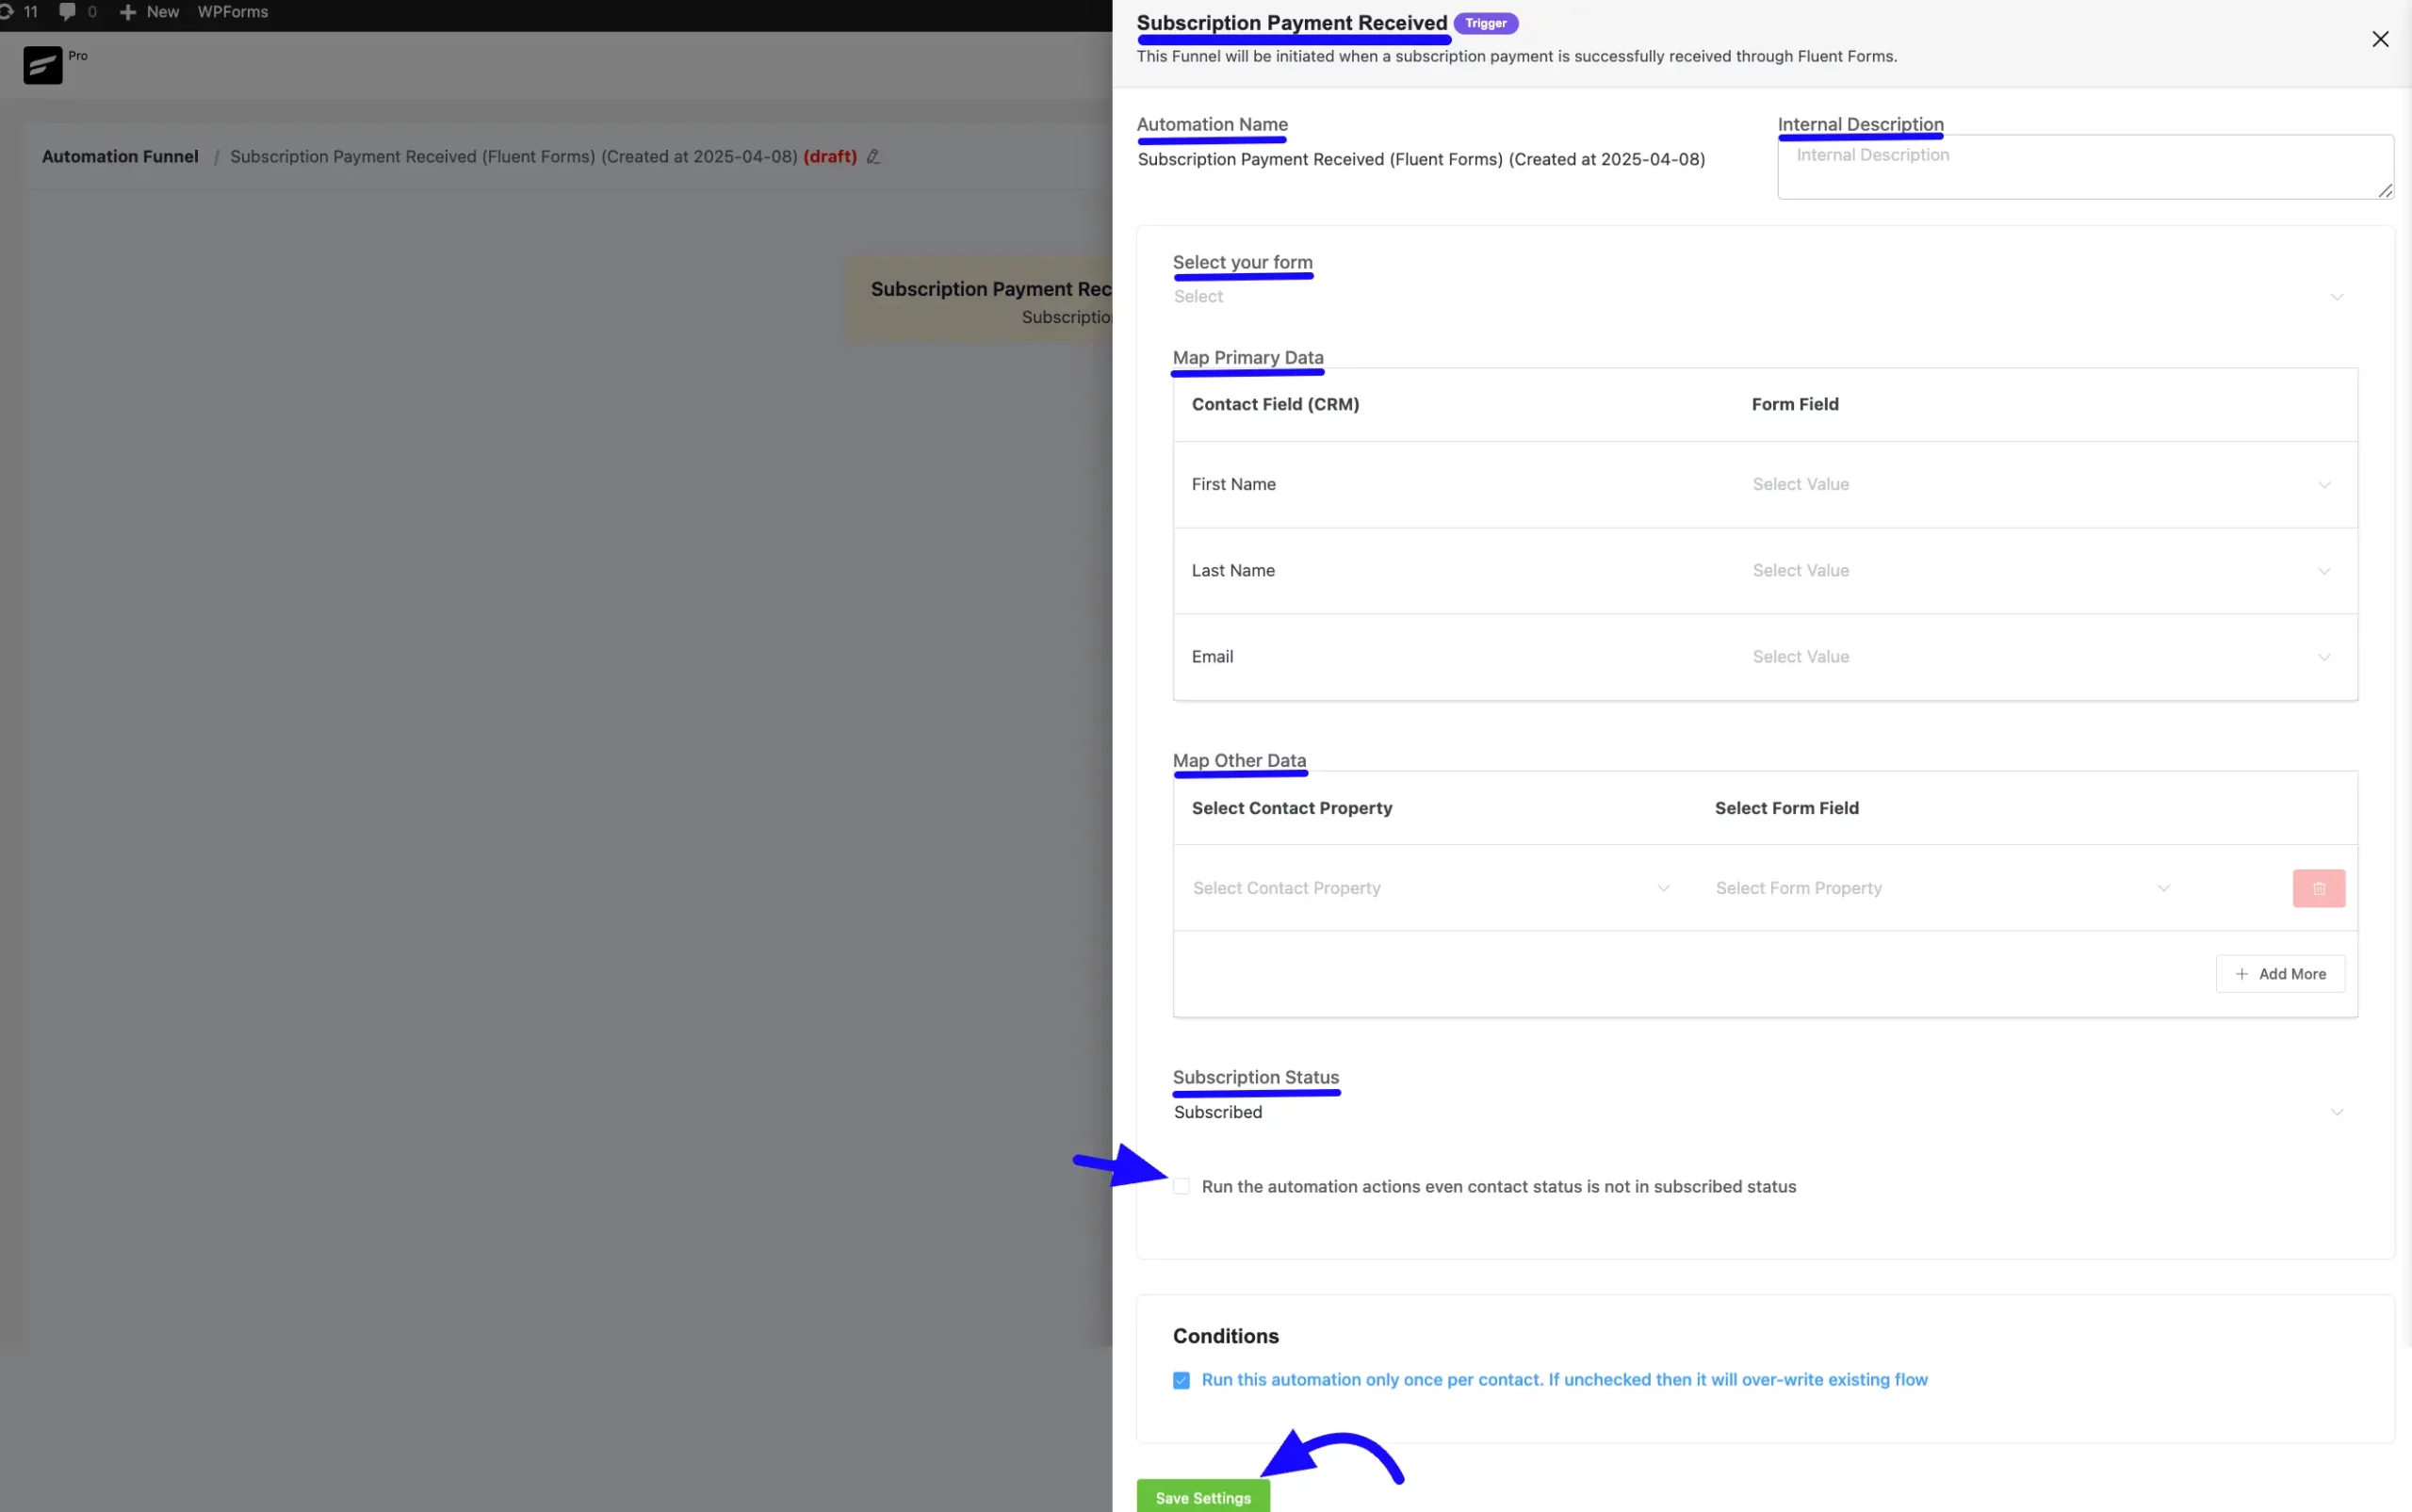
Settings Payment Received (Fluent Form) #
- Automation Name: Provide a Name for the Automation so you can find it later easily.
- Internal Description: Write a description that will be used as a Subtitle in the Block Diagram in the Automation Editor.
- Select your form: Choose the desired form from the dropdown option.
- Map Primary Data: Map the FluentCRM data (First Name, Last Name, Email) from the dropdown to select values.
- Map Other Data: Dropdowns to select contact properties and form fields for additional data mapping.
- Subscription Status: Change the subscription status using the dropdown list for the contact that submits the form according to FluentCRM Contacts Stratus.
- Conditions: Check the checkbox to Run this automation only once per contact options. If you unchecked, it will overwrite an existing flow.
Once you are done, click the Save Settings button to save all your changes.
New Form Submission (Fluent Form) #
This automation funnel will start once a New Form Submission (Fluent Form)
Once you select this trigger, a tab will appear on the right-hand side with options to set your trigger.
Note: The settings options of this New Form Submission (Fluent Form) trigger work the same way as the Subscription Payment Received (Fluent Form) trigger. To learn how to use all the settings, read previous Section.
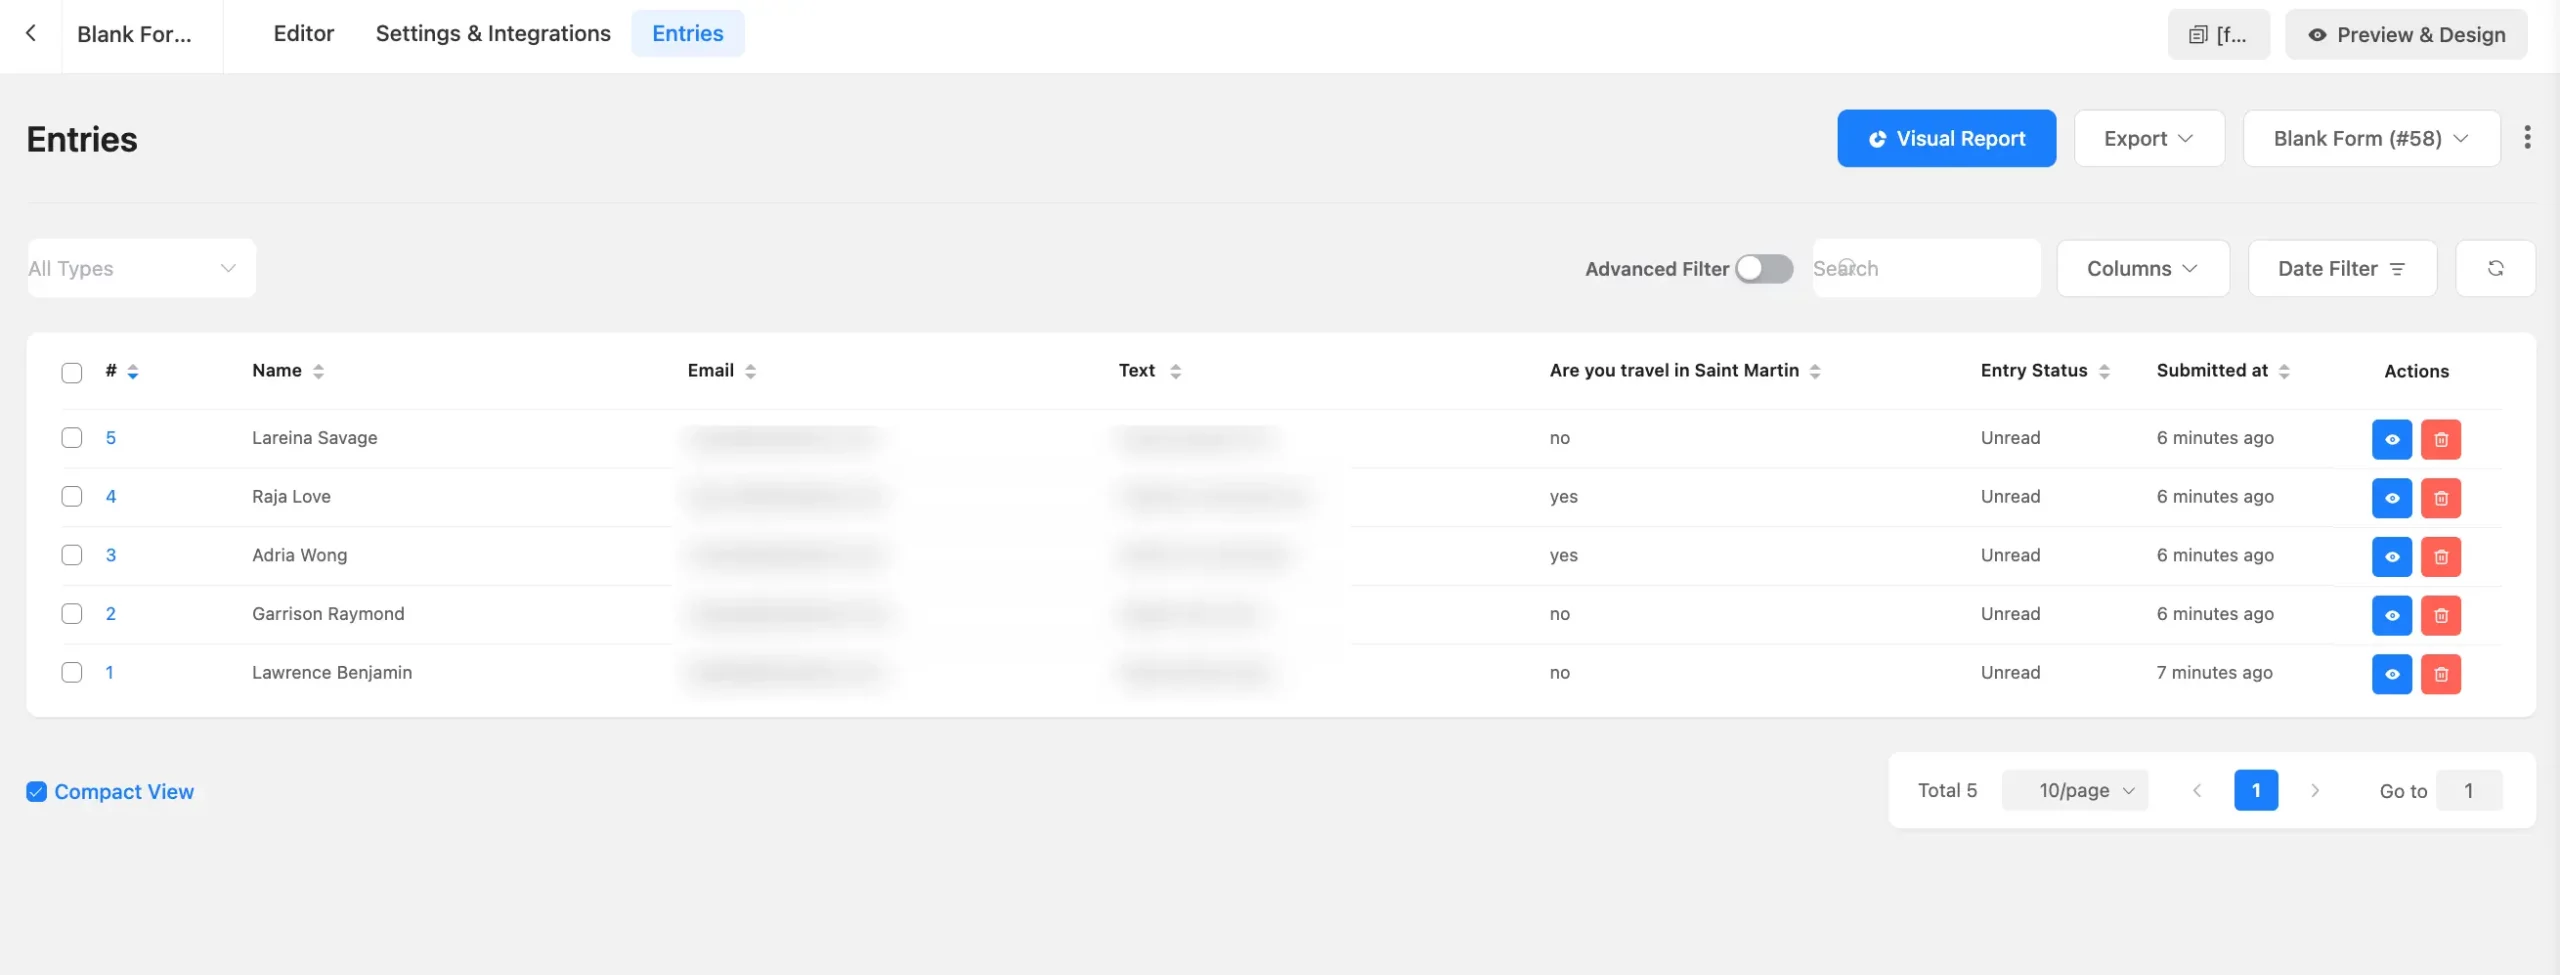
Preview of Integrated FluentCRM #
Once the integration is complete, you can preview the contacts added to FluentCRM from form entries. These will be visible in the Entries section of the form.
By integrating Fluent Forms with FluentCRM, you can easily sync user submissions with your CRM system, manage subscribers, and trigger automation workflows based on user actions.
If you have any further questions, concerns, or suggestions, please do not hesitate to contact our @support team. Thank you.


