
How to Create a Form in WordPress: A Beginner’s Guide to Fluent Forms
A form is one of the simplest tools you can add to a site, which does a lot more than collect information. It can bring in leads, qualify prospects, take payments, confirm bookings, run quizzes, and keep submissions organized inside your WordPress dashboard.
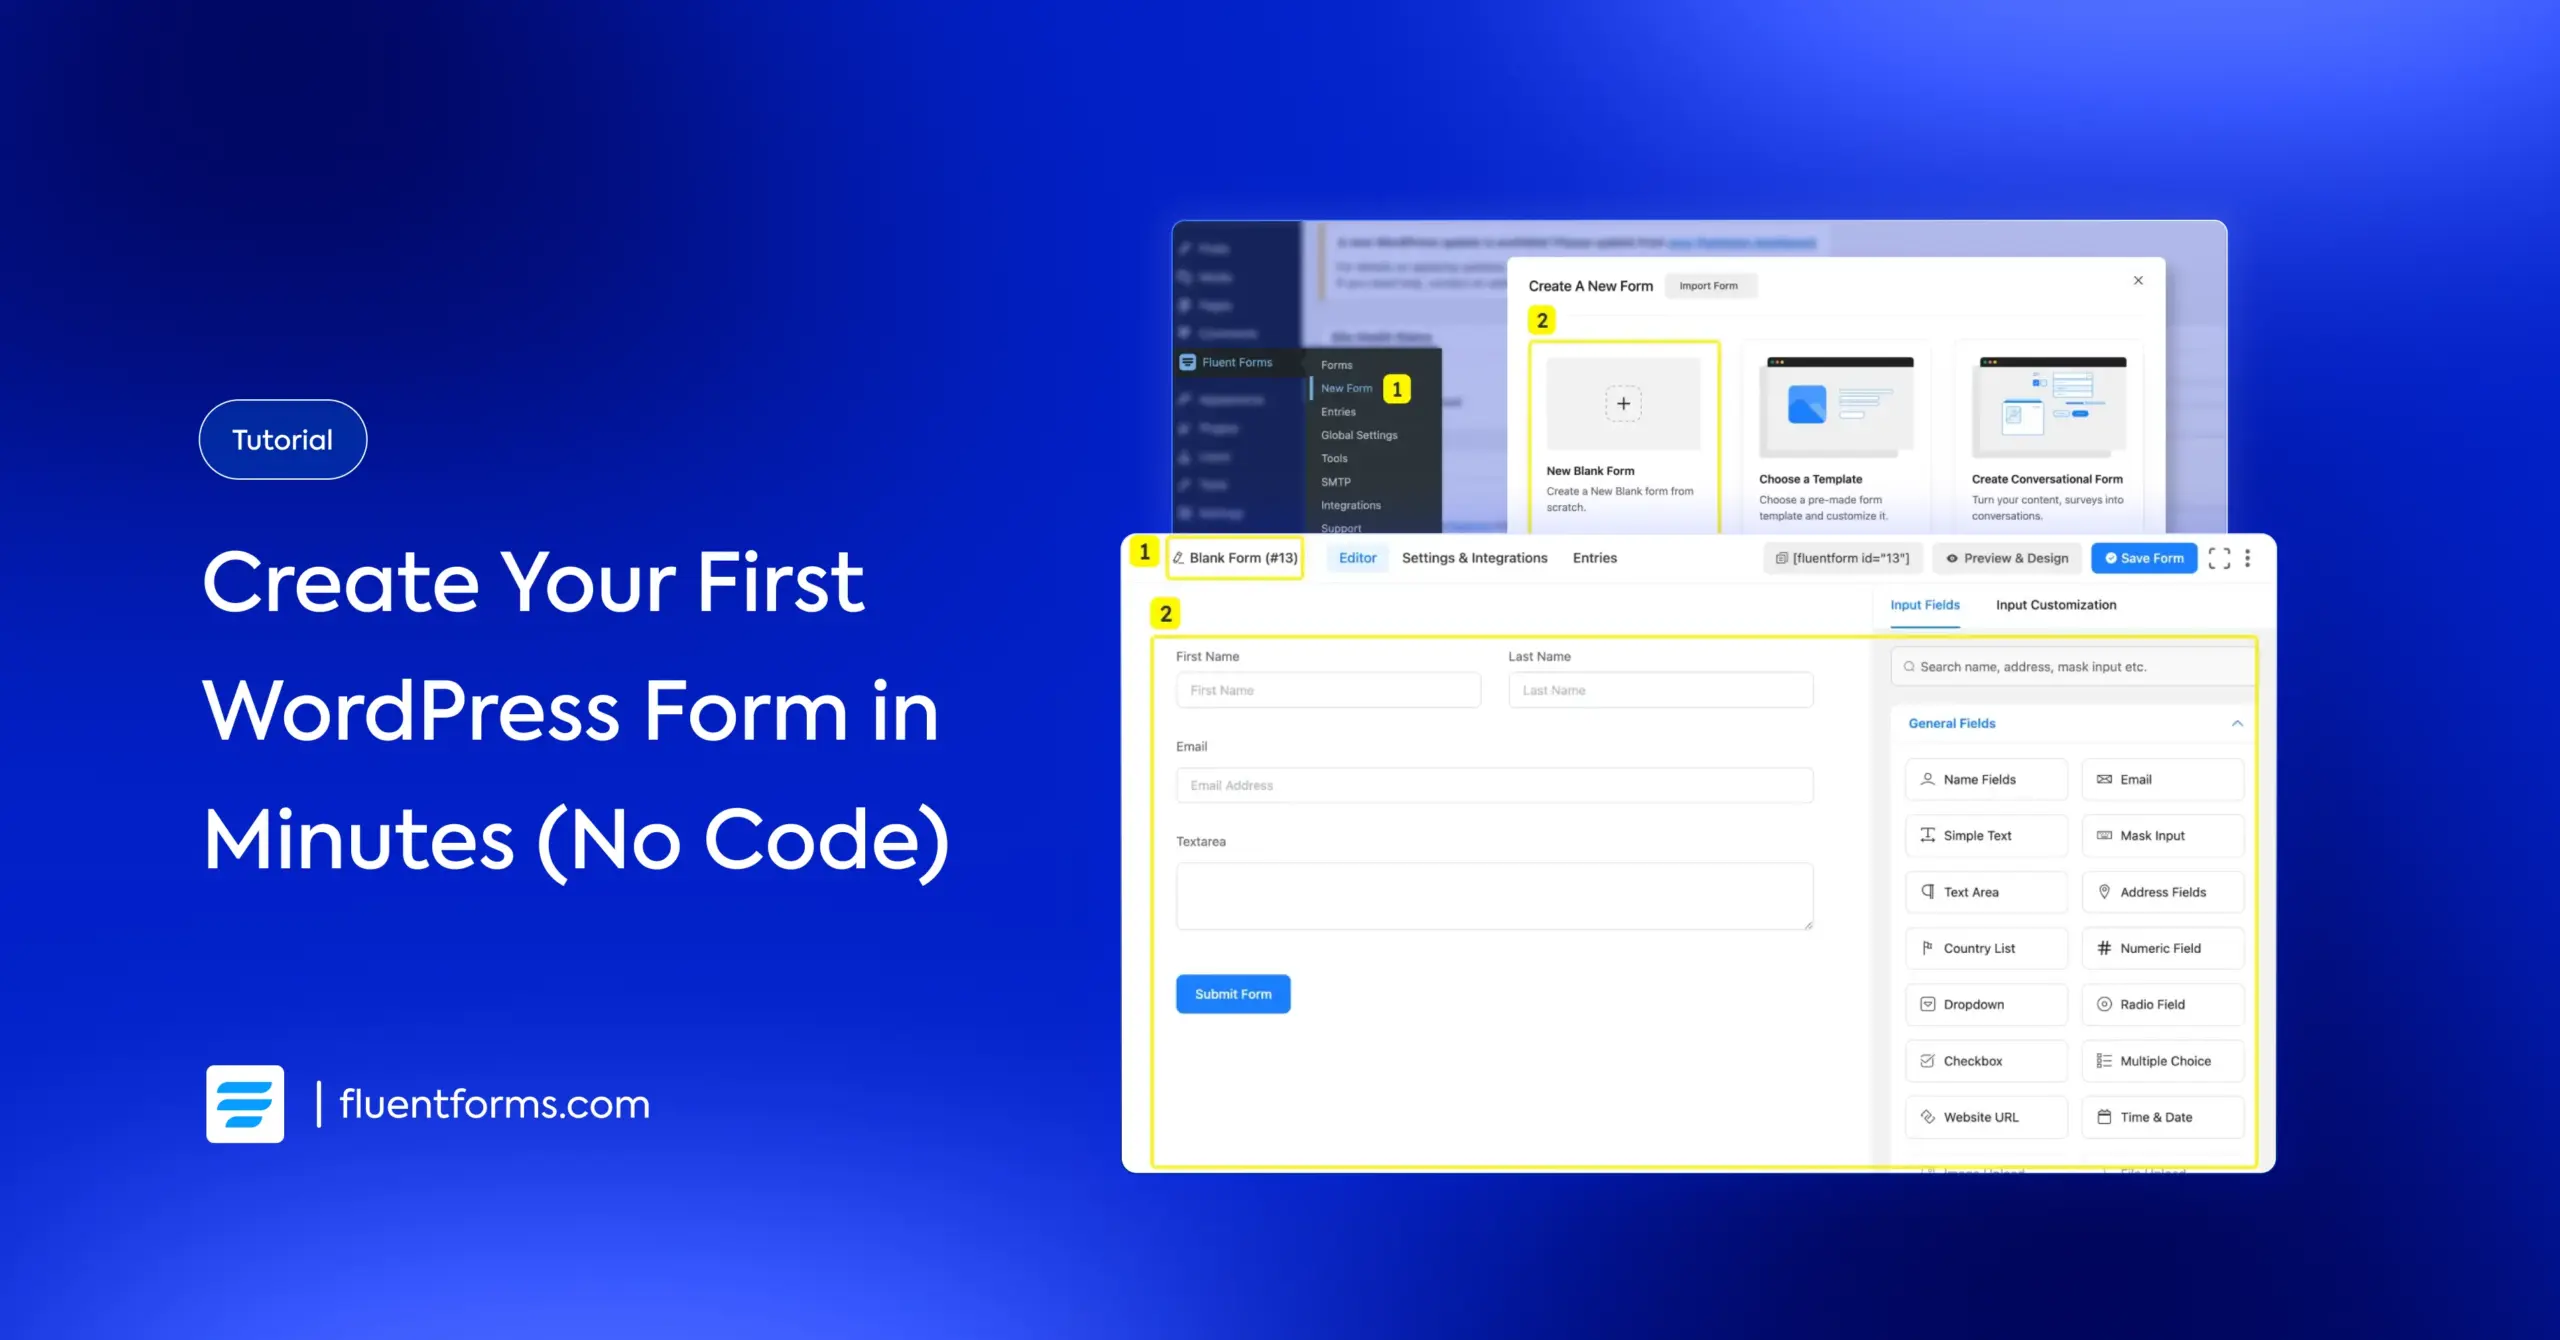
If you’re looking to add form functionality to your site, this content is for you. I’ll show you how to create a form in WordPress using Fluent Forms, the smartest form builder.
I have planned this tutorial to be beginner-friendly, so I’ll start from the basics and move into the practical use cases one at a time. If you are new to WordPress, this guide is designed to help you get started and confidently explore your way around Fluent Forms.
TL;DR
- How to create a form in WordPress: Use Fluent Forms for a fast, drag-and-drop experience that handles everything from simple contact fields to advanced business workflows.
- Flexible building options: Start from scratch, choose from 150+ professional templates, or use AI to generate a custom form structure in seconds.
- Smart functionality: Boost completion rates with conditional logic (showing fields based on user input), multi-step, & conversational “chat-style” forms.
- Business growth tools: Beyond basic contact info, you can easily set up secure payment collections, interactive quizzes with instant scoring, and custom calculator forms.
- Seamless design: Match your form’s look to your brand using the Advanced Form Styler, which requires zero coding or CSS knowledge.
- Security & automation: Block spam with built-in Honeypot and reCAPTCHA tools, then sync your leads directly to CRMs like HubSpot or FluentCRM.
- Easy publishing: Once your form is ready, simply drop it onto any page using the dedicated Gutenberg block or a shortcode.
What Does Fluent Forms Do
Fluent Forms is the fastest WordPress form builder designed to help you create everything from a basic contact form to advanced lead generation, payment, quiz, calculation, and multi-step forms.
It comes with a drag-and-drop visual interface that is easy to learn and use. It also gives you built-in analytics to track form performance and spot where drop-offs happen.
Why choose Fluent Forms for your WordPress site
If you are comparing it with Gravity Forms, Contact Form 7, or other form plugins, Fluent Forms stands out because it’s fast, mobile-responsive, and easy to use. The free version is already feature-packed. Pro unlocks all premium functionalities and advanced workflows, making it the perfect tool to offer your business room to grow.
- WPForms is friendly, but payment tiers can get expensive as you scale. (Compare with Fluent Forms)
- Gravity Forms is powerful, but it feels heavier, and there’s no free version. You might need 3rd-party add-ons for some of the features that are built into Fluent Forms. (Compare with Fluent Forms)
- Contact Form 7 is simple & free, but not really beginner-friendly. Besides, the plugin is entering a feature freeze phase (will be in maintenance mode). (Compare with Fluent Forms)
The best part is that Fluent Forms offers lifetime pricing, saving you significantly compared to annual-only competitors like Gravity Forms. If your goal is to easily build user-friendly forms, Fluent Forms is the best place to start.
Getting Started: Installation & Setup
Before you build anything, you need to install Fluent Forms on your WordPress site. The setup is quick, and you do not need to touch code.
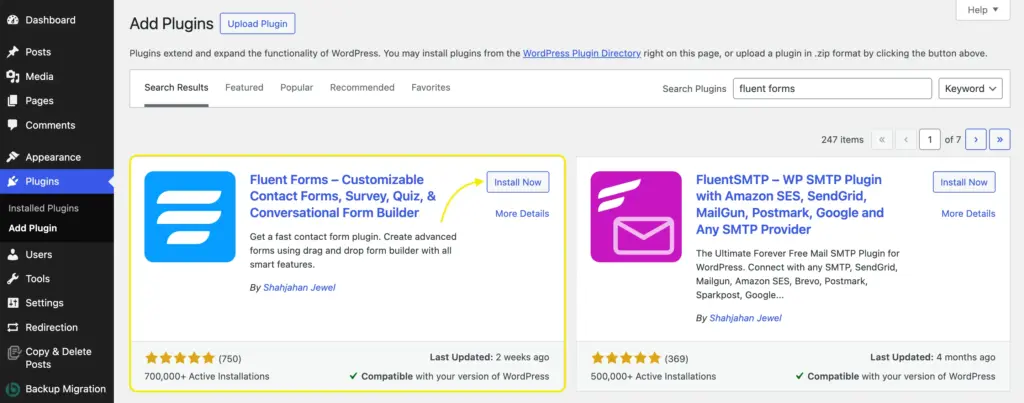
Go to your WordPress dashboard and open Plugins > Add New. Search for Fluent Forms, then click Install Now and Activate.
Once it is active, you will see Fluent Forms in the WordPress admin menu. From there, you can start building forms immediately.
This is the free version of Fluent Forms, which is feature-packed and enough for beginners. You can start and get used to the tool. Once you get comfortable and your workflow needs the advanced features, you can always upgrade.
Here’s an overview of Fluent Forms free vs pro:
| What you get with the free version | What Fluent Forms Pro unlocks |
|---|---|
| 30+ input fields Conversational forms Field-level conditional logic Multicolumn layout Basic payment features Basic spam protection Basic integrations PDF generation, and more. | 65+ fields Quiz and survey Numeric calculation Multistep forms Advanced form styler User registration Conditional logic in form settings 60+ integrations, and more. |
Compare Fluent Forms free vs pro.
How to Create a Form in WordPress in Minutes
You have two easy ways to start: build from scratch or use a template. Both are fine. If you are a first-time user, I usually recommend a template if you want speed, and a blank form if you want to learn how the builder works.
Create your first form from scratch
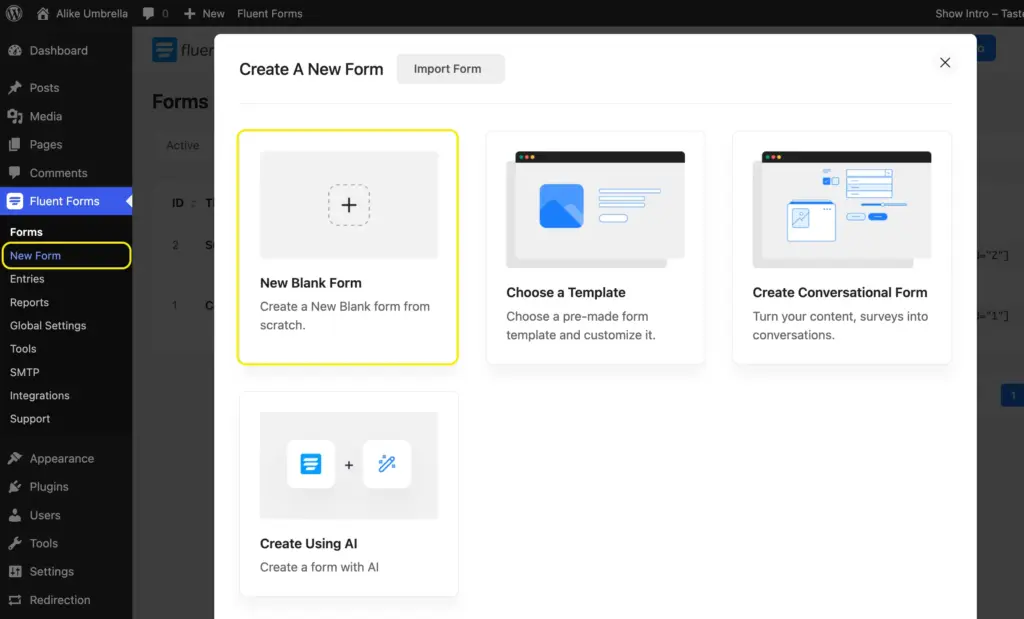
Click Fluent Forms > New Form from your dashboard’s left panel. Select New Blank Form from the pop-up that appears.
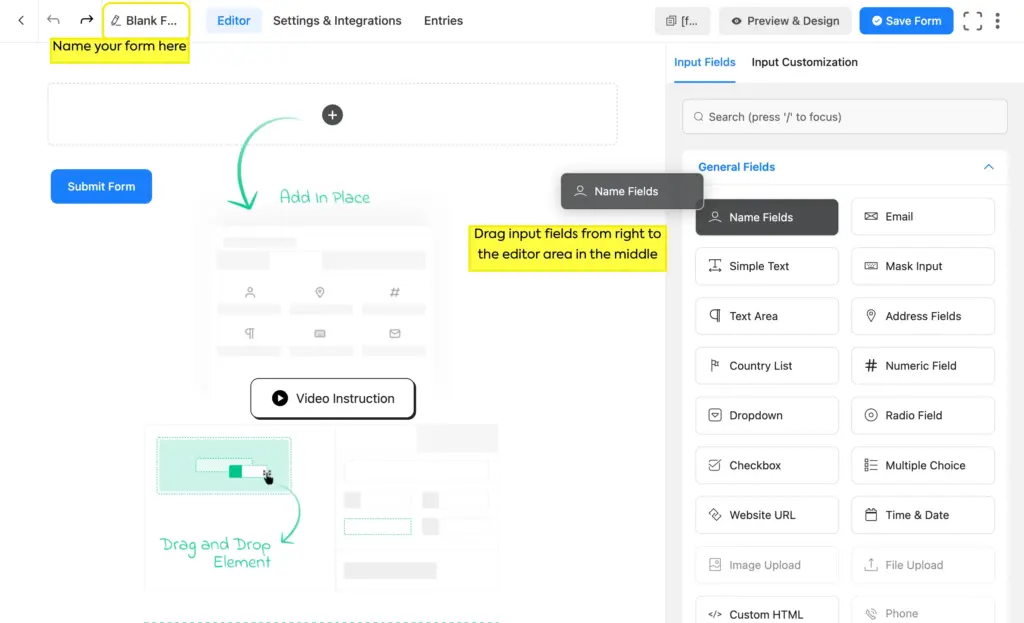
You will usually see two main areas:
- The Input Fields panel (on the right), where you pick the fields you want.
- The Form Editor, where you drag, arrange, and edit those fields
Start with the essentials:
- Name
- Phone
- Message
For most beginner forms, that is enough. Keep it lean. The more fields you ask for, the more likely people are to abandon the form.
To customize a field, click on it, and the options will appear on the right (replacing the field library). Once you’re done customizing a field, click on “Input Fields” to choose more fields.
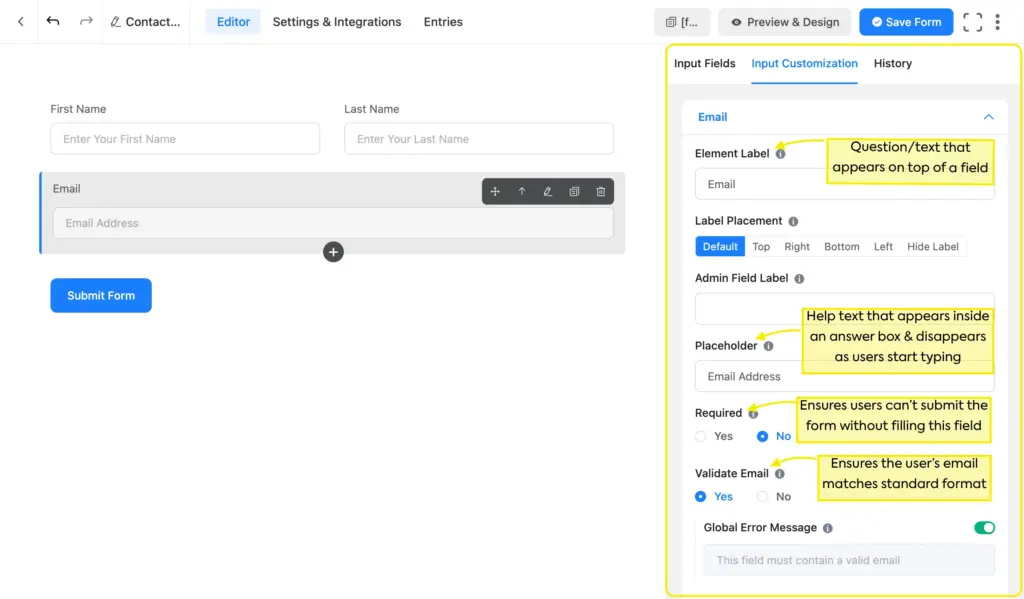
When you’re done editing a form, click Save Form in the top right corner. This is a must, or you’ll lose your progress.
Use conditional logic
Conditional logic is simply a rule that says: if the user enters this answer, show that field next. It keeps forms shorter and more relevant, which ultimately improves completion rates.
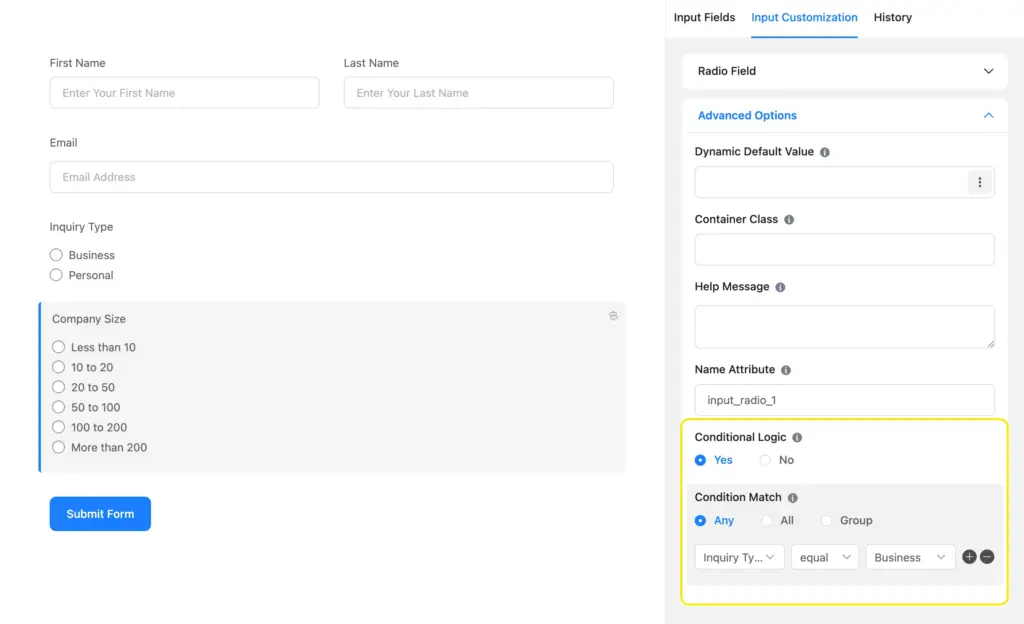
For example, if someone selects “Business inquiry,” you can show a company size field. If they select “Personal inquiry,” that field stays hidden.
How to set up conditional logic
You start with the field that you want to show or hide conditionally. Scroll down to the field’s settings, and you’ll find Advanced Options. Check Enable Conditional Logic.
Under Condition Match, select which other field this one should depend on. In the last box, select that field’s specific value for which this field should appear. In the middle, define the relation that should trigger the condition: equal/not equal/greater than/less than, etc.
Explore the top use cases of conditional logic to simplify your workflow.
Start with a template
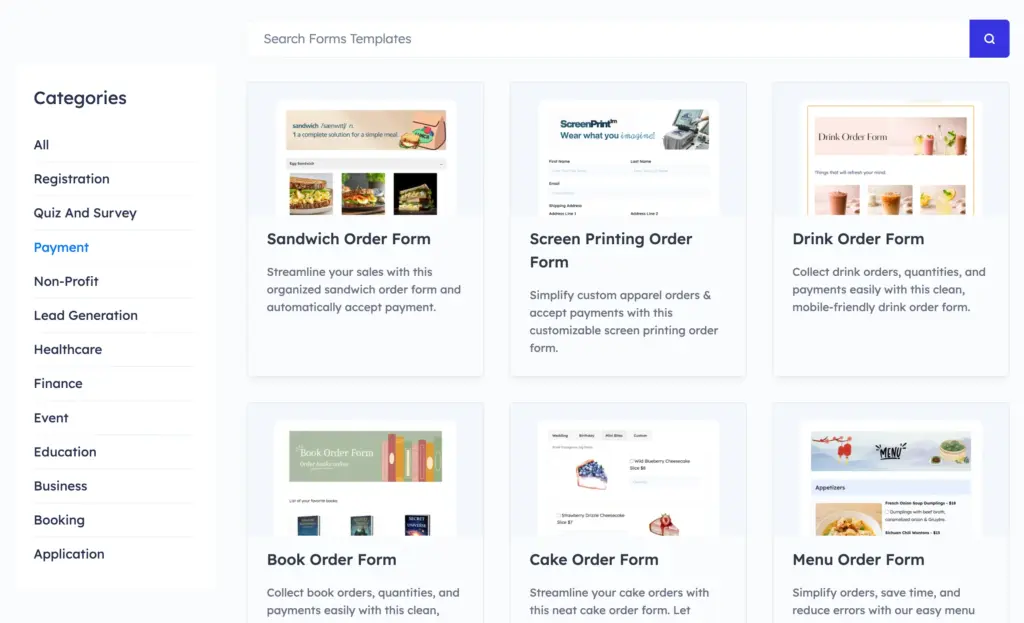
If you do not want to build from scratch, use one of Fluent Forms’ pre-built templates.
The plugin includes a solid set of templates. You can start with any of the 60+ templates and make adjustments to it.

Fluent Forms also offers a larger library of downloadable templates (150+) on its site, covering different use cases. That gives you a head start and saves time. All the templates are customizable, so you can edit fields, labels, or style as you like.
Learn how to use a template on your site.
Start building with AI
If you want an even faster starting point, use the “Create Using AI” option to draft the first version of your form. You describe what you need, and it helps generate a structure you can refine in the visual builder.
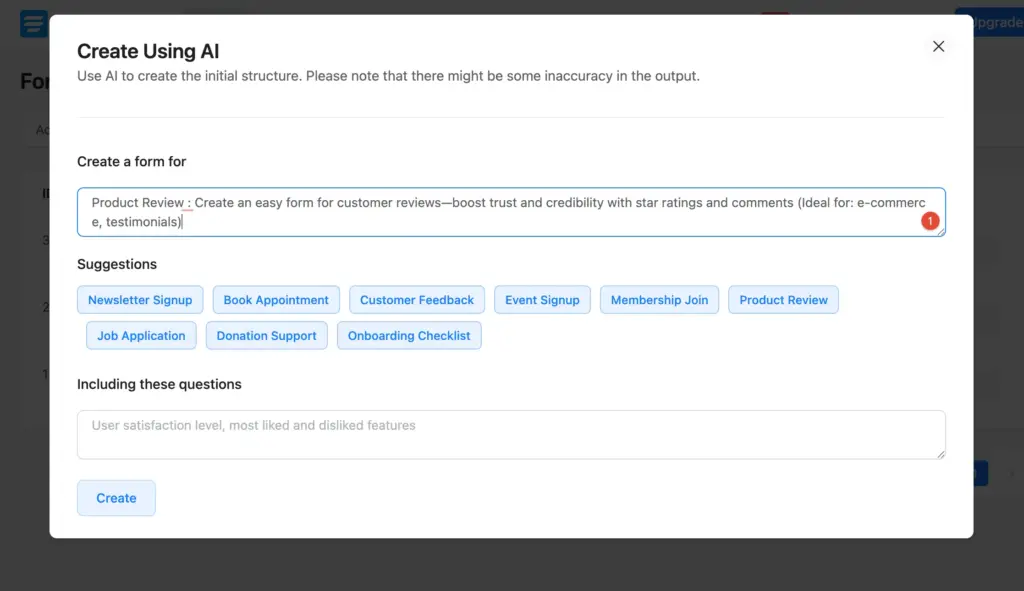
That is a good option when you know the goal but do not want to assemble every field manually.
Building Specific Forms for Your Business
Now let’s get into the forms you’ll actually need for your site.
1. Creating High-Converting Lead Generation Forms
A lead generation form is built to capture interest and turn visitors into contacts. Usually, that means fewer fields, a simple offer, and a clear reason to submit.
Essential Fields:
- Name
- Phone, if you really need it
- One qualifying question, if it helps categorize the lead
If you ask for too much too soon, people leave. A good rule is to ask only for the fields you will actually use first. Follow these steps:
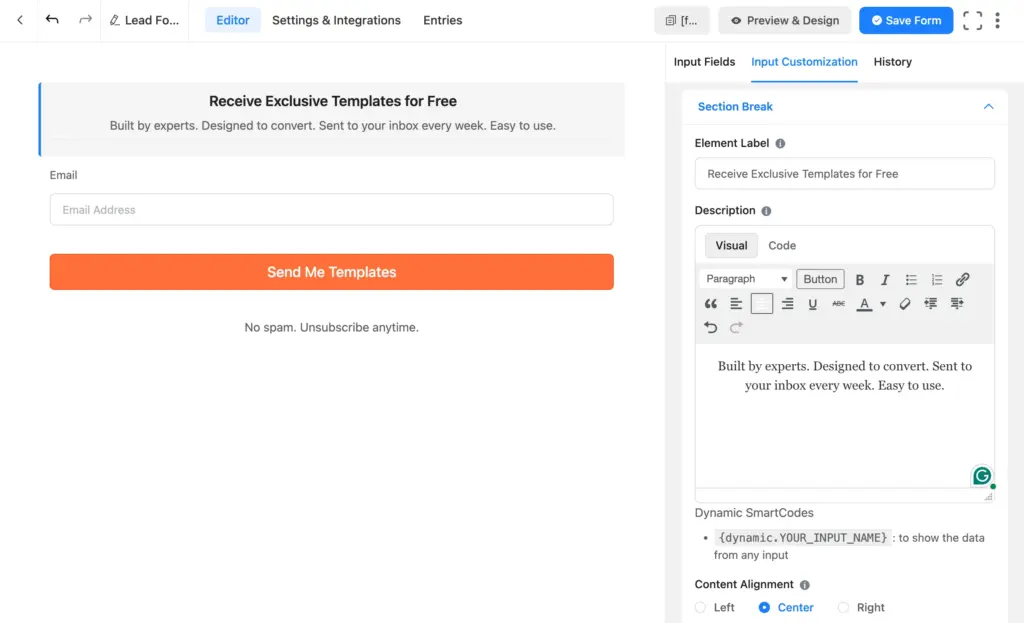
- Add a headline above the form (using the Custom HTML or Section Break field)
- Explain what the user gets after submitting
- Keep the fields short and obvious
- Use a clear button text like “Get the Guide” or “Request a Quote.”
If your goal is to only generate leads, build the shortest form. If your goal is to qualify leads, add a few questions that help you separate serious prospects from casual visitors. The best approach is to start by collecting enough to start the conversation.
2. Setting up secure payment & donation forms
If you sell services, accept donations, or charge for registrations, Fluent Forms allows you to accept payments right from the form. To use the payment features, first, you need to enable the Payment Module from Global Settings and connect your preferred gateways.
Once this is set up, the payment fields will appear inside your form.
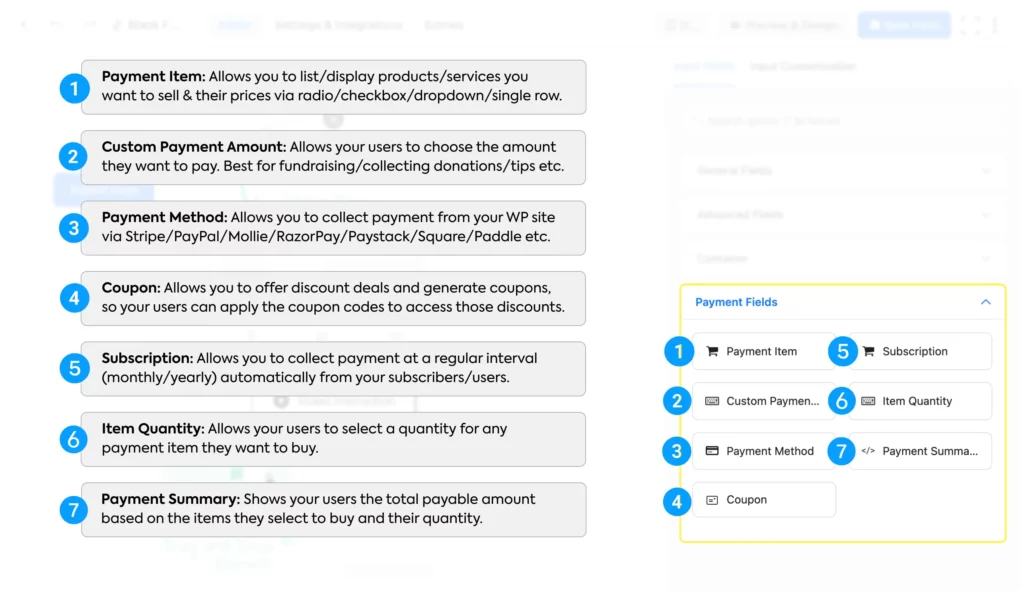
From there, you have to:
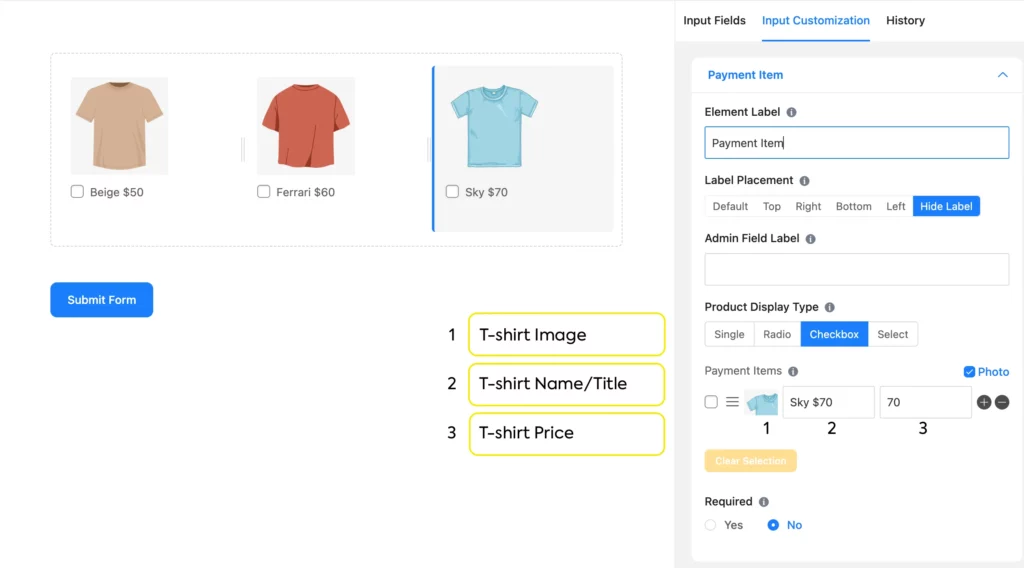
- Add a Payment Item field to your form
- Configure product name, image, and price
- Add the Item Quantity field if necessary
- Add Payment Method field (enables gateways to process payment)
- Test the form before publishing
Payment forms are especially useful for product orders, workshops, event registrations, consulting deposits, and donations.
Learn more about how to create a payment form using Fluent Forms.
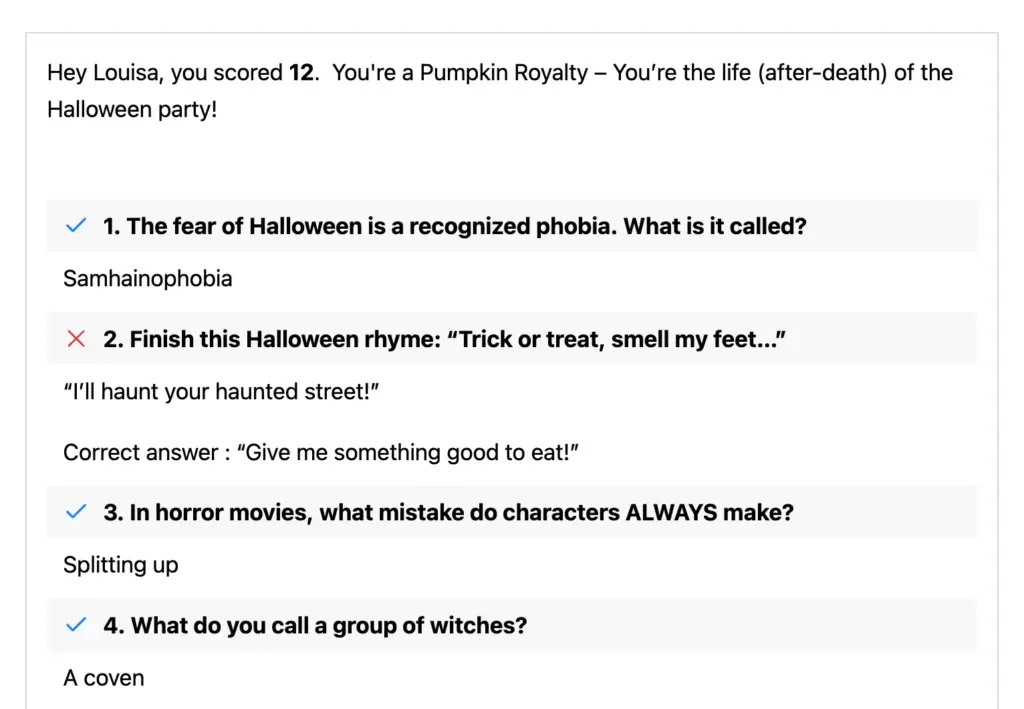
3. Building interactive quizzes with instant scoring
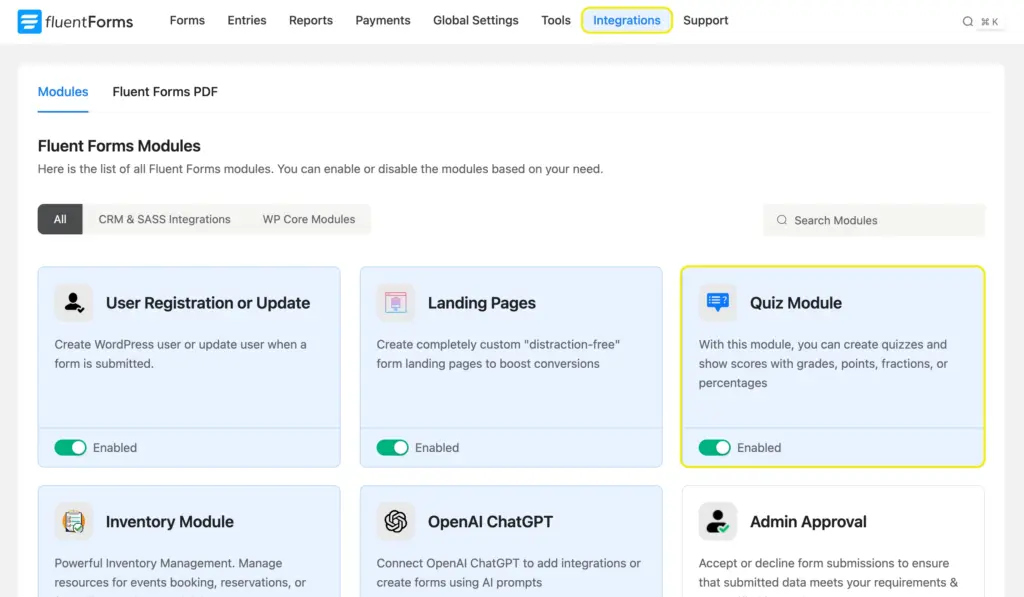
Quizzes work great when you want to engage users, qualify leads, or give them immediate feedback. Enable the Quiz Module from Integrations > Modules to access the quiz settings.
Next, create your quiz form with questions and options. Radio field works great for most quizzes. Once you’re done, add a Quiz Score field and select the score type from the field settings. Save your form and click the Settings & Integrations tab.
Navigate to Quiz Settings to select the correct answers and assign points to them. You can also set custom grading, randomize questions & options, or even create personality quizzes.
Learn more on creating engaging quiz forms in WordPress using Fluent Forms.
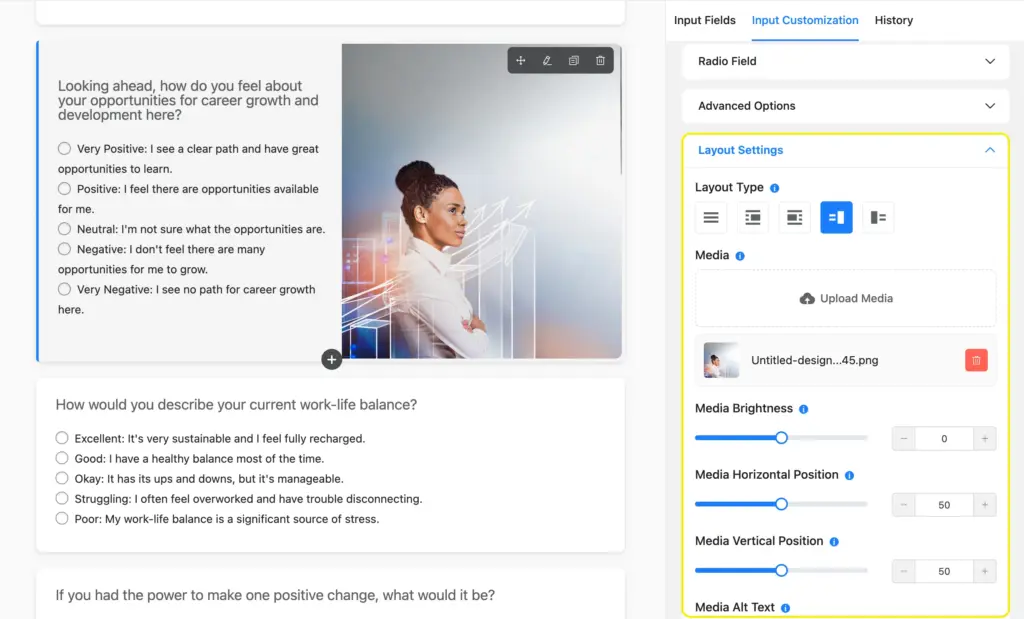
4. Conversational forms: the Typeform experience in WordPress
Conversational forms display one question at a time instead of showing a long form all at once. It feels more like a chat. That lowers friction, and completion rates on conversational forms are typically higher than on traditional long-form layouts. They work best for surveys, feedback forms, lead capture forms, or any other high-engagement forms.
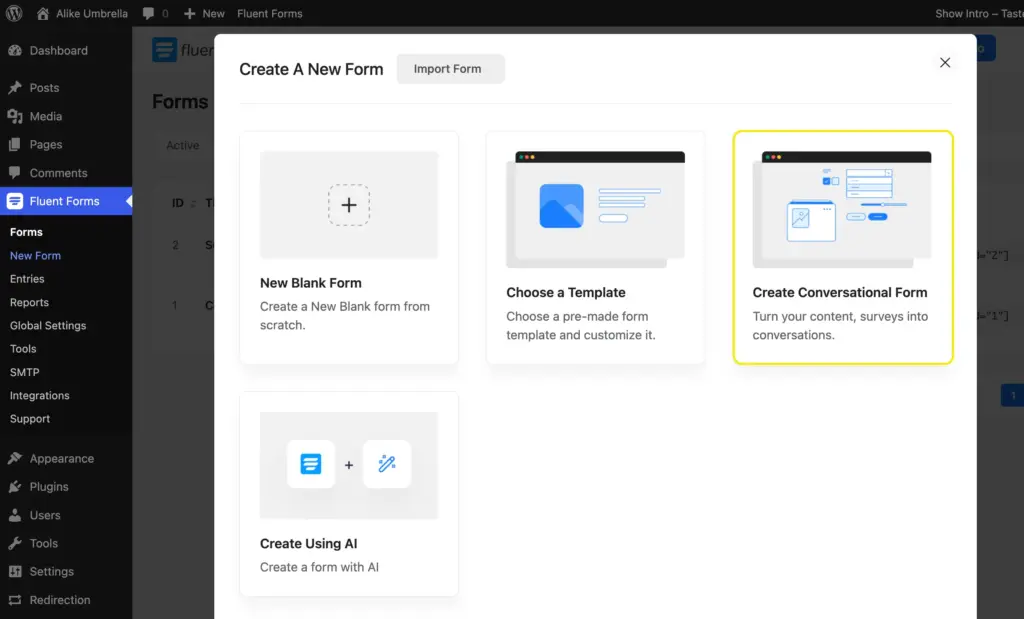
Click New Form > Create Conversational Form. Add a welcome screen to make the form friendlier. Choose from 5 layout options, and add relevant images. You can also customize its style to match your brand.
If people tend to abandon your long forms, conversational mode typically improves completion rates by reducing visual overwhelm.
Learn more about creating conversational forms in WordPress.
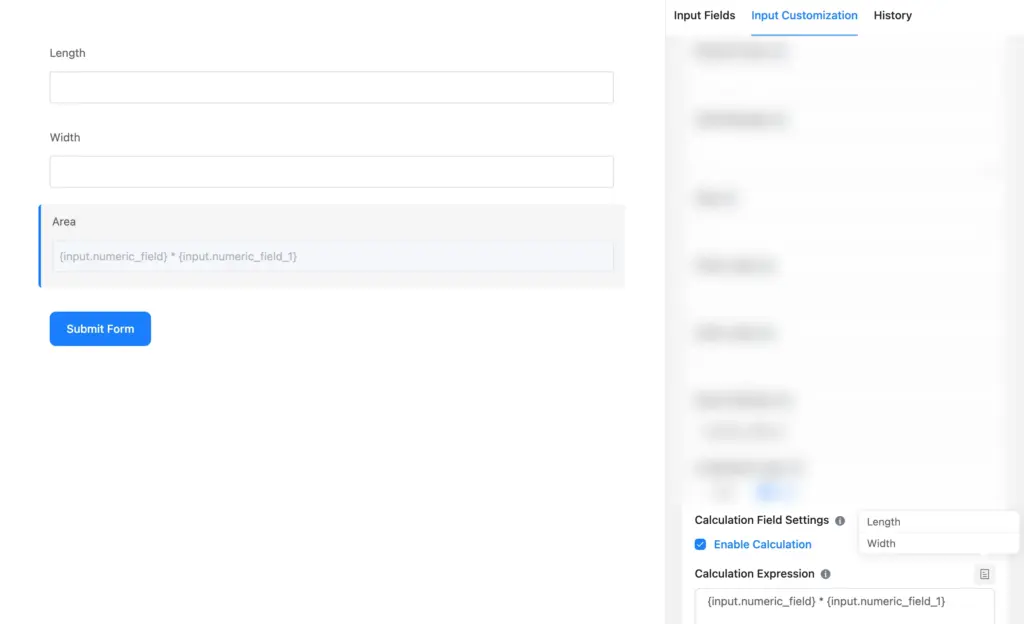
5. Calculator forms: providing instant value
Calculator forms give users an instant result based on what they enter. They use number fields and formulas to calculate estimates, totals, or scores. You can create any type of calculator using Fluent Forms, including quote calculators, mortgage estimators, BMI calculators, and more.
Common steps to set up a calculator form:
- Add fields to collect user input (numeric/radio/range slider/checkbox, etc.)
- For radio/checkbox fields, enable calc. value & assign numeric values to options.
- Add another numeric field for calculation
- Enable calculation from field settings
- Inside the calculation expression, create a formula using input fields and mathematical operators.
Learn more: How to create calculator forms in WordPress easily.
6. Multi-step forms: breaking down long processes
A long form becomes much easier when you split it into steps. Instead of showing 20 fields at once, you divide the form into 2 or 3 smaller pages with a progress bar. They work best for registrations, detailed bookings, onboarding flows, and e-commerce style checkouts.
Simply add a Form Step field, and then other fields inside those steps. You can also drop the step field where you want the next page to start. Customize the progress indicator type, add step titles, and enable per-step data save.
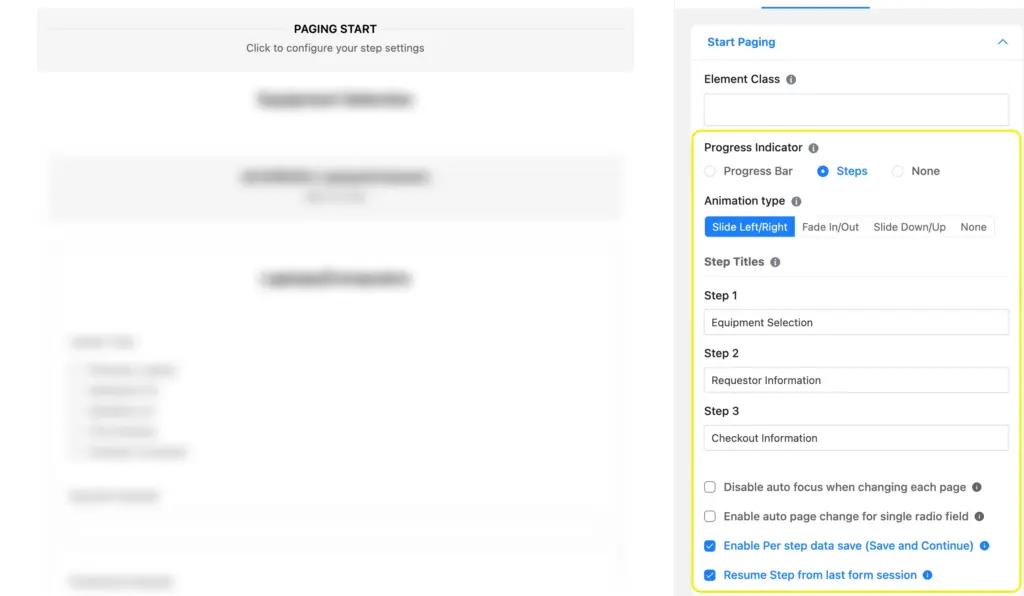
Multi-step forms greatly improve the completion rates for longer forms. Learn how to create multistep forms in WordPress.
Essential Settings for Your Forms
Once your form is built, you need to make sure it behaves properly after submission. In this section, I’ll show you how to do that using form settings. Fluent Forms comes with 2 types of settings.
- Global settings affect your forms across the whole site. For example, spam protection, integrations, and shared modules like PDF.
- Form-specific settings control one form only. For example, confirmation messages, notifications, and what happens after submission.
Let me acquaint you with some of the important form settings that you’ll need from the start.
Customizing the confirmation message
After someone submits a form, you can show a message, redirect them to another page, or send them somewhere else entirely. From your form, go to Settings & Integrations > Settings > Confirmation Settings.
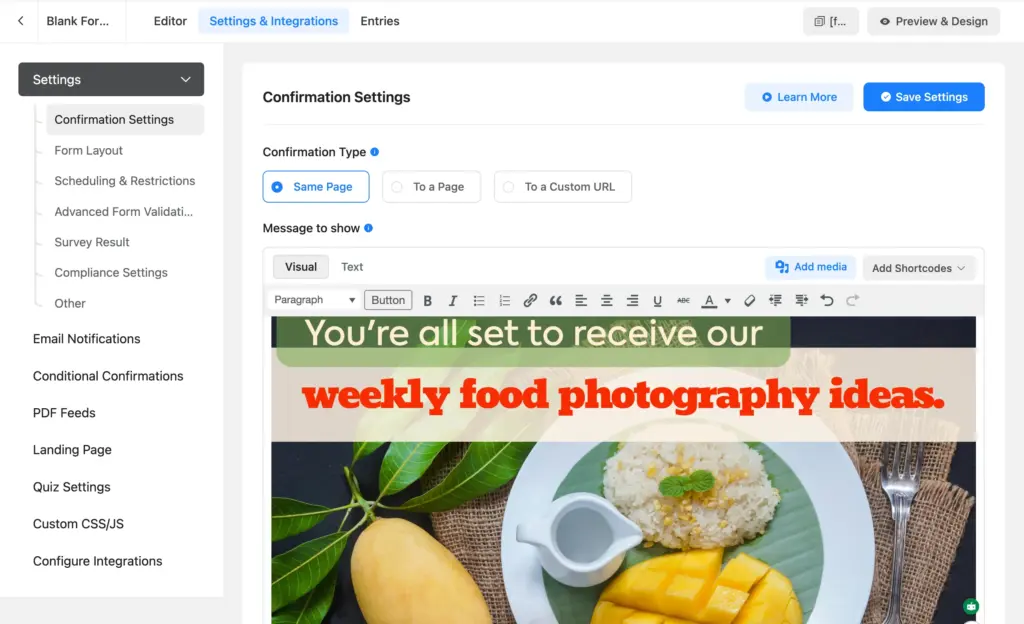
- Message on the same page: best for simple contact forms
- Redirect to a WordPress page: useful for thank-you pages and offers
- Redirect to an external URL: useful for external booking or next-step workflows
Click Add Shortcode to personalize the message with smart tags (for example, a name tag will insert their name), so users feel like the form is speaking to them directly.
Setting up email notifications
Notifications make sure the right people get alerted when a form is submitted.
Usually, you want two emails:
- One for your team (admin)
- One for the user as confirmation
You can also send email notifications to vendors or contractors by adding their email addresses in the notification settings.
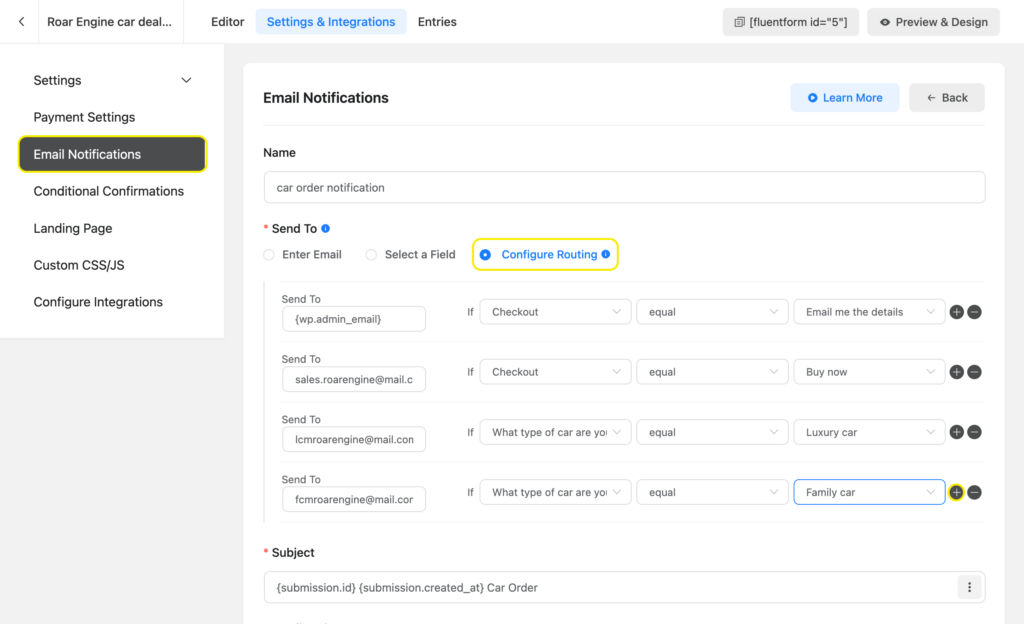
You can also conditionally route the notification to different teams. For example, your sales team gets a notification for a sales query, and the support team gets notified when customers are facing an issue with your products.
Spam protection for your forms
Forms attract bots as soon as they become visible on the internet. Fluent Forms offers several spam protection features and integrations to protect your forms from spam.
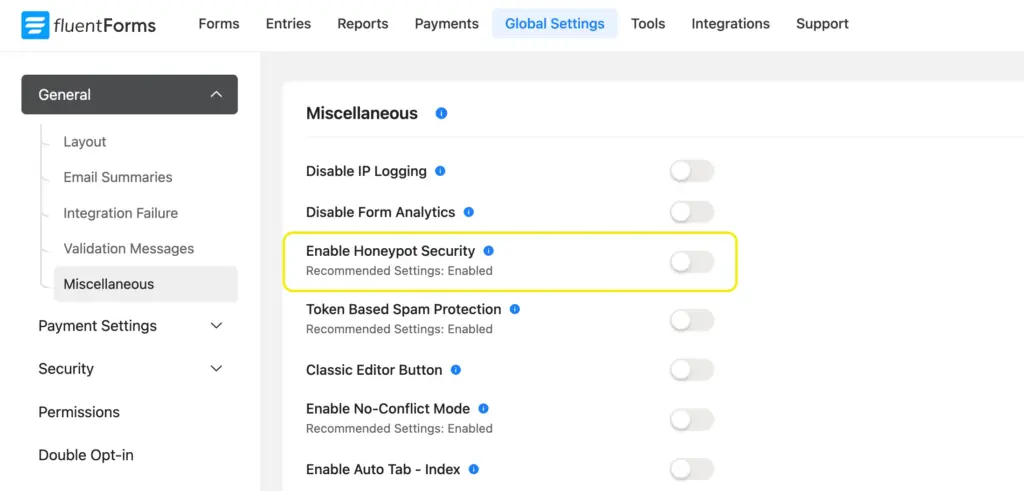
Anti-Spam Honeypot
A honeypot is a hidden field that humans do not see, but bots often fill out. If bots attempt to fill out this hidden field, the submission gets blocked. You’ll find the honeypot setting in Fluent Forms > Global Settings > General > Miscellaneous.
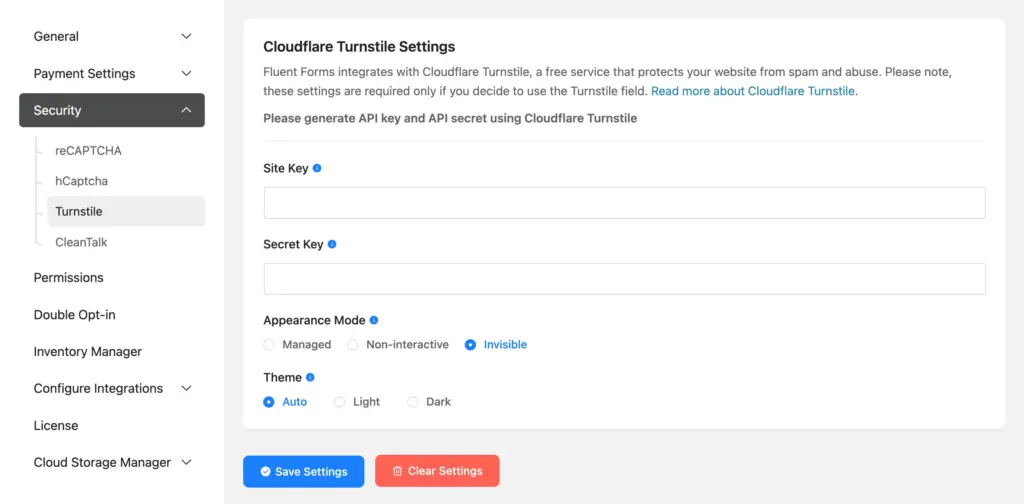
Connect reCAPTCHA/hCaptcha, and Turnstile
These add a verification layer for suspicious traffic. Connect them to reduce fake submissions. You’ll find the settings in Fluent Forms > Global Settings > Security. Enter the site key & secret key. Save the settings, and you’re all done.
Fluent Forms also supports protection tools like token-based spam protection (built-in), Akismet, and other validation controls, depending on your setup. Learn how to protect your forms against spam and bots.
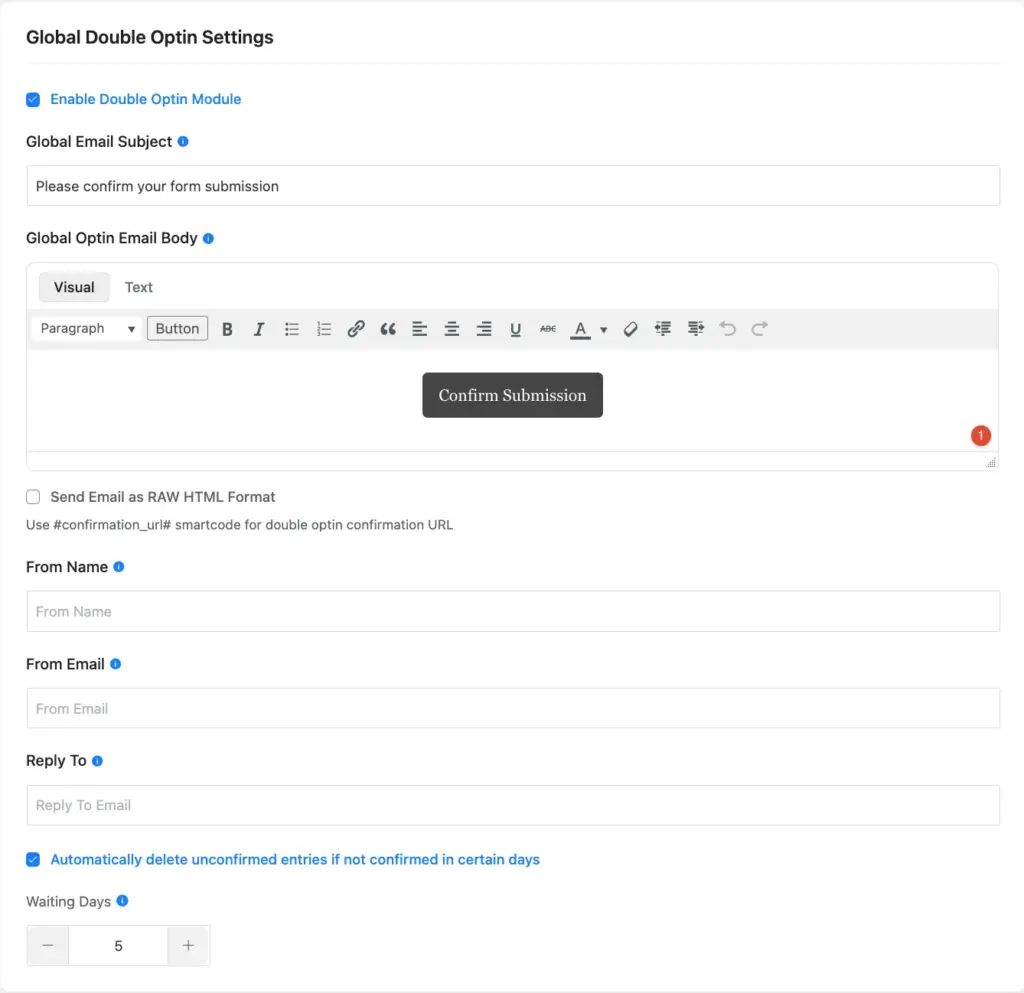
Ensuring quality leads with double opt-in
Double opt-in means a user must confirm their email before they are fully added to your list or marked as verified. This is helpful because it improves list quality and keeps fake or mistyped addresses out of your system.
How it works
- User submits the form
- They see a confirmation message asking them to check their email
- They receive an email with a verification link
- Once they click “Verify Email”, the submission is confirmed
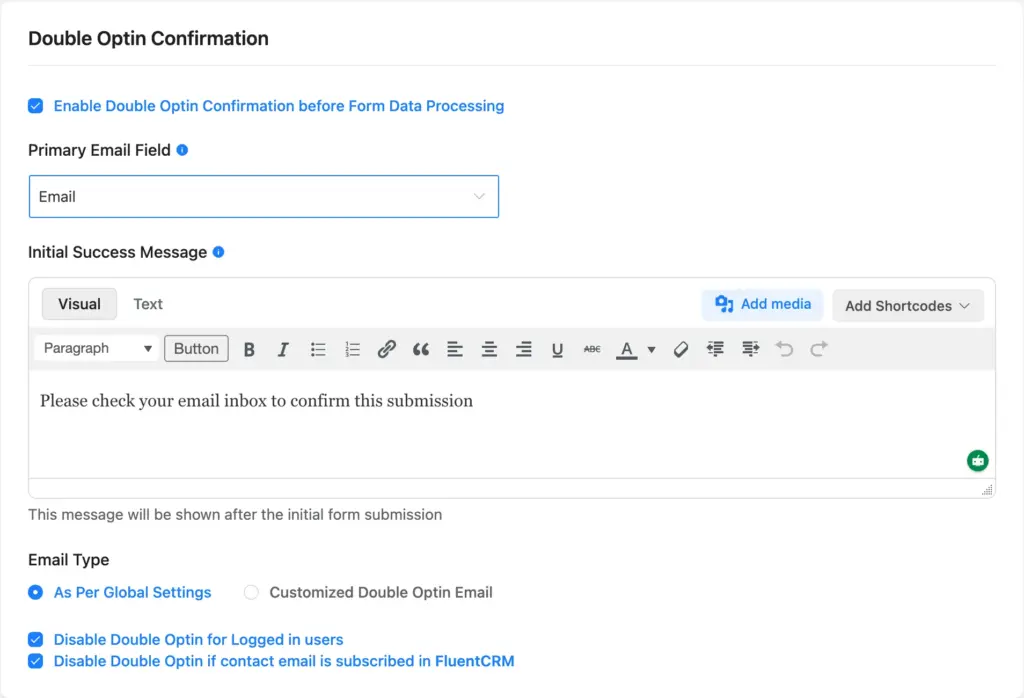
In Fluent Forms, the double opt-in setting works in two steps. First, you have to enable it globally and configure the settings, then turn on double opt-in for individual forms as needed.
Style Your Form to Match Your Site
You do not need to be a designer to make forms look good. Fluent Forms gives you layout tools that help you build cleaner forms without custom CSS.
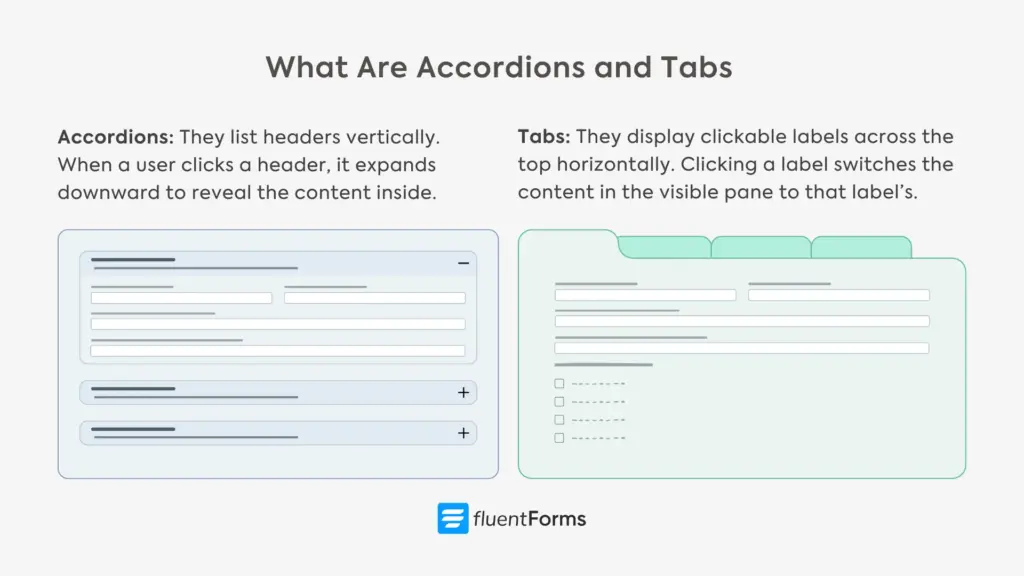
Multicolumn layout and collapsible sections
You can place fields into columns for a more compact look. Accordions and tab sections keep forms organized by grouping related fields together. Only one section stays open at a time, so even larger forms don’t feel overwhelming to users.
You’ll find the layout and accordion/tab features inside the form editor. Simply navigate to Input Fields > Container and drag whatever field suits your needs.
Learn how to organize your forms using accordions and tabs.
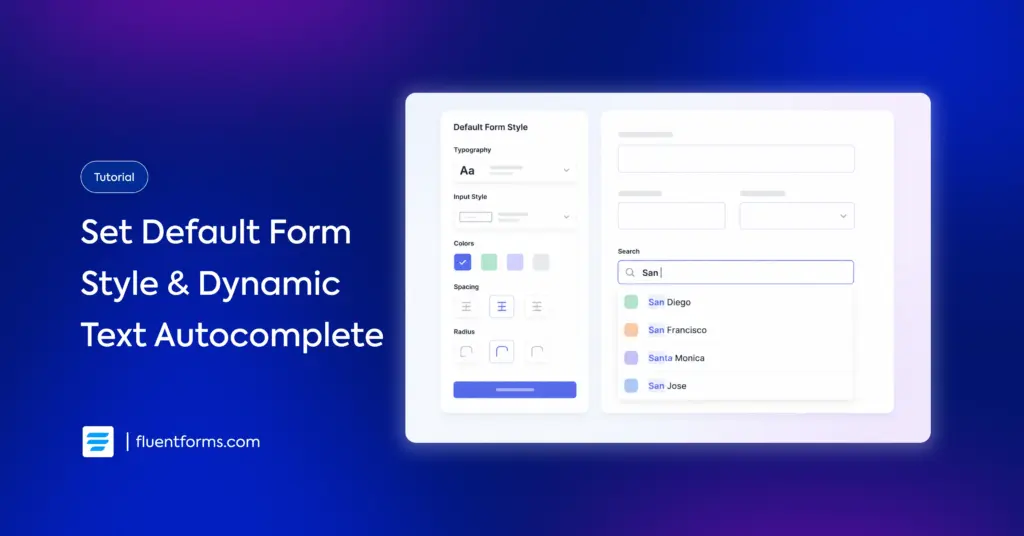
Designing forms with the Advanced Form Styler
The global styler lets you adjust your forms’ colors, spacing, borders, shadow, and more. You can style each element separately. Moreover, you can add background images, change margin & padding, and style the normal & hover state of interactive elements (buttons, answer boxes) separately.
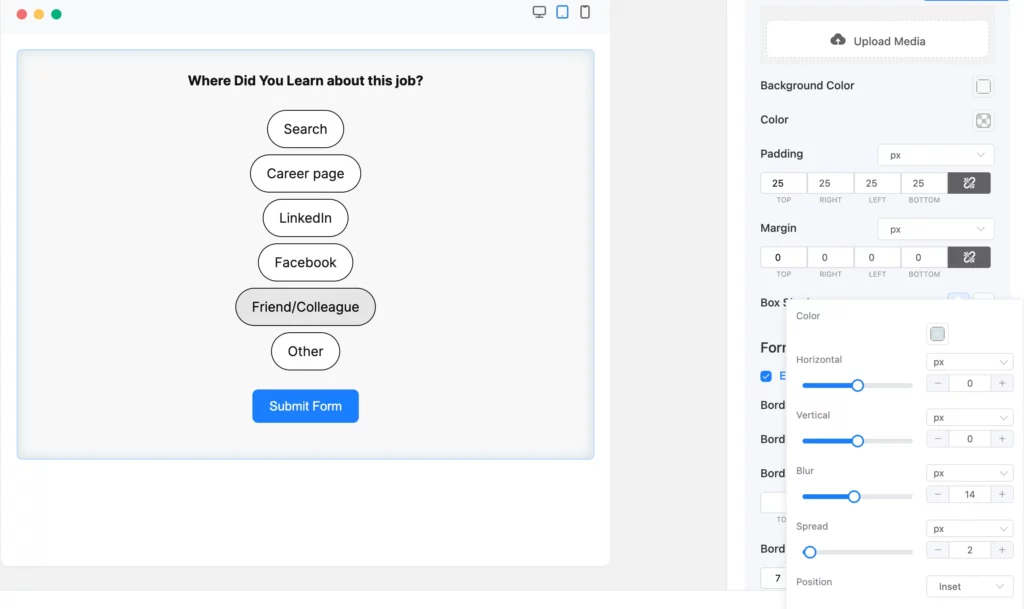
Click the Preview & Design tab to access the visual styling tools. Match your forms’ look to your brand’s theme to maintain professionalism across your site.
Learn more about Fluent Forms’ Advanced Form Styler.
Publishing Your Form
Once your form is ready, you need to put it on a page, post, or landing page.
Using the Fluent Forms Gutenberg block
If you use the WordPress block editor, insert the Fluent Forms block and select your form by name from the dropdown. That is the simplest way to publish it inside a page or post.
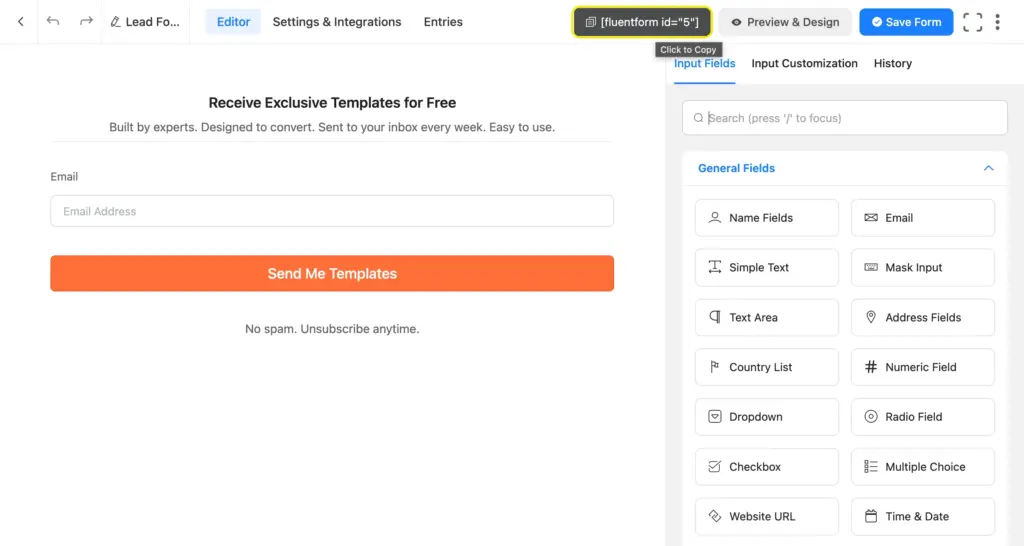
Embedding with shortcodes on any page
You can also copy the form shortcode and paste it anywhere WordPress accepts shortcodes.
This is handy if you want the form in a sidebar, custom page template, or another supported area.
Share your form as a landing page
You can also share your form as a standalone landing page. The landing page settings allow you to add a background image, logo, title, description, and more. Then you can directly share the landing page URL on social media, email, and other channels, or embed it via the provided HTML code.
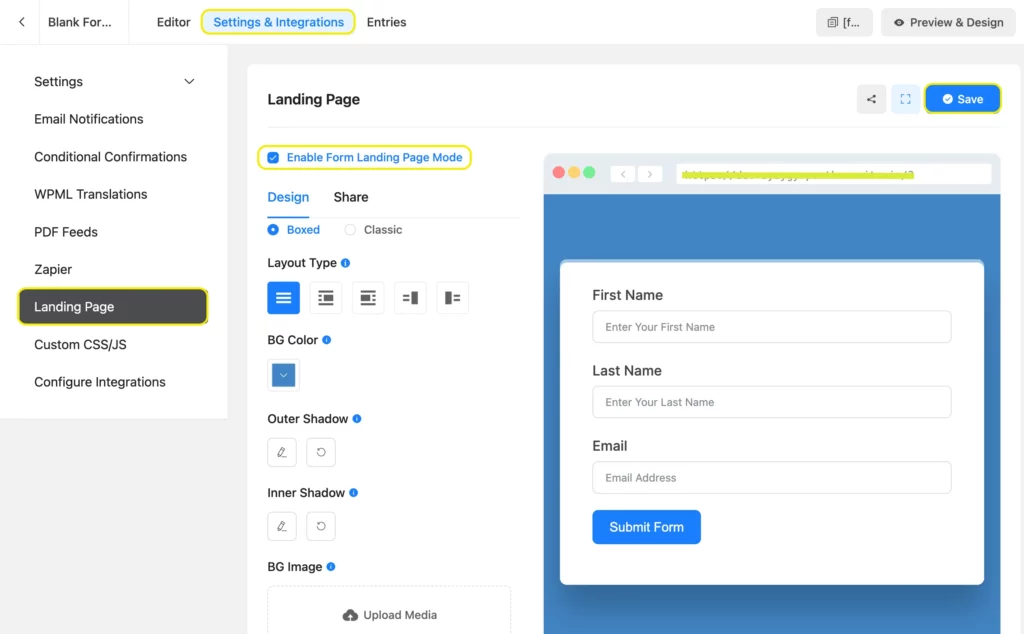
Access the landing page features from Integrations > Modules > Landing Pages. After that, the landing page option will appear in your form’s Settings & Integrations tab.
Learn more: How to create conversion-friendly landing pages using Fluent Forms.
Next Steps: Optimizing Your Workflow
Creating the form is step one. Using the data well helps you grow and strategize.
Managing your submissions
Inside Fluent Forms, you can view entries, export them, and review the data from the dashboard. You can enable Form Analytics from Global Settings to track conversion rates.
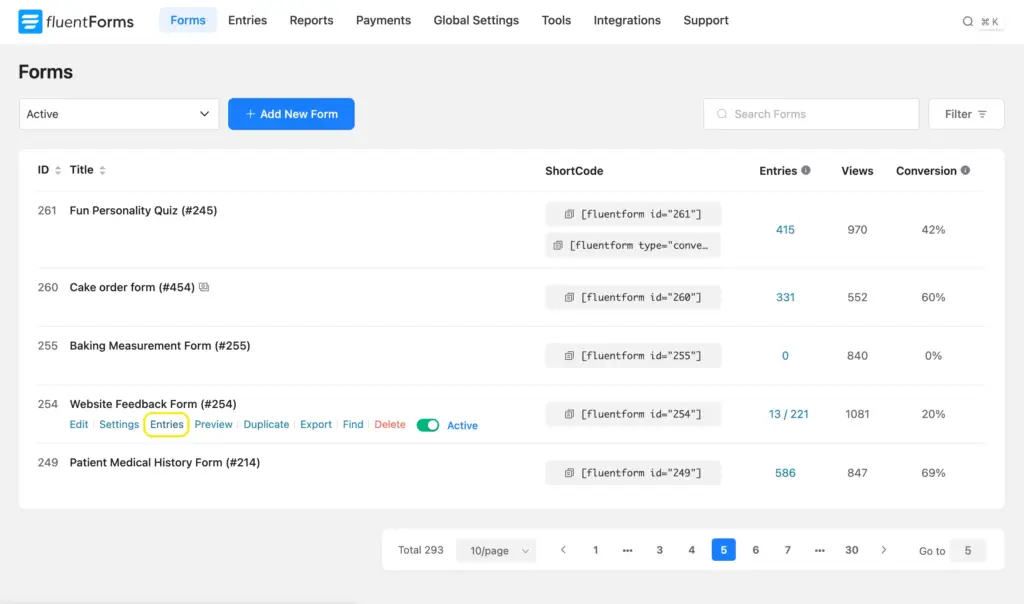
You can visualize individual forms’ entries to spot patterns, to spot drop-off patterns, identify high-intent submissions, and see what questions are getting skipped.

Using the Reporting Dashboard
Fluent Forms also comes with a reporting dashboard so you can see how your forms are performing over time. There’s a heatmap showing which regions most of your users are from, a timeline highlighting the duration when you receive most submissions, payment summaries, and more.
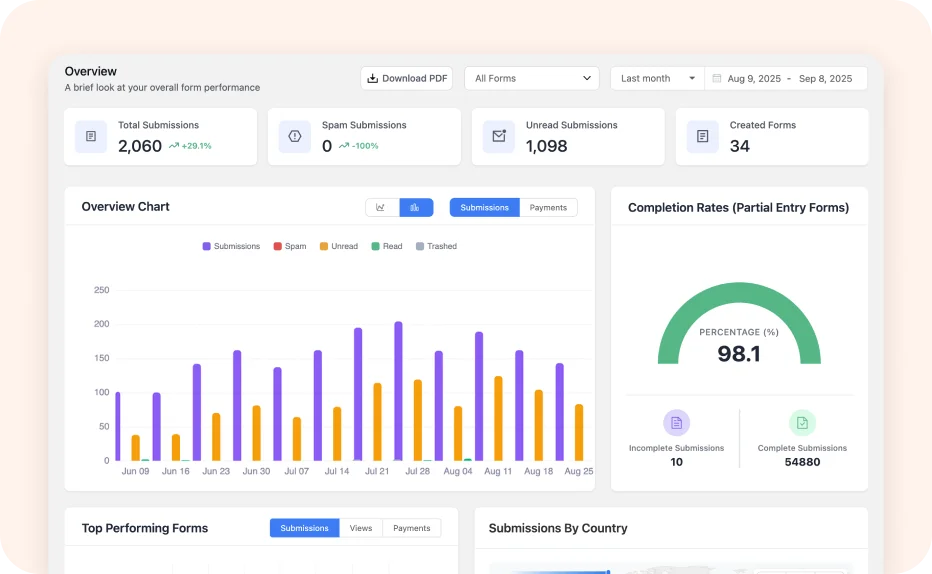
Learn more about the Fluent Forms Reporting Dashboard.
Integrating with CRMs and follow-up tools
If you connect Fluent Forms with tools like FluentCRM or HubSpot, you can automate what happens after submission, meaning:
- Adding a lead to your CRM
- Tagging contacts by interest
- Automating follow-up email sequences
That is where your form stops being a simple contact tool and starts becoming part of your workflow that nurtures and converts leads.
Fluent Forms integrates with 60+ tools you already use in your workflow. Explore integrations.
Enjoying this article?
We regularly publish actionable content on our blog. Subscribe to get them delivered straight to your inbox.
We won’t spam you. You can unsubscribe whenever you want.
Easily Build Any Form Using Fluent Forms
If you wanted to know how to create a form in WordPress, the short answer is this: install Fluent Forms, choose a blank form or template, add the fields you need, save your form, and publish it.
The better answer is that a form can do much more than collect messages. It can bring in leads, qualify prospects, take payments, run quizzes, and connect your site to the rest of your workflow. Whereas you can start simple, Fluent Forms offers the right tools to help you grow over time.
That is why Fluent Forms works so well for beginner & advanced users alike. If you are ready to build your first form, download the free version of Fluent Forms and try it out. If you later need advanced features or workflow tools, Fluent Forms Pro gives you the extra power without complicating the experience.
Your first form does not need to be perfect. It just needs to serve a purpose. The purpose can be as simple as providing your users with an easy way to contact you. Start there.
Explore more: Where should I place forms on my website?

Sarika writes for Fluent Forms and loves to offer insights into small businesses. She’s curious and enjoys discussing ideas, interests, and perspectives. In her free time, she’s either marvelling at architectural beauties or trying different cuisines.


Leave a Reply