Integrating BuddyBoss with Fluent Forms allows you to enhance your community engagement on your WordPress site. This allows you to collect and update BuddyBoss profile fields directly through Fluent Forms. This article will guide you through integrating BuddyBoss with Fluent Forms on your WordPress Site.
Remember, BuddyBoss is the Premium Feature of the Fluent Forms Plugin. So, you need the Fluent Forms Pro plugin to integrate this.
Setting up BuddyBoss in WordPress Site #
Before starting the process, make sure the BuddyBoss plugin (both Free and Pro versions) is installed and activated on your WordPress site.
Now, go to BuddyBoss from the Left Sidebar, click the Profiles, and it will take you to the Profile Fields page.
Here, you can Edit any of your existing fields or Add New Field according to your requirements.
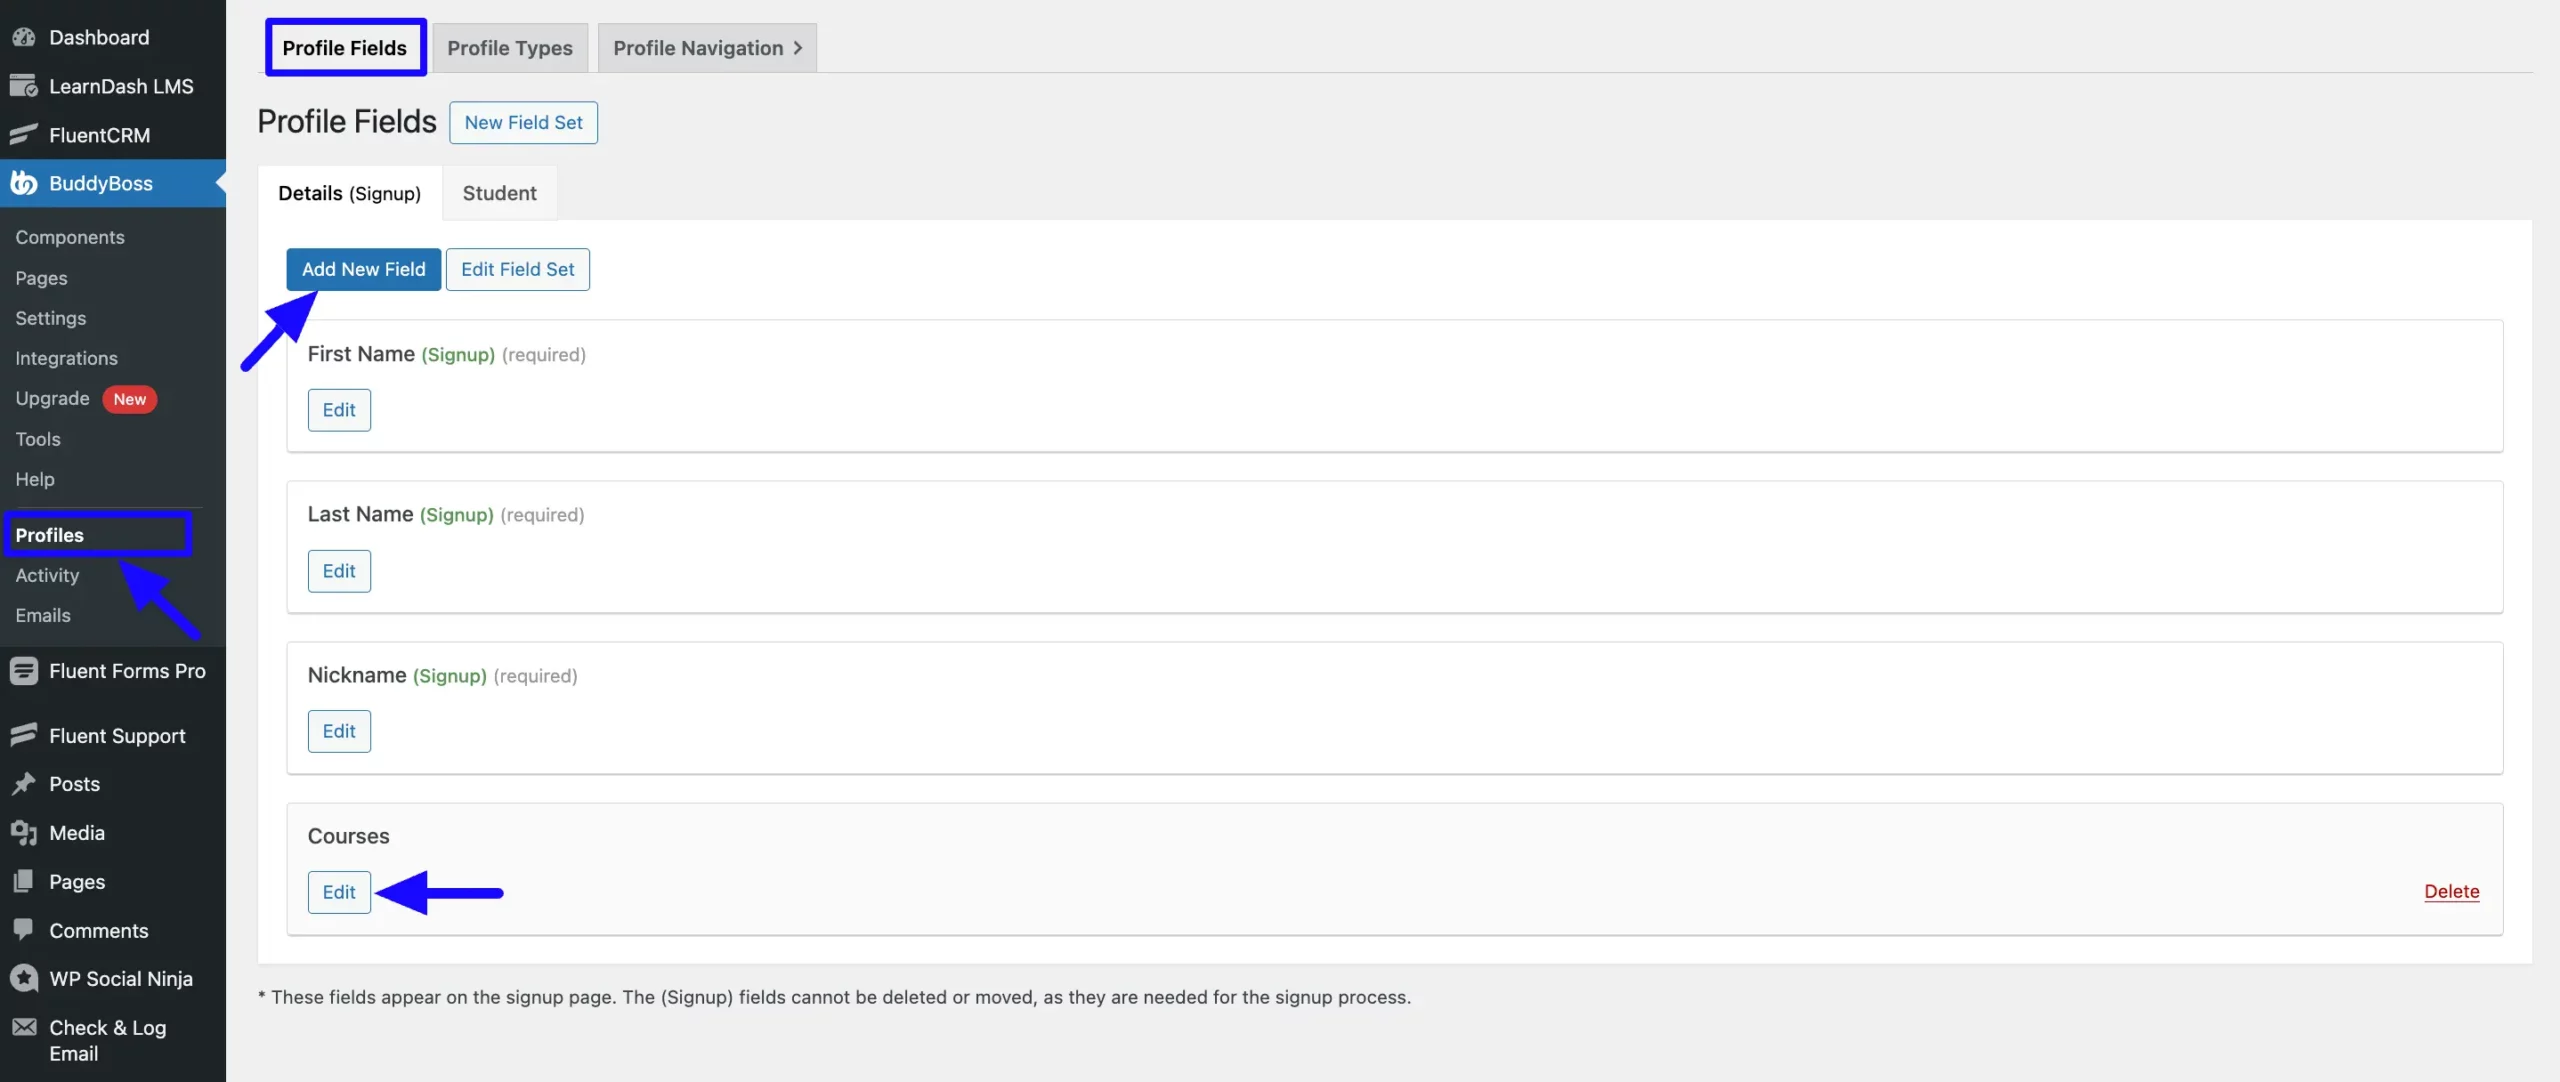
Then go to the Profile Types page from the Top Navbar. Here, you can Edit any of your existing profile types or Add New profile types based on your needs.

Enabling User Registration or Update #
To integrate BuddyBoss integration, you need to enable the User Registration or Update integration module in your Fluent Forms. Through this integration module, you will be able to integrate BuddyBoss with Fluent Forms.
To learn how to enable the User Registration or Update module, follow the steps below –
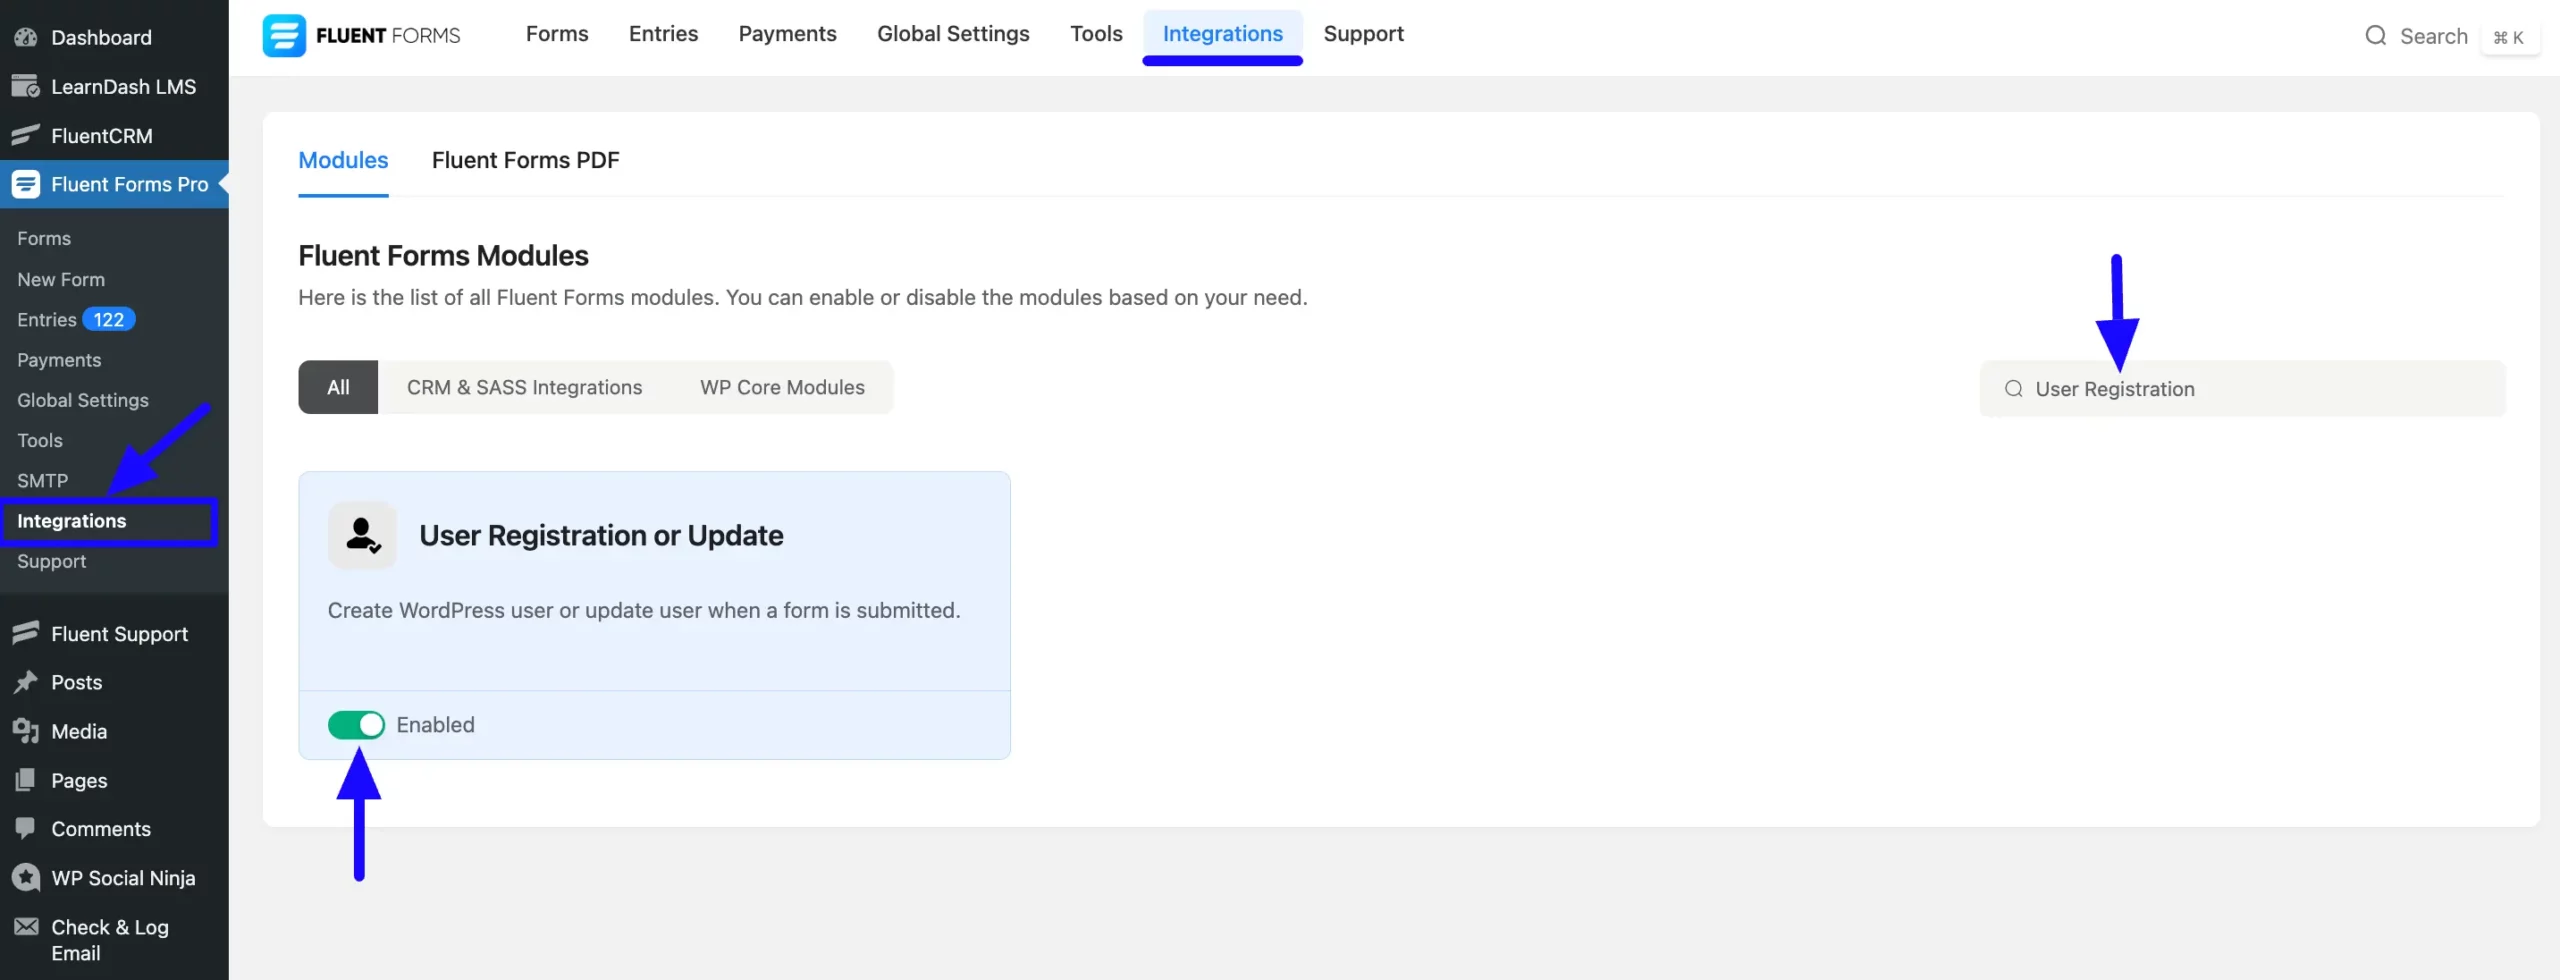
First, go to Integrations from the WordPress Left Sidebar or Fluent Forms Navbar, search for User Registration through the search bar, and get the integration module.
Now, turn on the Toggle and the User Registration or Update module wil be enabled.
Integrating BuddyBoss with Forms #
To learn how to integrate BuddyBoss into any specific Form in Fluent Forms, follow the steps with the screenshots below –
First, go to Forms from the Fluent Forms Navbar, select the Desired Form where you want to integrate your BuddyBoss, and click the Settings button.
If you do not have any existing forms, read the Create a Form from Scratch or Create a Form using Templates documentation to create a new one.

Once you are on the Settings & Integrations, go to the Configuration Integrations tab, click the Add New Integration button, and select User Registration or Update Integration feed from the dropdown list.
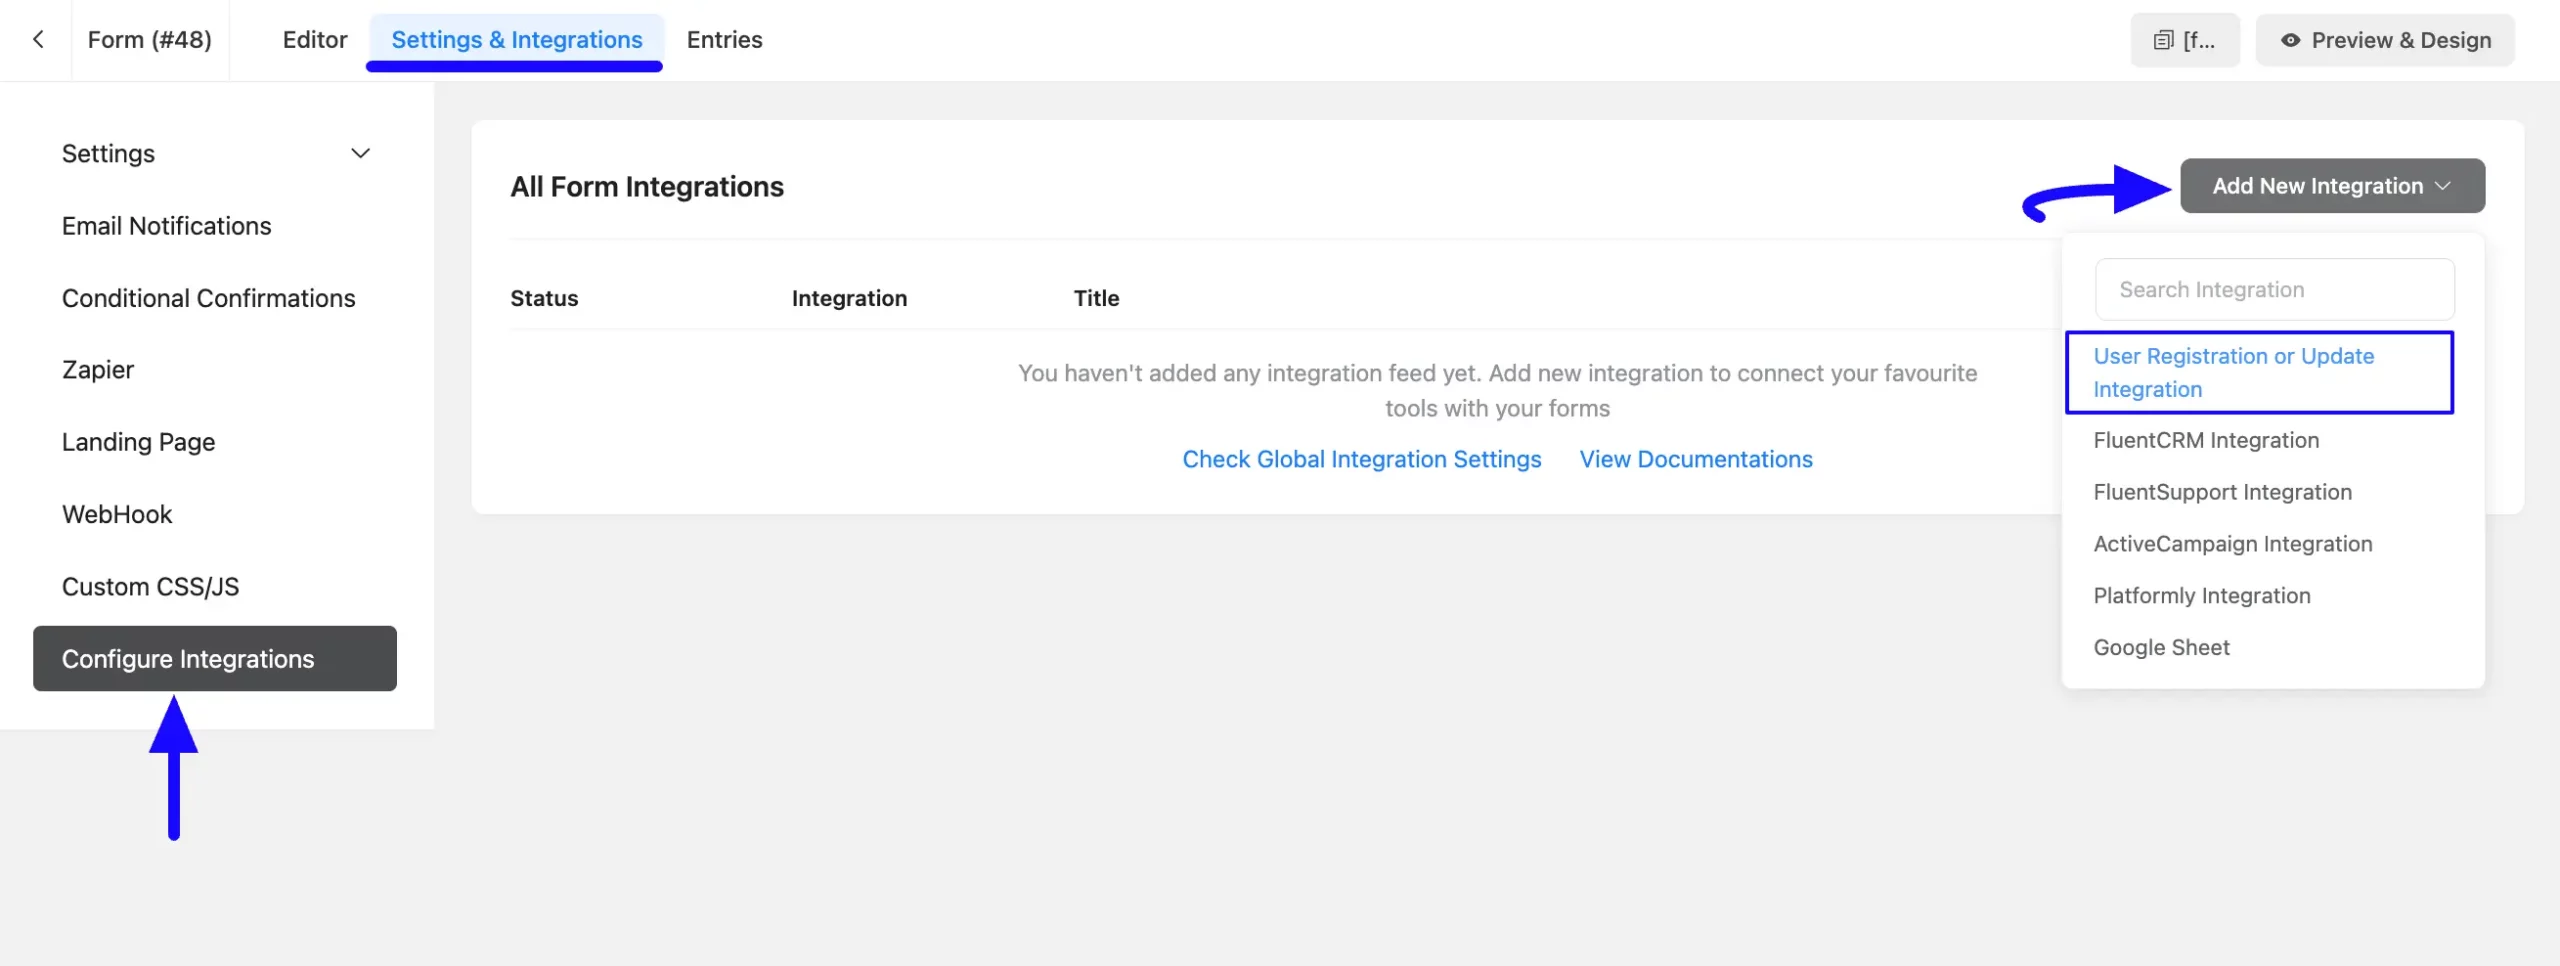
Once you select the list, a pop-up page will appear with various settings options for configuring the User Registration feed.
To learn the detailed configuration process of User registration or Update integration feed, read this Documentation.
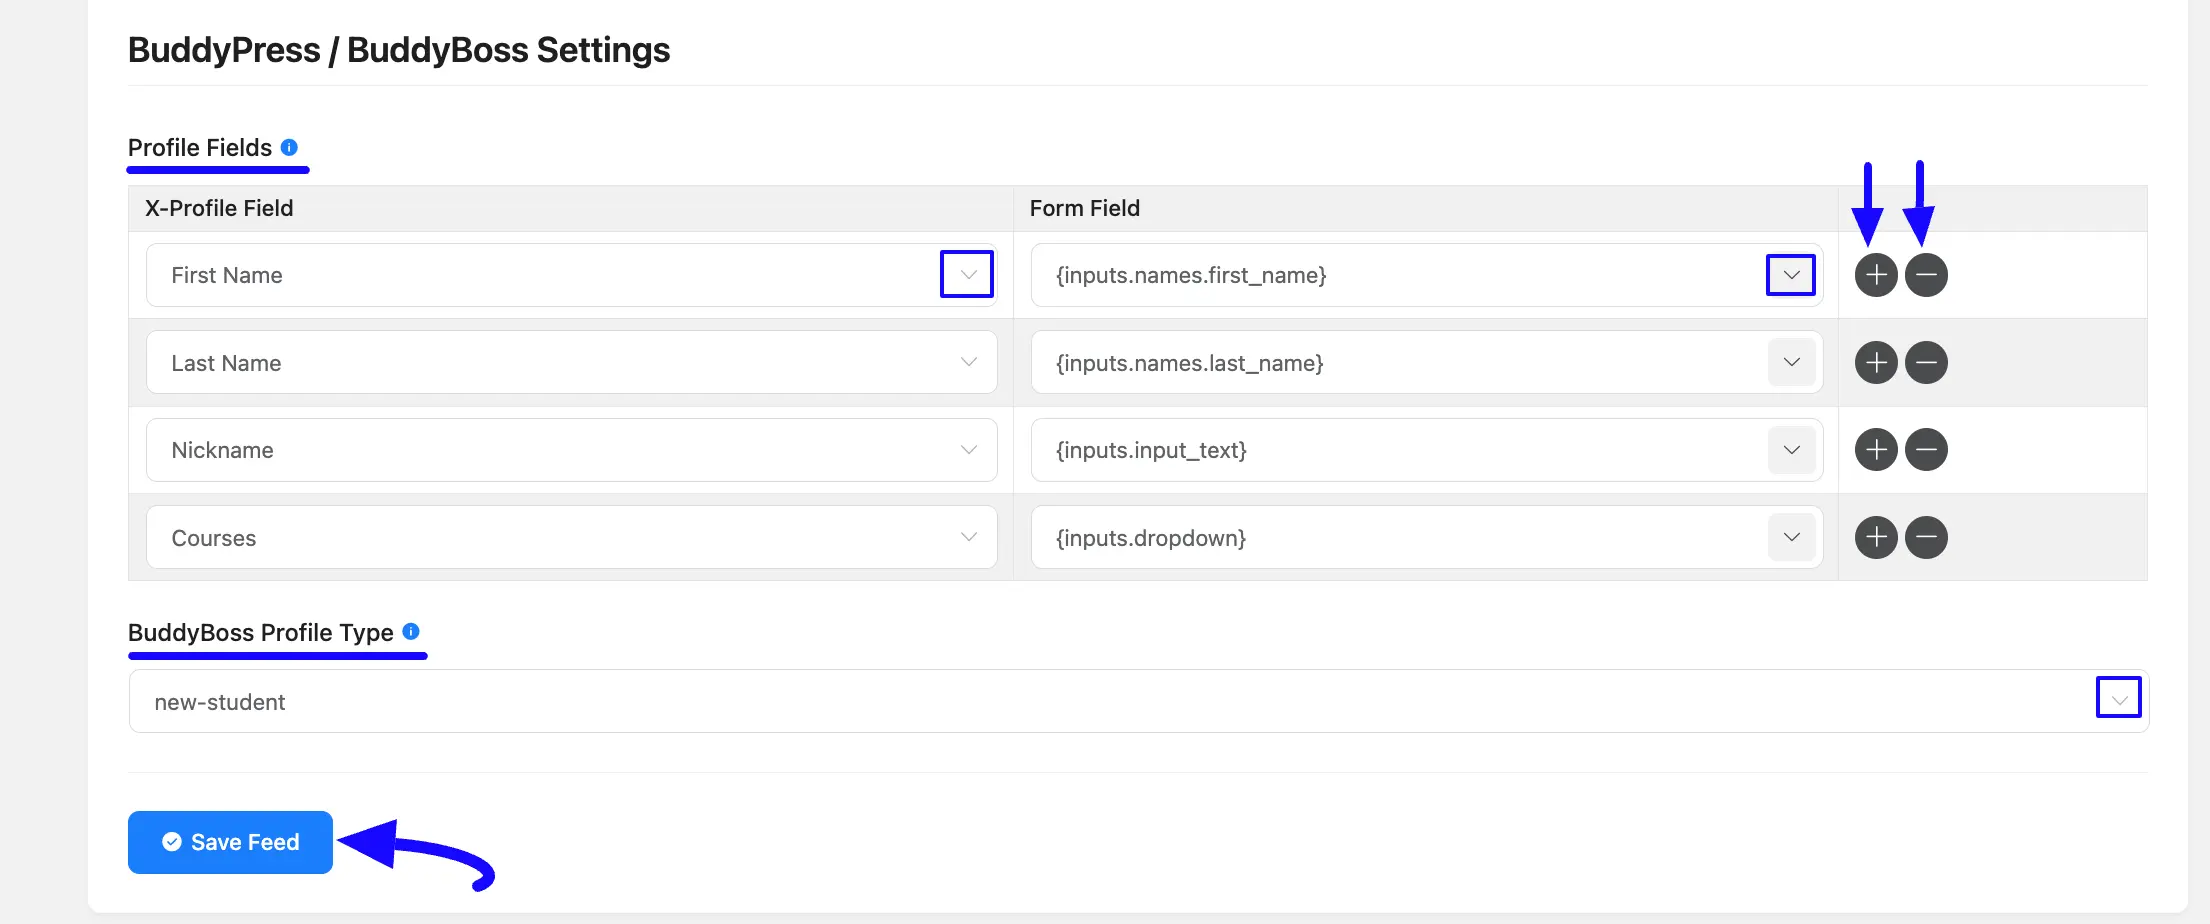
Finally, scroll down to the BuddyBoss Settings section, and you will get the following options to integrate it with the form.
- Profile Fields: Use all the fields under this option to properly link your BuddyBoss Fields with the Form Fields. You can easily select the value for the form fields based on the BuddyBoss fields using the Shortcode Arrow. Plus, you add or delete as many fields as you want by clicking the Plus or Minus icon on the right side.
- BuddyBoss Profile Type: Here, you can directly select your desired BuddyBoss Profile Type from the dropdown list by clicking the Arrow Icon on the right side.
Once the configuration is done, click the Save Feed button, and your BuddyBoss will be integrated into this specific form!
After successful Integration, now you will see that your BuddyBoss has been integrated through the User Registration integration feed here.
You can modify your BuddyBoss Settings anytime by clicking the Settings Icon and delete it by clicking the Trash Icon. Also, you can disable or enable this feed anytime by turning off the Toggle if needed.

Embedding the Form into Frontend #
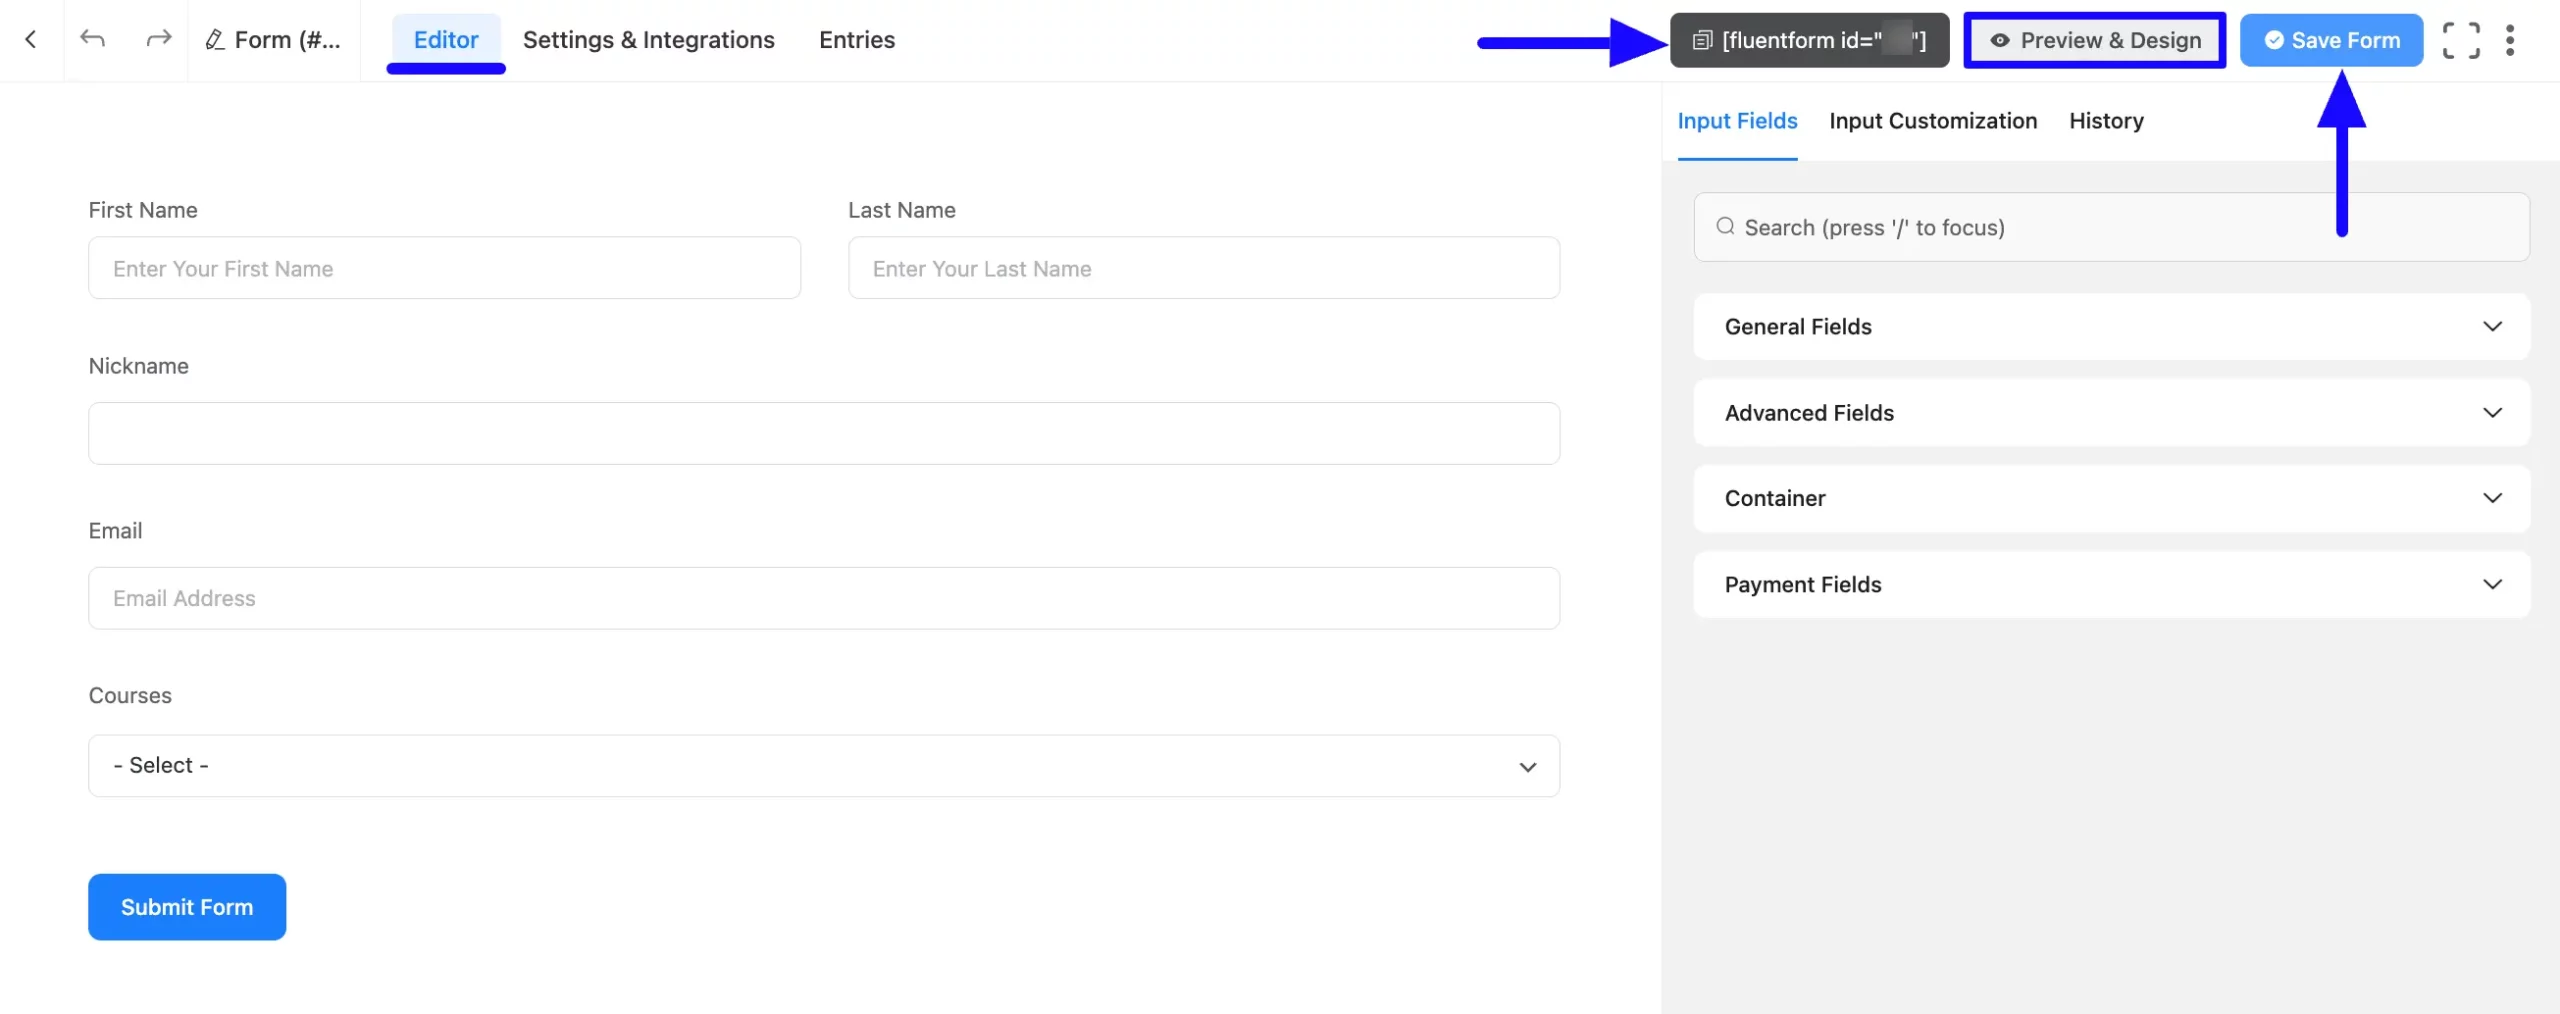
To embed and display the form on a specific Page/Post on your site, go to the Editor page from the top navbar.
Now, copy the Shortcode from the top right side and paste it into your desired Page/Post. Also, to see the form preview, click the Preview & Design button in the middle.
Once you are done, click the Save Form button to save all your changes.
This way, you can easily integrate BuddyBoss with Fluent Forms!
If you have any further questions, concerns, or suggestions, please do not hesitate to contact our @support team. Thank you.


