Skip to content
Get Discount
Formidable Forms alternatives
  • Pricing
  • Features
  • Templates
  • Integrations
  • Blog
  • Docs
  • Account
Sign in

Get Discount
Formidable Forms alternatives
Popular Search submitsubmissionentryentriespayment

Getting Started

  • How to Install Fluent Forms
  • Upgrade to Fluent Forms Pro Add-on
  • Fluent Forms Glossary
  • Getting Started With Fluent Forms
  • Fluent Forms User Interface

Form Editor

  • How to Create a Form with Fluent Forms
  • Using and Customizing Pre-built Quick Forms in Fluent Forms
  • How to create a conversational form 
  • How to Design a Conversational Form 
  • How to Create a Form with OpenAI ChatGPT
  • How to Create a Form with Fluent Forms AI

Form Style/Template

  • Modal/Popup/Lightbox in Fluent Forms
  • Fluent Forms Styling/Custom CSS
  • Official Form Styler of Fluent Forms
  • Form Layout Settings in Fluent Forms

Publishing Form

  • How to embed your forms directly in Gutenberg layout
  • Dedicated Landing Page in Fluent Forms
  • How to Use Your Forms as Widget on your Sidebar or Footer
  • How to embed your forms using Elementor Widget
  • Fluent Forms with Oxygen Builder Widget

Form Settings

  • Error Message Customization with Fluent Forms
  • User Login Requirement in Fluent Forms
  • Restrict Blank Form Submission with Fluent Forms
  • Help Message Customization in Fluent Forms

Manage Entries

  • Edit User Submitted Entries With Fluent Forms
  • Visual Representation of Form Entries in Fluent Forms
  • Managing Entries in Fluent Forms

Post Fields

  • Add Post Title Field in Post Forms 
  • Add Post Content Field in Post Forms
  • Add Featured Image Field in Post Forms 
  • Add Post Excerpt Field in Post Forms 
  • How to Create a Post Form with Fluent Forms
  • Add Post Update Field in Post Forms

Container Fields

  • Add Container Fields in Fluent Forms
  • Add Repeat Container Field in Fluent Forms 

Payment Fields

  • Add Subscription Field in Payment Forms 
  • Add Coupon Field in Payment Forms  
  • Add Payment Item Field in Payment Forms 
  • Add Payment Summary Field in Payment Forms 
  • Add Item Quantity Field in Payment Forms 
  • Add Custom Payment Amount Field in Payment Forms 
  • Add Payment Method Field in Payment Forms 

Advance Fields

  • Creating a Multi-Step Form in Fluent Forms  
  • hCaptcha in Fluent Forms
  • Hidden Input Field in Fluent Forms
  • Ratings Input Field in Fluent Forms
  • reCAPTCHA Field in Fluent Forms
  • Section Break in Fluent Forms
  • Terms & Conditions Field in Fluent Forms
  • Shortcode Input Field in Fluent Forms
  • Action Hook Field in Fluent Forms
  • Checkable Grid Input Field in Fluent Forms
  • GDPR Agreement Field in Fluent Forms
  • Password Input Field in Fluent Forms
  • Custom Submit Button in Fluent Forms
  • Range Slider Field in Fluent Forms
  • Net Promoter Score in Fluent Forms
  • Chained Select Field in Fluent Forms
  • Color Picker Field in Fluent Forms
  • Repeat Input Field in Fluent Forms
  • Rich Text Input Field in Fluent Forms
  • Save Progress Button in Fluent Forms
  • Quiz Score in Fluent Forms
  • Dynamic Field in Fluent Form  
  • FluentBooking Field in Fluent Form

General Fields

  • Address Input Field in Fluent Forms
  • Name Input Field in Fluent Forms
  • CheckBox Field in Fluent Forms
  • Phone/Mobile Input Field in Fluent Forms
  • Dropdown Field in Fluent Forms
  • Email Address Input Field in Fluent Forms
  • Custom HTML Field in Fluent Forms
  • File Upload Input Field in Fluent Forms
  • Image Upload Input Field in Fluent Form
  • Multiple Choice Field in Fluent Forms
  • Numeric Input Field in Fluent Forms
  • Radio Field in Fluent Forms
  • Adding a Mask Input Field Guide
  • Adding a Simple Text Input Field
  • Adding a Text Area Input Field
  • Website URL Input Field Guide
  • Time & Date Input Field in Fluent Forms
  • Country List Field in Fluent Form

Taxonomy Fields

  • Add Categories Taxonomy Field in Post Forms
  • Add Tags Taxonomy Field in Post Forms

Form Notification

  • Conditional Email Notification in Fluent Forms
  • Conditional Email Routing 
  • How to Setup Admin/User Email Notifications  
  • Weekly Email Summary
  • Setup Form Submission Confirmation Message in Fluent Forms
  • Fluent Forms Not Sending Email Confirmations

Form Entries

  • How to Search and Filter Form Entries
  • How to Add a Date and Time Stamp to Form Entries
  • Partial Entries for Step Forms

Features and Functionalities

  • Conditional Confirmation Message in Fluent Forms
  • Unique Field Validation
  • Surveys and Polls in Fluent Forms
  • Set up Forms with Conditional Logic in Fluent Forms
  • Set up Double Opt-in emails in Fluent Forms
  • Inline Opt-in Form using Fluent Forms
  • Form Scheduling Feature in Fluent Forms
  • Form Restrictions Feature in Fluent Forms
  • Fluent Forms Quiz Module
  • Dynamic Default Value in Fluent Forms
  • How to use Meta Box Custom Fields with Fluent Forms
  • How to Create a WordPress User Registration Form With Fluent Forms
  • Post Selection Module in Fluent Forms
  • How to add Calc Values on the Repeat Field
  • Edit History Feature in Fluent Forms
  • Keyboard Navigation & Shortcuts in Fluent Forms
  • Use ACF to Add a Custom Field in the Post Form
  • Numeric Calculation in Fluent Forms
  • Admin Approval Feature in Fluent Forms
  • Global Inventory Manager in Fluent Forms
  • Fluent Forms Inventory Module
  • Creating a Personality Quiz Form in Fluent Forms
  • How to Create a WordPress User Update Form With Fluent Forms
  • Resizeable Container in Fluent Forms
  • Dynamic Input Values In Form Steps | Fluent Forms
  • Using JetEngine Custom Fields with Fluent Forms
  • Fluent Forms PDF Module
  • Mapping Meta Fields with Meta Keys in Fluent Forms
  • Set Default Form Value from URL Parameters

Email Marketing

  • How to Integrate ActiveCampaign with Fluent Forms
  • How to Integrate CleverReach with Fluent Forms
  • How to Integrate iContact with Fluent Forms
  • How to Integrate Kit (Former ConvertKit) with Fluent Forms
  • How to Integrate GetResponse with Fluent Forms  
  • How to Integrate Mailchimp with Fluent Forms  
  • How to Integrate MailerLite with Fluent Forms
  • Mailpoet Integration with Fluent Forms
  • Mautic Integration with Fluent Forms
  • How to Integrate Gist with Fluent Forms
  • How to Integrate MooSend with Fluent Forms
  • How to Integrate Brevo (Formerly Sendinblue) with Fluent Forms  
  • How to Integrate Constant Contact with Fluent Forms 
  • ClickSend SMS Integration with Fluent Forms
  • Automizy Integration with Fluent Forms
  • How to Integrate Mailjet with Fluent Forms
  • How to Integrate Mailster with Fluent Forms 
  • How to Integrate SendFox with Fluent Forms
  • How to Integrate Campaign Monitor with Fluent Forms

CRM

  • AmoCRM Integration with Fluent Forms
  • Salesflare Integration with Fluent Forms
  • Pipedrive Integration with Fluent Forms
  • OnePageCRM Integration with Fluent Forms
  • Drip Integration with Fluent Forms
  • Zoho CRM Integration with Fluent Forms
  • FluentCRM integration with Fluent Forms
  • HubSpot Integration with Fluent Forms
  • Salesforce Integration with Fluent Forms

Automation

  • How to Integrate Webhook with Fluent Forms
  • How to Integrate Zapier with Fluent Forms
  • How to Integrate Platformly with Fluent Forms 

Notification

  • How to Integrate Telegram with Fluent Forms
  • How to Integrate Discord with Fluent Forms
  • How to Integrate Slack with Fluent Forms

Others

  • How to Integrate Google Sheets with Fluent Forms
  • How to Integrate Trello with Fluent Forms 
  • Twilio Integration with Fluent Forms
  • How to Integrate Airtable with Fluent Forms
  • How to Integrate BuddyBoss with Fluent Forms  
  • How to Integrate Notion with Fluent Forms    
  • How to Integrate Google Maps with Fluent Forms
  • How to Integrate OpenAI ChatGPT with Fluent Forms

Payment

  • How to Create a Payment Form with Fluent Form

Payment Integration

  • How to Integrate Stripe with Fluent Forms
  • How to Integrate PayPal with Fluent Forms
  • How to Integrate Paddle with Fluent Forms
View Categories
  • Home
  • Docs
  • General Docs
  • Payment
  • Payment Integration
  • How to Integrate Stripe with Fluent Forms

How to Integrate Stripe with Fluent Forms

Stripe is a globally recognized payment gateway that offers Fluent Forms inline payment options and a smooth and secure payment experience using credit and debit cards.

This article will guide you through integrating Stripe into your WordPress Site with the  Fluent Forms plugin.

Remember, you can integrate Stripe Payment Methods with the Free Version of Fluent Forms plugin, but a minimum platform fee of 1.9% per transaction applies. But, premium users of the Fluent Forms Pro plugin do not need to pay any extra fees for using Stripe on your site

Enabling Stripe Payment Method #

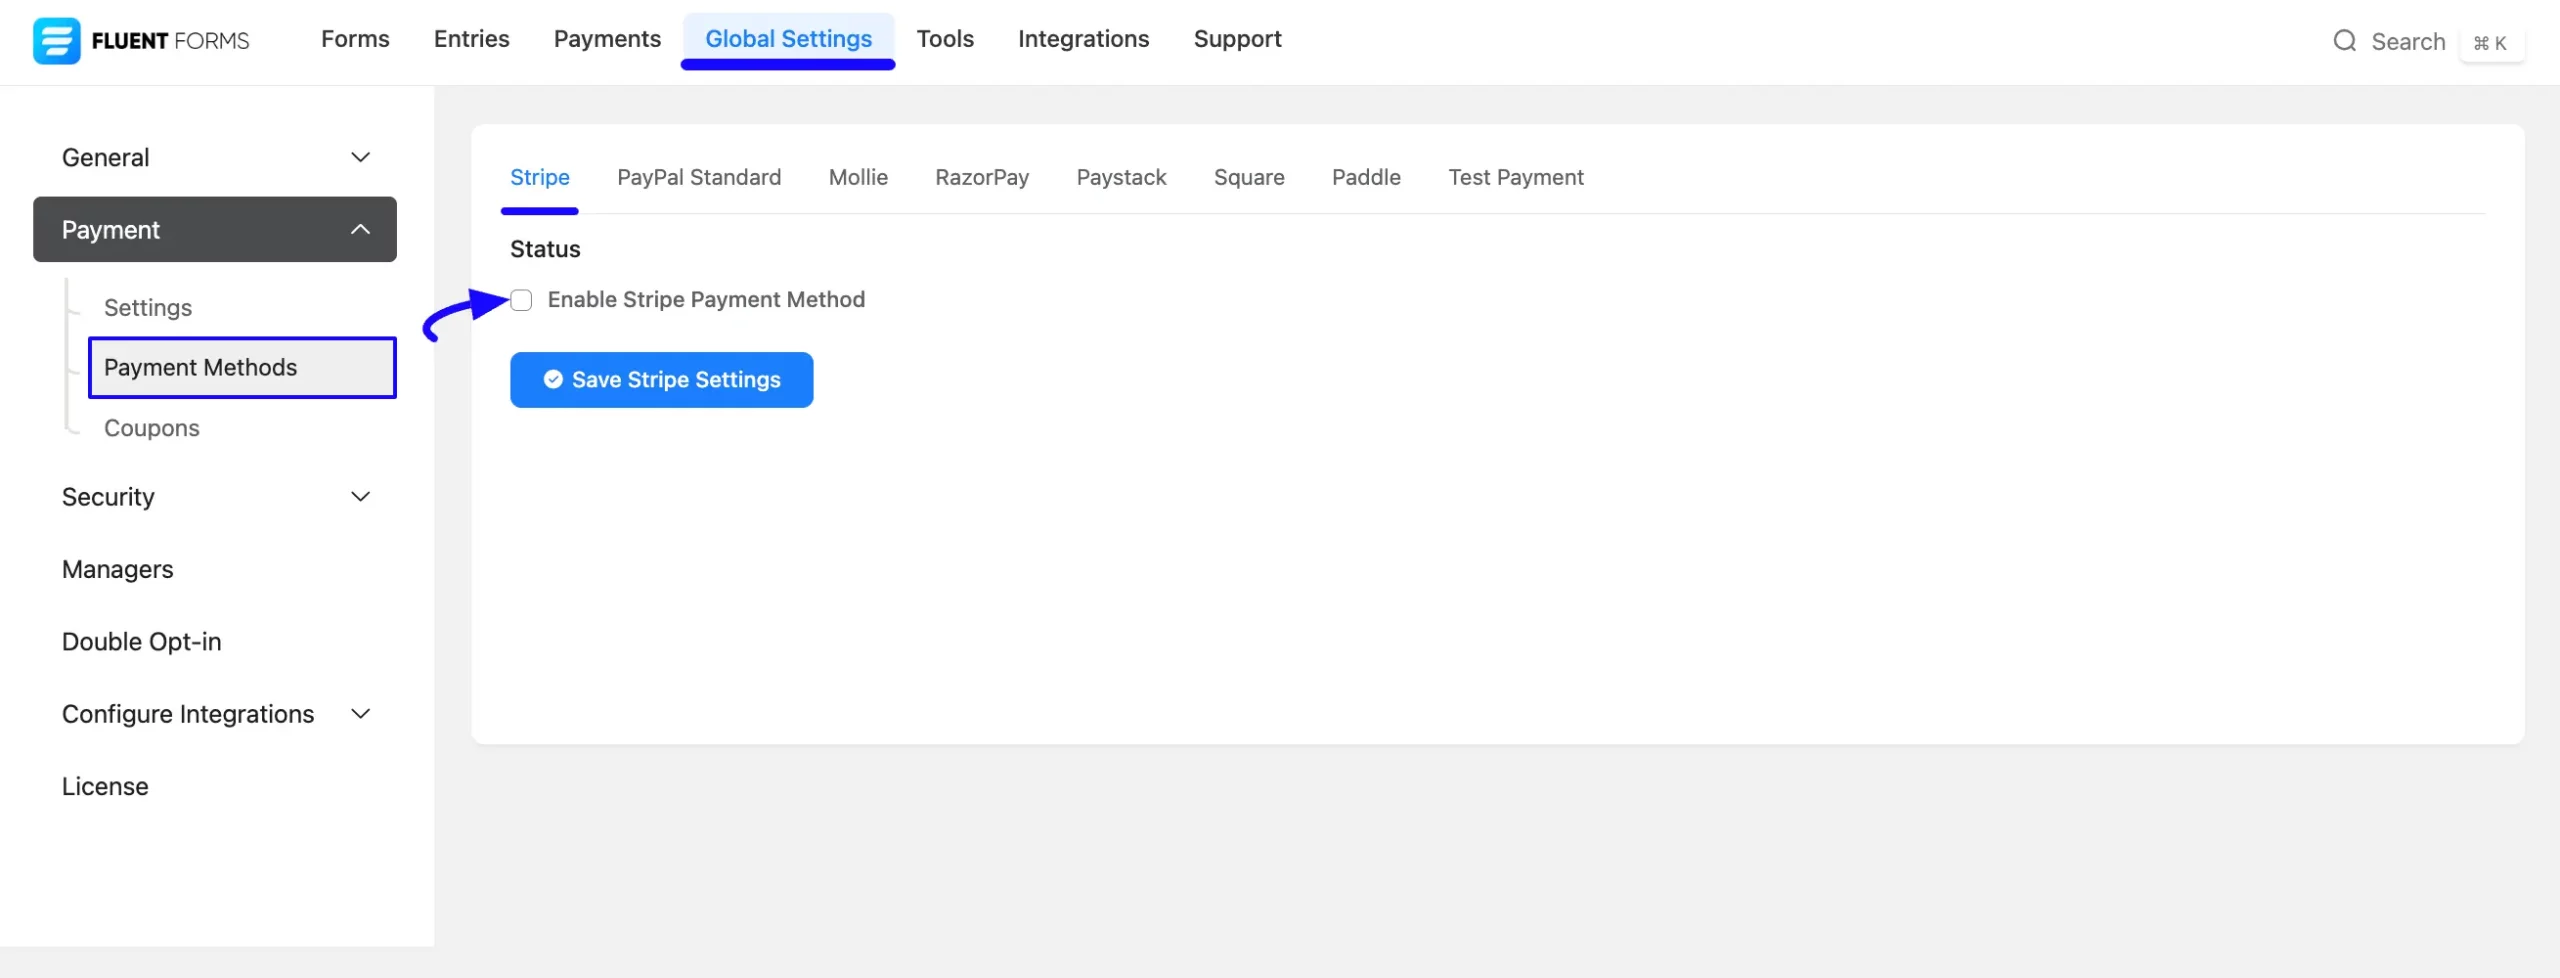
First, go to Global Settings from the Fluent Forms Navbar, open the Payment tab from the left sidebar, and click the Payment Methods option.

Now, go to Stripe in the top navbar and click Enable Stripe Payment Method. The Stripe Payment Method will be enabled globally for all forms. 
1. Enable Stripe Payment method scaled 48155

Configuring Stripe with Fluent Forms #

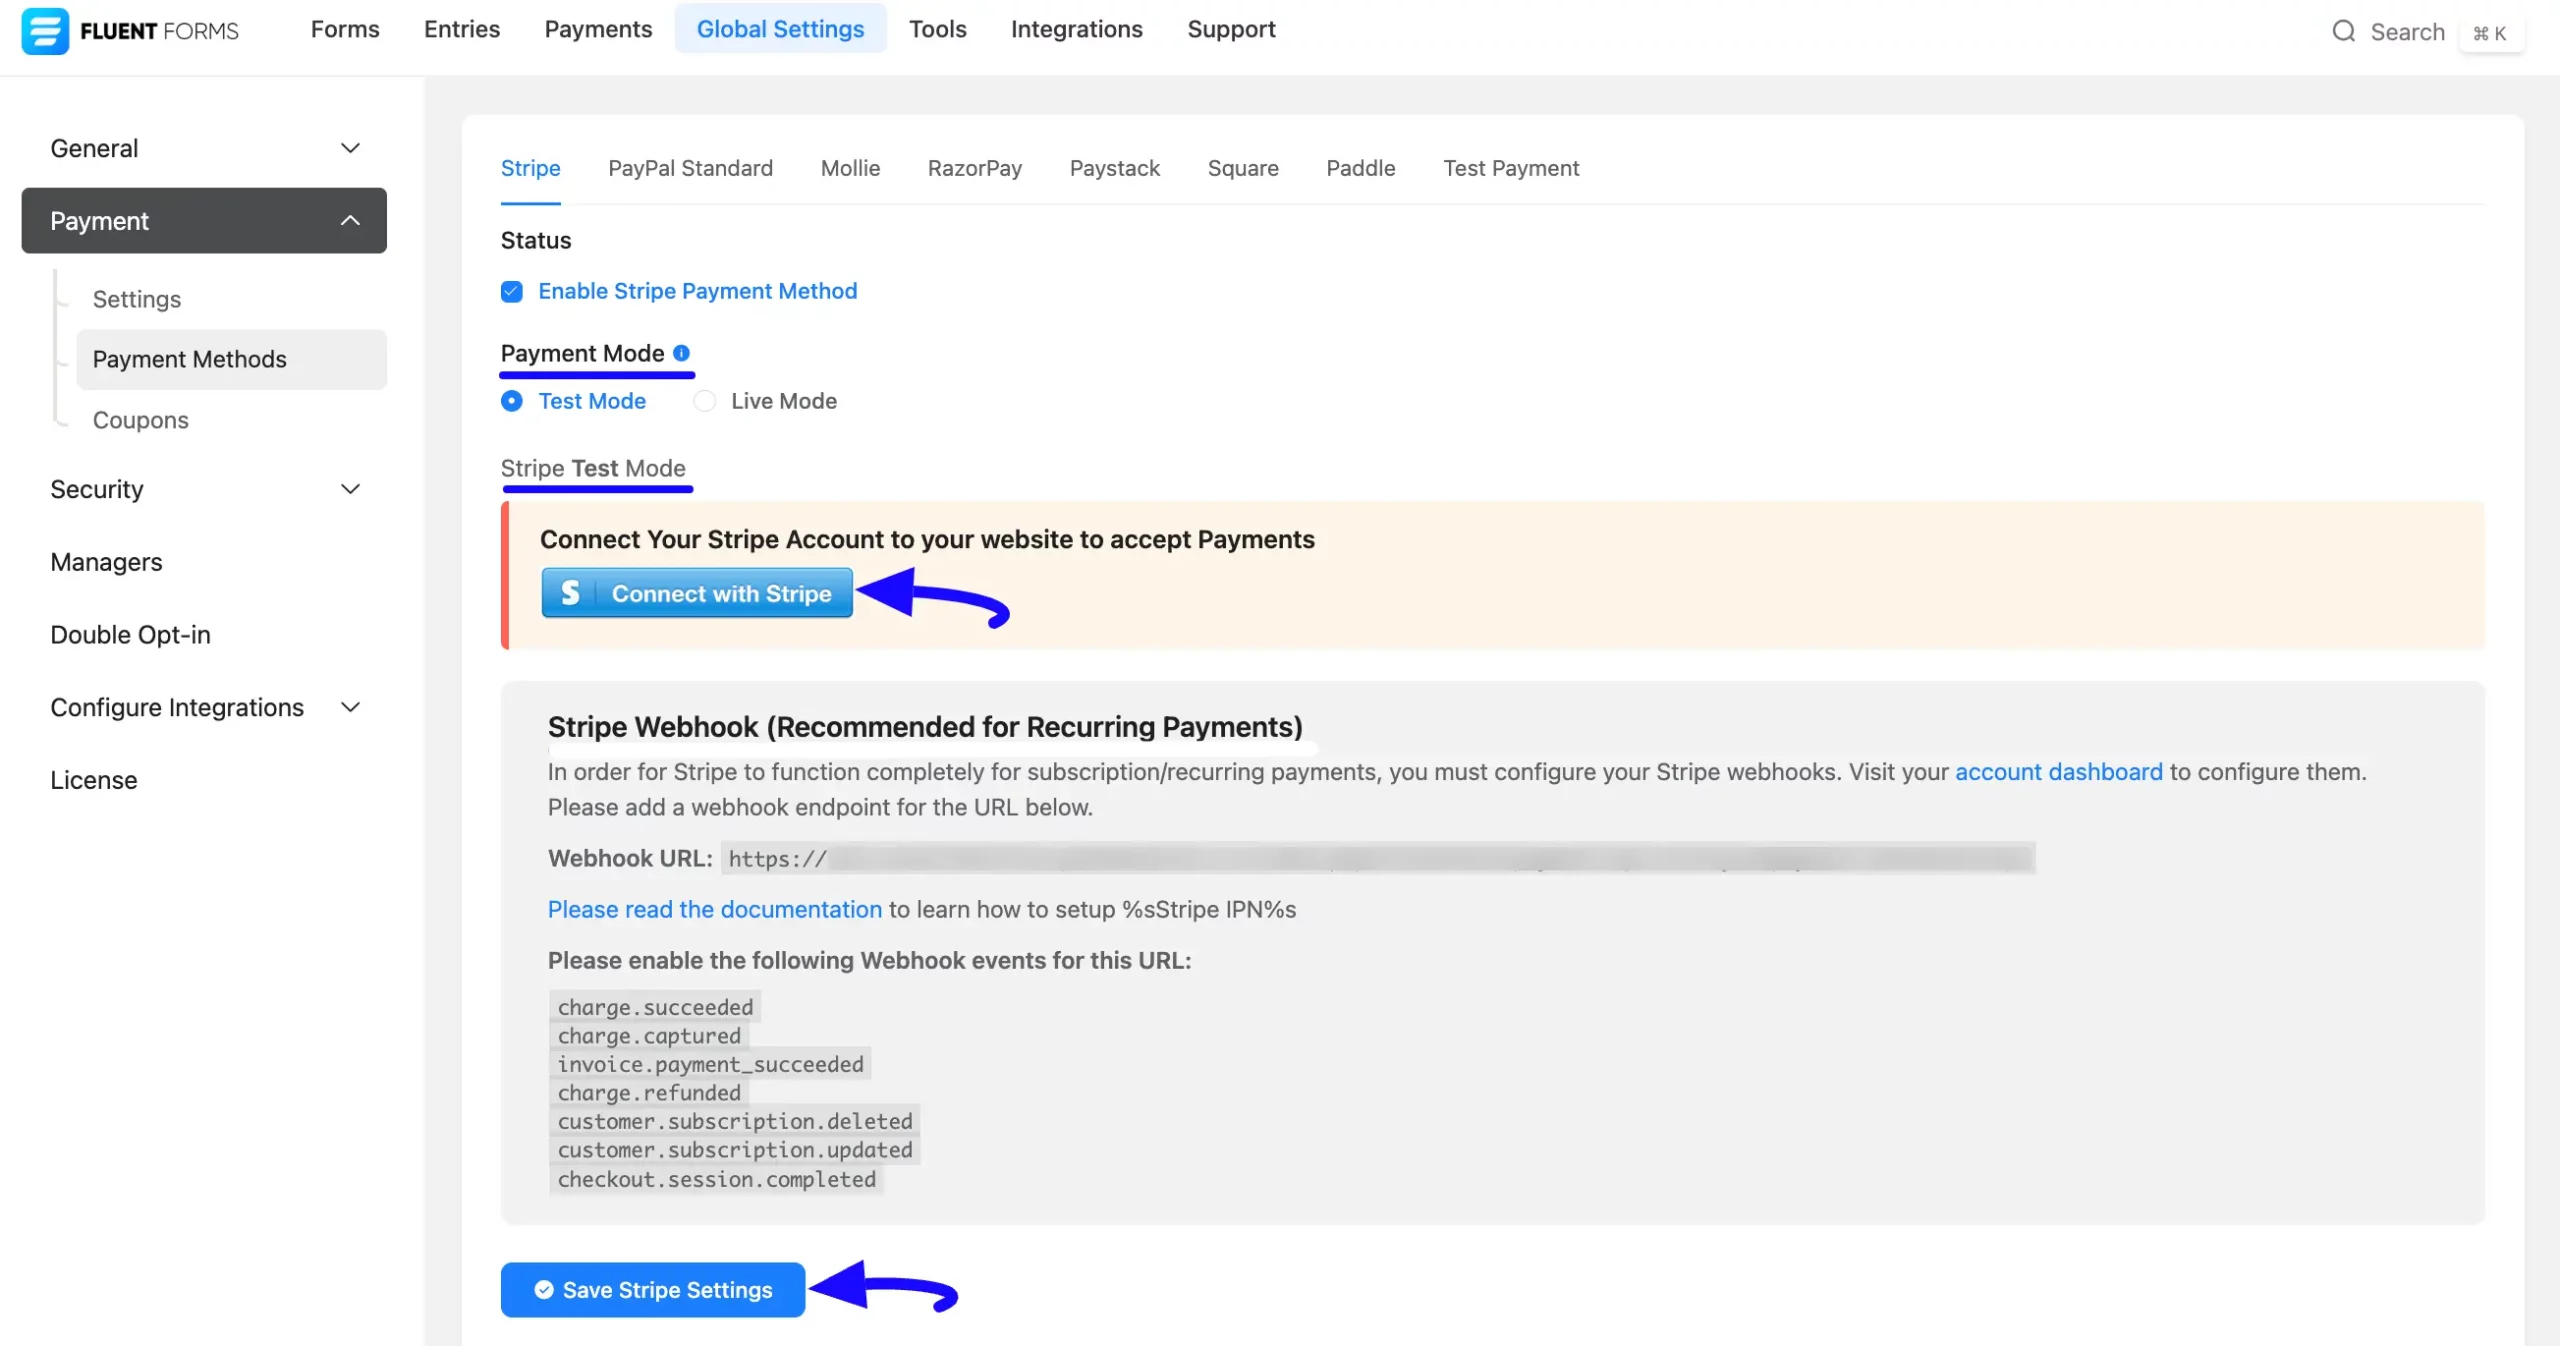
Once you enable Stripe, all the required settings will appear to configure Stripe with Fluent Forms. 

Before starting the configuration, select any Payment Mode between Test (for test payments) and Live (for real payments) as both options follow the same process, e.g., I choose the Test Mode.

Then, click the Connect with Stripe button to redirect you to the Stripe Login Page to connect your Stripe Account.

Do not forget to press the Save Stripe Settings button to save all your changes. 
2. Connect with Stripe scaled 48155

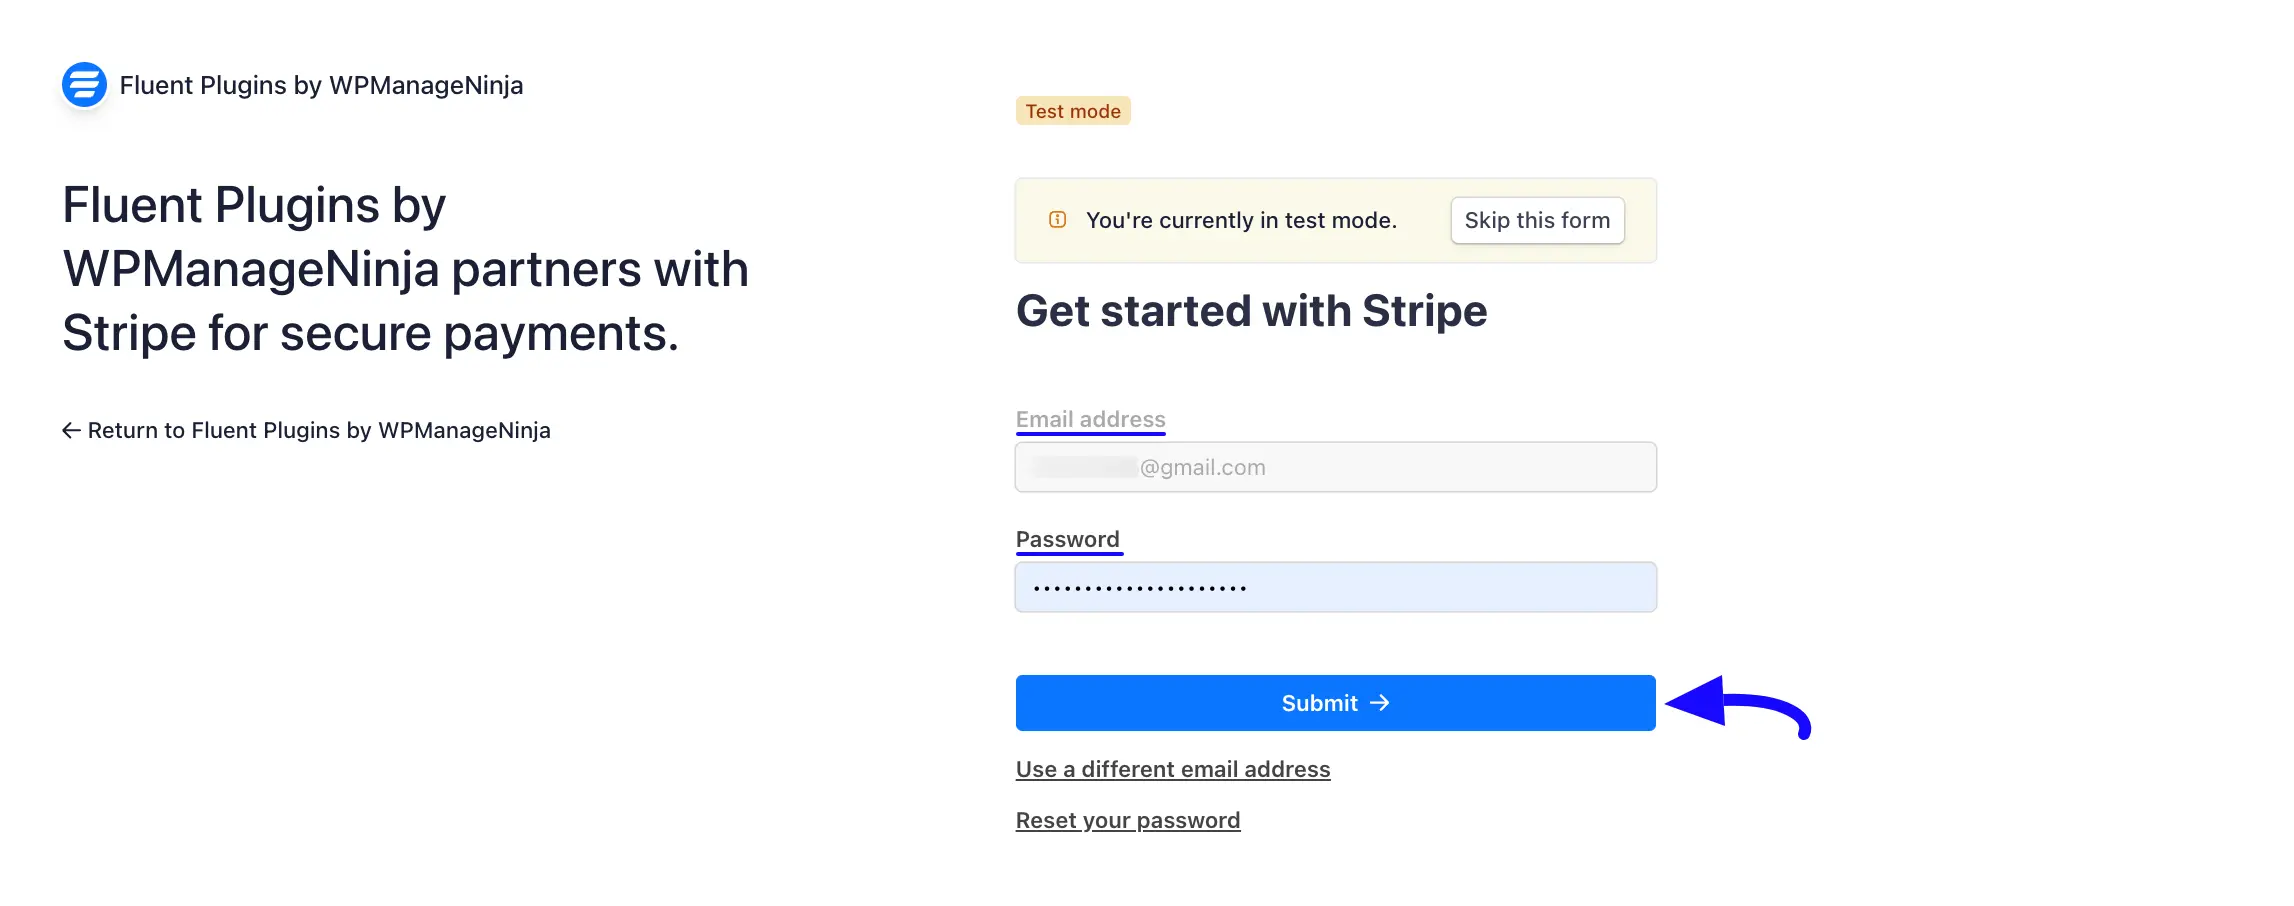
Here, provide the login credentials of your desired Stripe Account that you want to connect with Fluent Forms, click the Submit button, and your Stripe account will be configured. 

If you do not have an existing Stripe Account, click here to open a new account.
3. Submit button 48155

Remember, Fluent Forms offers the above-mentioned Connect with Stripe option by default for secure and easy integration with Stripe. Also, Fluent Forms recommends using this option for all Stripe Verified Partners.

But, if you prefer the traditional API Key method for the integration, you can Disable this Connect with Stripe option by adding the following code snippet to your theme’s functions.php file or a code snippet plugin.

We recommend you use the Fluent Snippet Plugin to add any snippet code to your WordPress Site.

add_filter('fluentform/disable_stripe_connect', '__return_true');

Configuring Webhook to Set Up Stripe IPN #

After configuring Stripe, you can set up IPN (Instant Payment Notification) Settings to enable notifications for subscription or recurring payments in Stripe.

IPN (Instant Payment Notification) is a post-message notification sent by Stripe after a successful subscription or recurring payment. For Stripe to function completely for subscription/recurring payments, you must configure your Stripe webhooks.

To learn how to configure Stripe Webhooks, follow the steps with screenshots below –

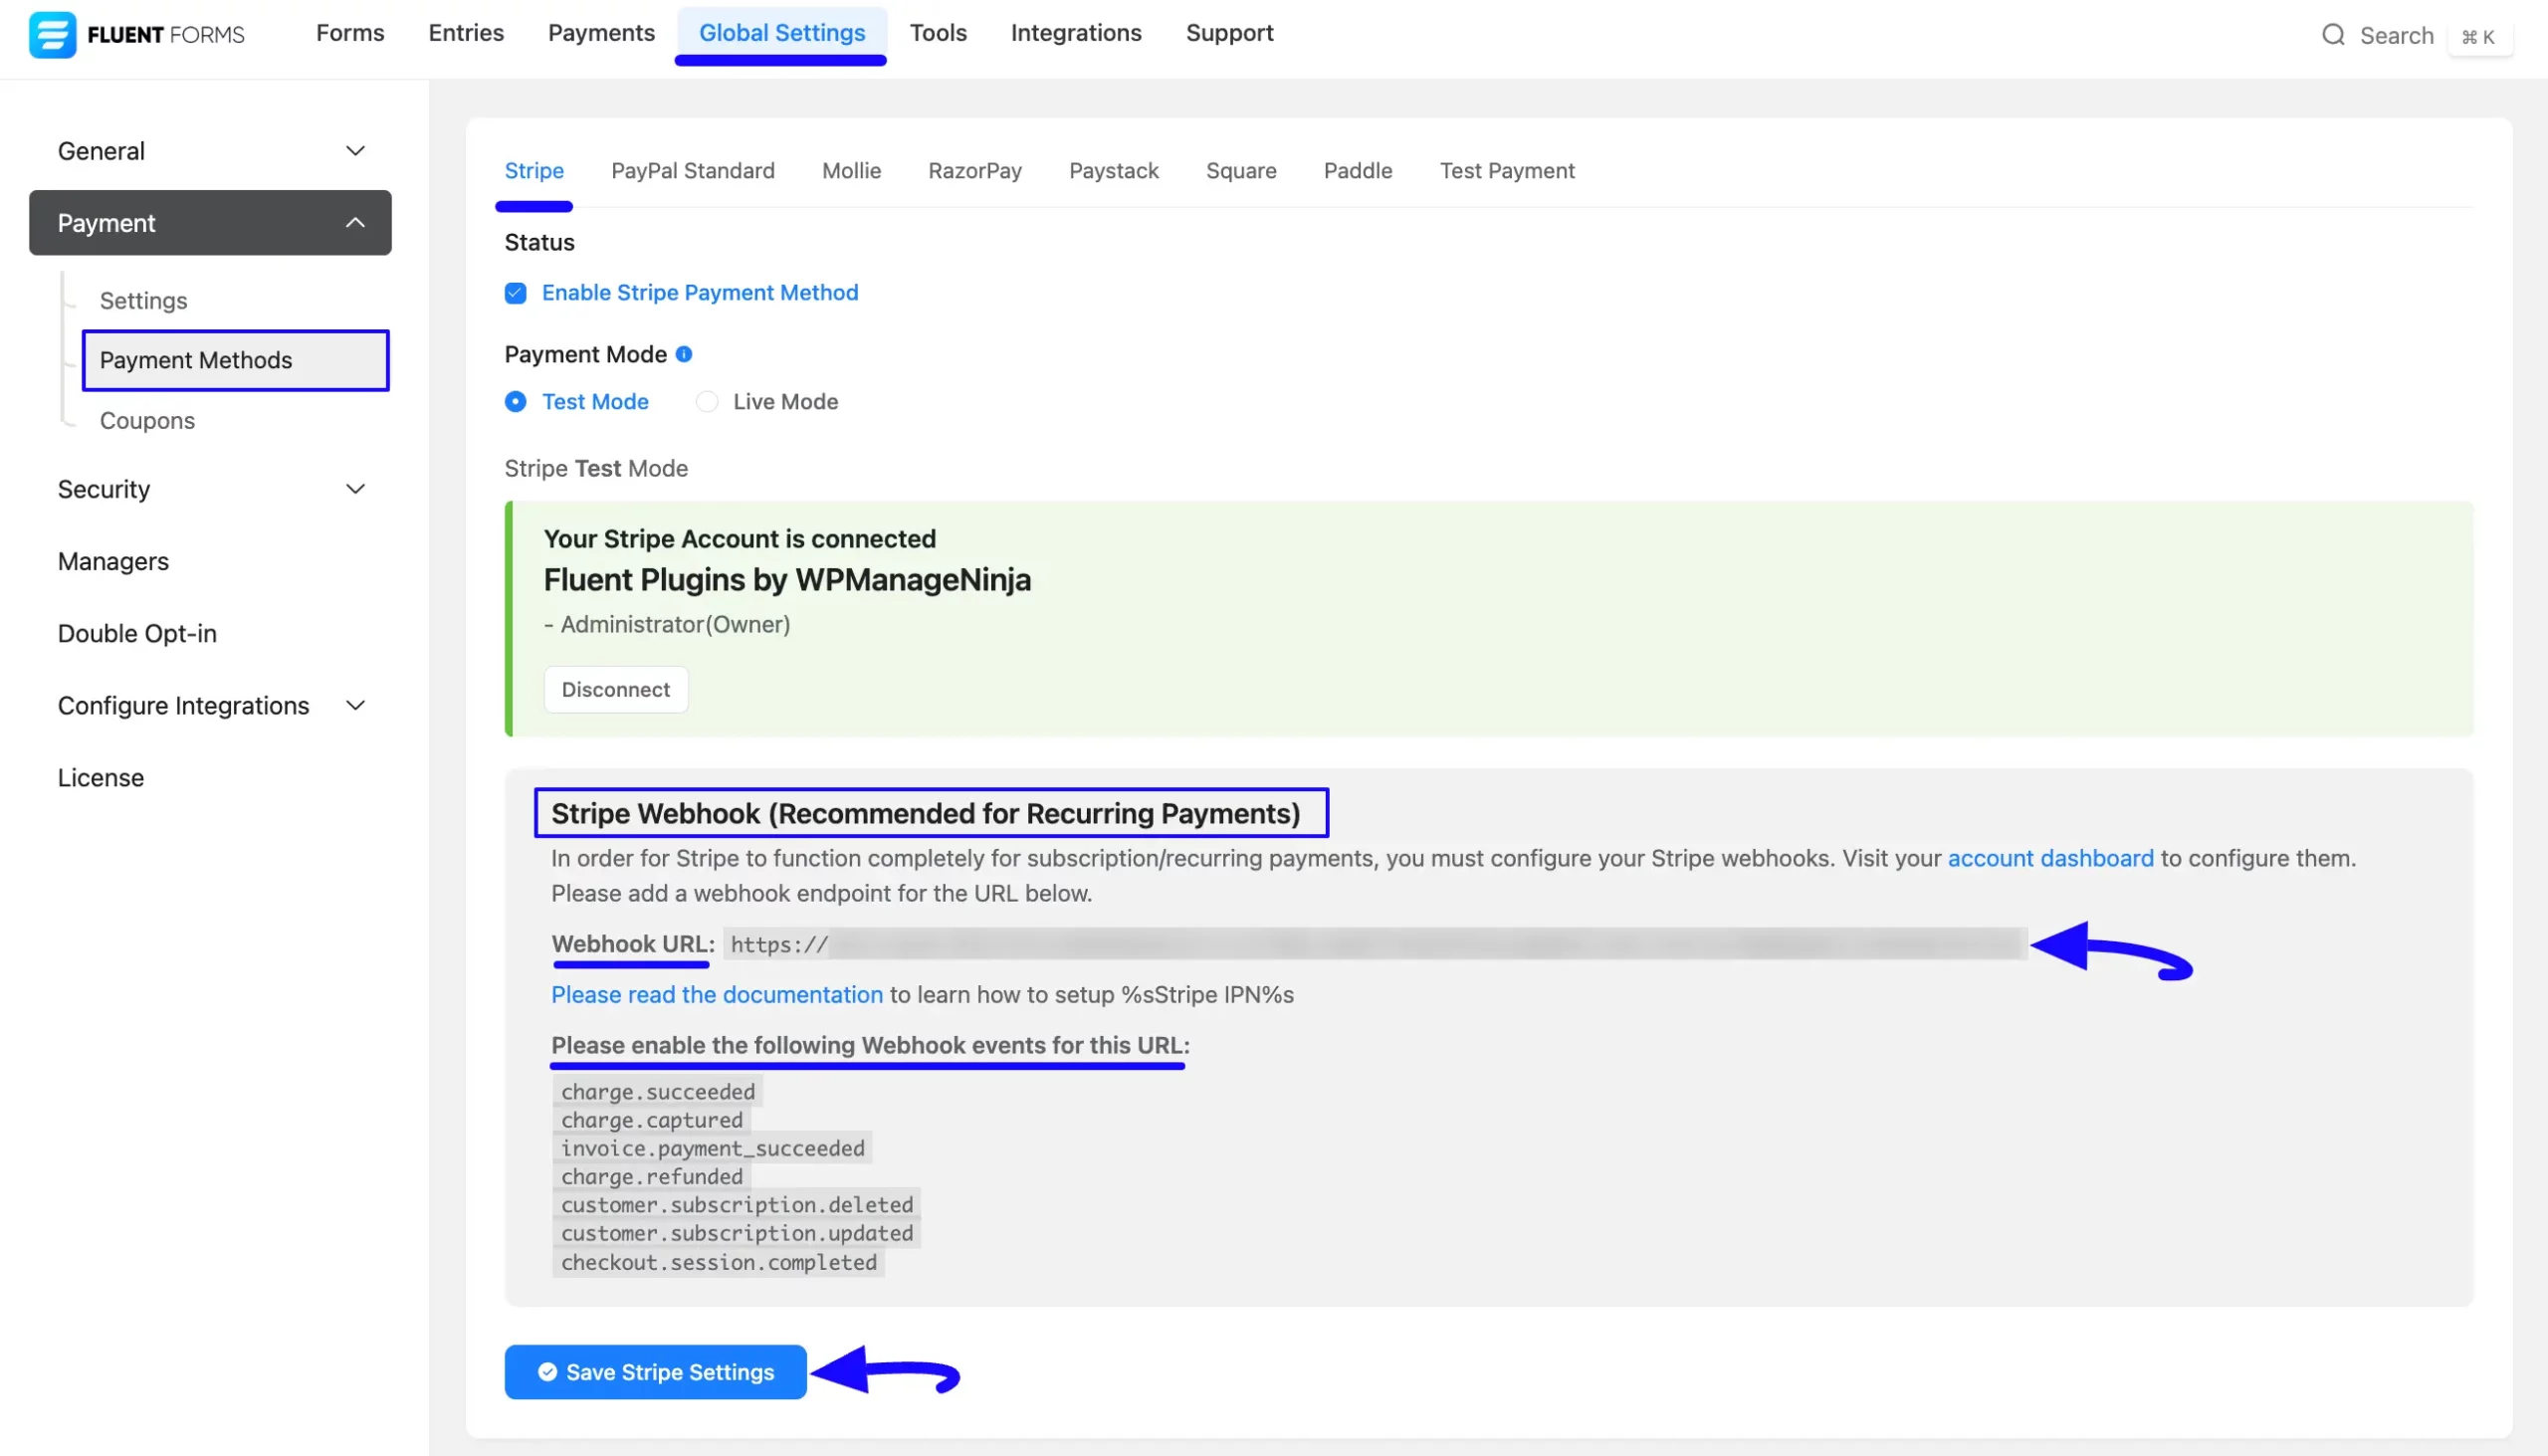
First, go to Global Settings from the Fluent Forms Navbar, open the Payment tab from the left sidebar, and click the Payment Methods option.

Now, go to Stripe, and scroll down to the Stripe Webhook (Recommended for Recurring Payments) option. 

Then, copy the Webhook URL and the recommended Webhook Events for smooth transactions based on Stripe Data related to Subscription/Recurring payments. 

Do not forget to press the Save Stripe Settings button to save all your changes. 
4. Add stripe webhook URL scaled 48155

Now, visit your Stripe Account Dashboard, click the Developers from the bottom-left corner, and press the Webhooks.

5. Developers Webhooks scaled 48155

Click the + Add destination button.

6. Add Destination button scaled 48155

Now, choose the events recommended by the Fluent Forms for Stripe to send to your endpoint. 

You can find your desired events by entering their Name or Description into the Events fields and can select events by clicking the checkbox.

The Events recommended by Fluent Forms are briefly explained below:

  • charge.succeeded: This triggers when a charge is successfully processed. Basically, this event occurs when a payment is completed on Stripe.
  • charge.captured: This triggers when a previously authorized charge is successfully captured. You must use this for Hold payments.
  • invoice.payment_succeeded: This triggers when a payment for an invoice is successful. This is often used for Subscription payments.
  • charge.refunded: This triggers when a charge is refunded. This event helps track refund activity that happened on Stripe.
  • customer.subscription.deleted: This triggers when a customer’s subscription is canceled or ends. This could be due to customer action, automatic cancellation, or a failed payment after retries.
  • customer.subscription.updated: This triggers when a customer’s subscription is changed or updated.
  • Checkout.session.completed: This triggers when a checkout session is completed. This event confirms that the customer successfully paid for the session.

Once you select all the suggested Webhook Events, click the Continue button.
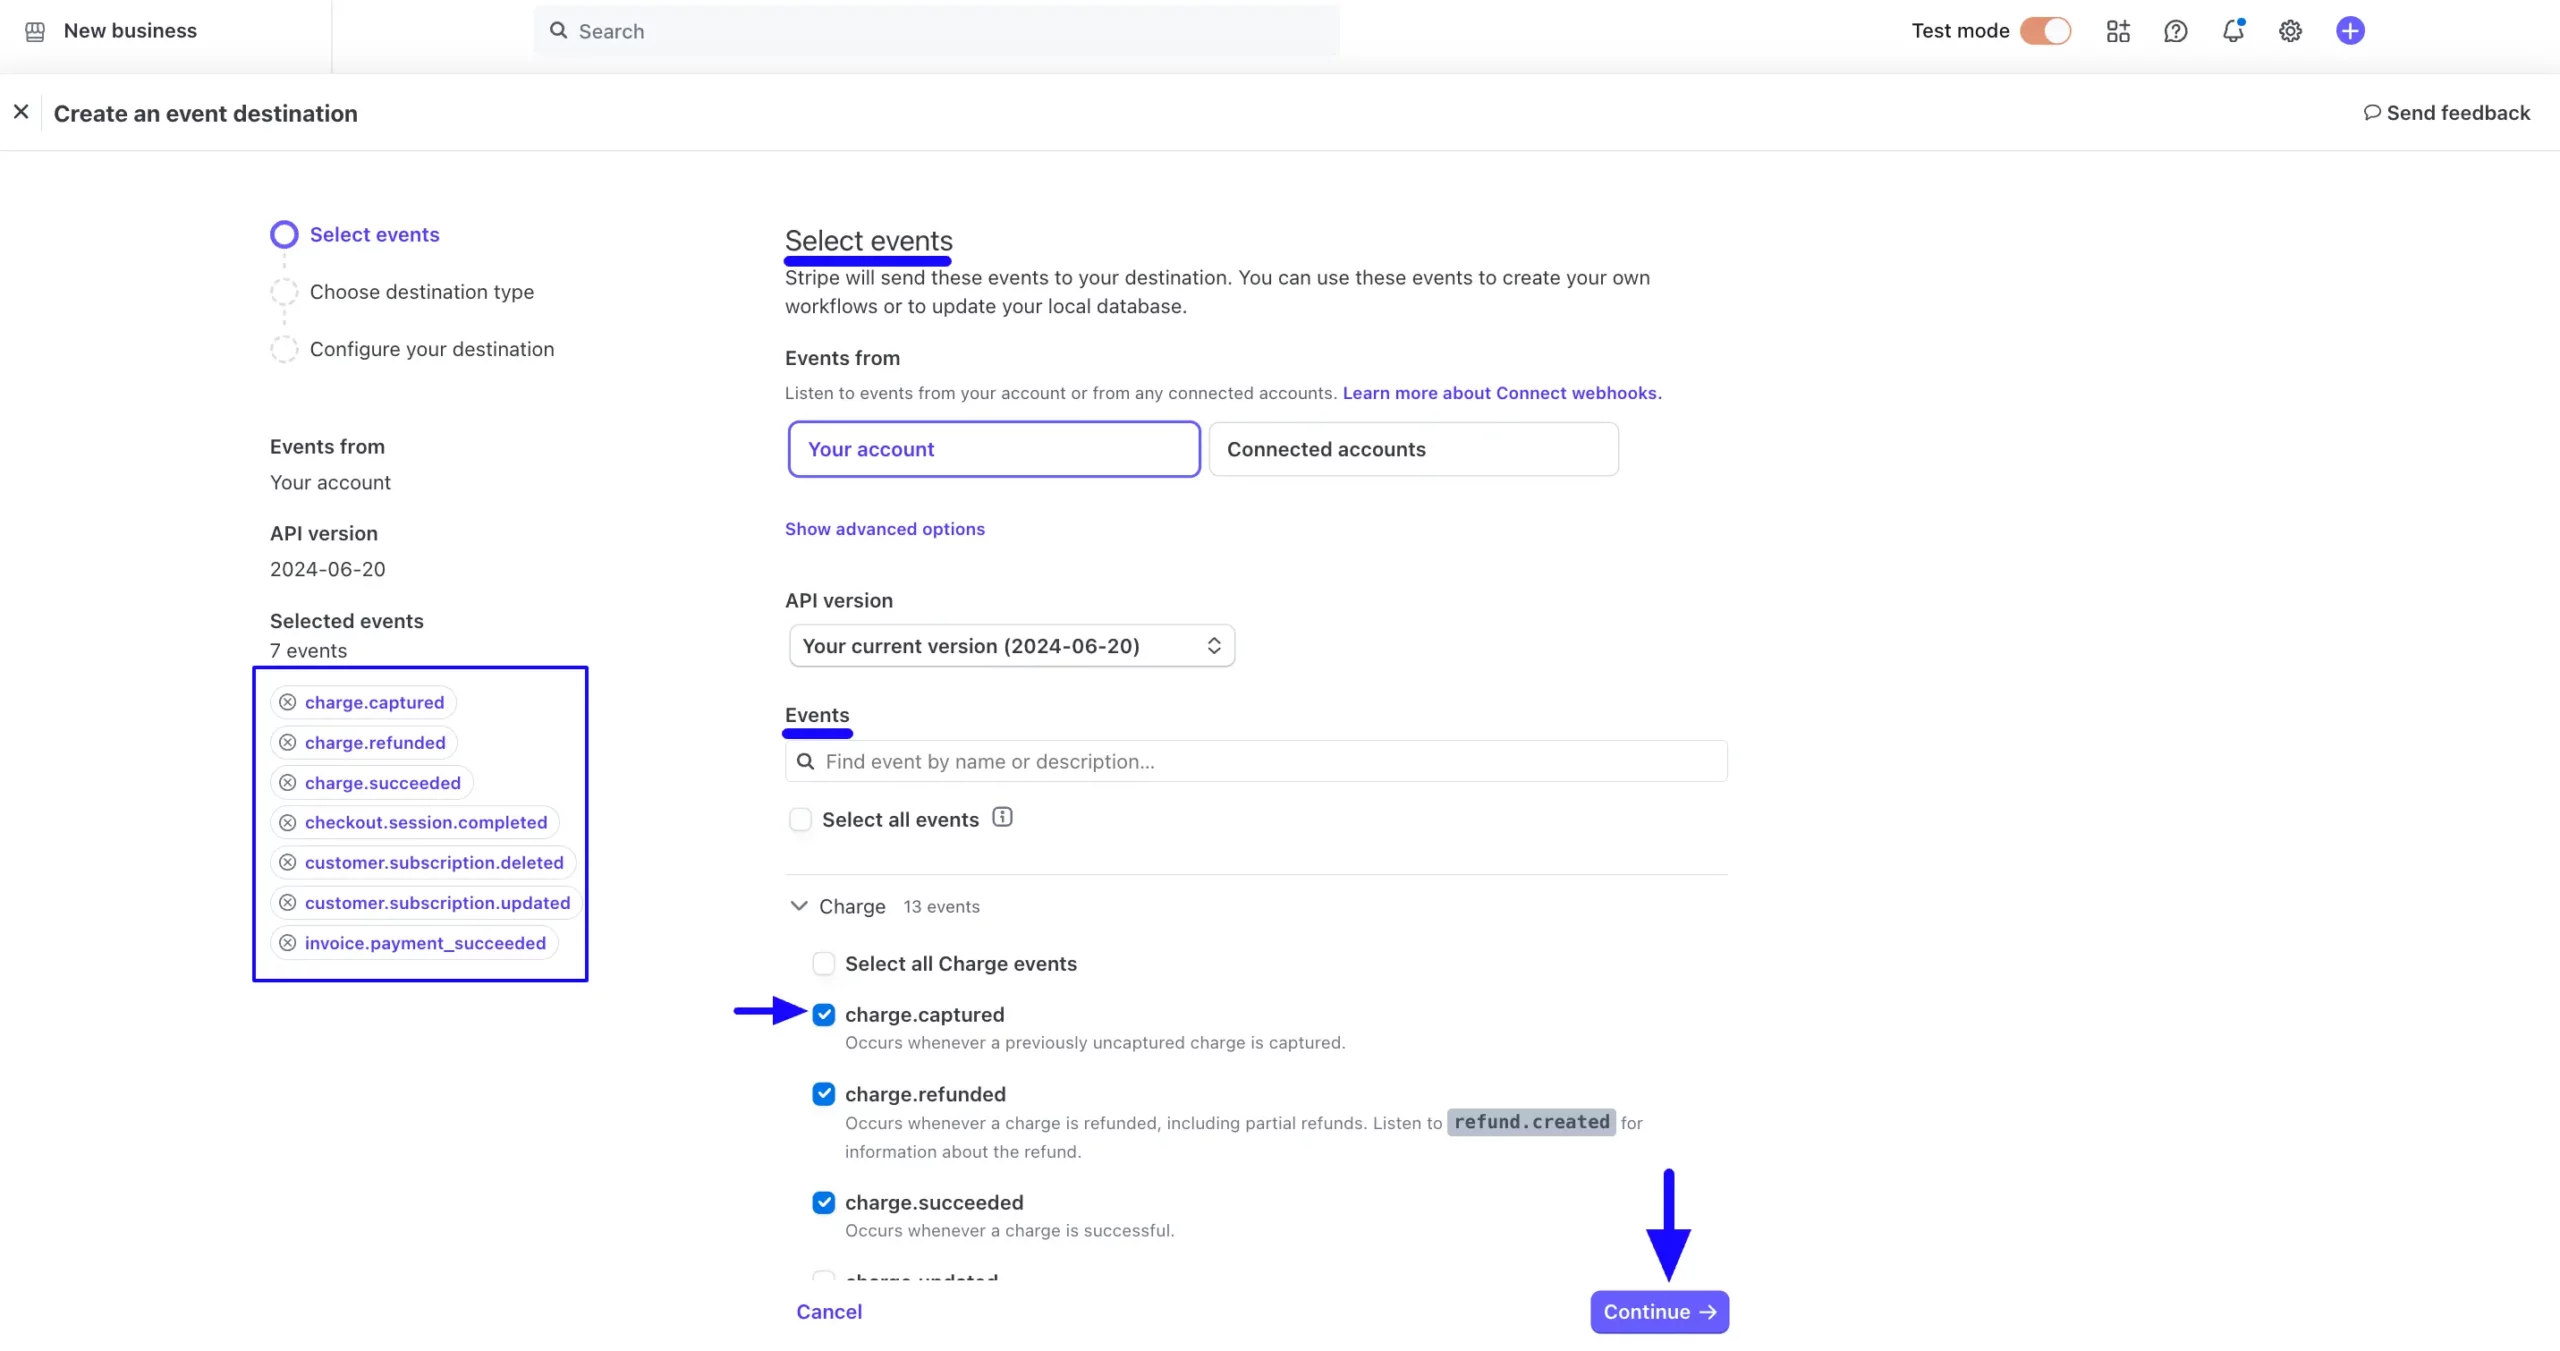
7. Select Events scaled 48155

Then, select the Webhook endpoint and again click the Continue button.
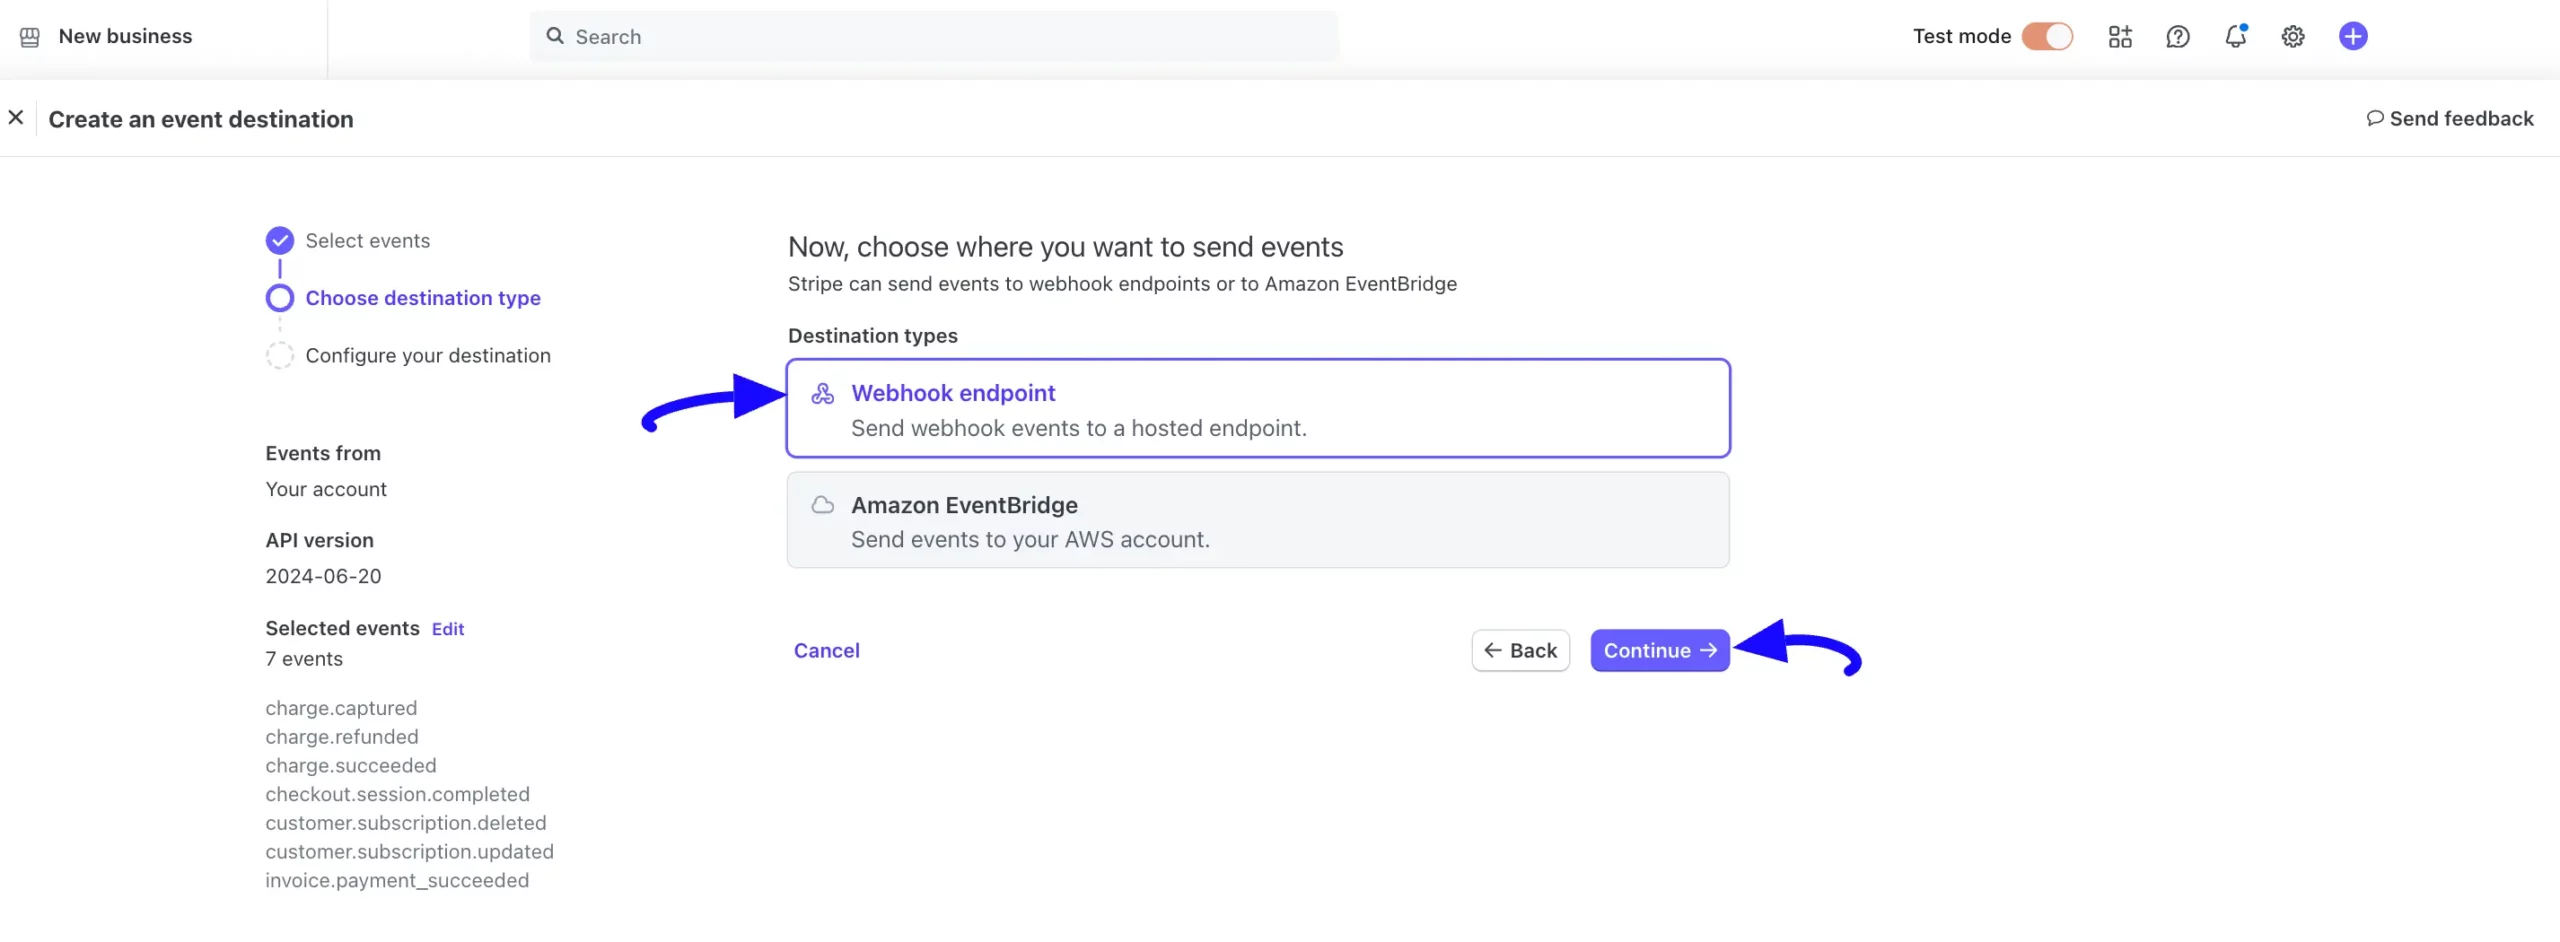
8. Webhook endpoint scaled 48155

Finally, paste the Webhook URL you copied from the Stripe Settings page into the Endpoint URL field and click the Create destination button. 

And, the Stripe Webhooks will be configured with your WordPress Site!
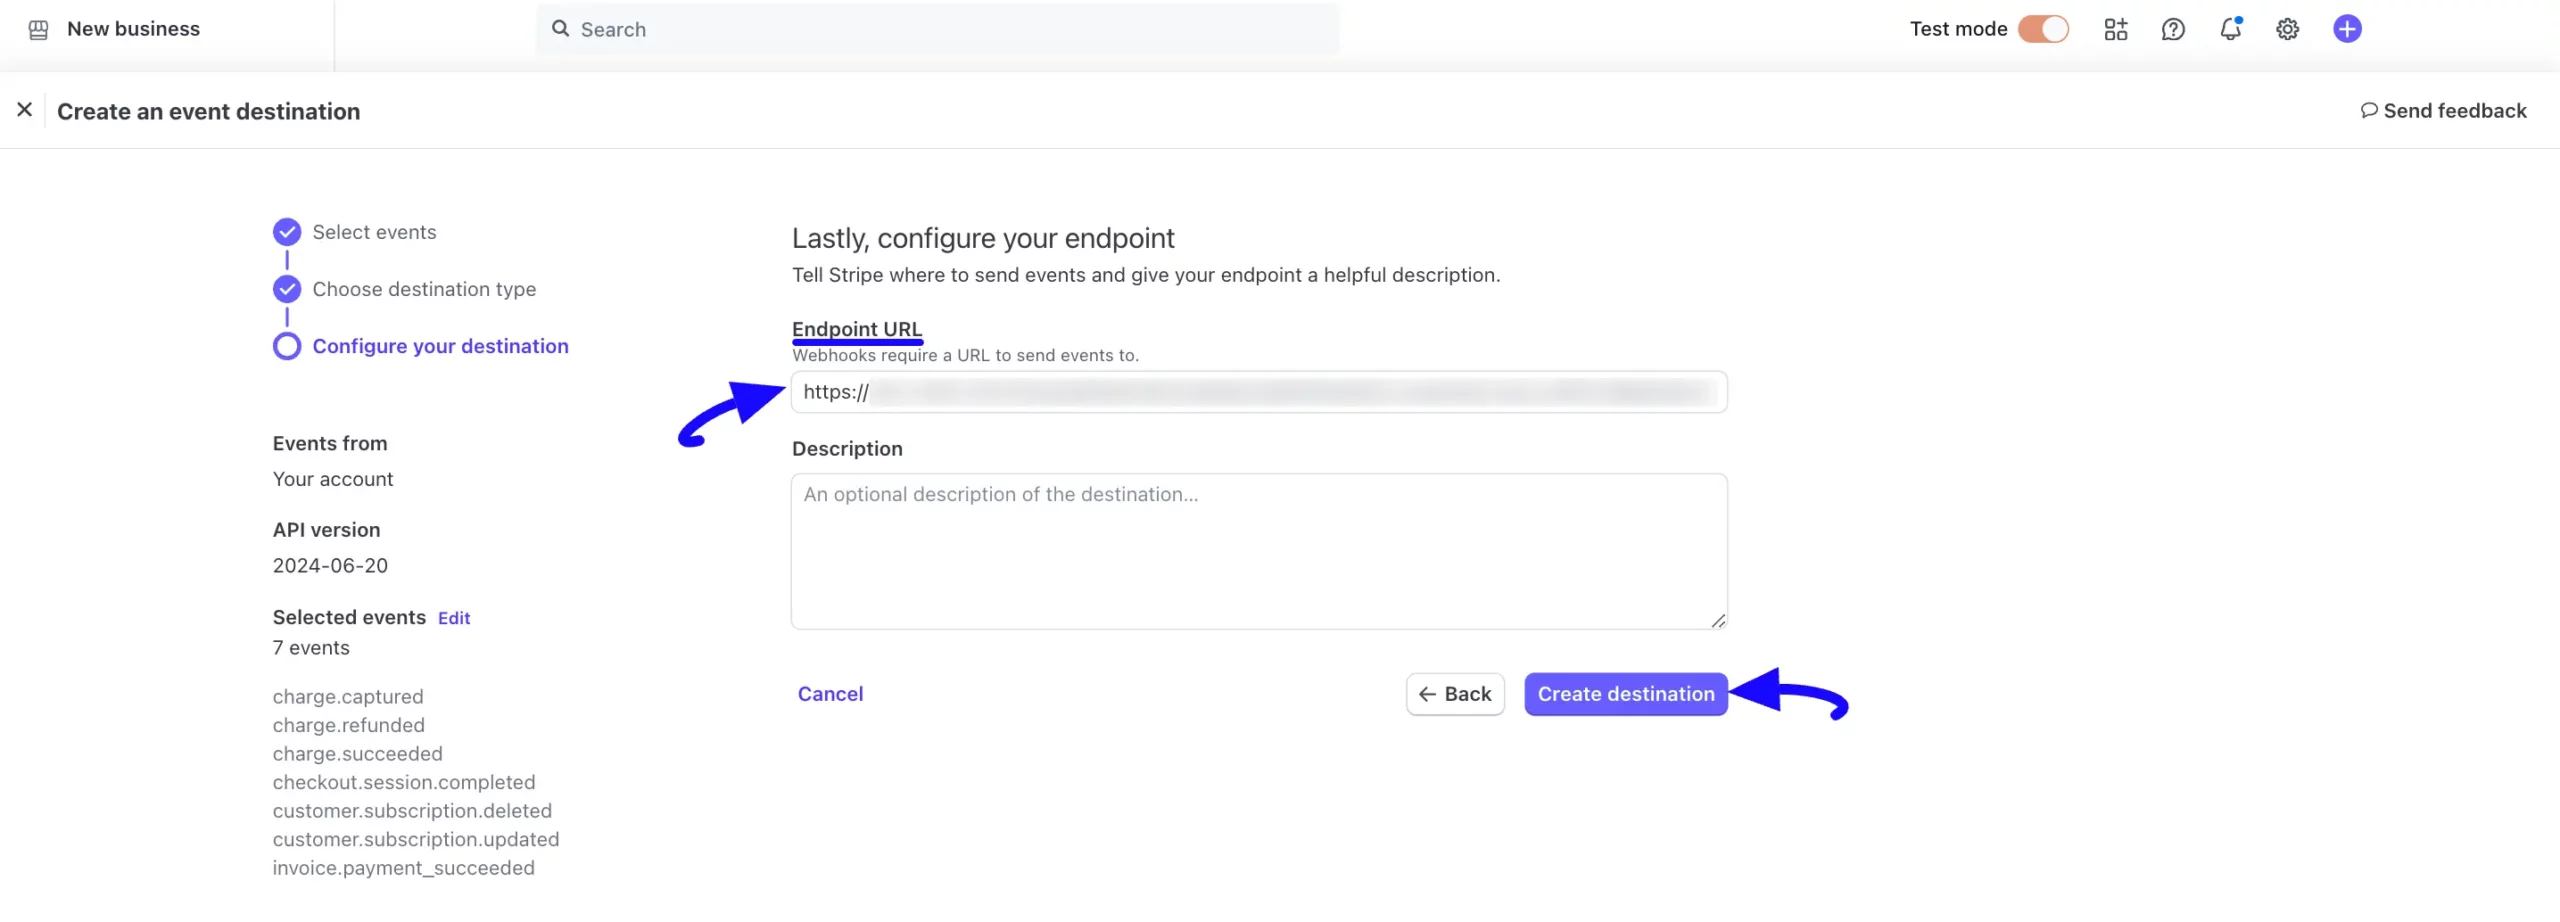
9. Create Destination button scaled 48155

Integrating Stripe in Forms #

Once you finish setting up your Stripe payment method, you can easily add this payment method to any of your existing Payment Forms (i.e., a form where Payment Item and Payment Method fields are added).

If you do not have any existing Payment Forms, read this Documentation to learn how to create one.

First, go to the Editor page of your desired form by clicking its Edit option.
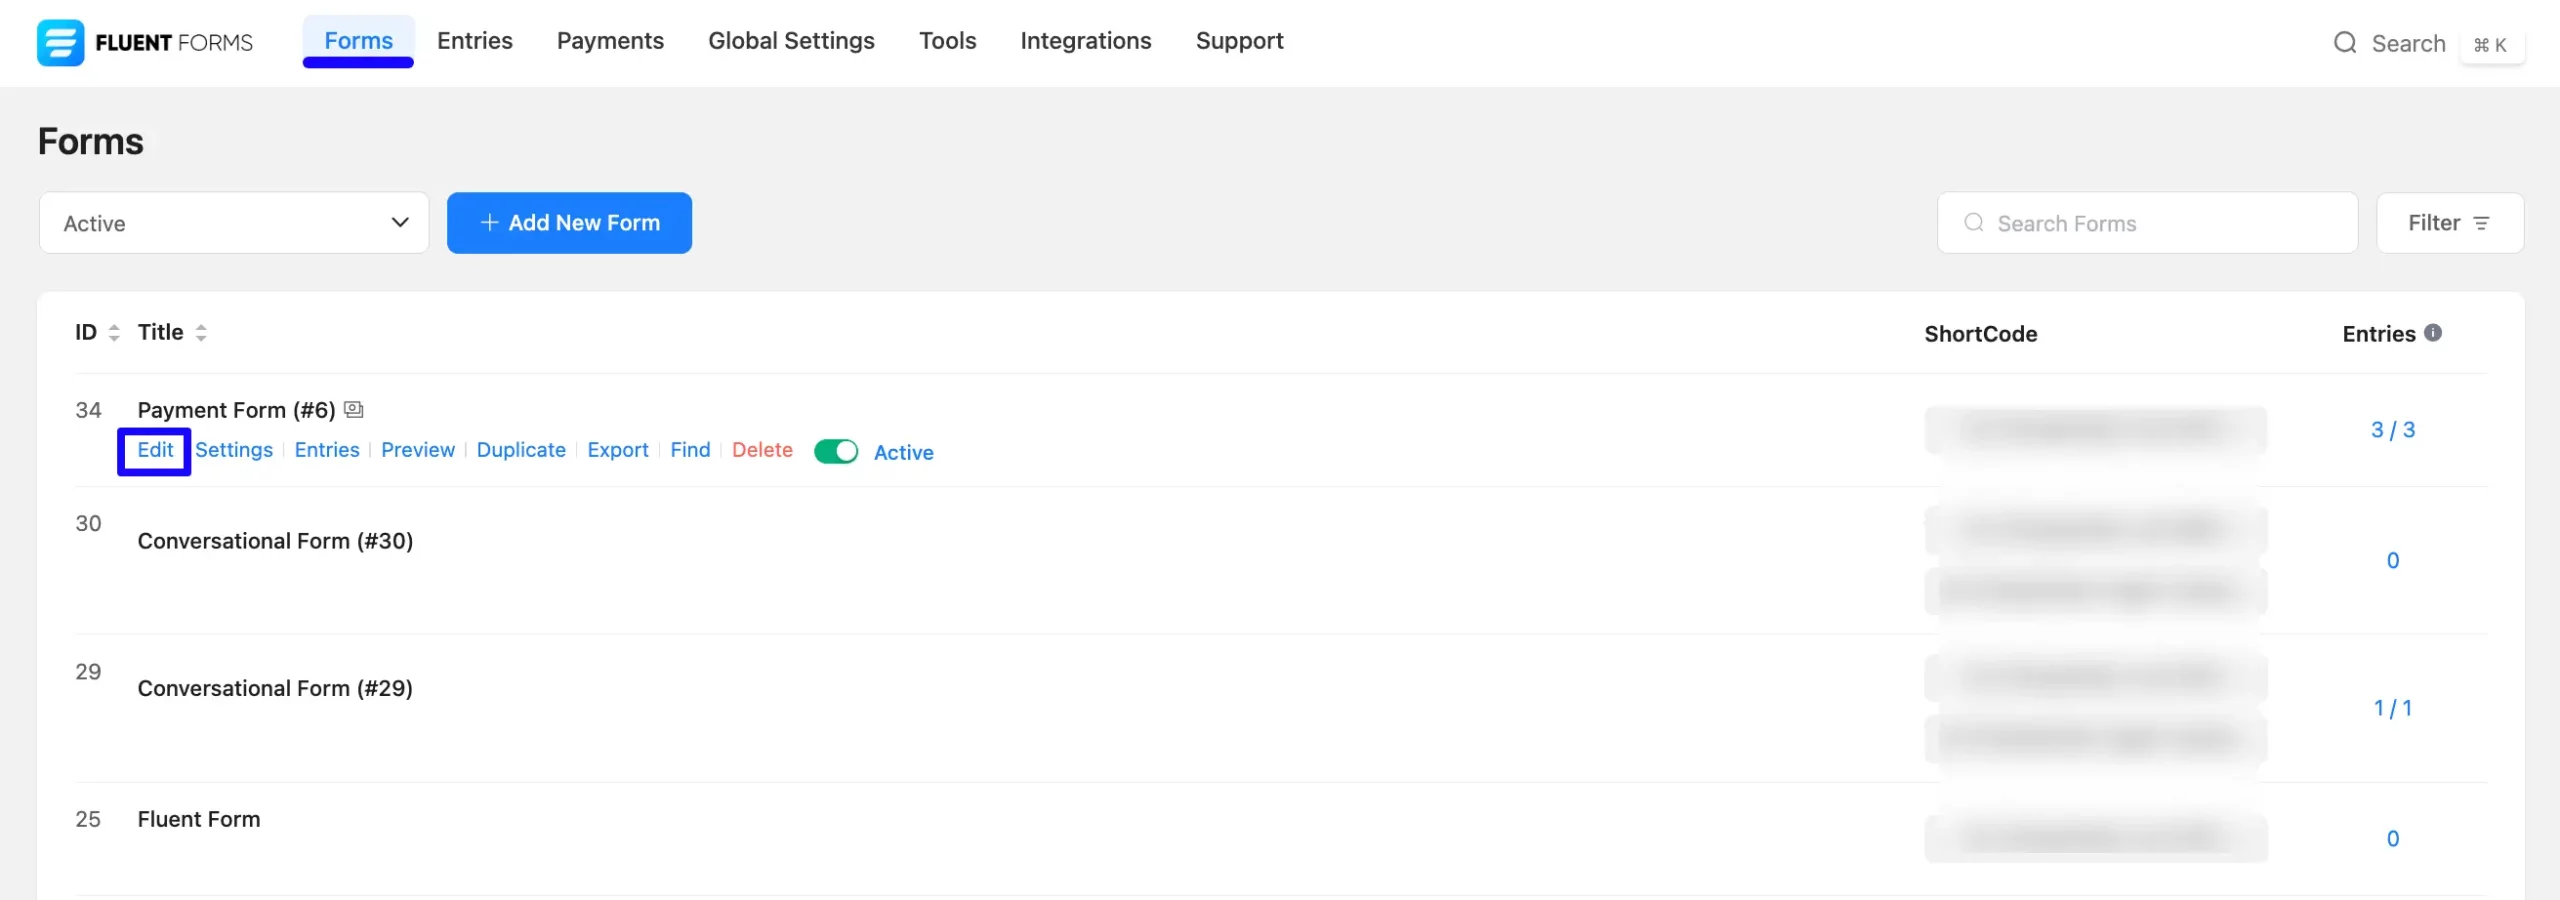
Open desired form scaled 48155

Once you are on the Editor page, go to the Input Customization menu on the right side of the added Payment Method field by hovering over it and clicking the Pencil Icon.

Now, go to the Payment Methods, check the Stripe option, click the Dropdown Arrow, and you will get three options. These are:

  • Method Label: Here, you can change the label based on your preference for your added payment method.
  • Embedded Checkout: Check this box to activate Stripe as an inline payment option.
  • Verify Zip/Postal Code: Check this box if you want to make providing the Zip/Postal Code information mandatory for your users to submit the forms. 

To learn more details about the Payment Method field, read this Documentation.
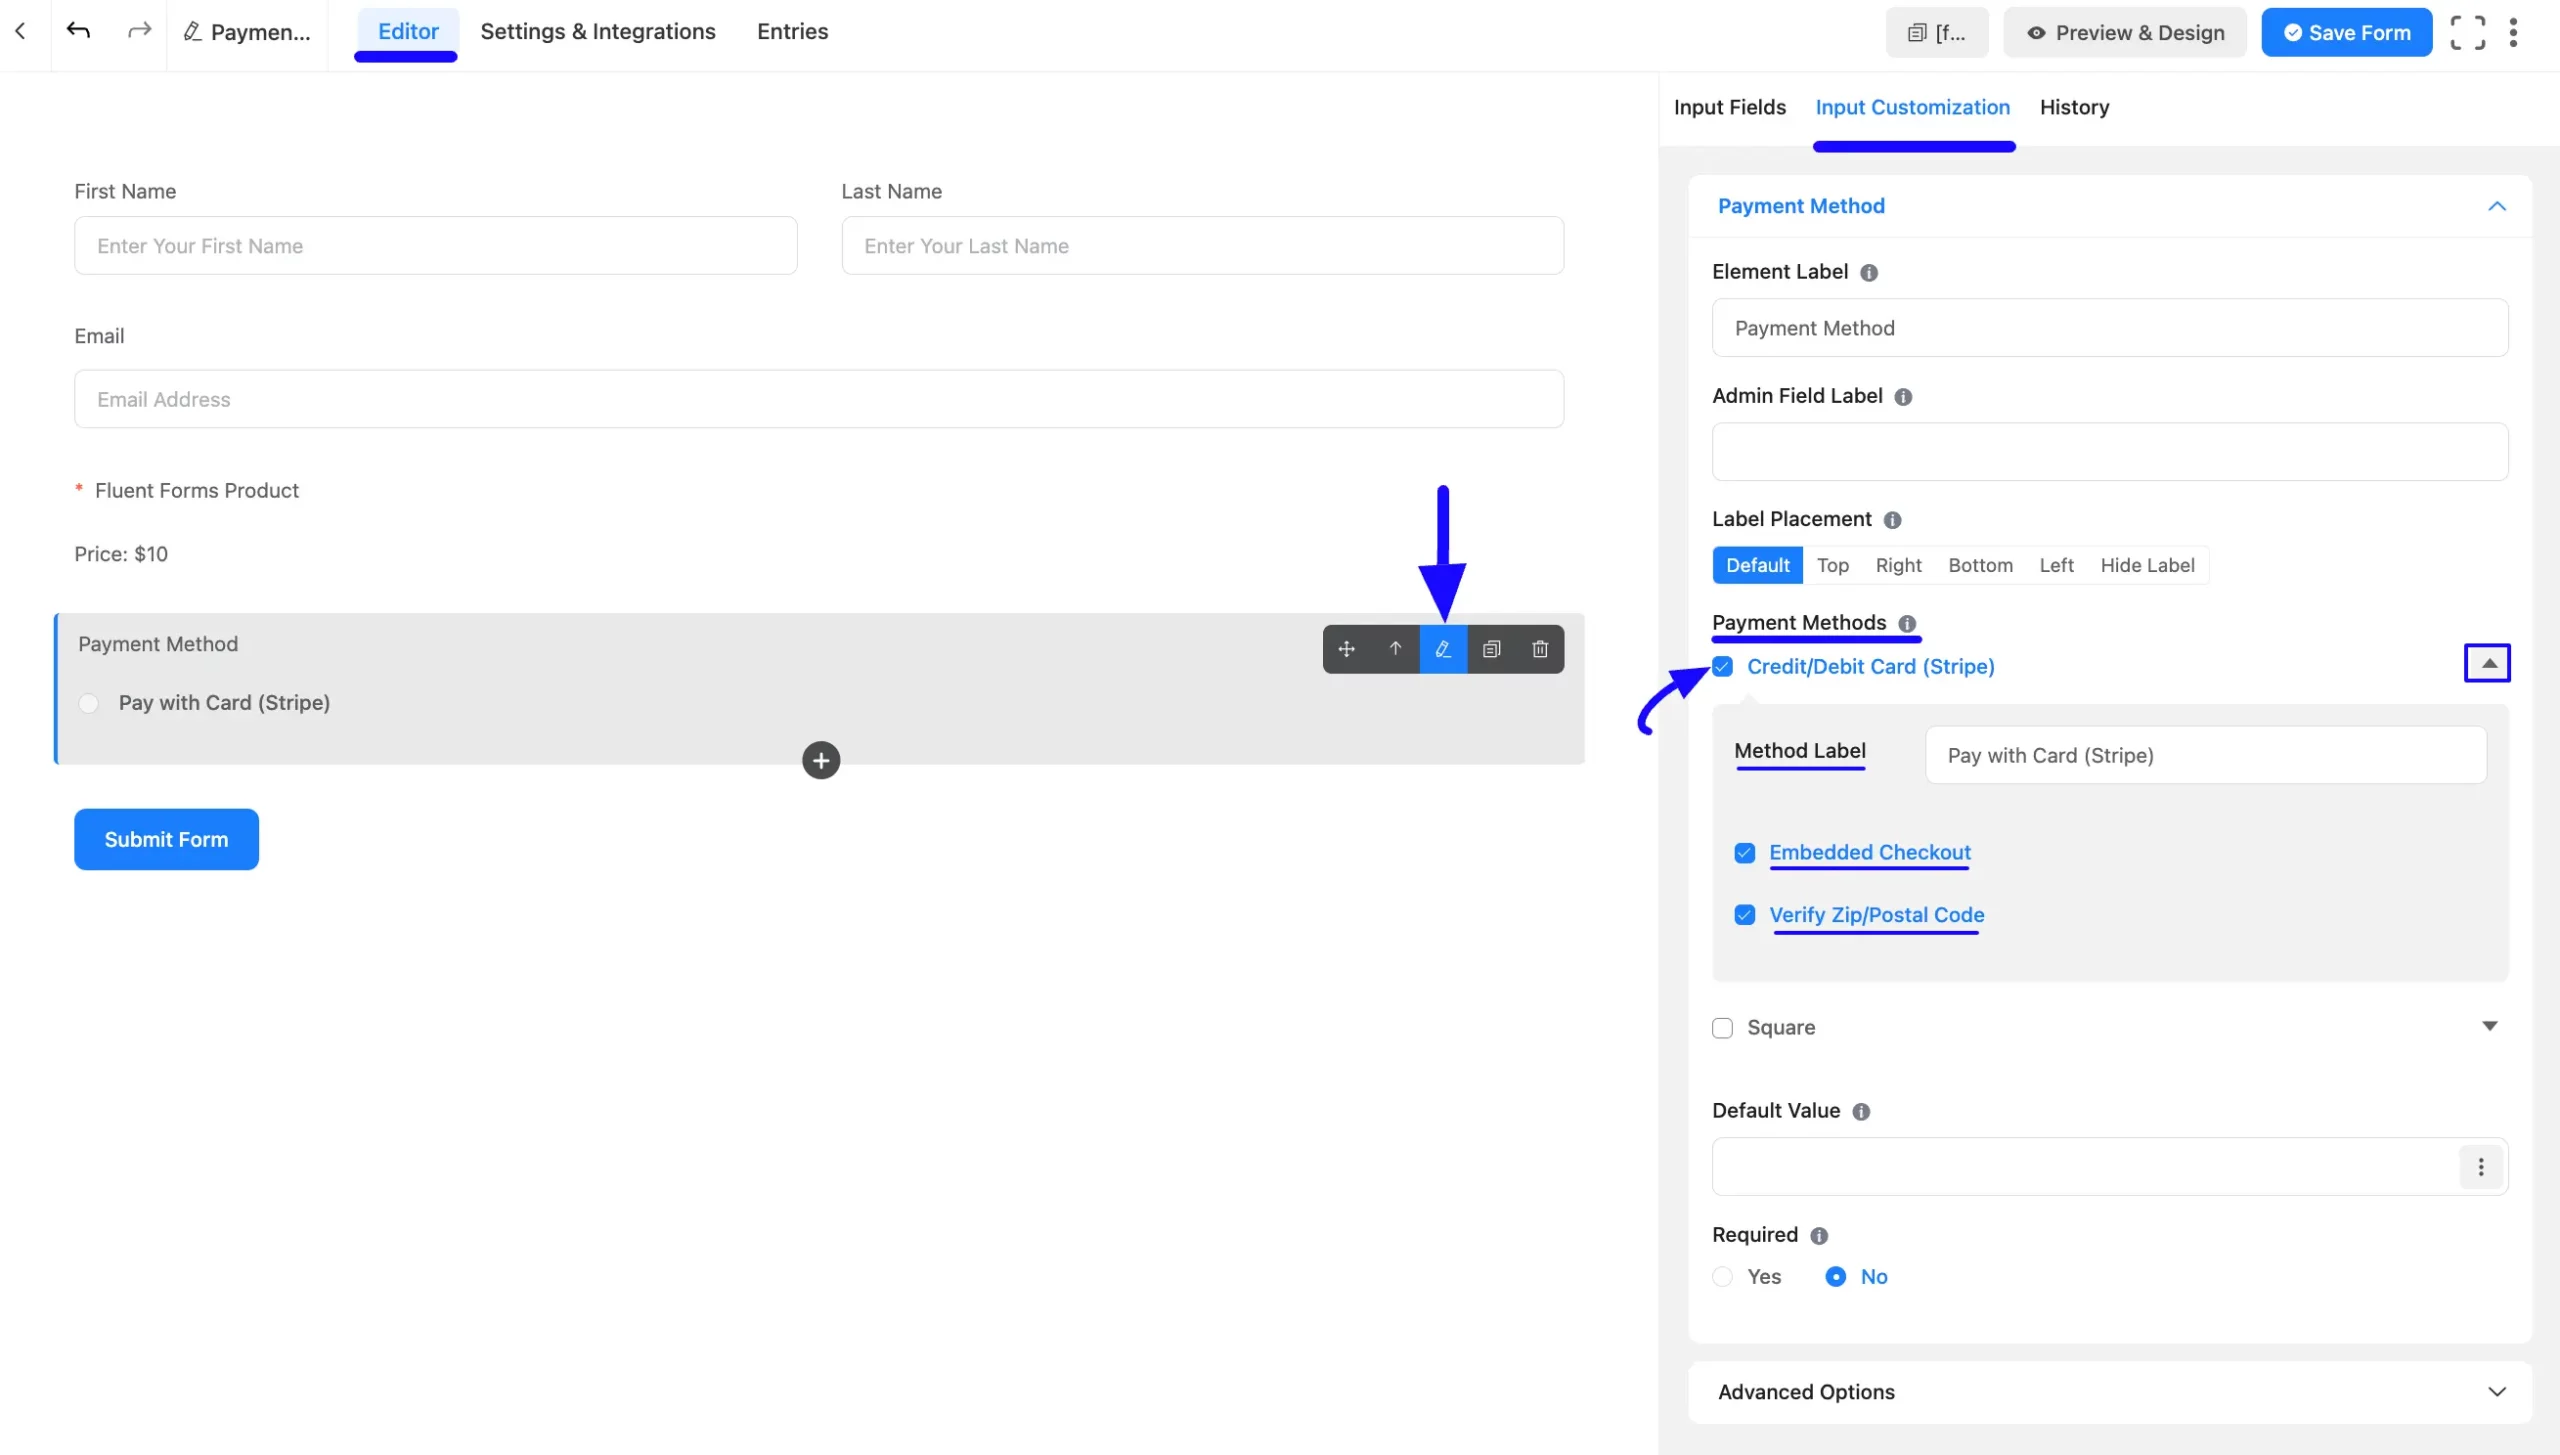
10. Embed checkout scaled 48155

Once you complete the edit, press the Save Form button to save all the changes.

Now, to embed and display the form on a specific Page/Post, copy this Shortcode from the top right side and paste it into your desired Page/Post. 

Also, to see the Preview of the form, click the Preview & Design button in the middle.
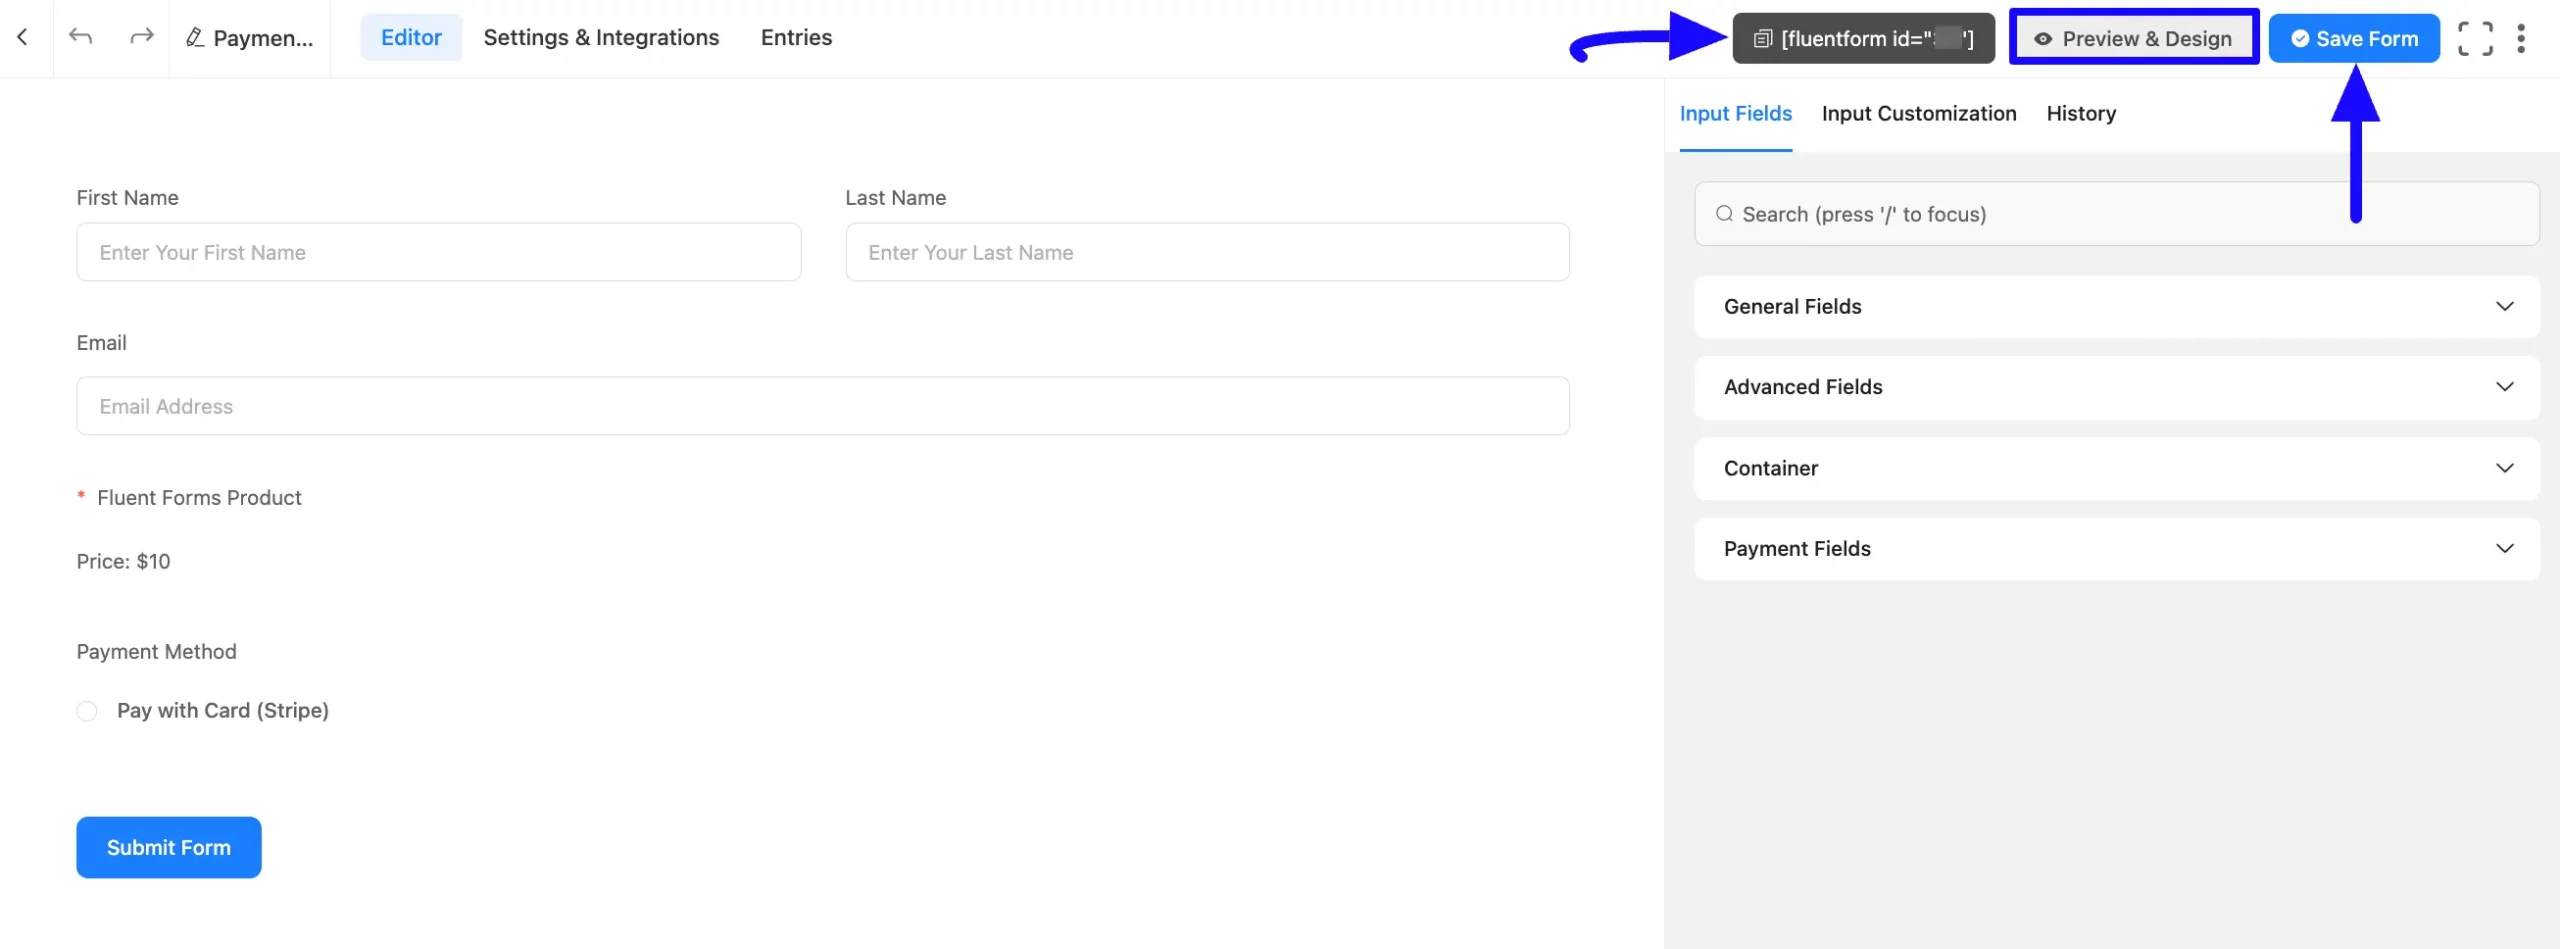
11. Save form scaled 48155

Preview of Added Payment Method #

Here is the preview of the Payment Method that we just added. 
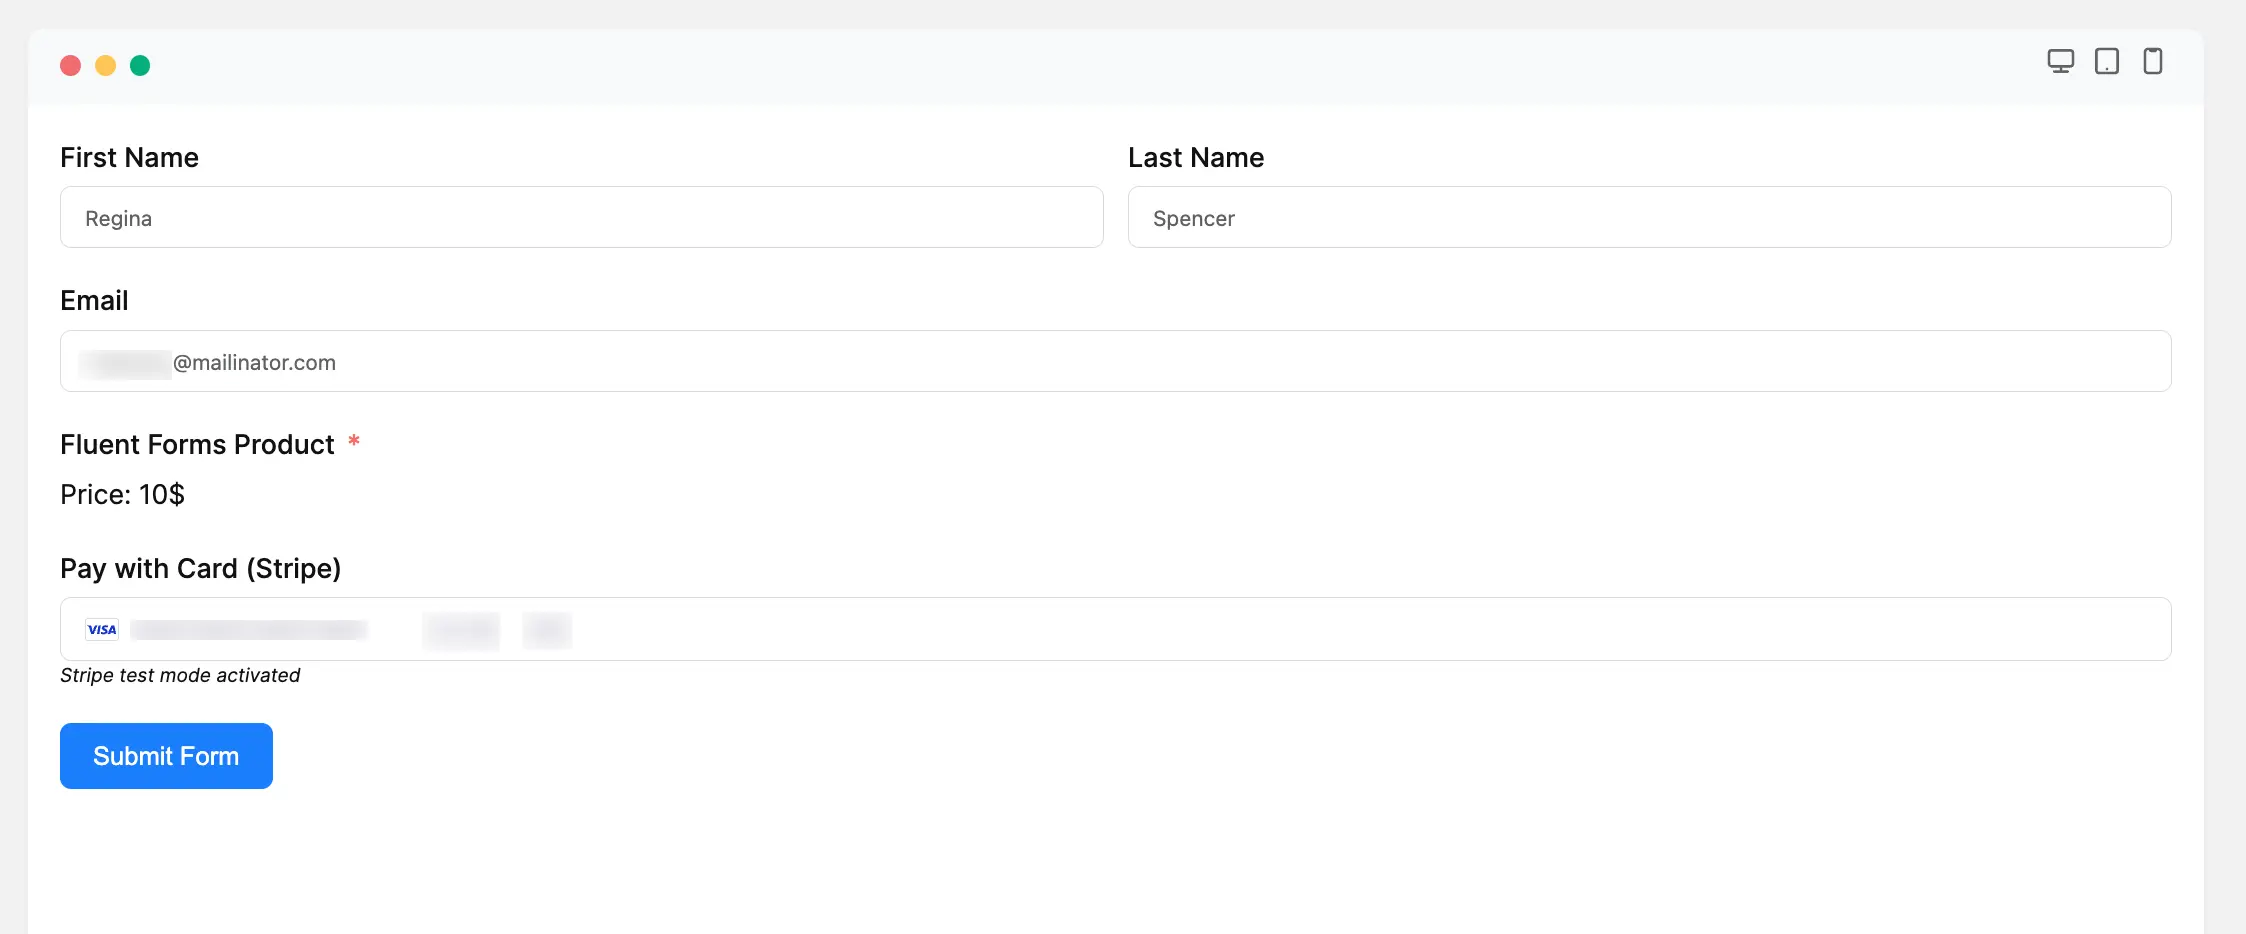
12. Form Preview 48155

Form Specific Stripe Settings #

You can also customize the Stripe Settings for a specific form according to your needs.

To customize the Stripe Settings, go to the Forms from the Fluent Forms Navbar, and click the Settings option of a desired Form. 

Open Form Settings scaled 48155

Once you are on the Settings and Integrations tab, click the Payment Settings option, scroll down to Stripe Settings, and customize it based on your needs.

Do not forget to click the Save Settings button to save all your changes. 
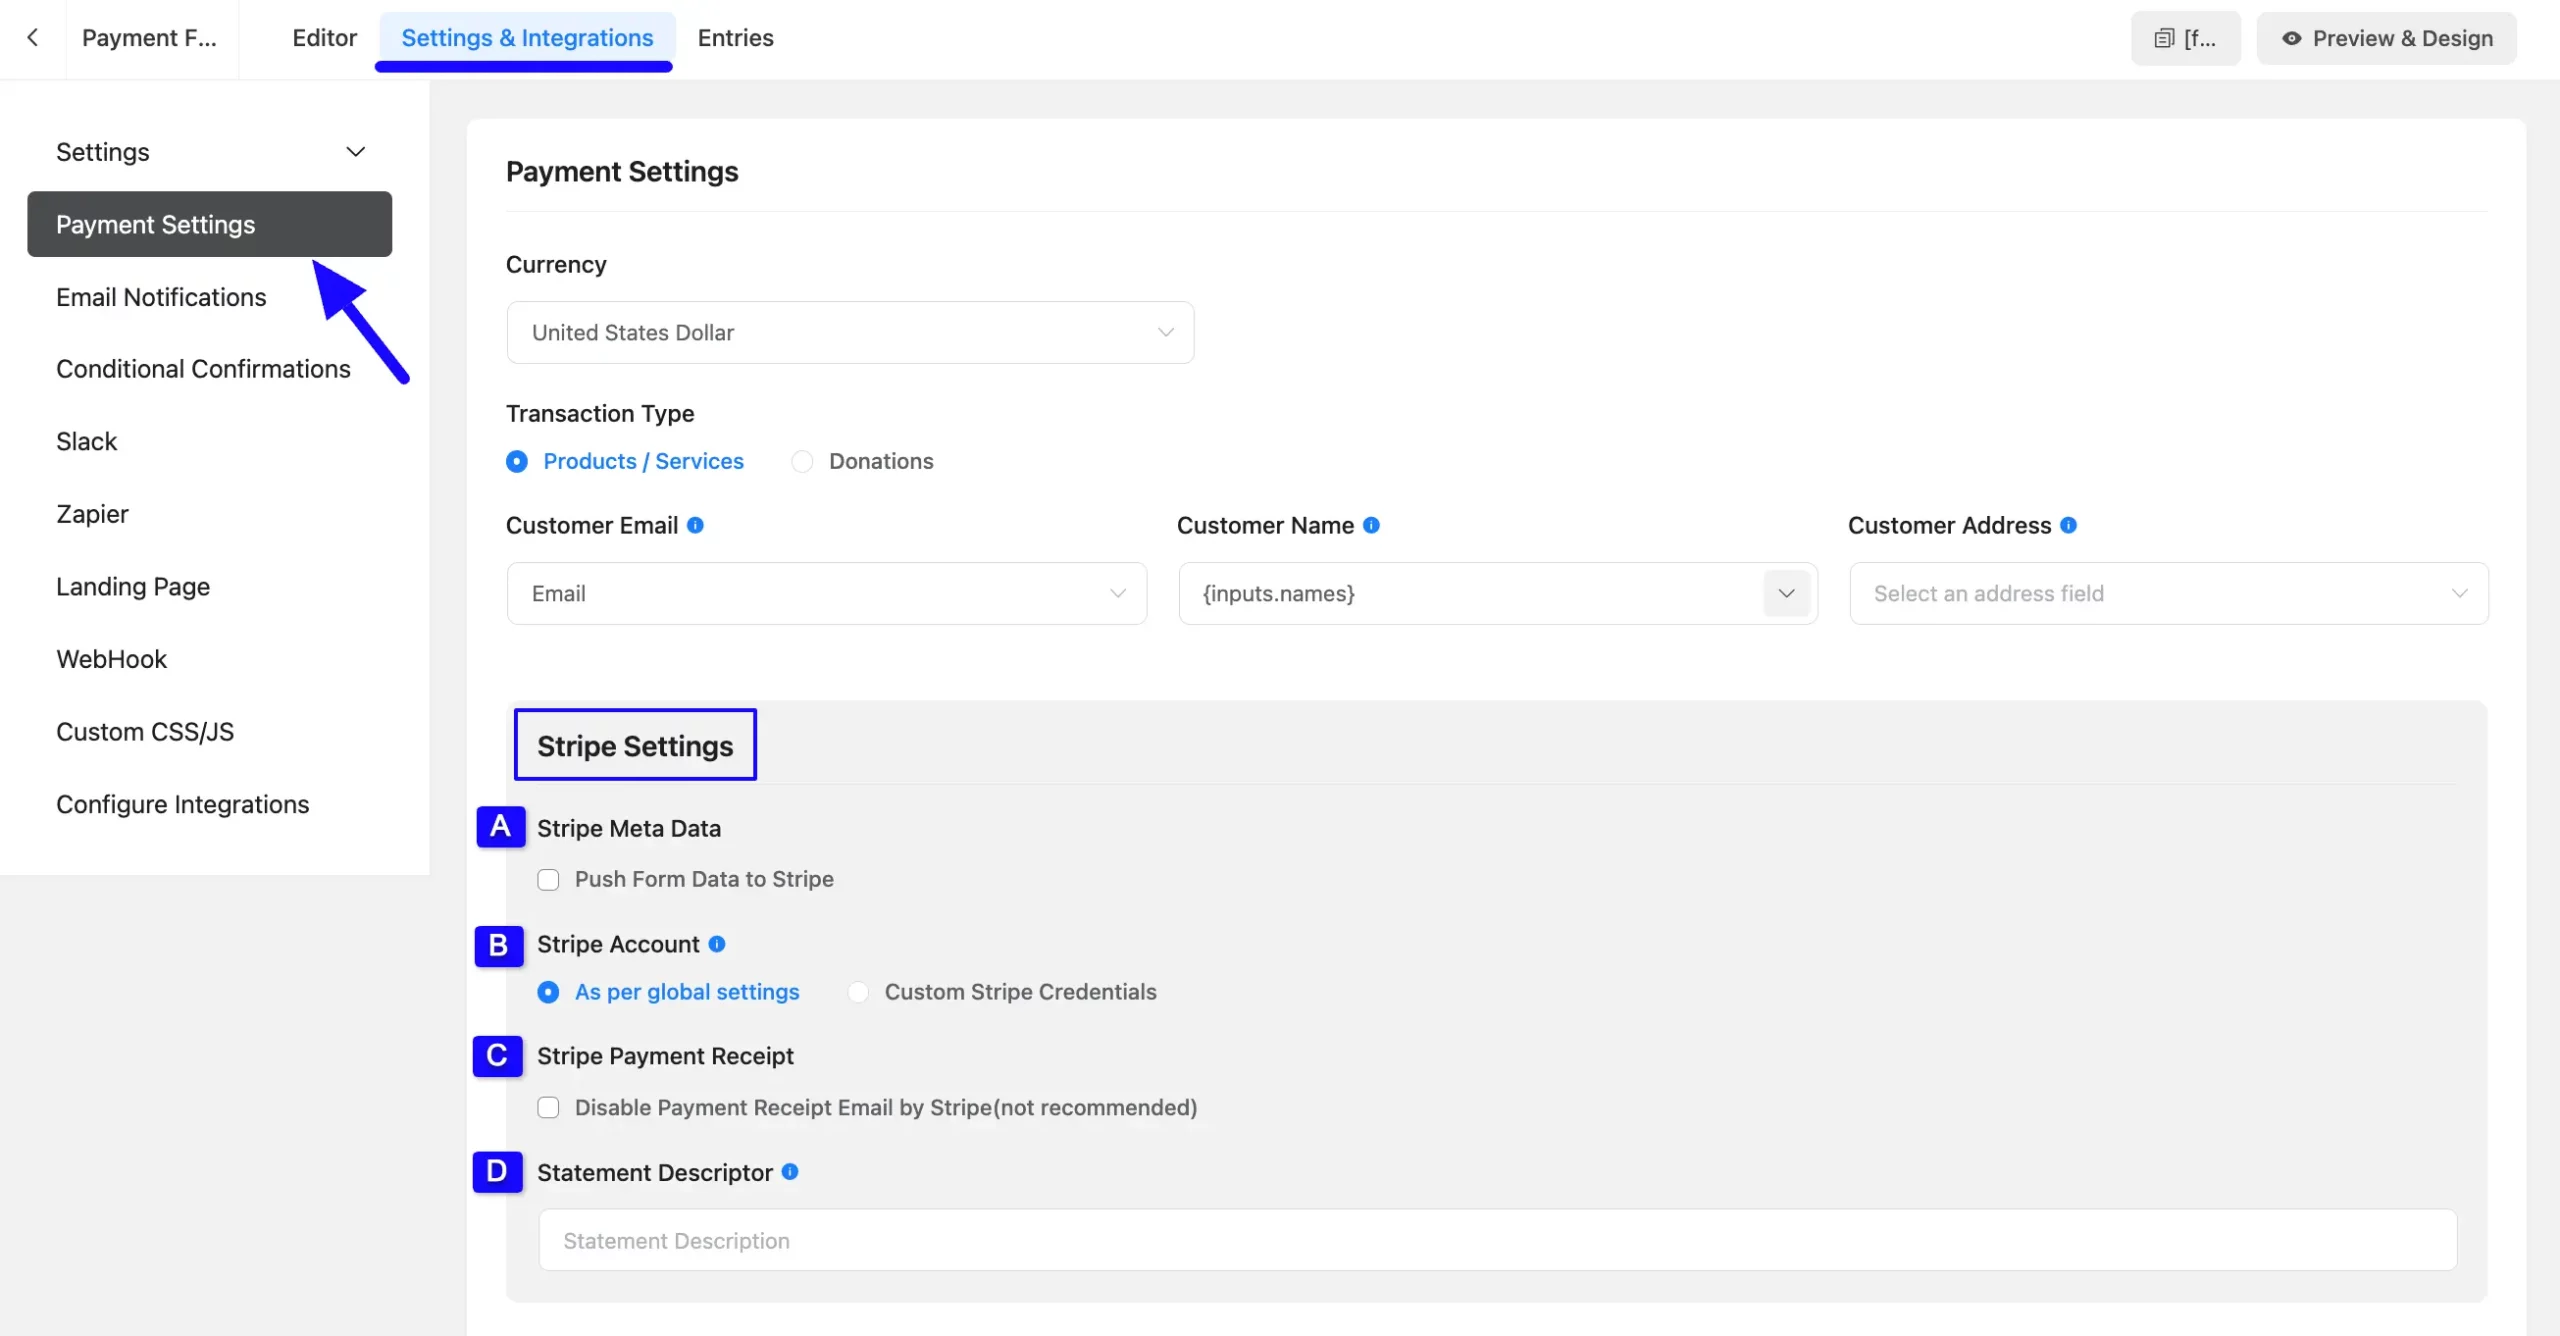
13. Form Specific Stripe Settings scaled 48155

All the Stripe Settings options mentioned above are briefly explained below:

A. Stripe Meta Data #

Check the Push Form Data to Stripe to send the form submission date to your Stripe. 

14. Stripe meta data option 48155

B. Stripe Account #

Here, you can select which stripe account credential (Global or Custom) will be used for this form. Select the Custom Stripe Credentials if you want to set up a different Stripe account for this specific form.
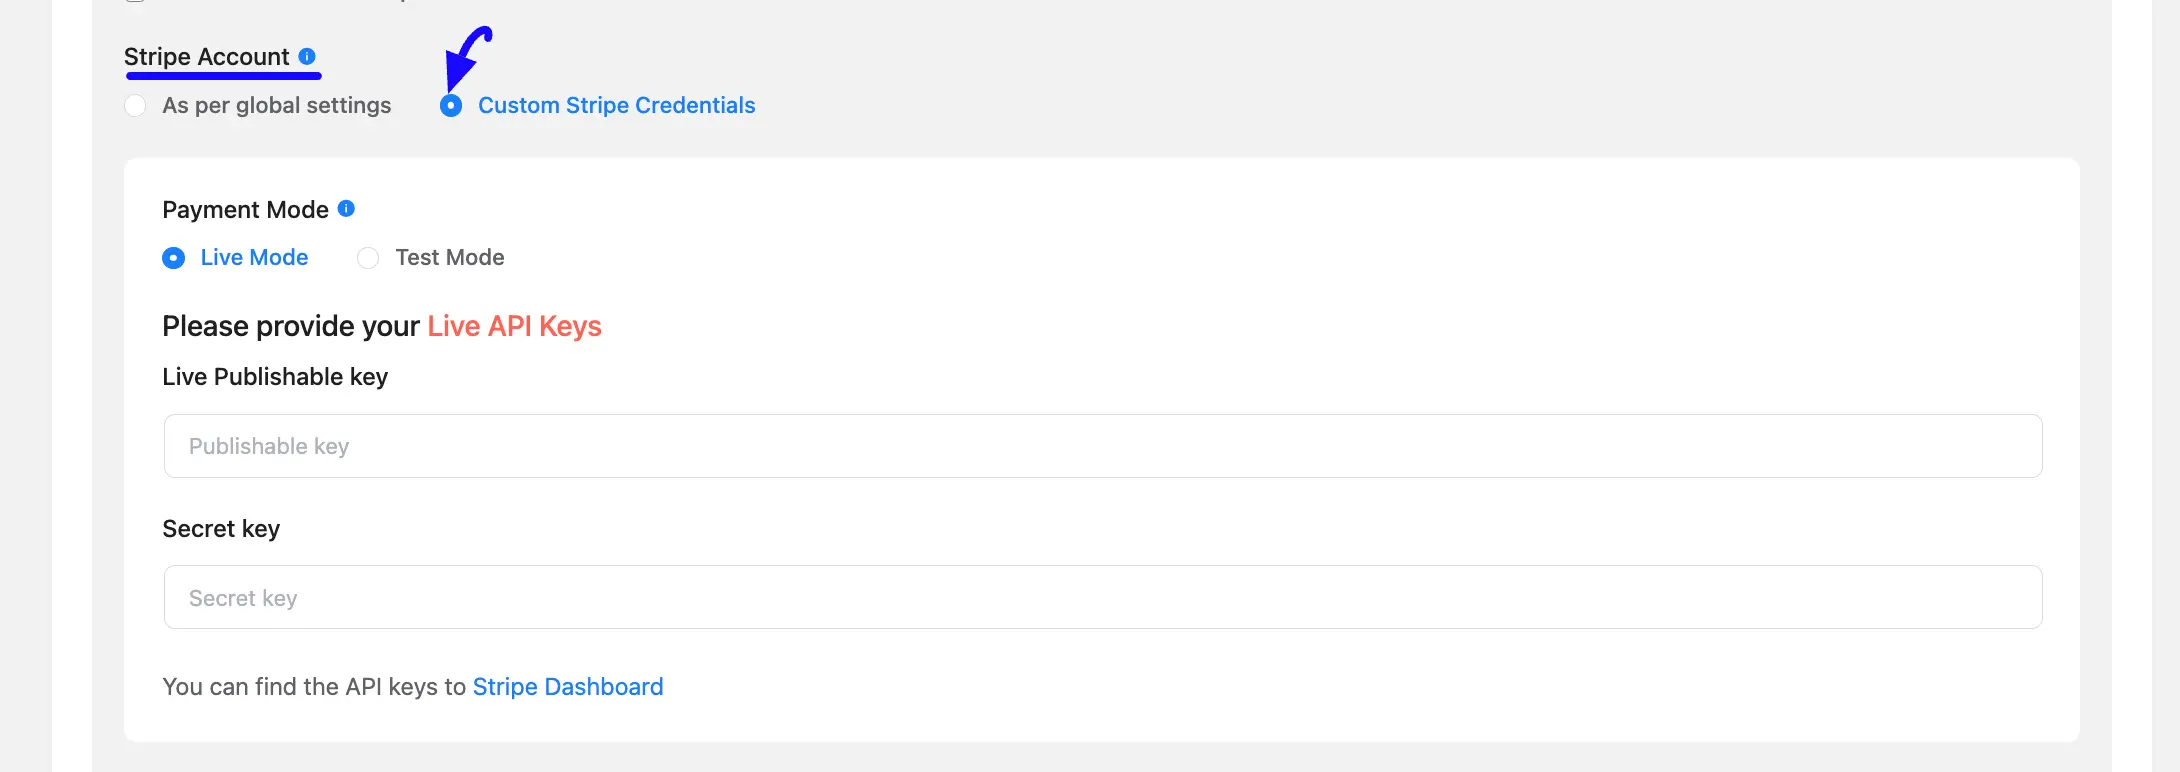
15. Custom Stripe Credentials 48155

C. Stripe Payment Receipt #

Check this option if you want to disable the option of receiving payment receipt email notifications of this form.

But we recommend you do not disable this option if you want to keep track of your payment transactions.

16. Stripe Payment Receipt 48155

D. Stripe Descriptor #

Here, provide the text as per your wish (Contains between 5 and 22 characters) as a statement descriptor. If you keep it empty, your Form Name will be set as a statement descriptor.

17. Statement Descriptor 48155

If you have any further questions, concerns, or suggestions, please do not hesitate to contact our @support team. Thank you.

What are your Feelings
Share This Article :
  • Facebook
  • X
  • LinkedIn
  • Pinterest
Still stuck? How can we help?

How can we help?

Updated on June 3, 2025
How to Integrate PayPal with Fluent Forms

Powered by BetterDocs

Table of Contents
  • Enabling Stripe Payment Method
  • Configuring Stripe with Fluent Forms
  • Configuring Webhook to Set Up Stripe IPN
  • Integrating Stripe in Forms
  • Preview of Added Payment Method
  • Form Specific Stripe Settings
    • A. Stripe Meta Data
    • B. Stripe Account
    • C. Stripe Payment Receipt
    • D. Stripe Descriptor

Fluent Forms is a lightweight, fastest WordPress contact form plugin empowering 500K+ businesses worldwide.

Email Newsletter

fluentform Newsletter Inline
Free tutorials, exclusive contents & more.
Facebook Facebook Group Twitter Instagram Linkedin YouTube WordPress

Resources

  • Account
  • Contact Us
  • Get Support
  • Brand Guideline
  • Changelog
  • Documentation
  • Developers Docs
  • API Docs
  • Report a Security Issue

Addons

  • Signature
  • PDF Generator (Free)
  • Mautic (Free)
  • Mailpoet (Free)

Calculators

  • BMI Calculator
  • GKI Calculator
  • Pay Raise Calculator
  • VAT Calculator
  • Fuel Cost Calculator
  • All Calculator Forms

Comparison

  • Free vs. Pro
  • Fluent Forms vs. WPForms
  • Fluent Forms vs. Gravity Forms
  • Fluent Forms vs. Ninja Forms
  • Fluent Forms vs. Forminator

Miscellaneous

  • Features Available in Free Version
  • Free Form Templates
  • Form Templates
  • Quick Start Guide
  • Fluent Forms Integrations

Features

  • Conversational Forms
  • Multi-Step Forms
  • Conditional Logic
  • Numeric Calculation
  • Payment
  • Quiz and Survey
  • Form Security
  • Advanced Form Styler
  • Advanced Post Creation
  • Address Autocomplete
  • Form to PDF
  • AI Form Builder

OUR PRODUCTS

  • FluentCommunity
  • FluentCRM
  • FluentBooking
  • FluentBoards
  • Fluent Support
  • FluentSMTP
  • Ninja Tables
  • WP Social Ninja
  • Paymattic
  • AzonPress
  • FluentSnippets

Copyright © 2025 Fluent Forms, a brand of WPManageNinja™.
This site is protected by reCAPTCHA and the Google Privacy Policy and Terms of Service apply.

The Free Version of Fluent Forms is Ready! We’ll send it to your email.
Direct Download – CTA- Homepage

By downloading you agree to our terms of use and privacy policy.

  • Pricing
  • Features
  • Templates
  • Integrations
  • Blog
  • Docs
  • Account